Agenda :-
1- TechnicalInformation about Router 6471/2 and TDM 1001.
2- Router and TDM Hardware connection and Installation .
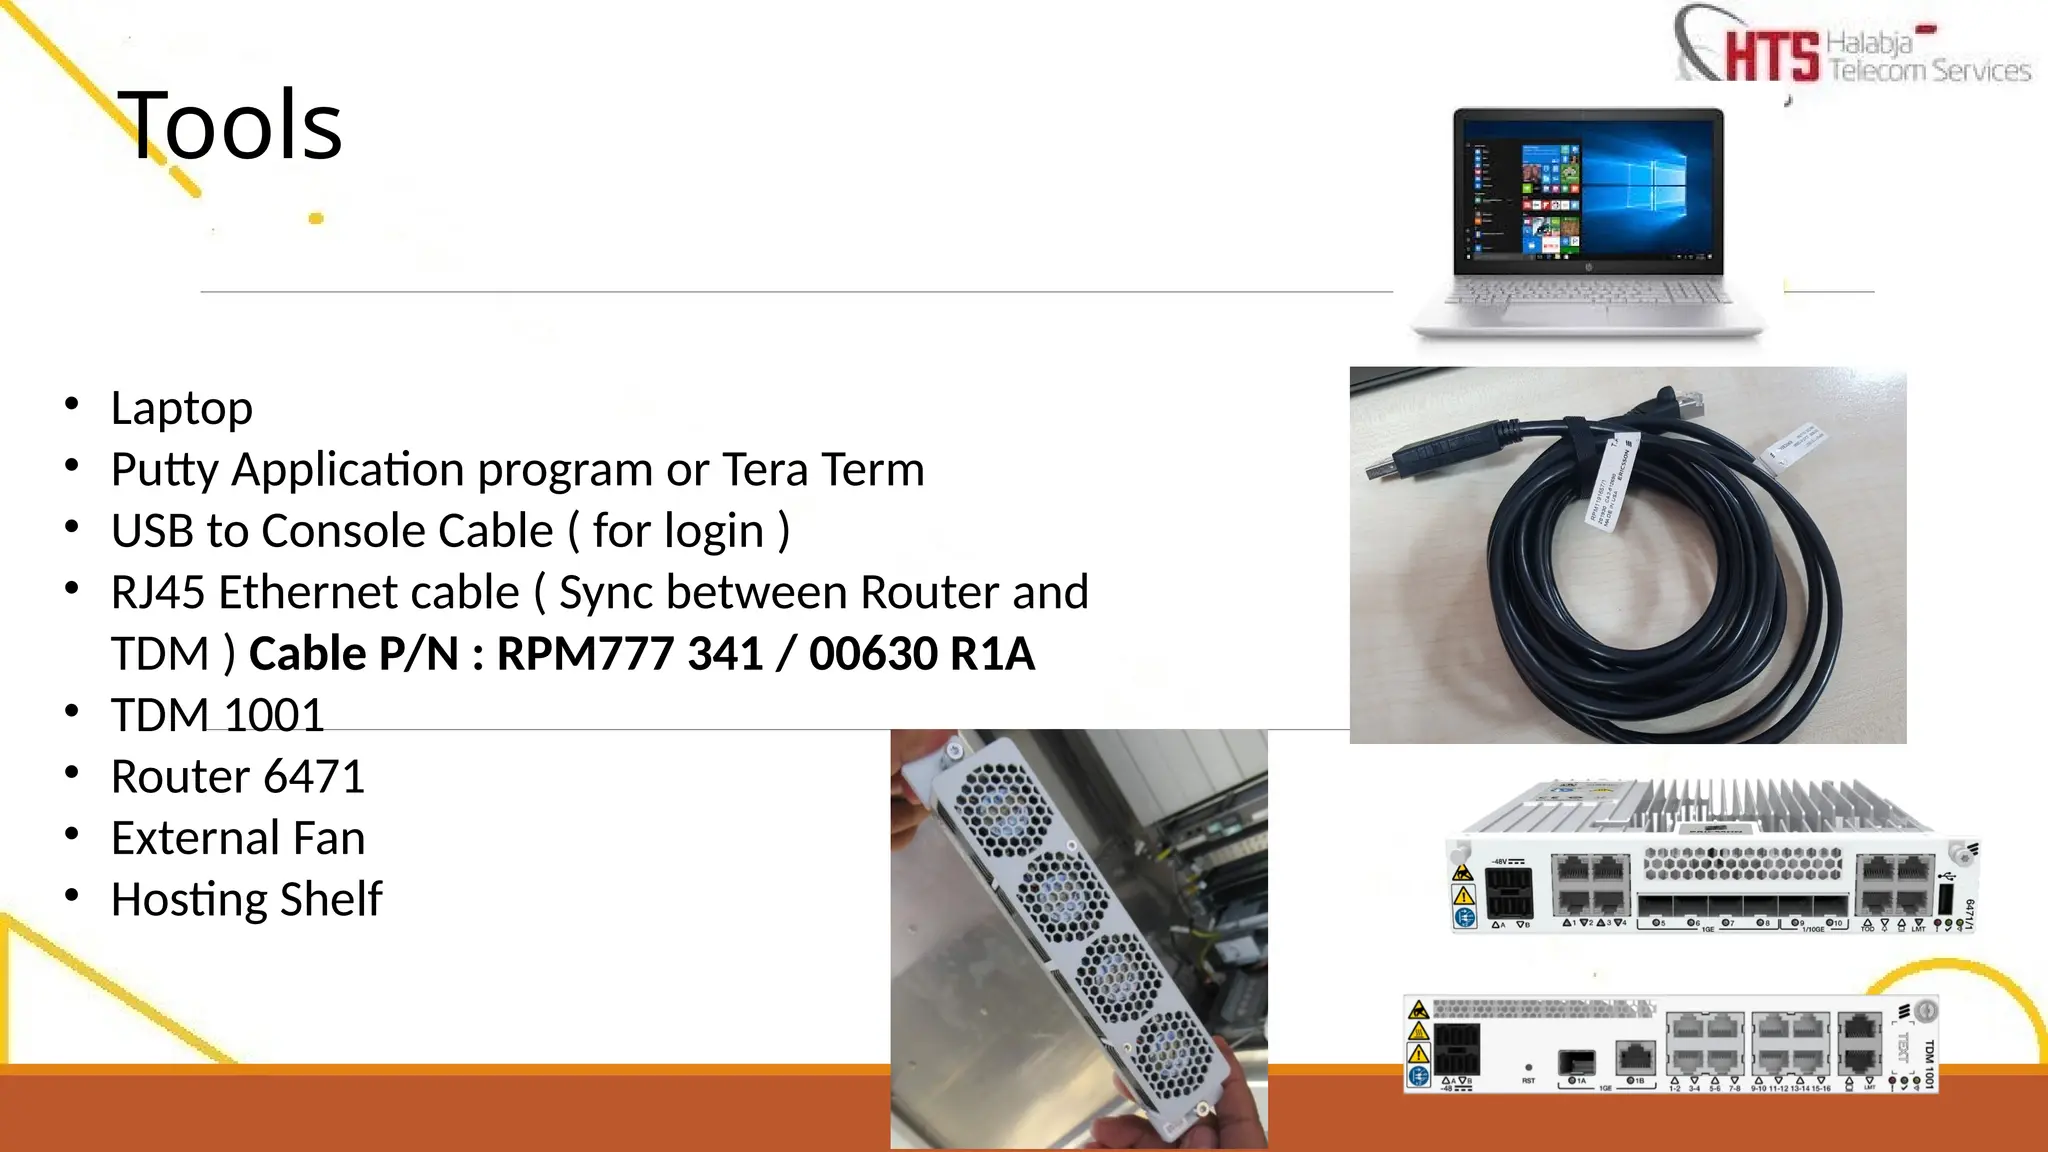
3- Tools that needs to connect to the Router .
4- Script Installation on Router by using Putty Application program.
5- SW installation on Router by using Putty Application program .
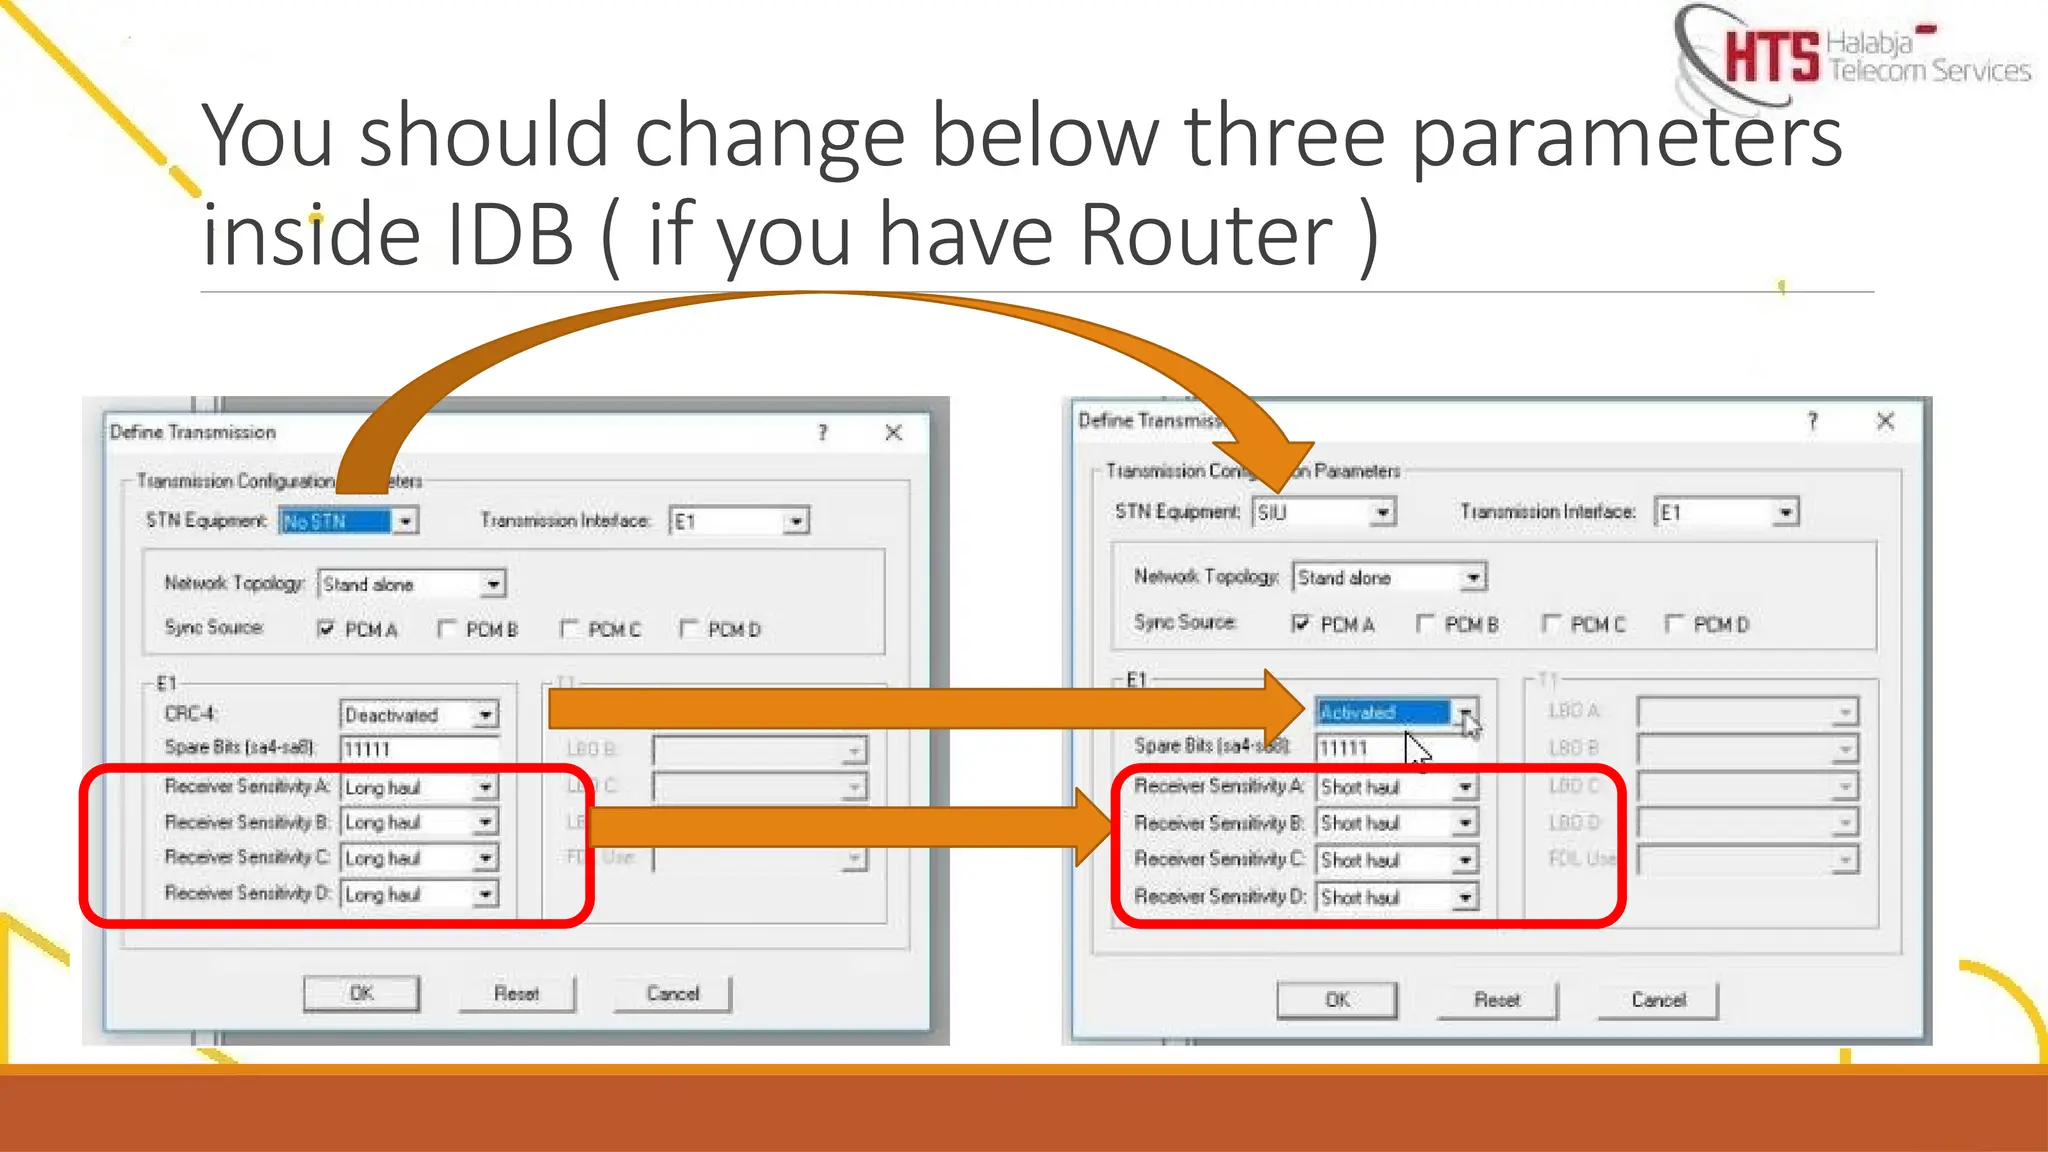
6- IDB modification .
7- Some basic commands used in Router .
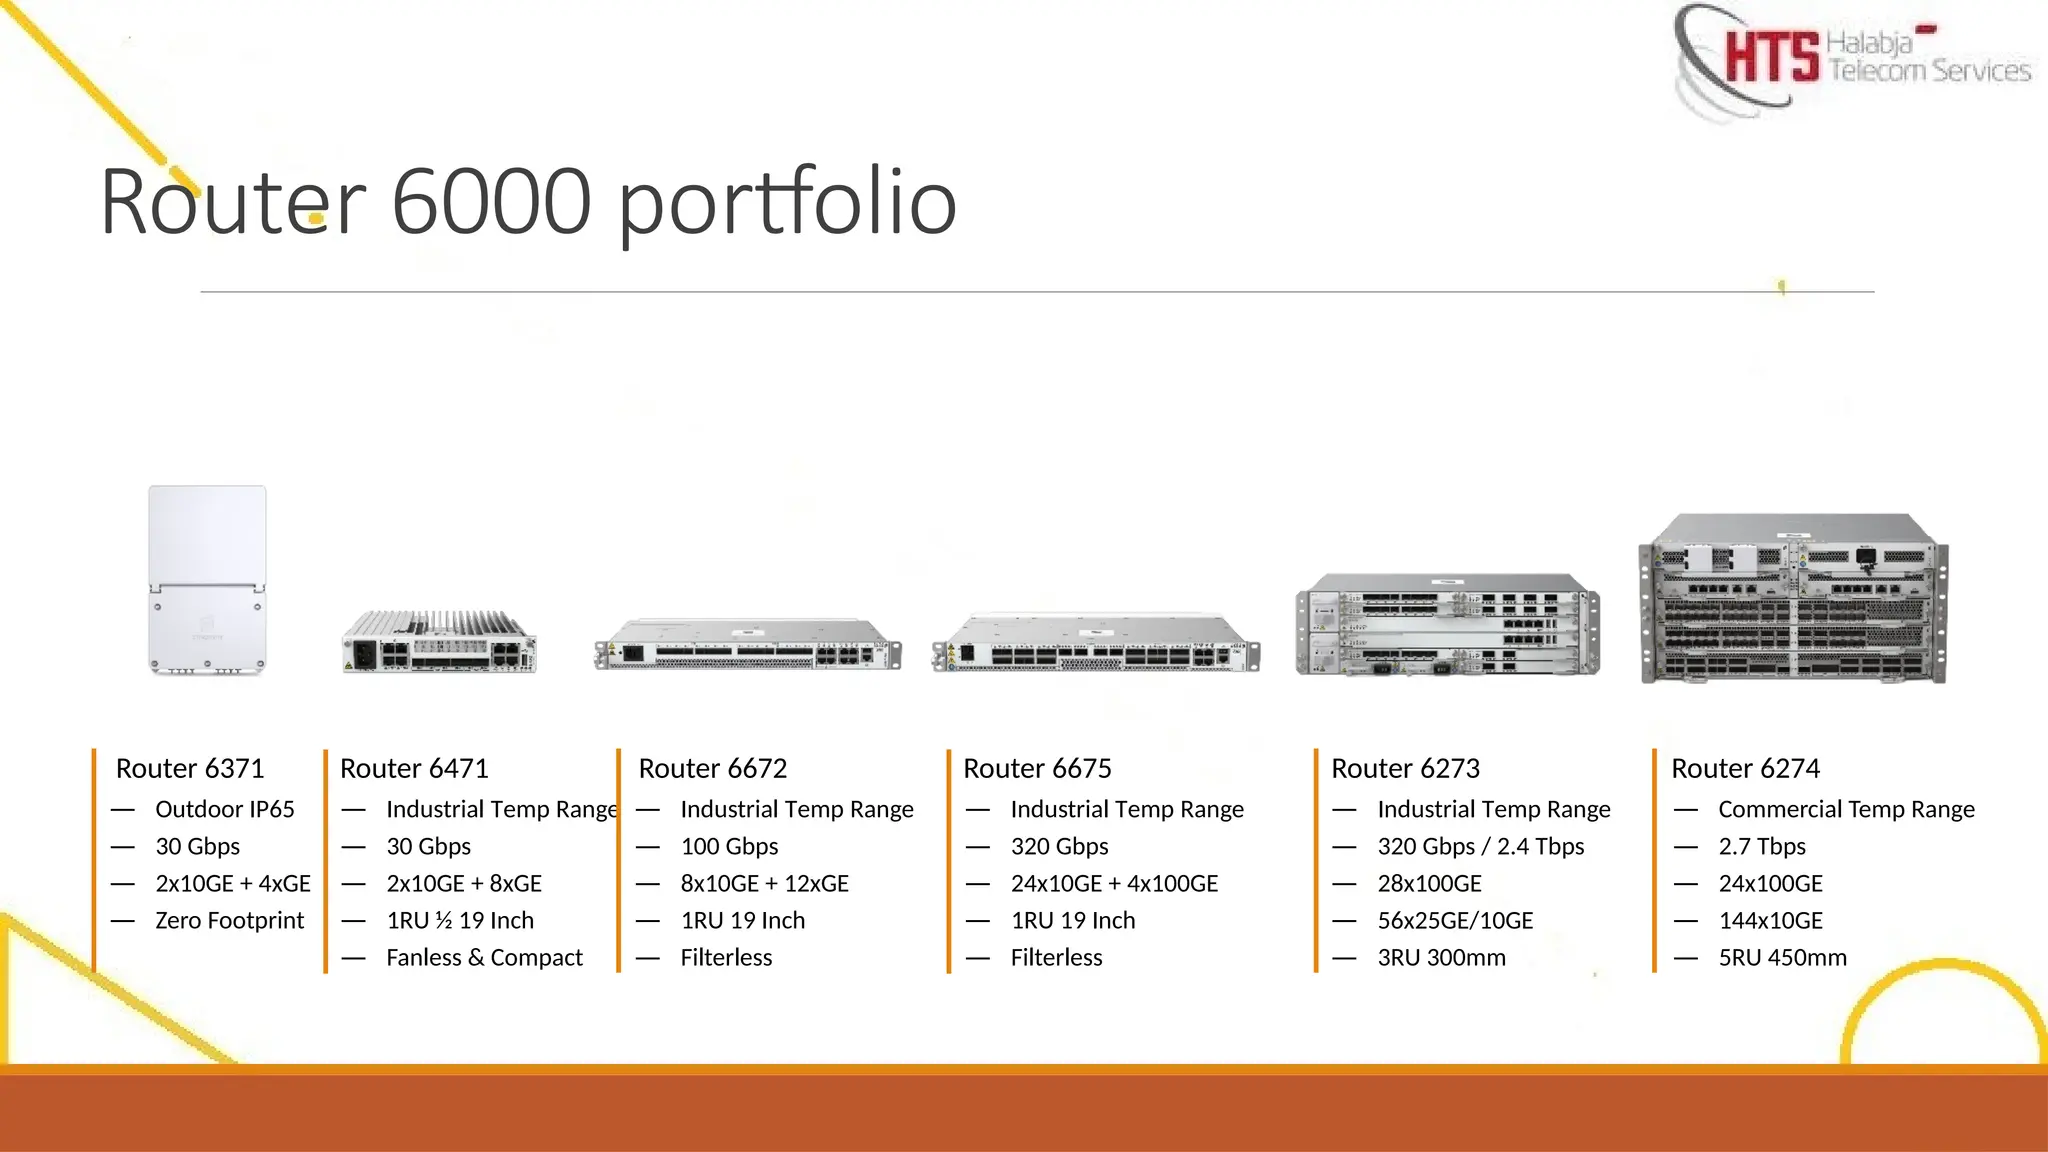
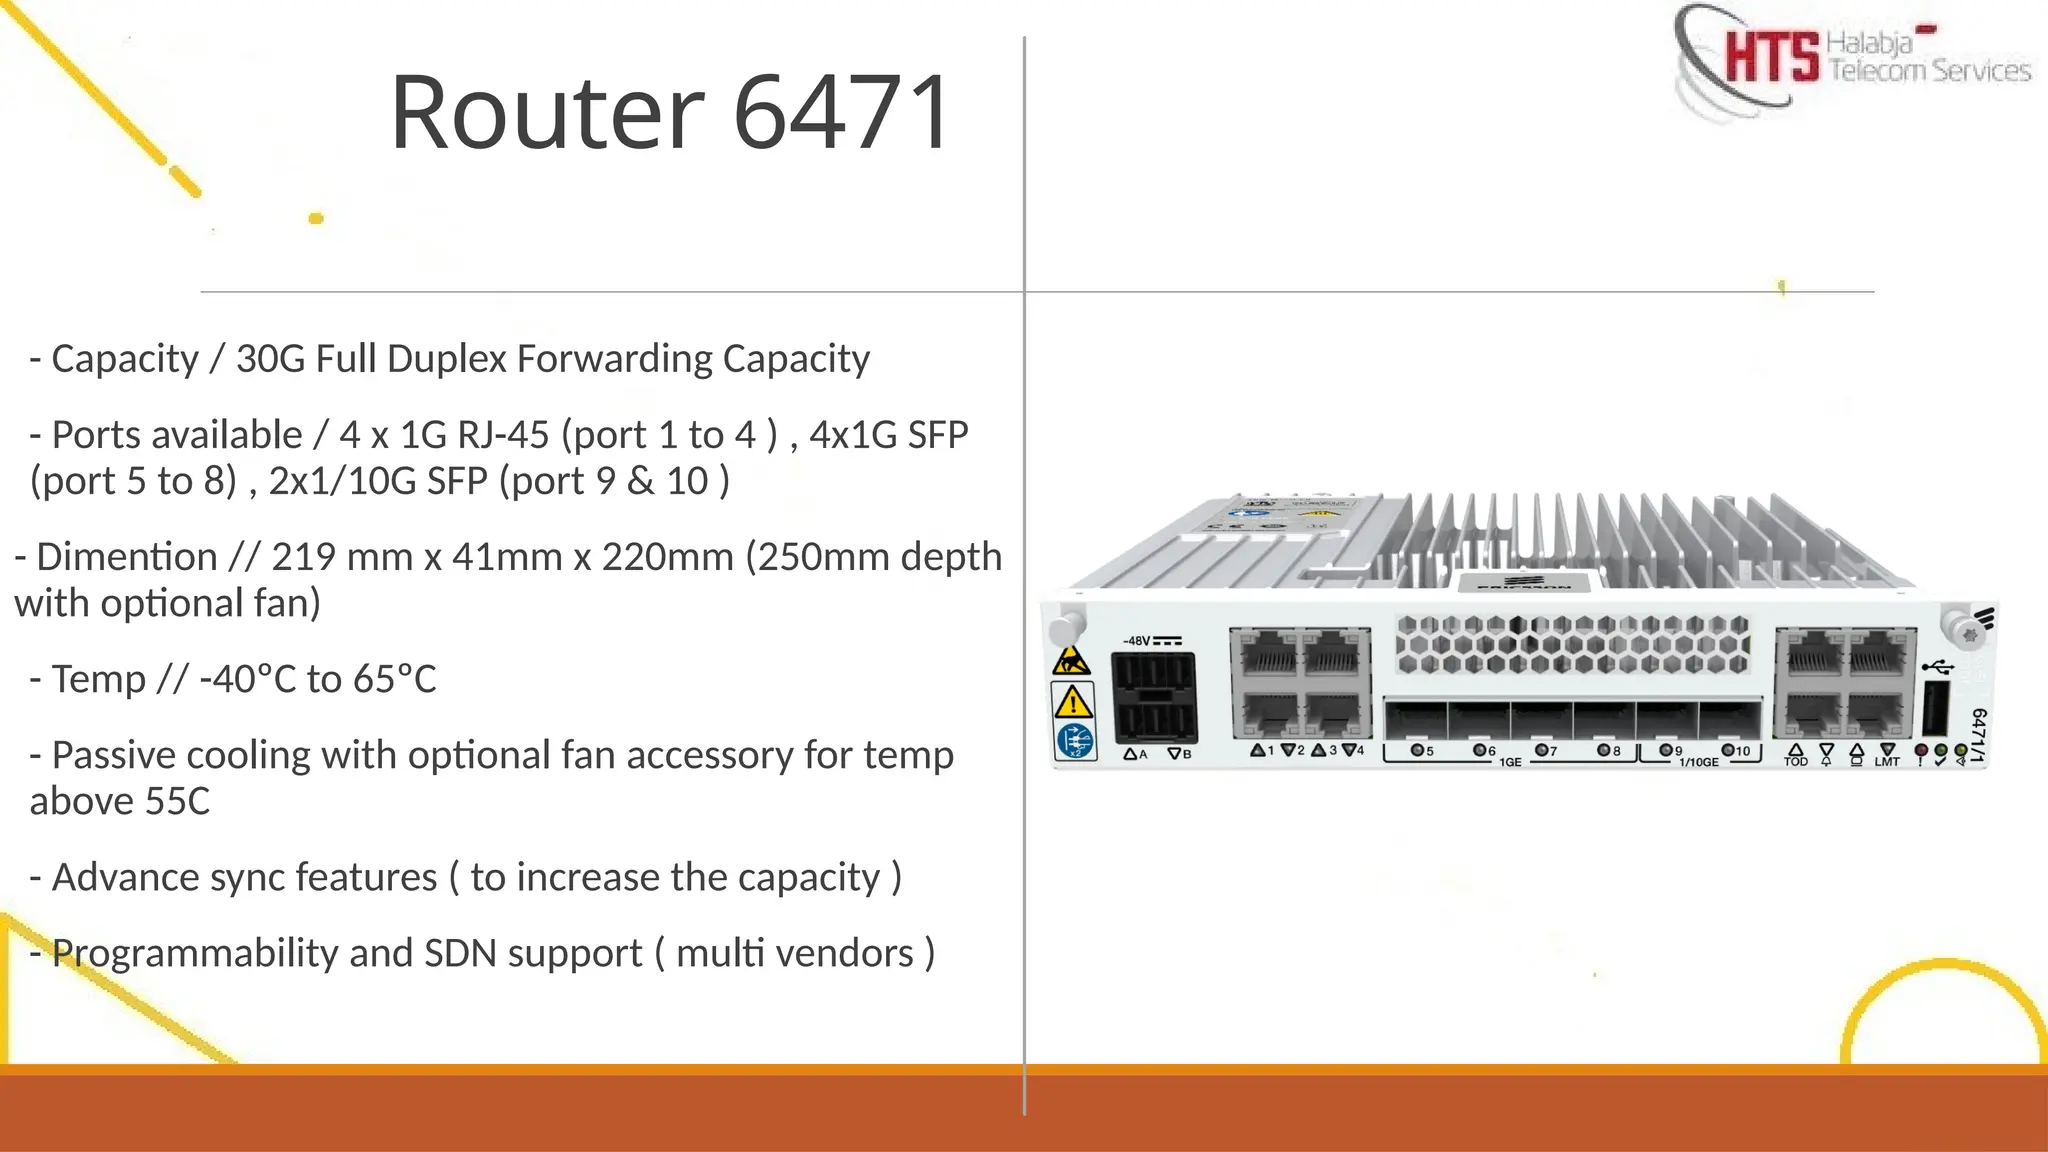
- Capacity /30G Full Duplex Forwarding Capacity
- Ports available / 4 x 1G RJ-45 (port 1 to 4 ) , 4x1G SFP
(port 5 to 8) , 2x1/10G SFP (port 9 & 10 )
- Dimention // 219 mm x 41mm x 220mm (250mm depth
with optional fan)
- Temp // -40ºC to 65ºC
- Passive cooling with optional fan accessory for temp
above 55C
- Advance sync features ( to increase the capacity )
- Programmability and SDN support ( multi vendors )
Router 6471
6.
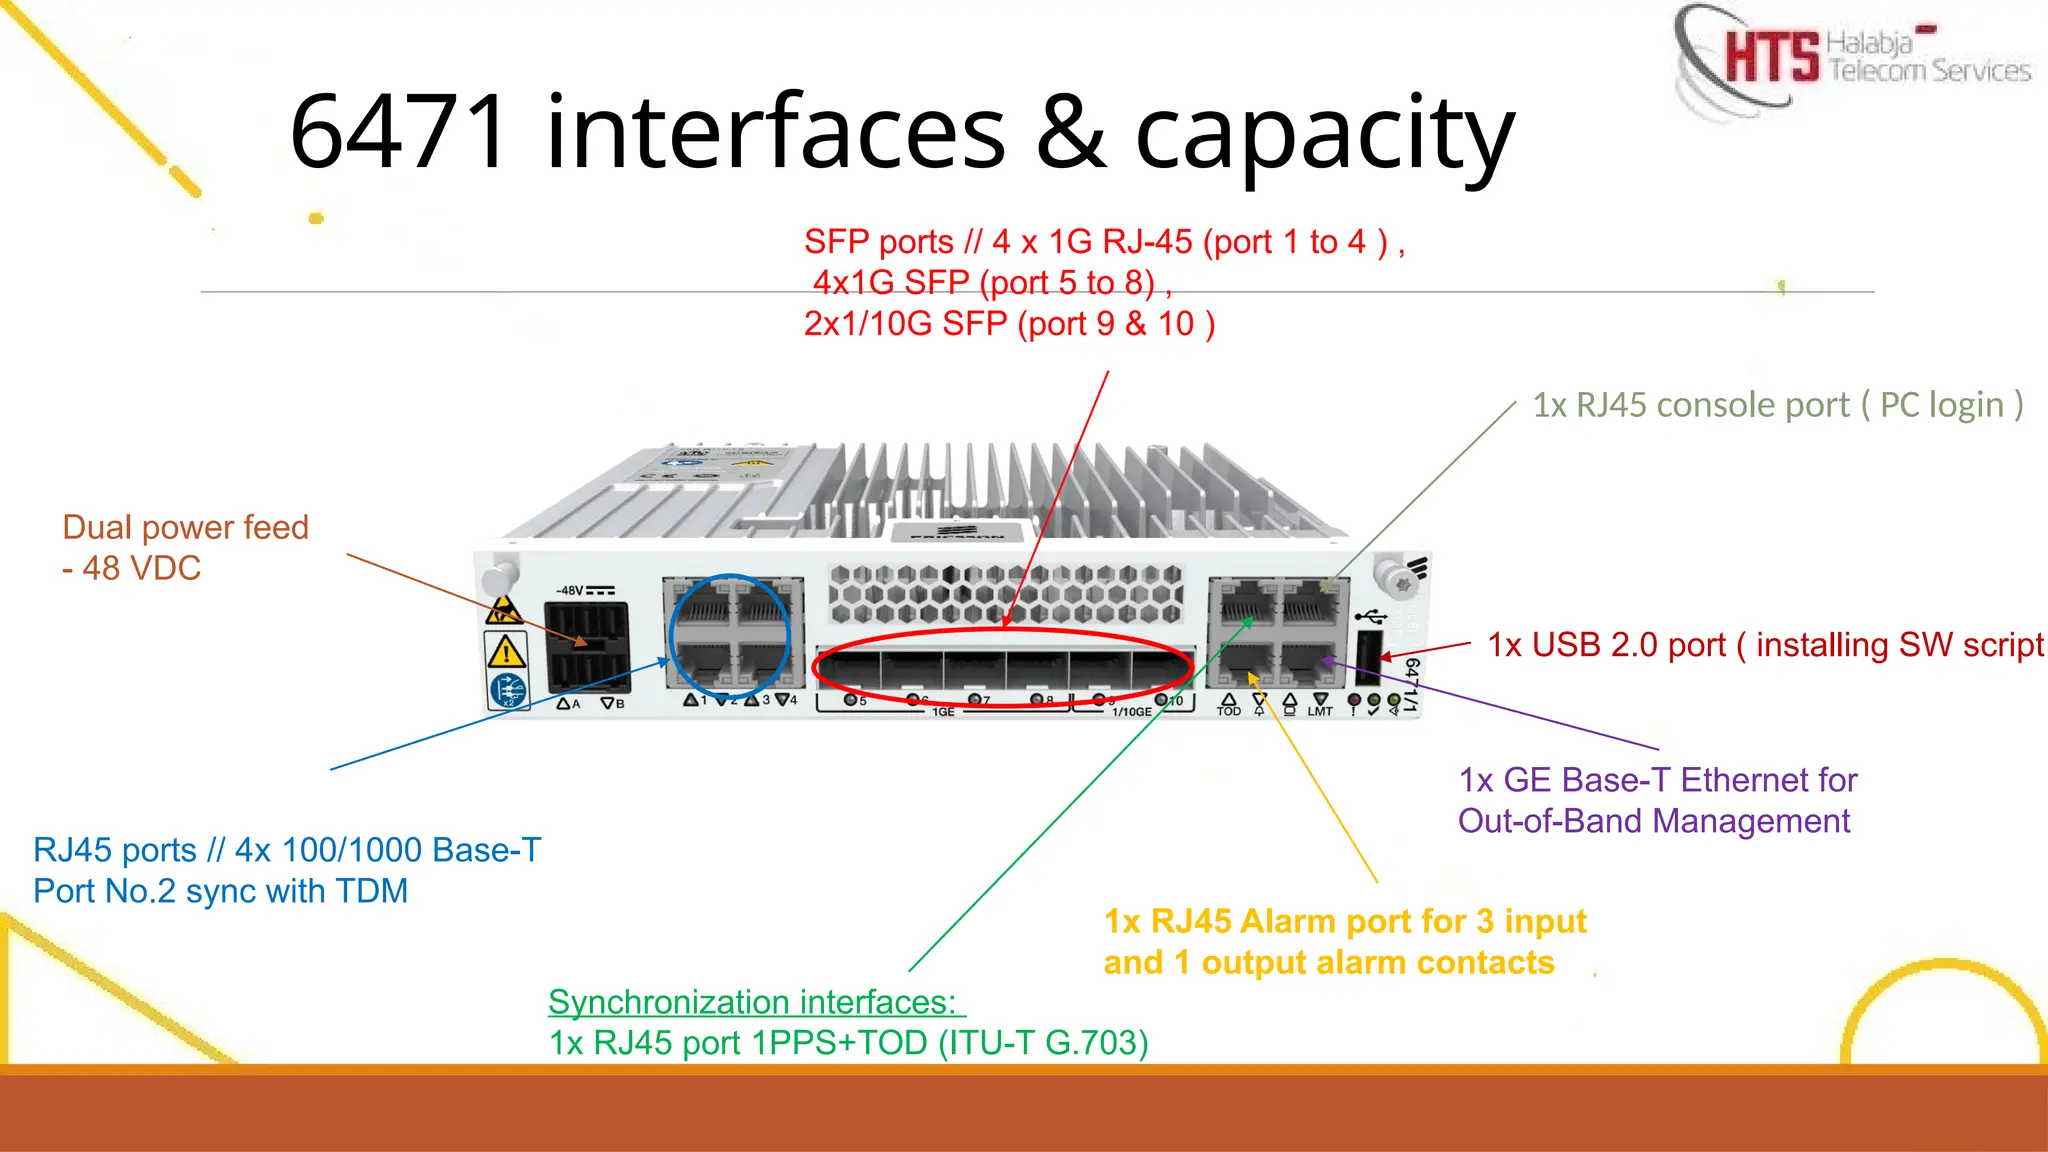
6471 interfaces &capacity
Dual power feed
- 48 VDC
SFP ports // 4 x 1G RJ-45 (port 1 to 4 ) ,
4x1G SFP (port 5 to 8) ,
2x1/10G SFP (port 9 & 10 )
RJ45 ports // 4x 100/1000 Base-T
Port No.2 sync with TDM
1x GE Base-T Ethernet for
Out-of-Band Management
1x USB 2.0 port ( installing SW script
1x RJ45 Alarm port for 3 input
and 1 output alarm contacts
1x RJ45 console port ( PC login )
Synchronization interfaces:
1x RJ45 port 1PPS+TOD (ITU-T G.703)
7.
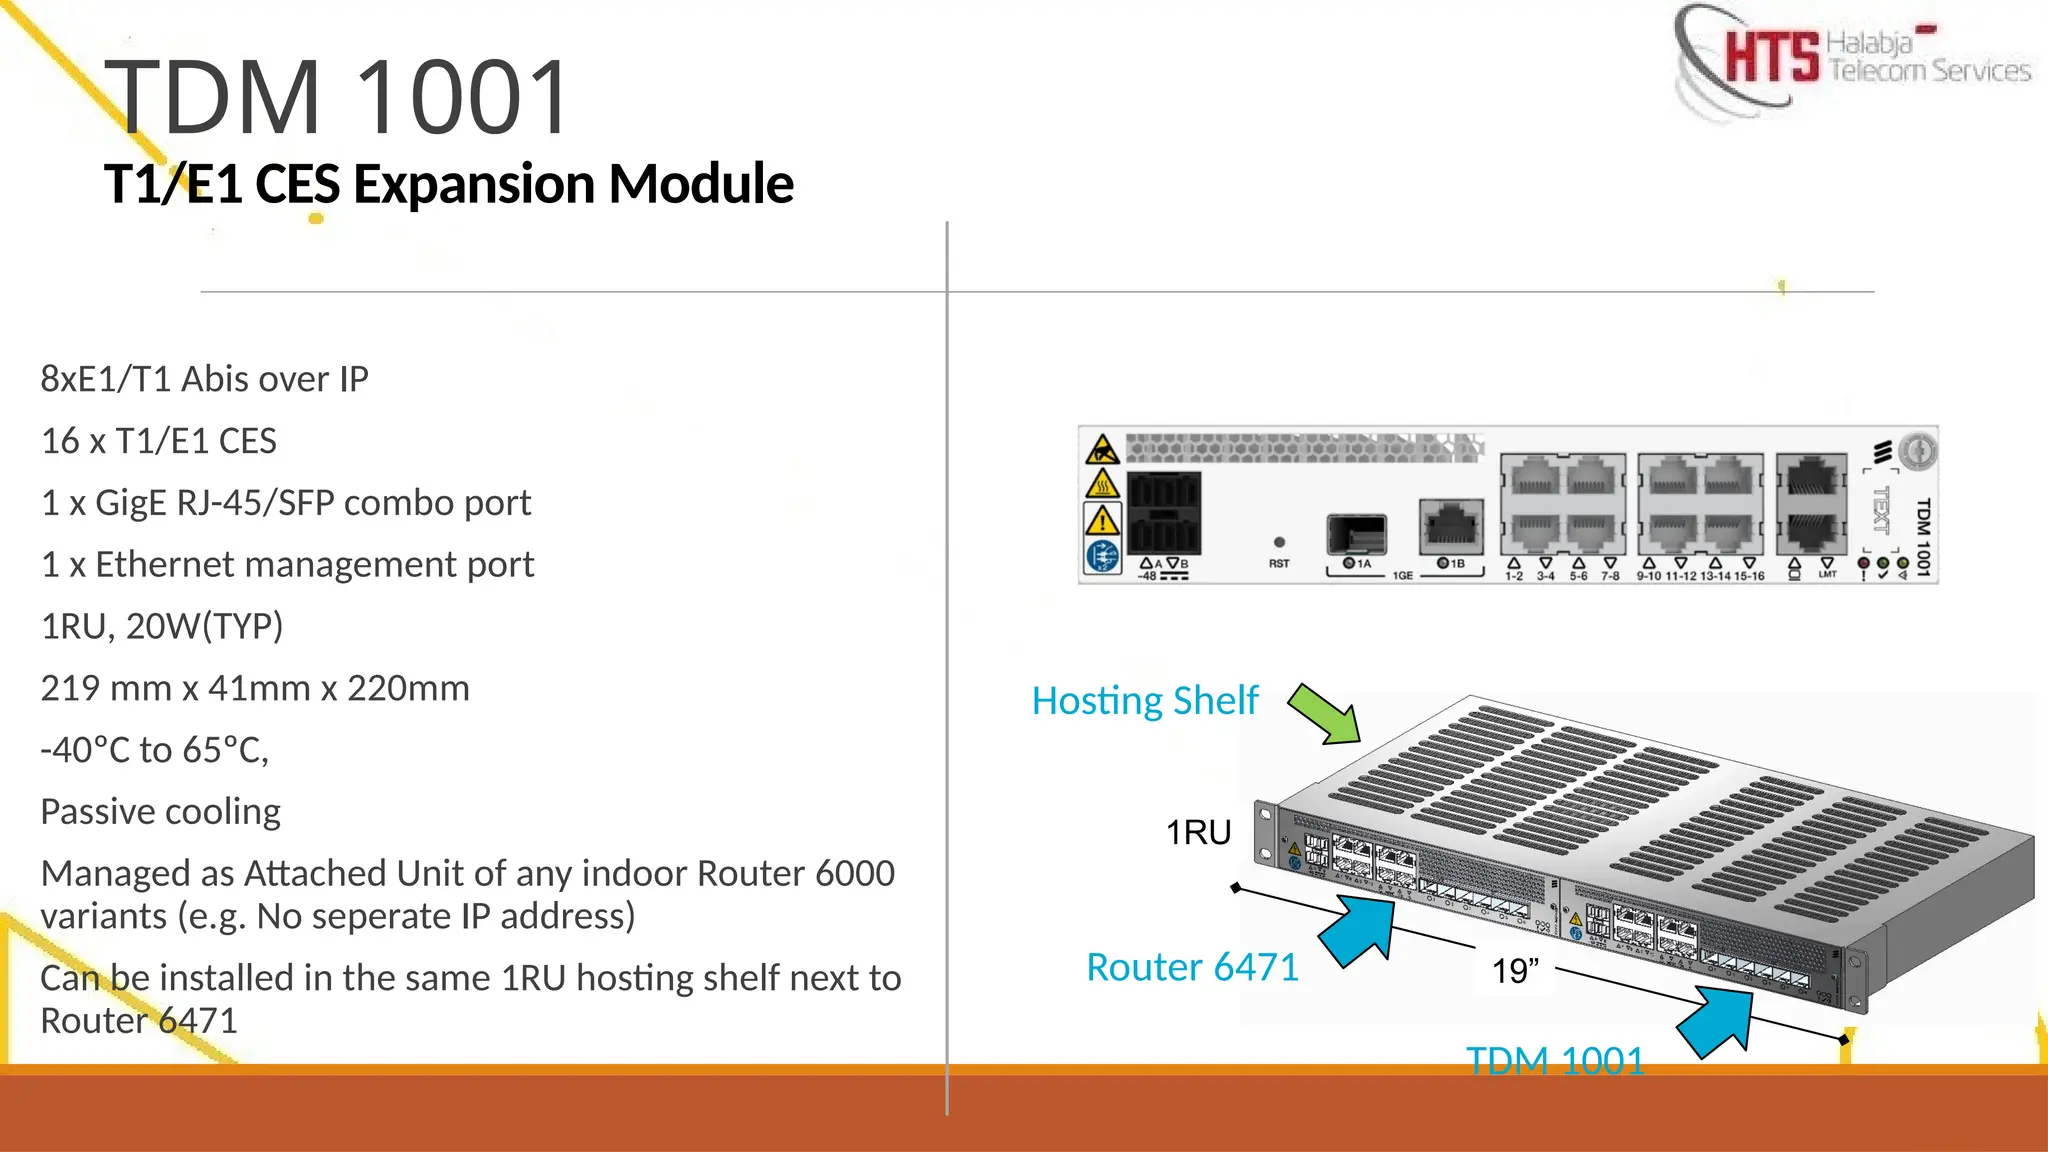
8xE1/T1 Abis overIP
16 x T1/E1 CES
1 x GigE RJ-45/SFP combo port
1 x Ethernet management port
1RU, 20W(TYP)
219 mm x 41mm x 220mm
-40ºC to 65ºC,
Passive cooling
Managed as Attached Unit of any indoor Router 6000
variants (e.g. No seperate IP address)
Can be installed in the same 1RU hosting shelf next to
Router 6471
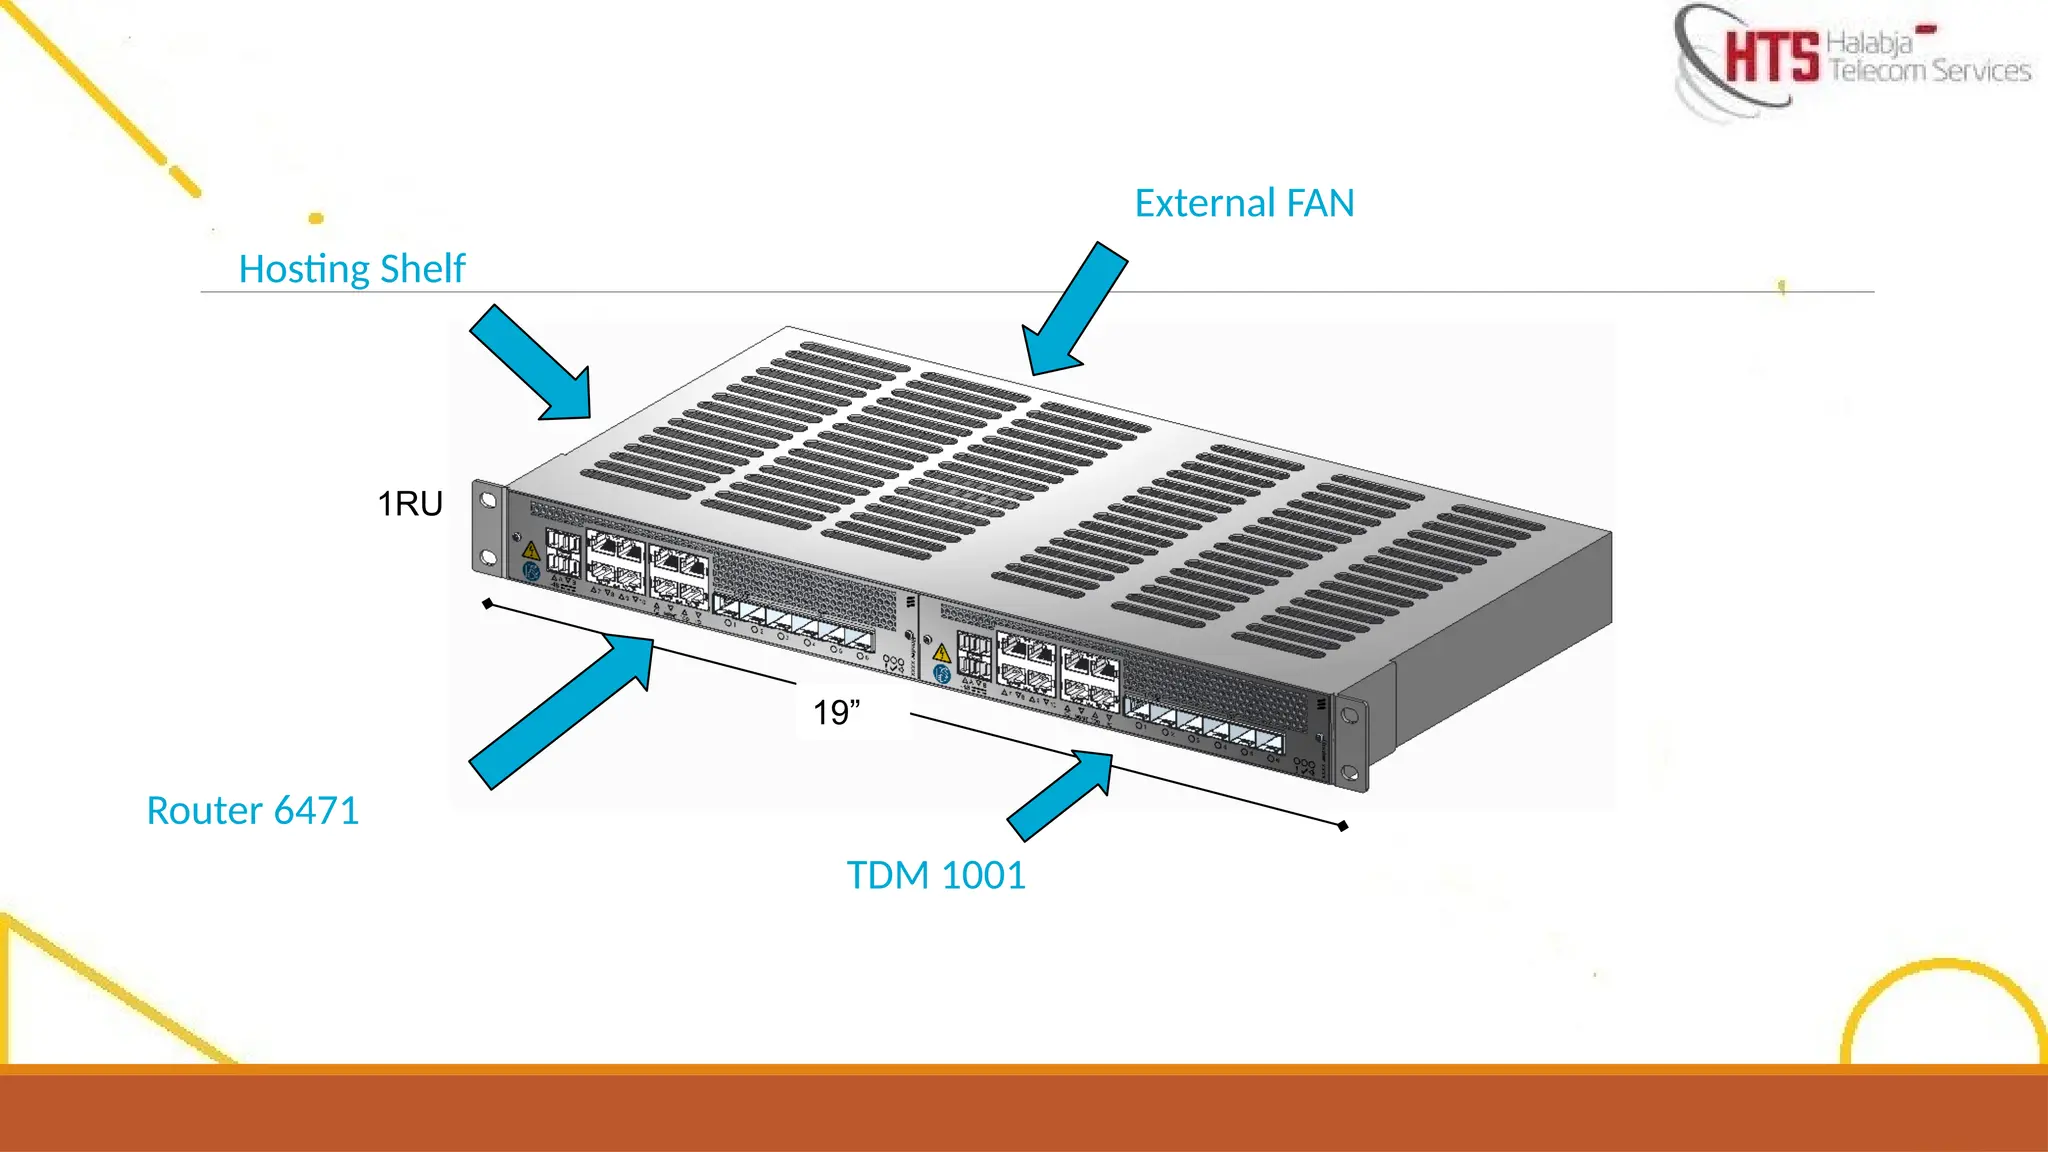
TDM 1001
T1/E1 CES Expansion Module
19”
1RU
Router 6471
TDM 1001
Hosting Shelf
8.
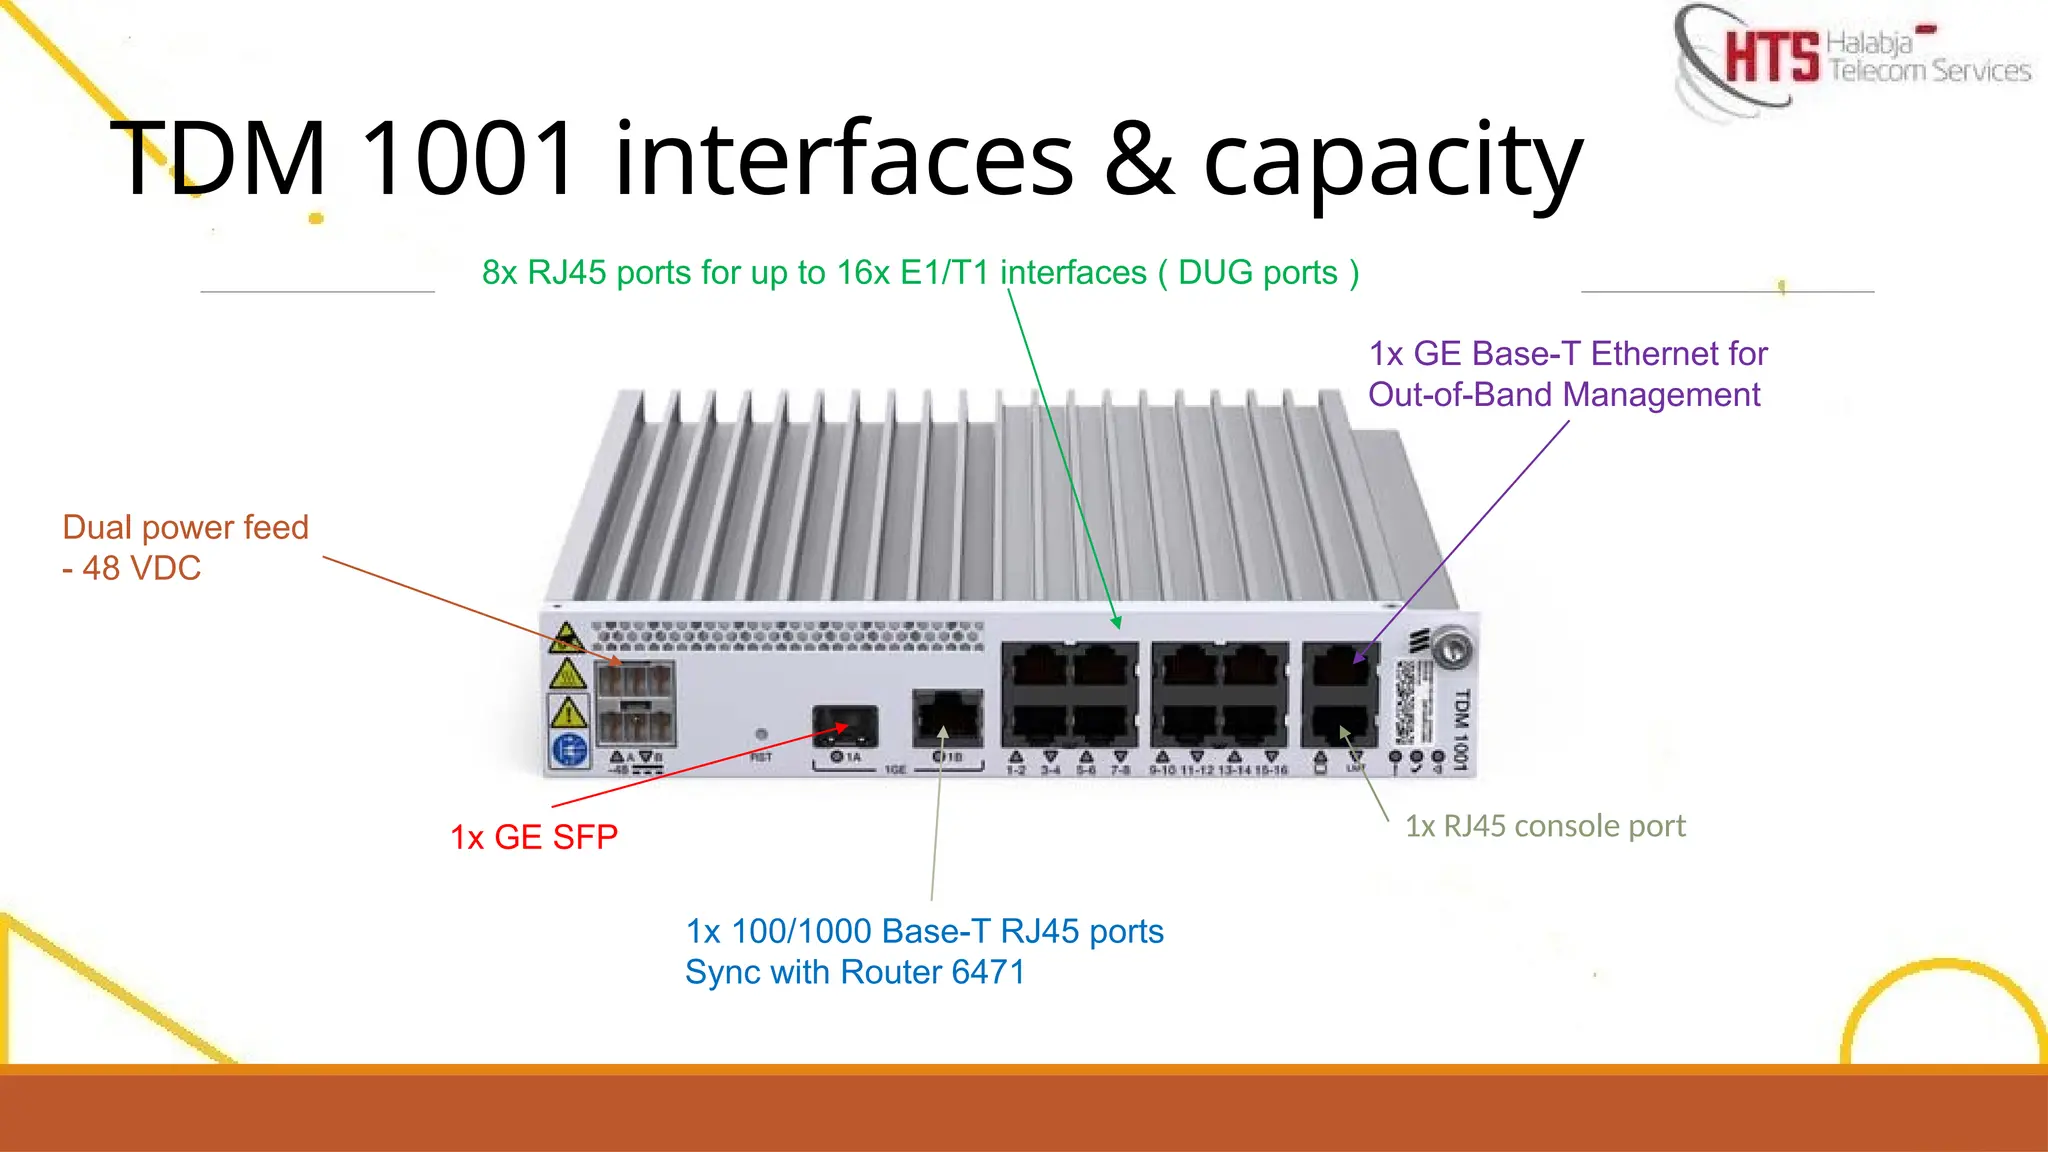
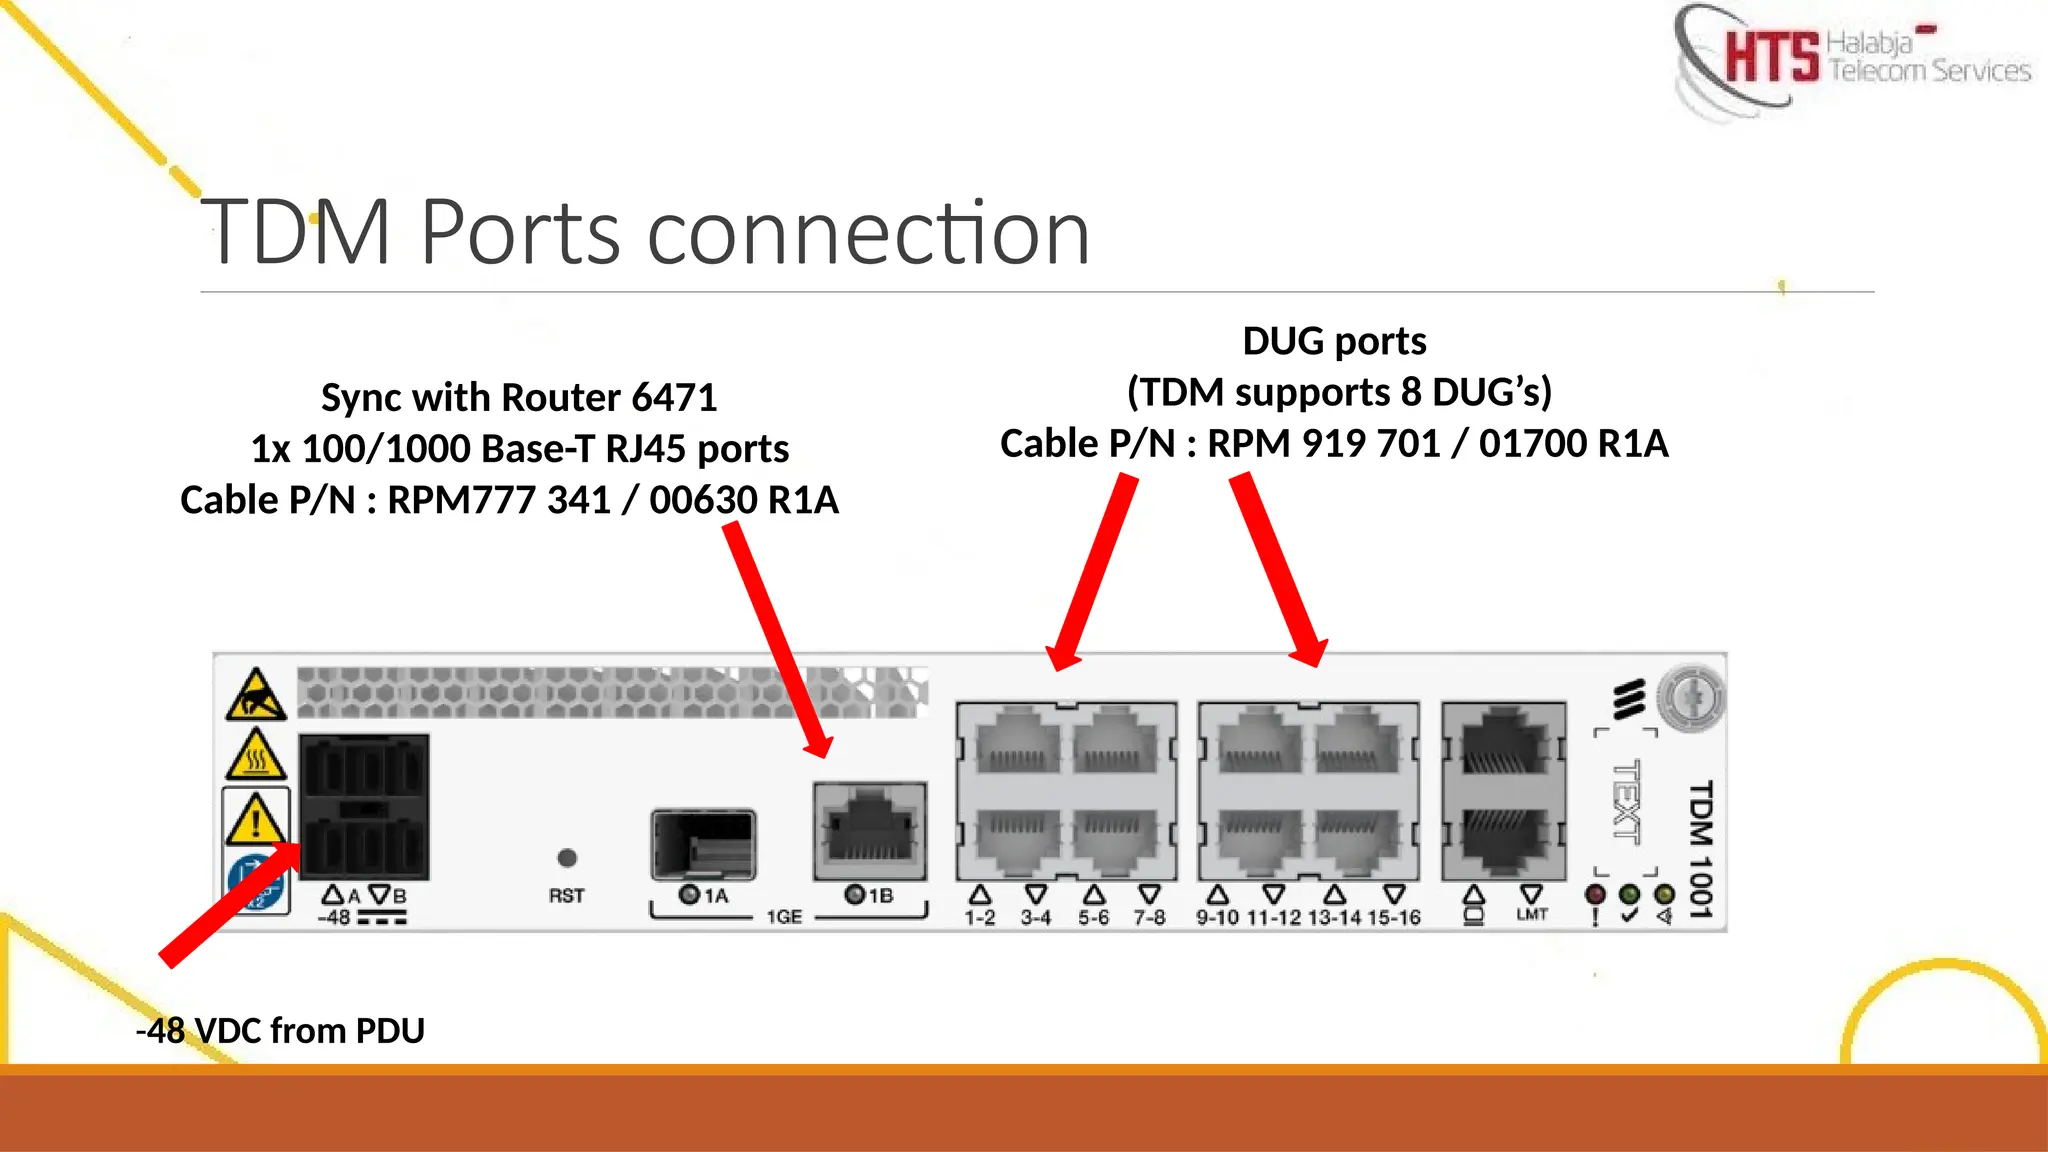
TDM 1001 interfaces& capacity
1x GE SFP
1x 100/1000 Base-T RJ45 ports
Sync with Router 6471
1x GE Base-T Ethernet for
Out-of-Band Management
8x RJ45 ports for up to 16x E1/T1 interfaces ( DUG ports )
1x RJ45 console port
Dual power feed
- 48 VDC
9.
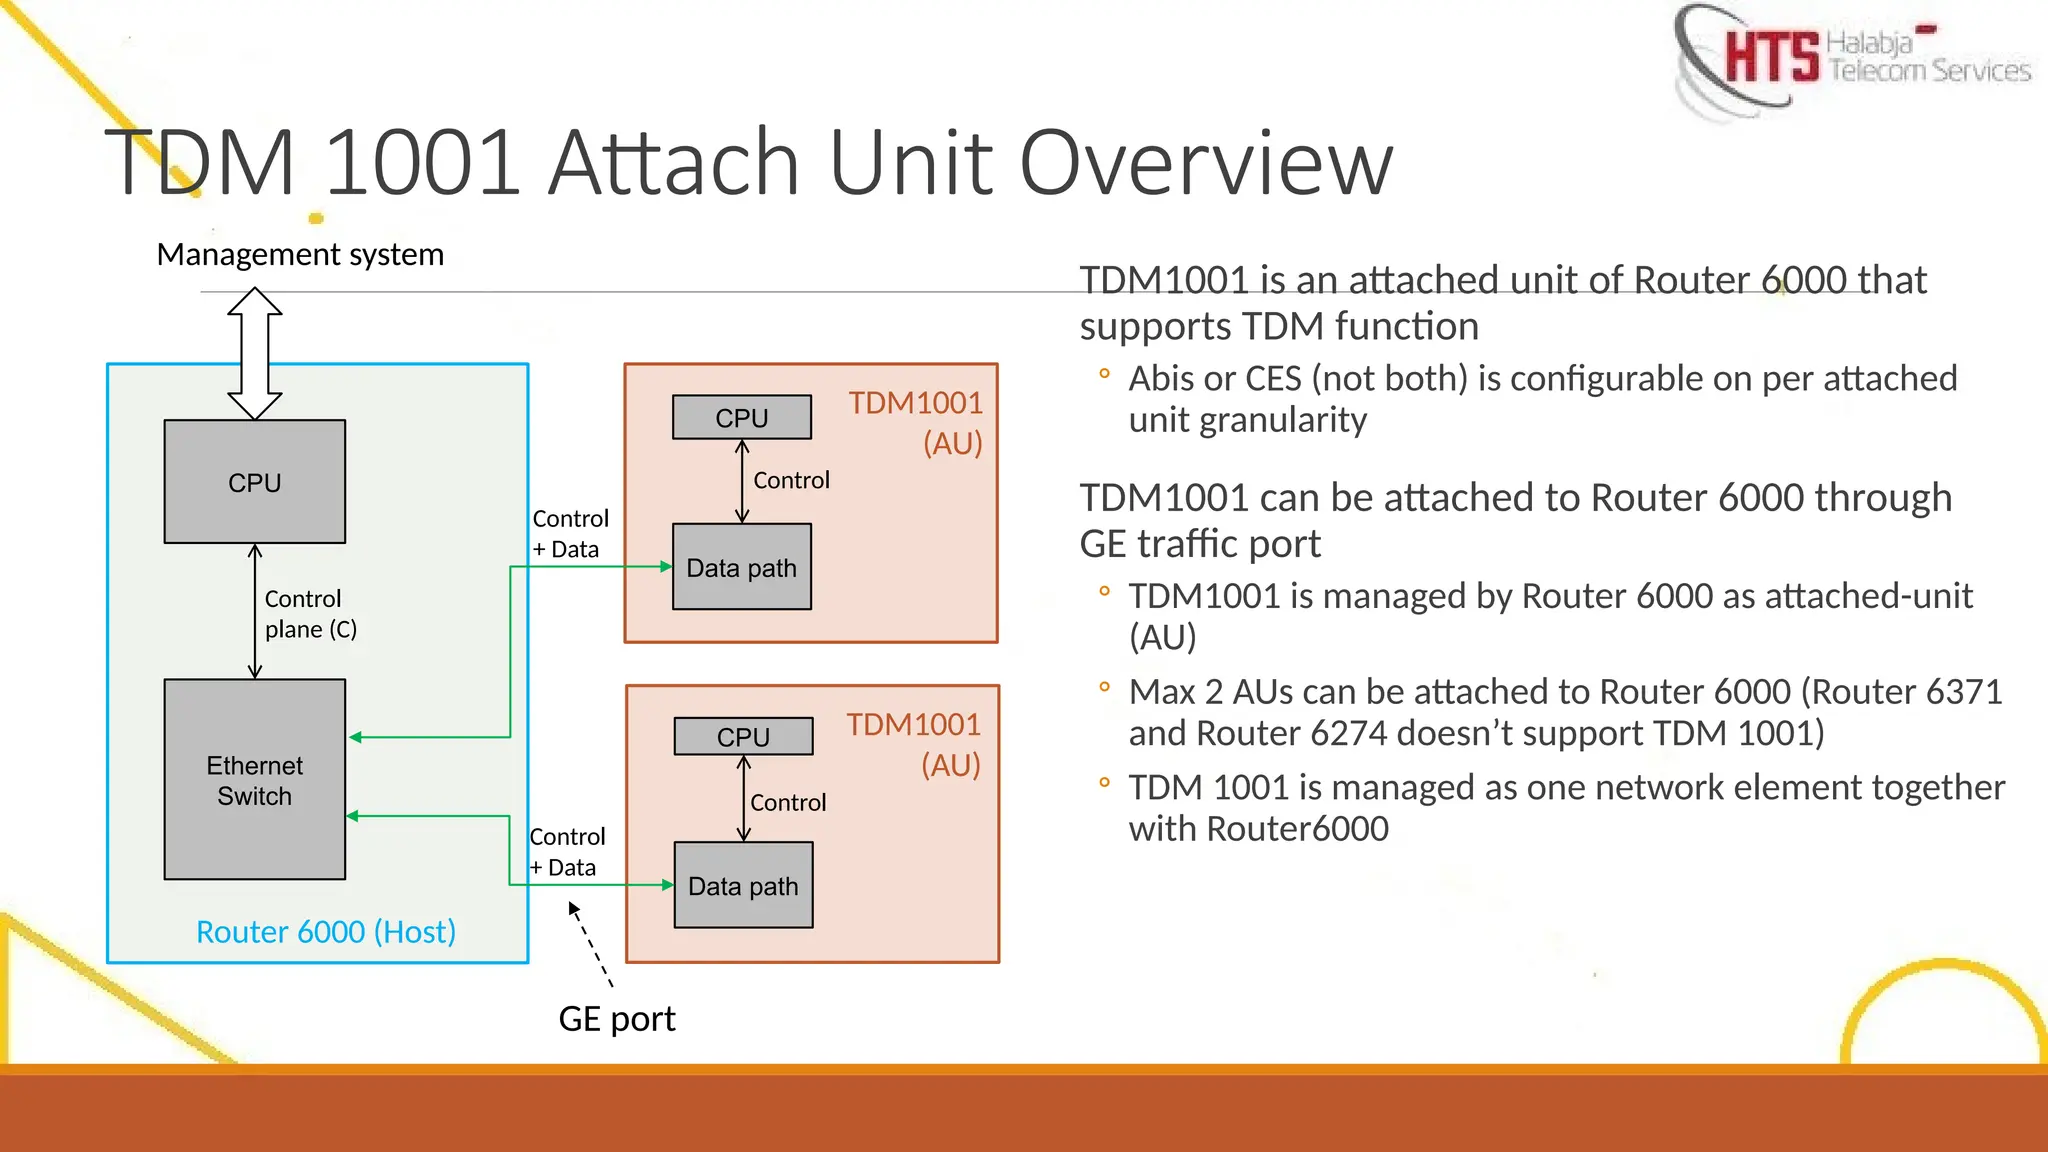
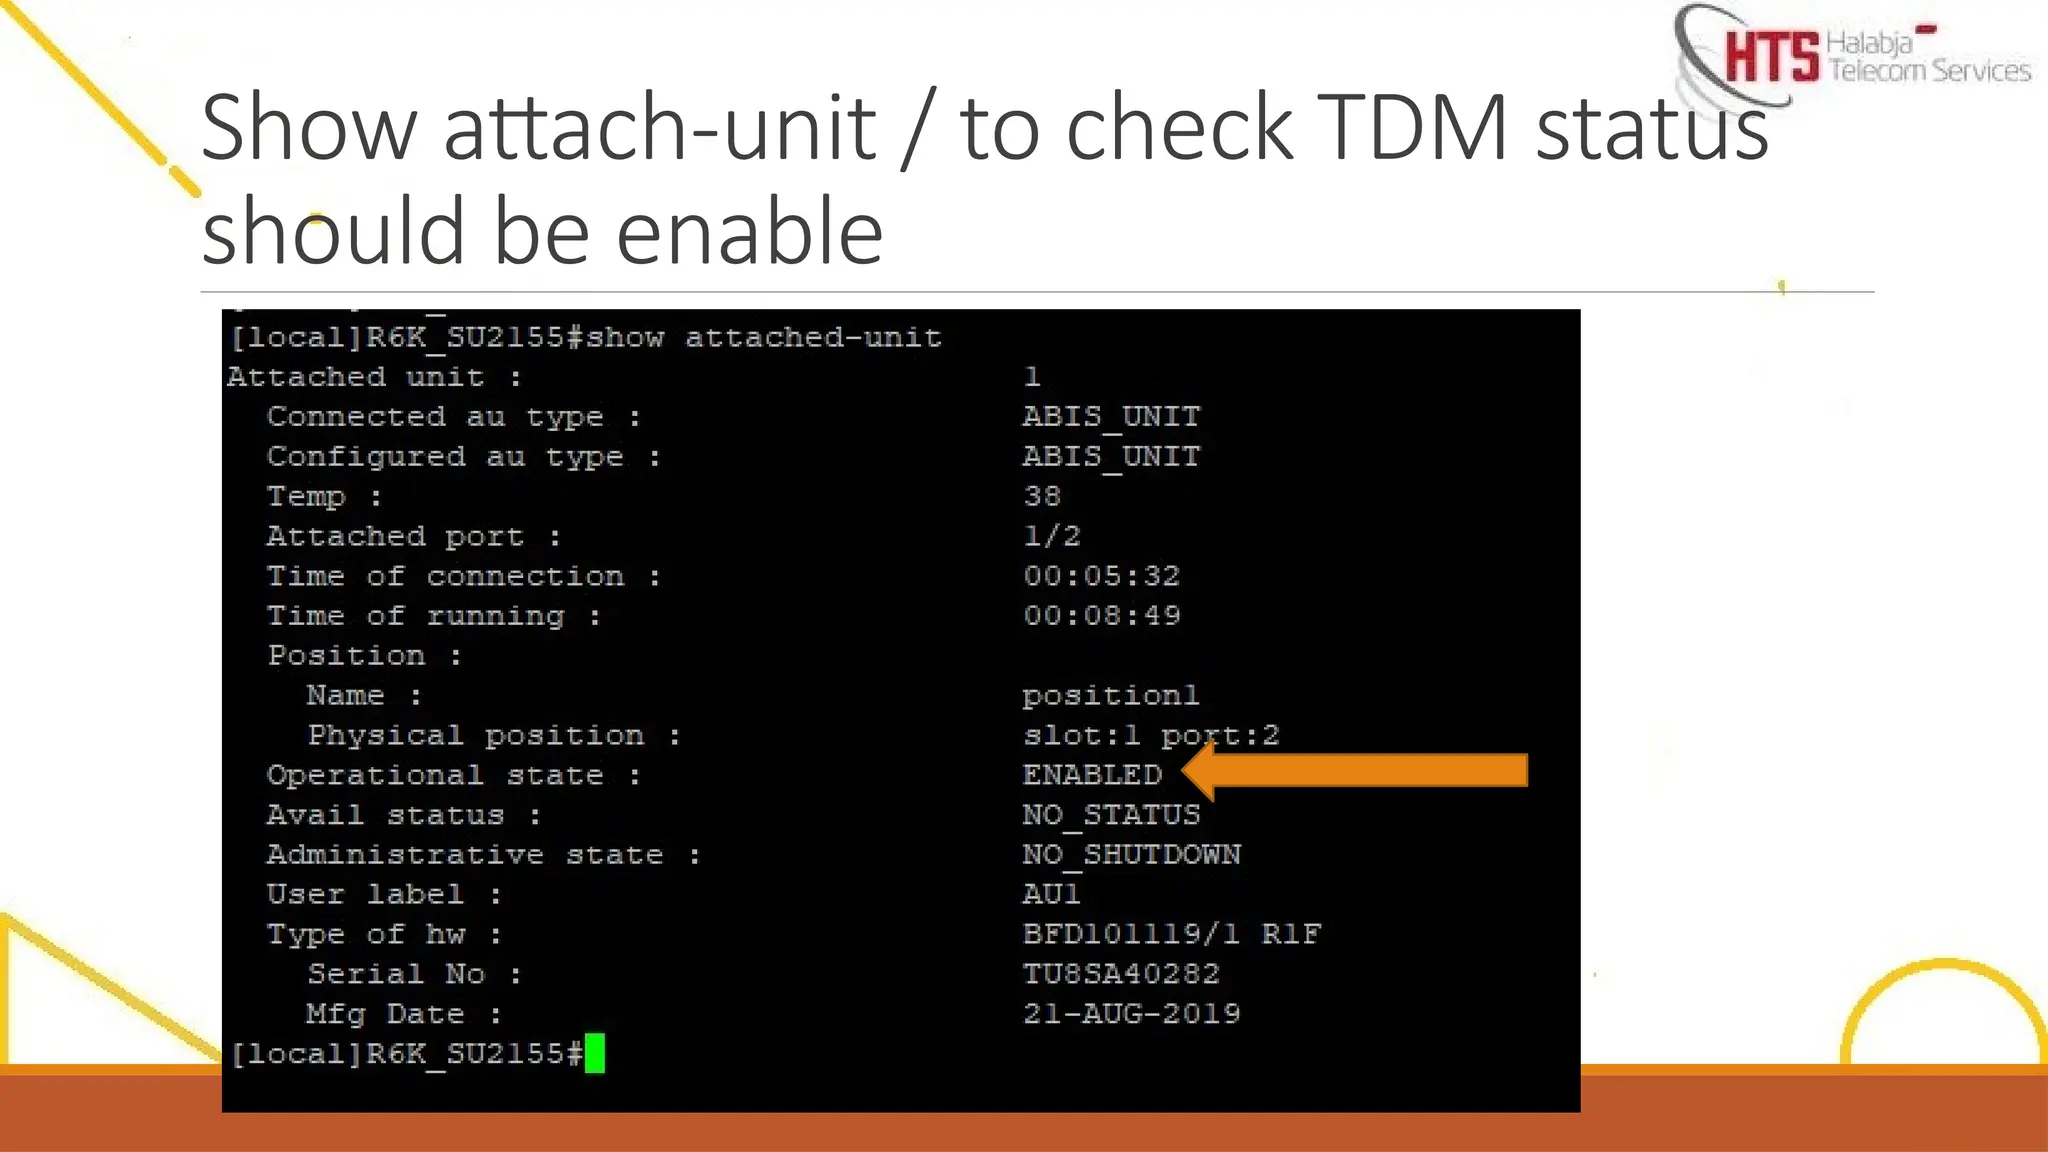
TDM 1001 AttachUnit Overview
TDM1001 is an attached unit of Router 6000 that
supports TDM function
◦ Abis or CES (not both) is configurable on per attached
unit granularity
TDM1001 can be attached to Router 6000 through
GE traffic port
◦ TDM1001 is managed by Router 6000 as attached-unit
(AU)
◦ Max 2 AUs can be attached to Router 6000 (Router 6371
and Router 6274 doesn’t support TDM 1001)
◦ TDM 1001 is managed as one network element together
with Router6000
Router 6000 (Host)
TDM1001
(AU)
TDM1001
(AU)
CPU
Ethernet
Switch
Data path
Data path
CPU
CPU
Management system
Control
plane (C)
Control
+ Data
Control
Control
Control
+ Data
GE port
10.
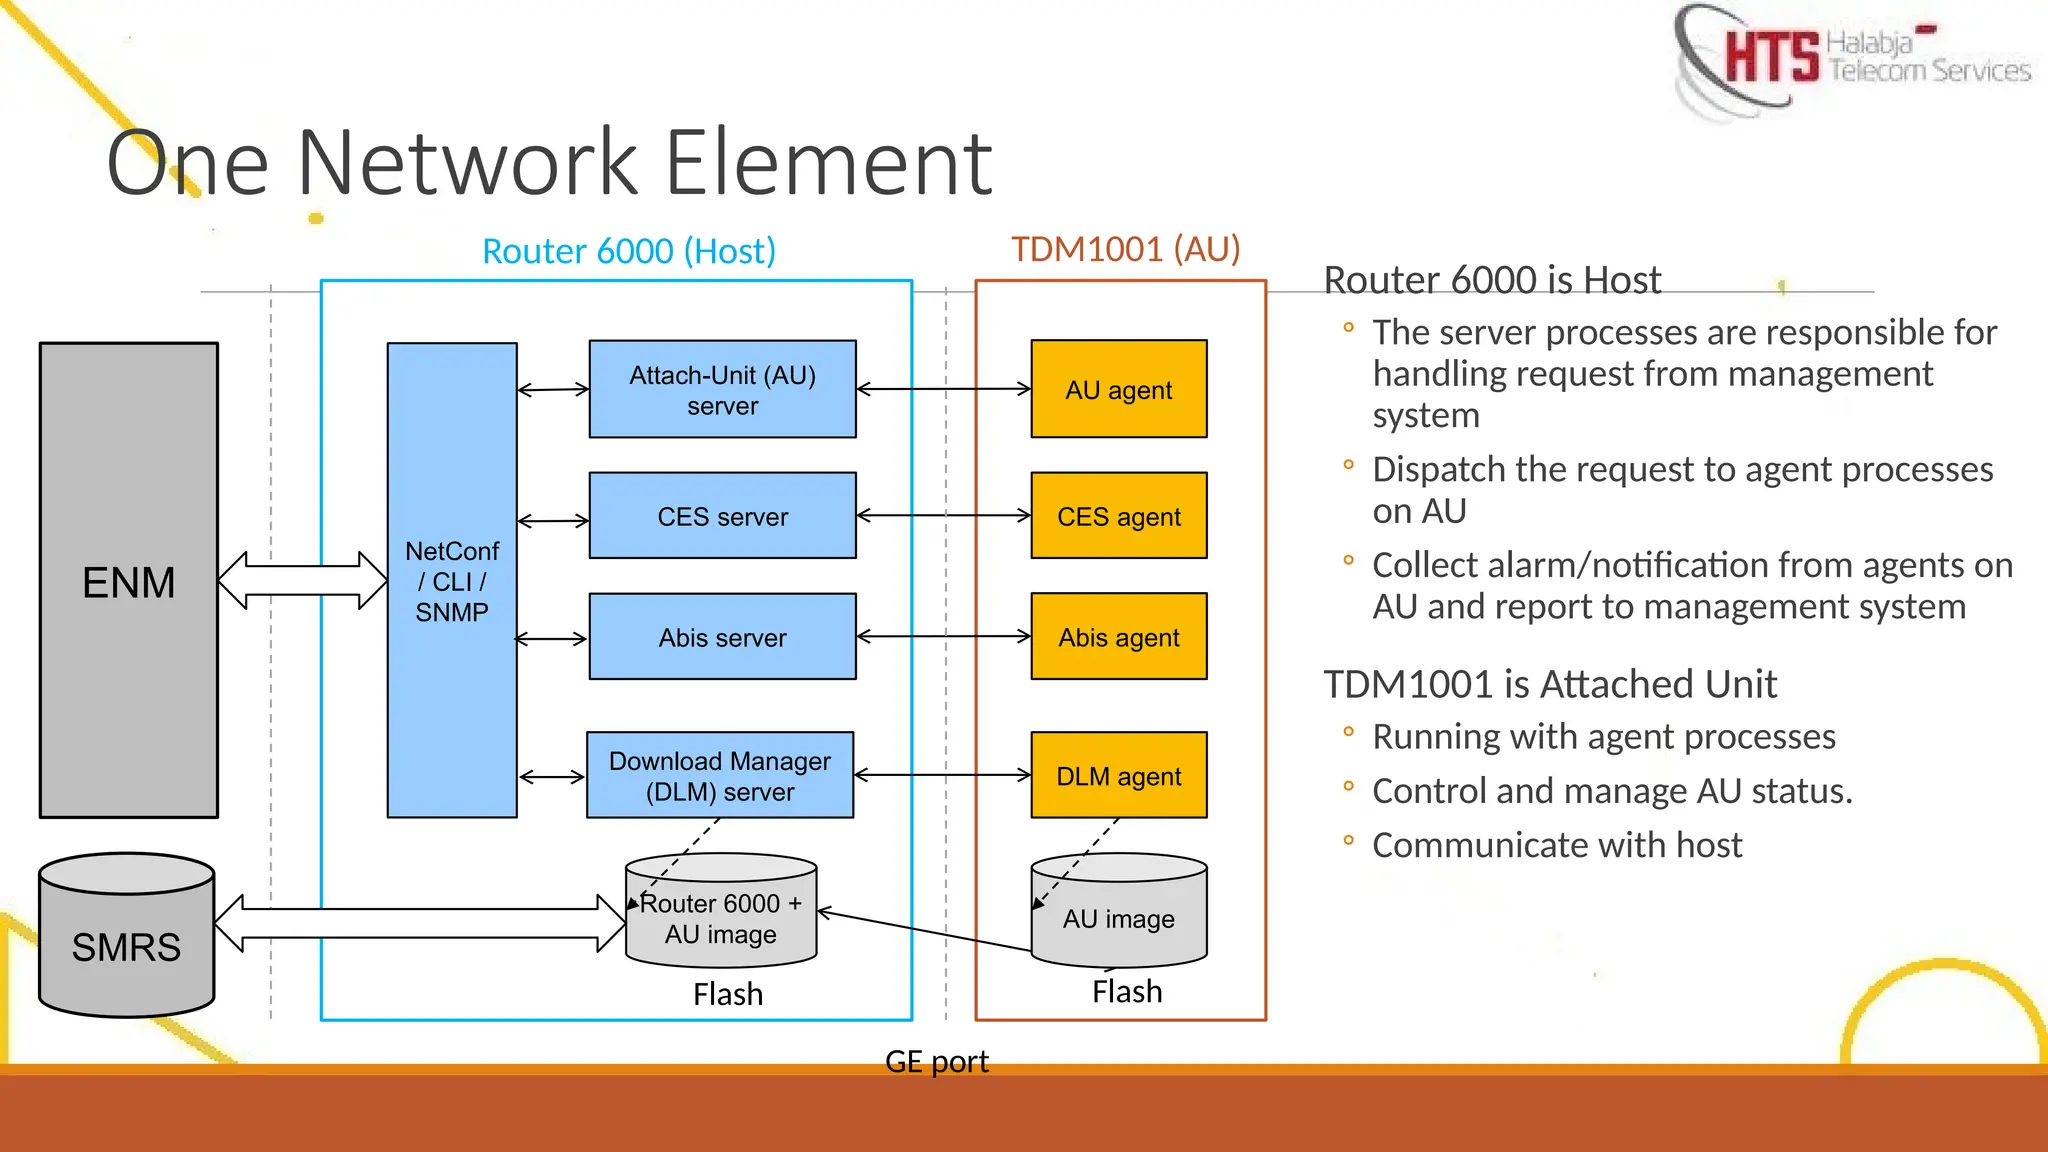
One Network Element
Router6000 is Host
◦ The server processes are responsible for
handling request from management
system
◦ Dispatch the request to agent processes
on AU
◦ Collect alarm/notification from agents on
AU and report to management system
TDM1001 is Attached Unit
◦ Running with agent processes
◦ Control and manage AU status.
◦ Communicate with host
Router 6000 (Host) TDM1001 (AU)
ENM
Attach-Unit (AU)
server
NetConf
/ CLI /
SNMP
SMRS
CES server
Abis server
AU agent
CES agent
Abis agent
Download Manager
(DLM) server
DLM agent
Router 6000 +
AU image
AU image
Flash Flash
GE port
11.
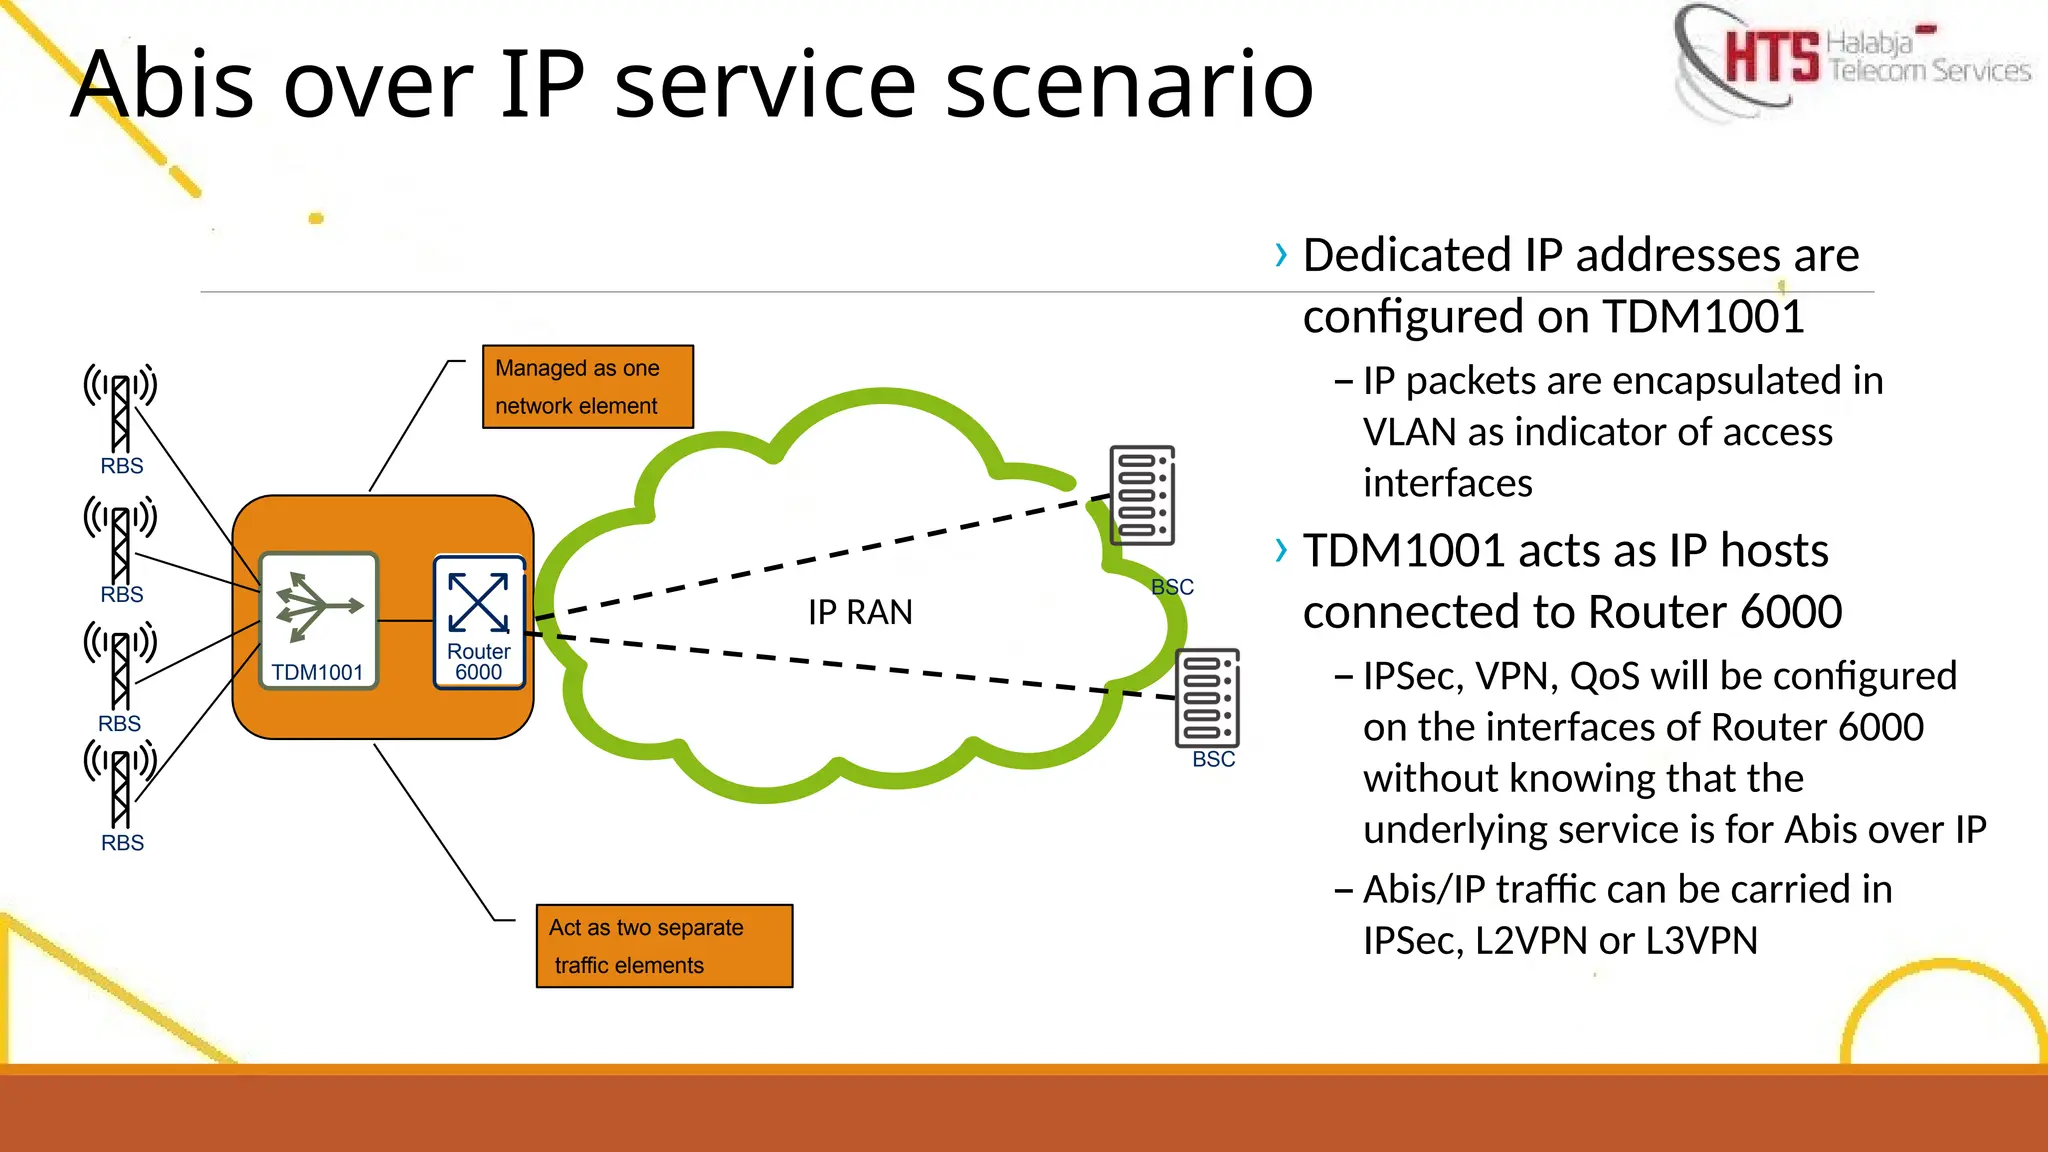
Abis over IPservice scenario
TDM1001
Router
6000
IP RAN
RBS
RBS
RBS
RBS
BSC
BSC
Managed as one
network element
Act as two separate
traffic elements
› Dedicated IP addresses are
configured on TDM1001
– IP packets are encapsulated in
VLAN as indicator of access
interfaces
› TDM1001 acts as IP hosts
connected to Router 6000
– IPSec, VPN, QoS will be configured
on the interfaces of Router 6000
without knowing that the
underlying service is for Abis over IP
– Abis/IP traffic can be carried in
IPSec, L2VPN or L3VPN
12.
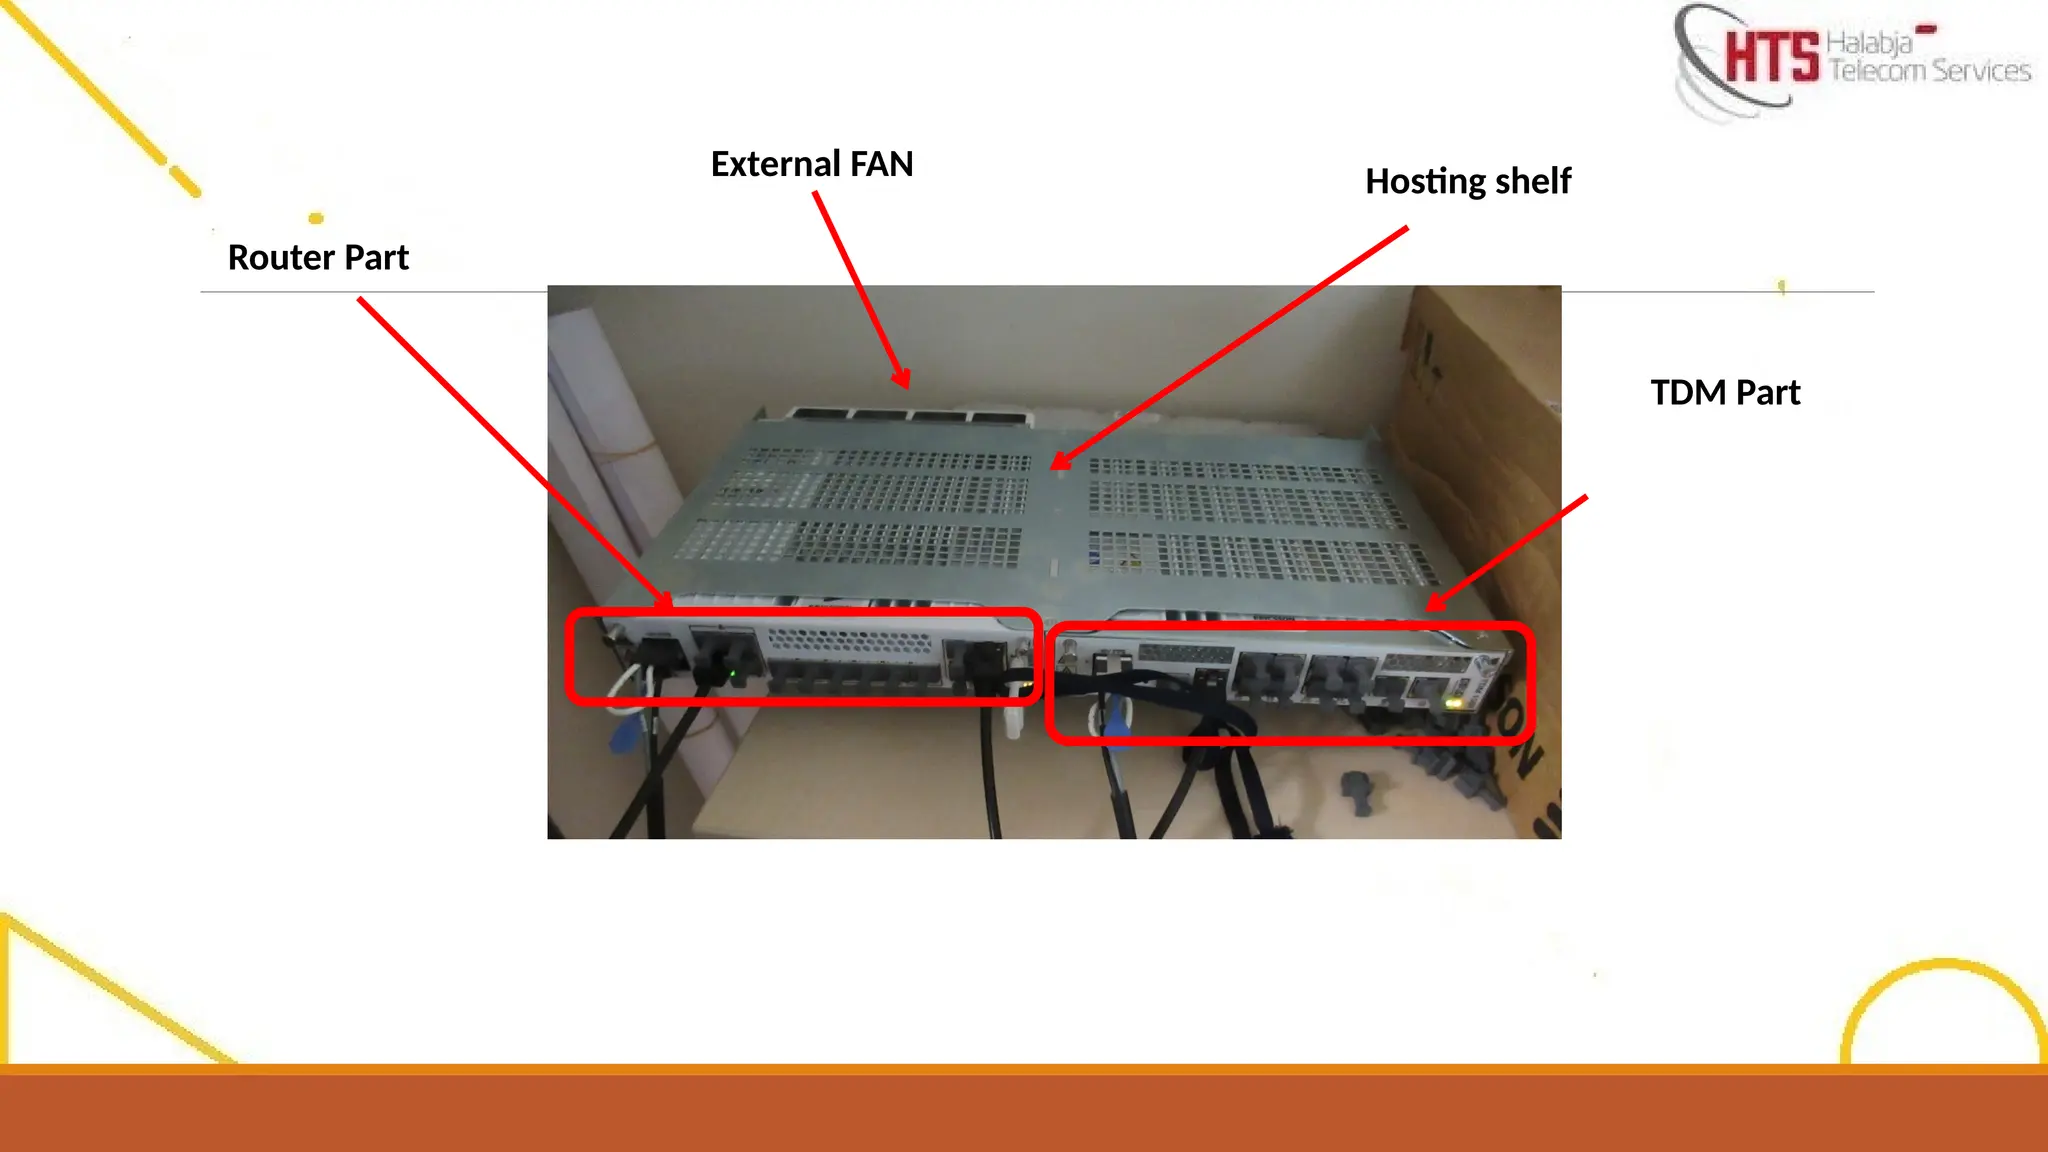
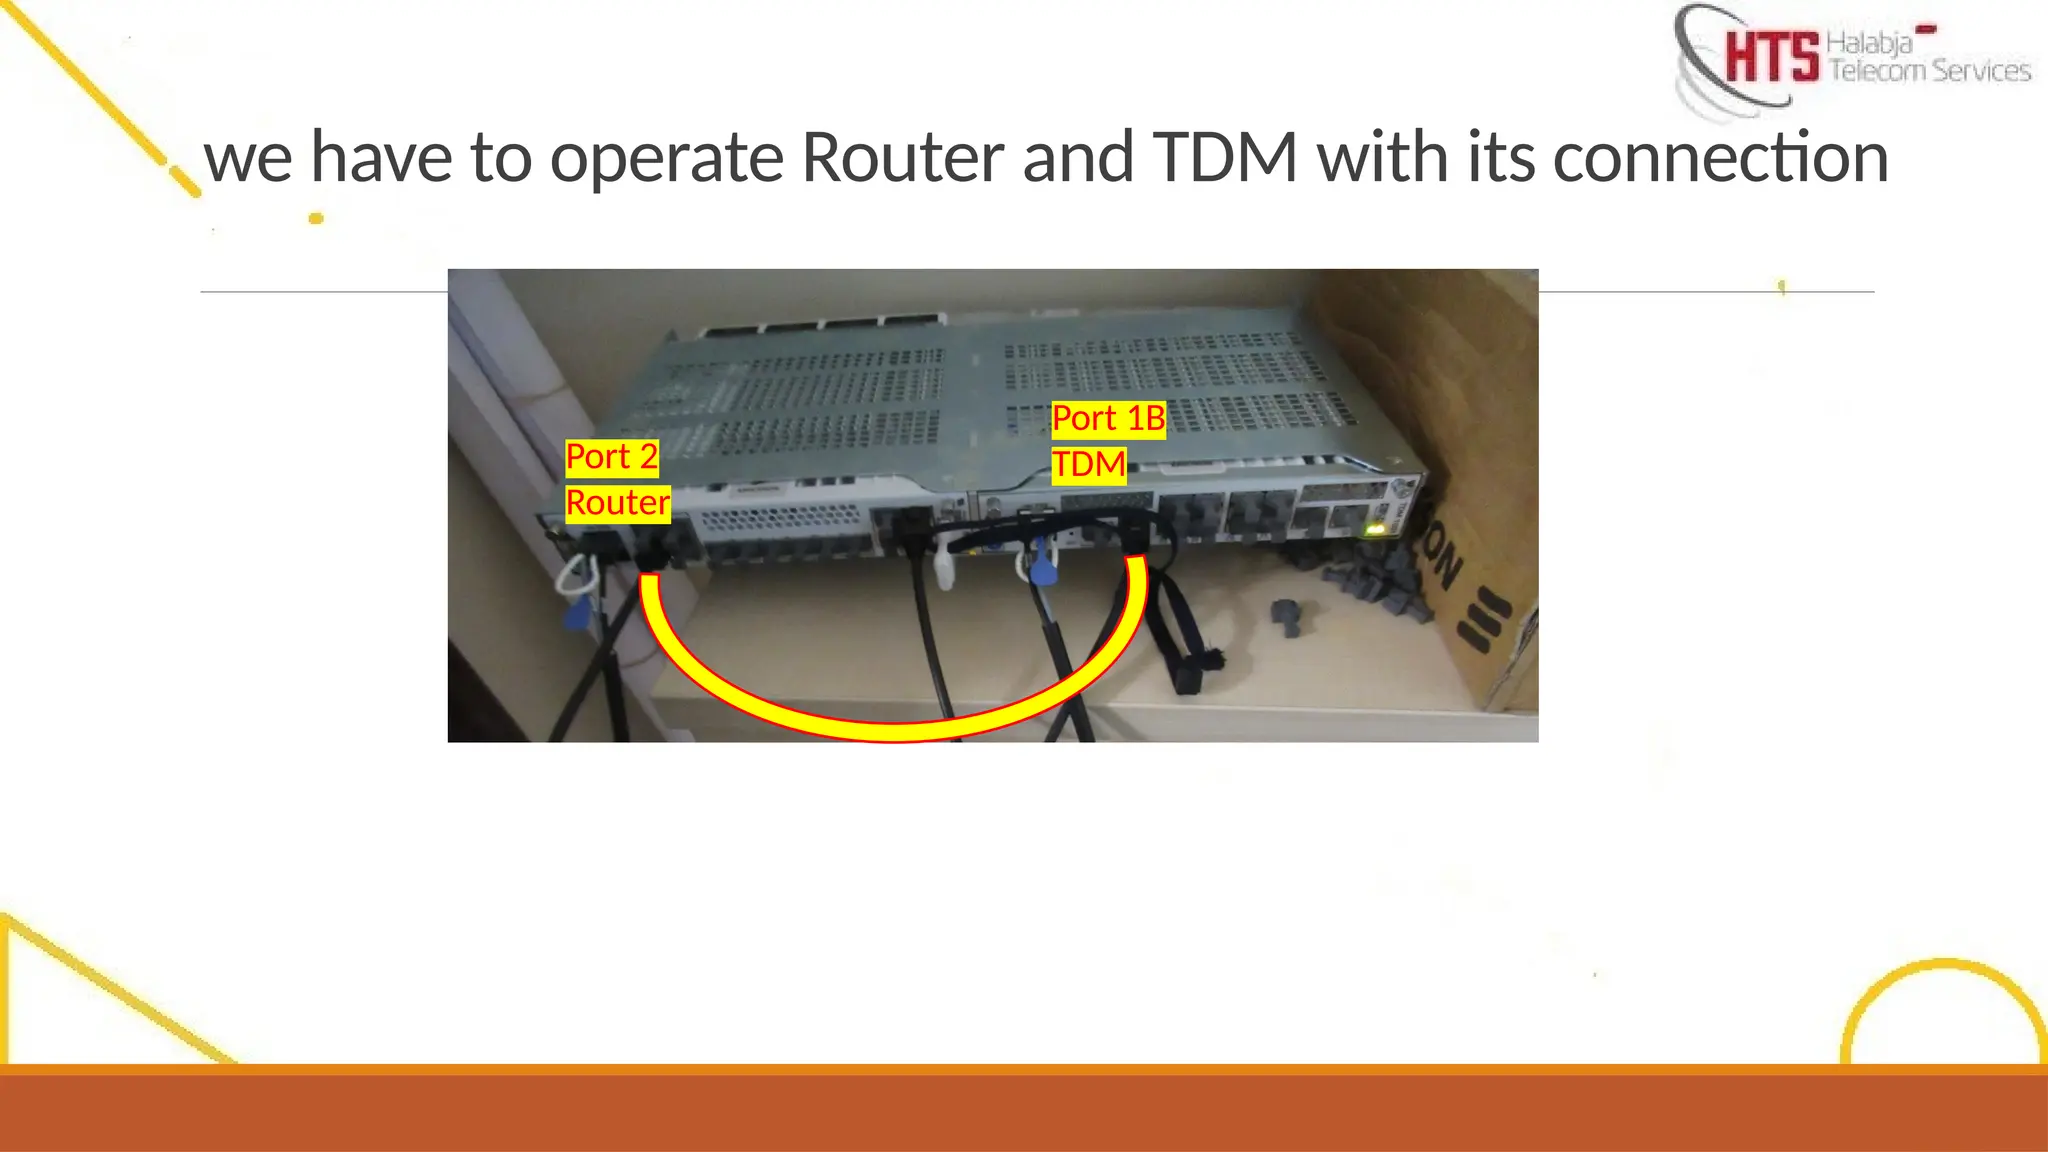
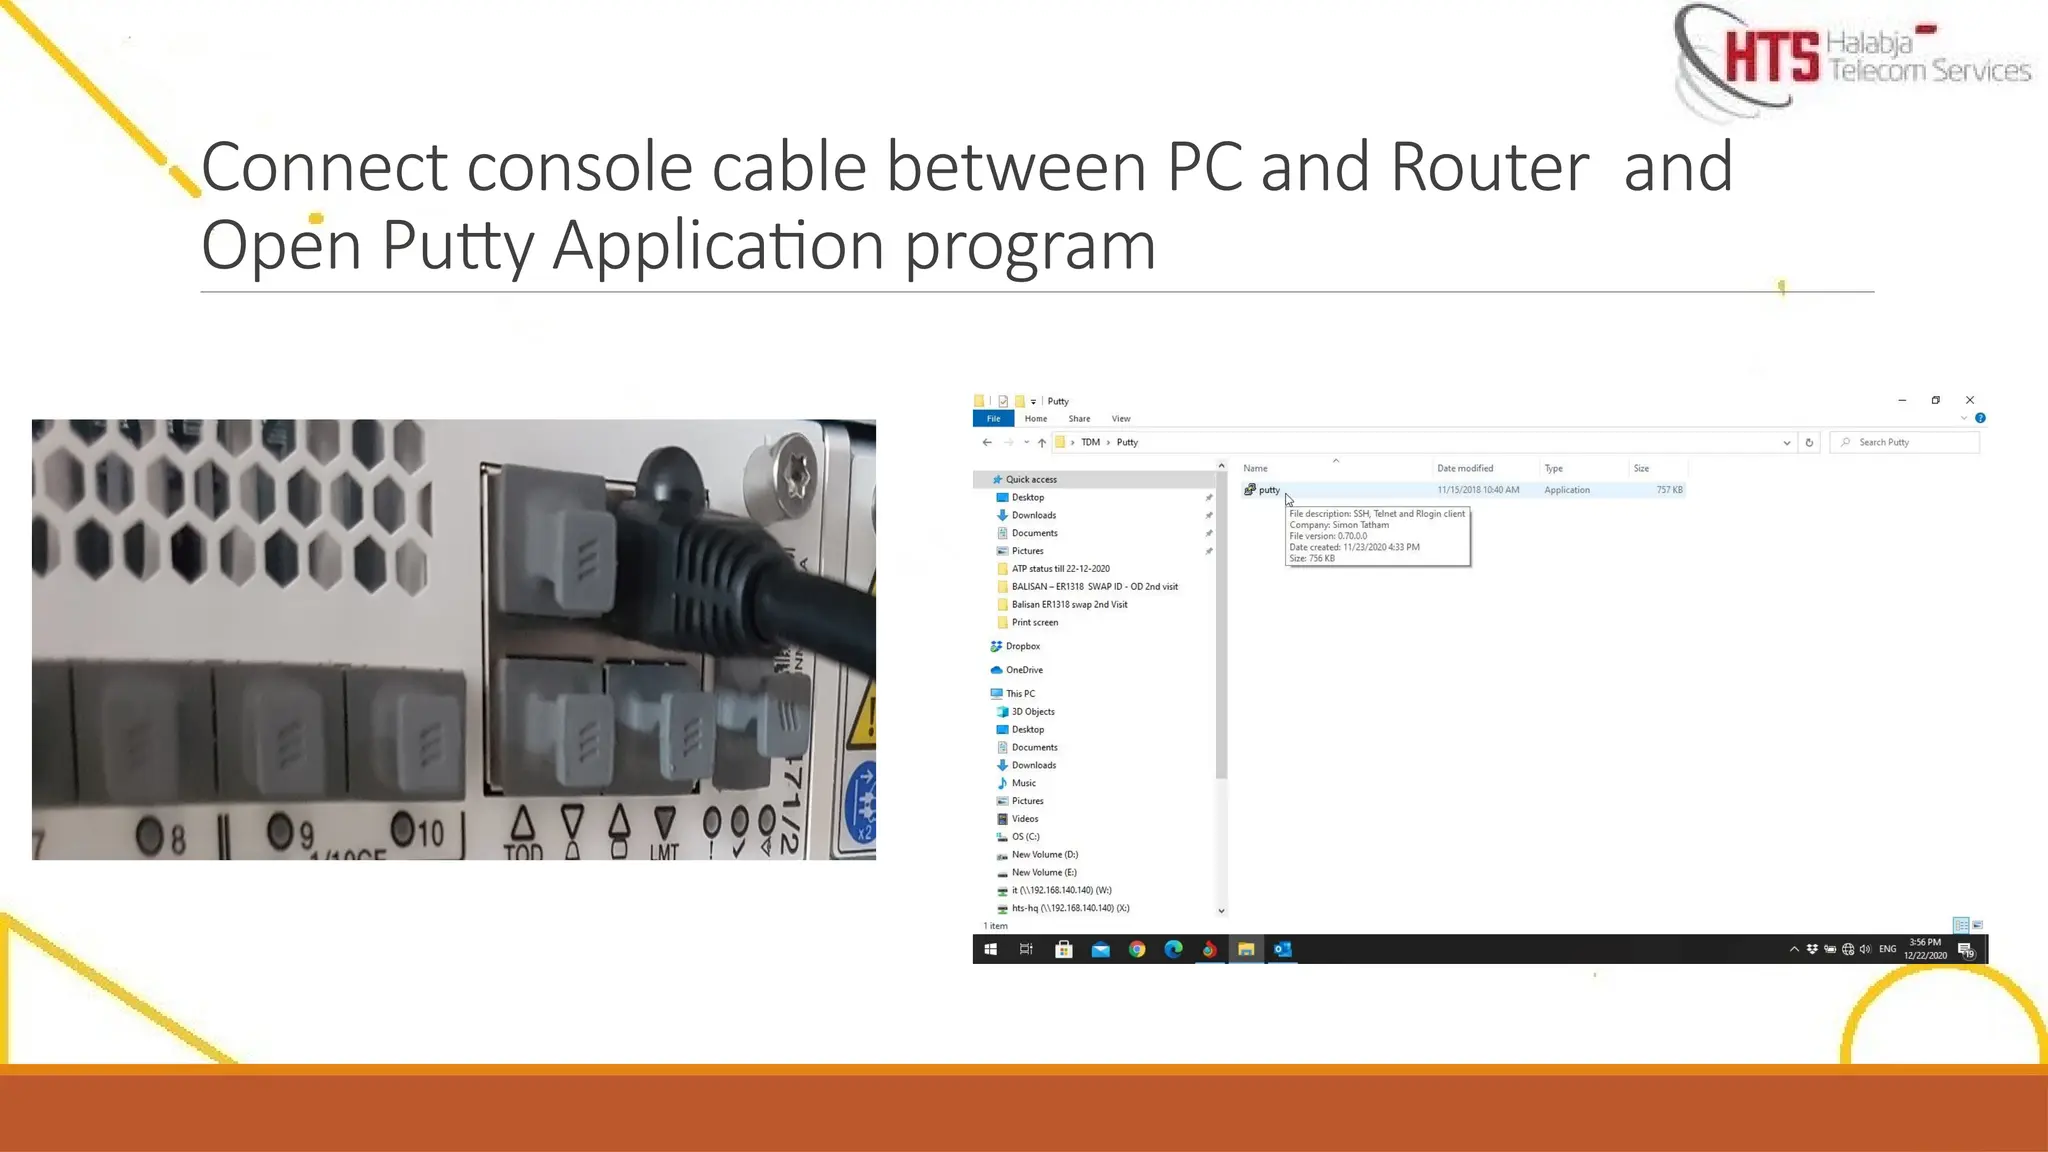
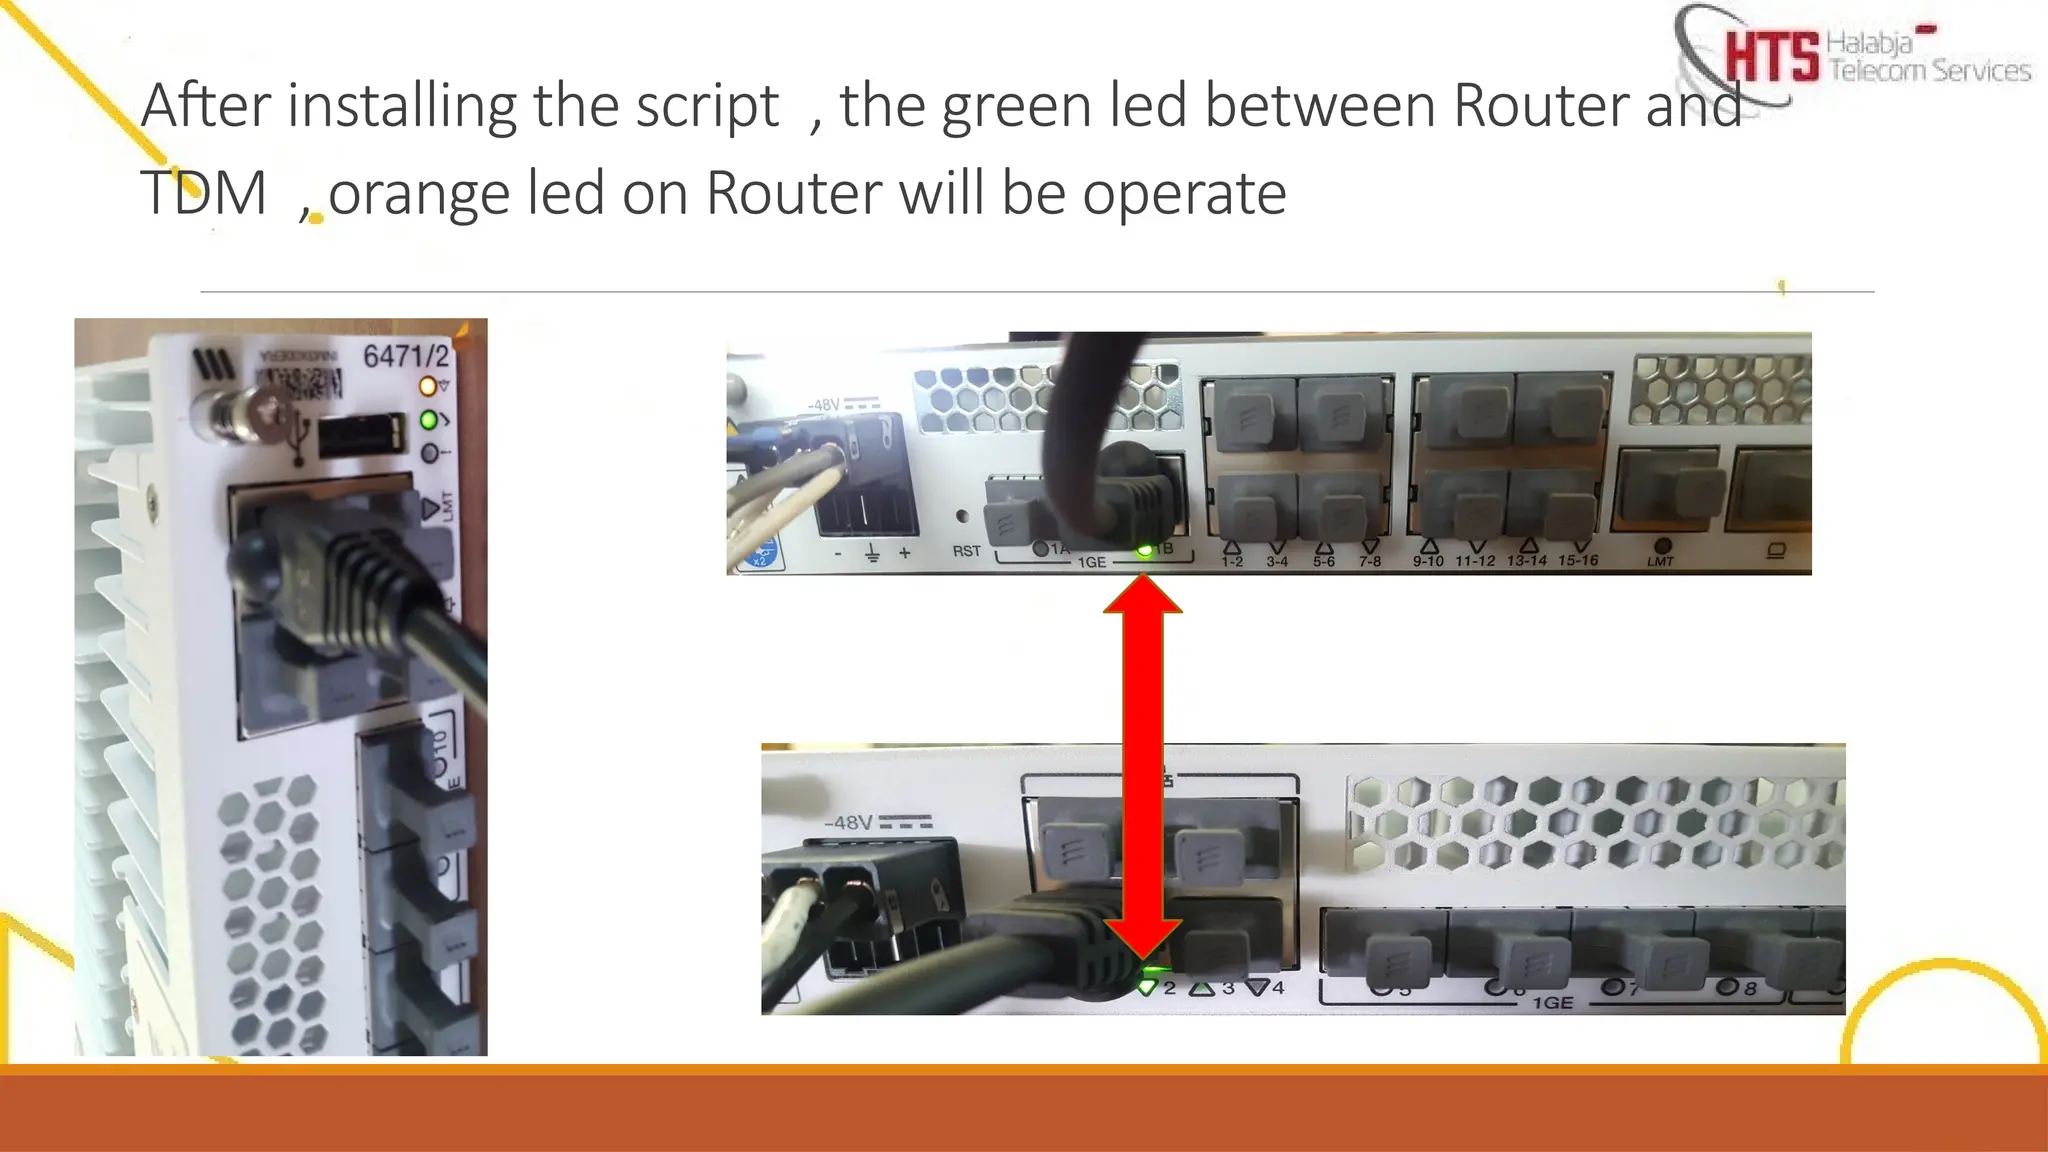
2- Router andTDM Installation and Hardware connection.
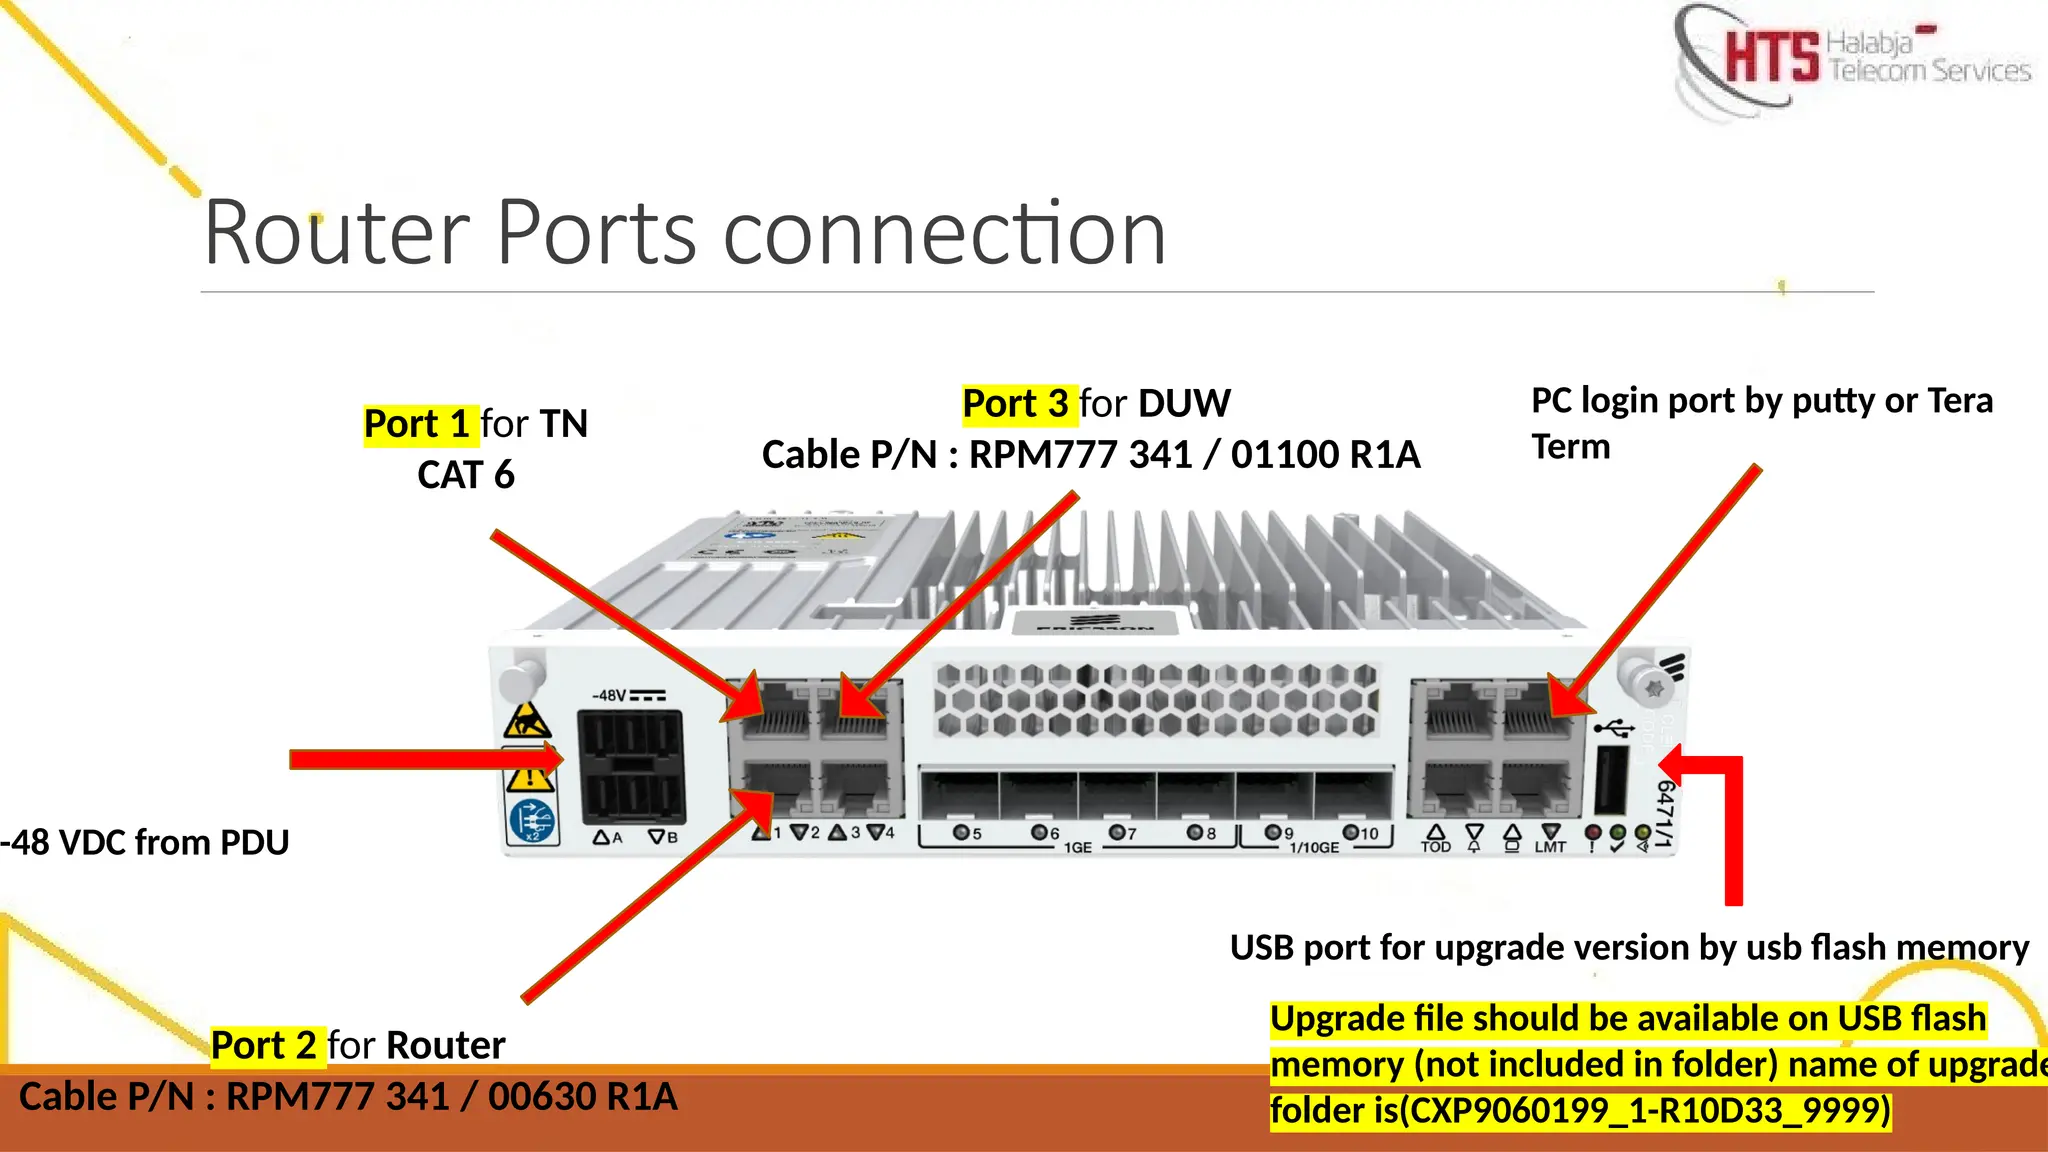
Router Ports connection
Port1 for TN
CAT 6
-48 VDC from PDU
Port 2 for Router
Cable P/N : RPM777 341 / 00630 R1A
Port 3 for DUW
Cable P/N : RPM777 341 / 01100 R1A
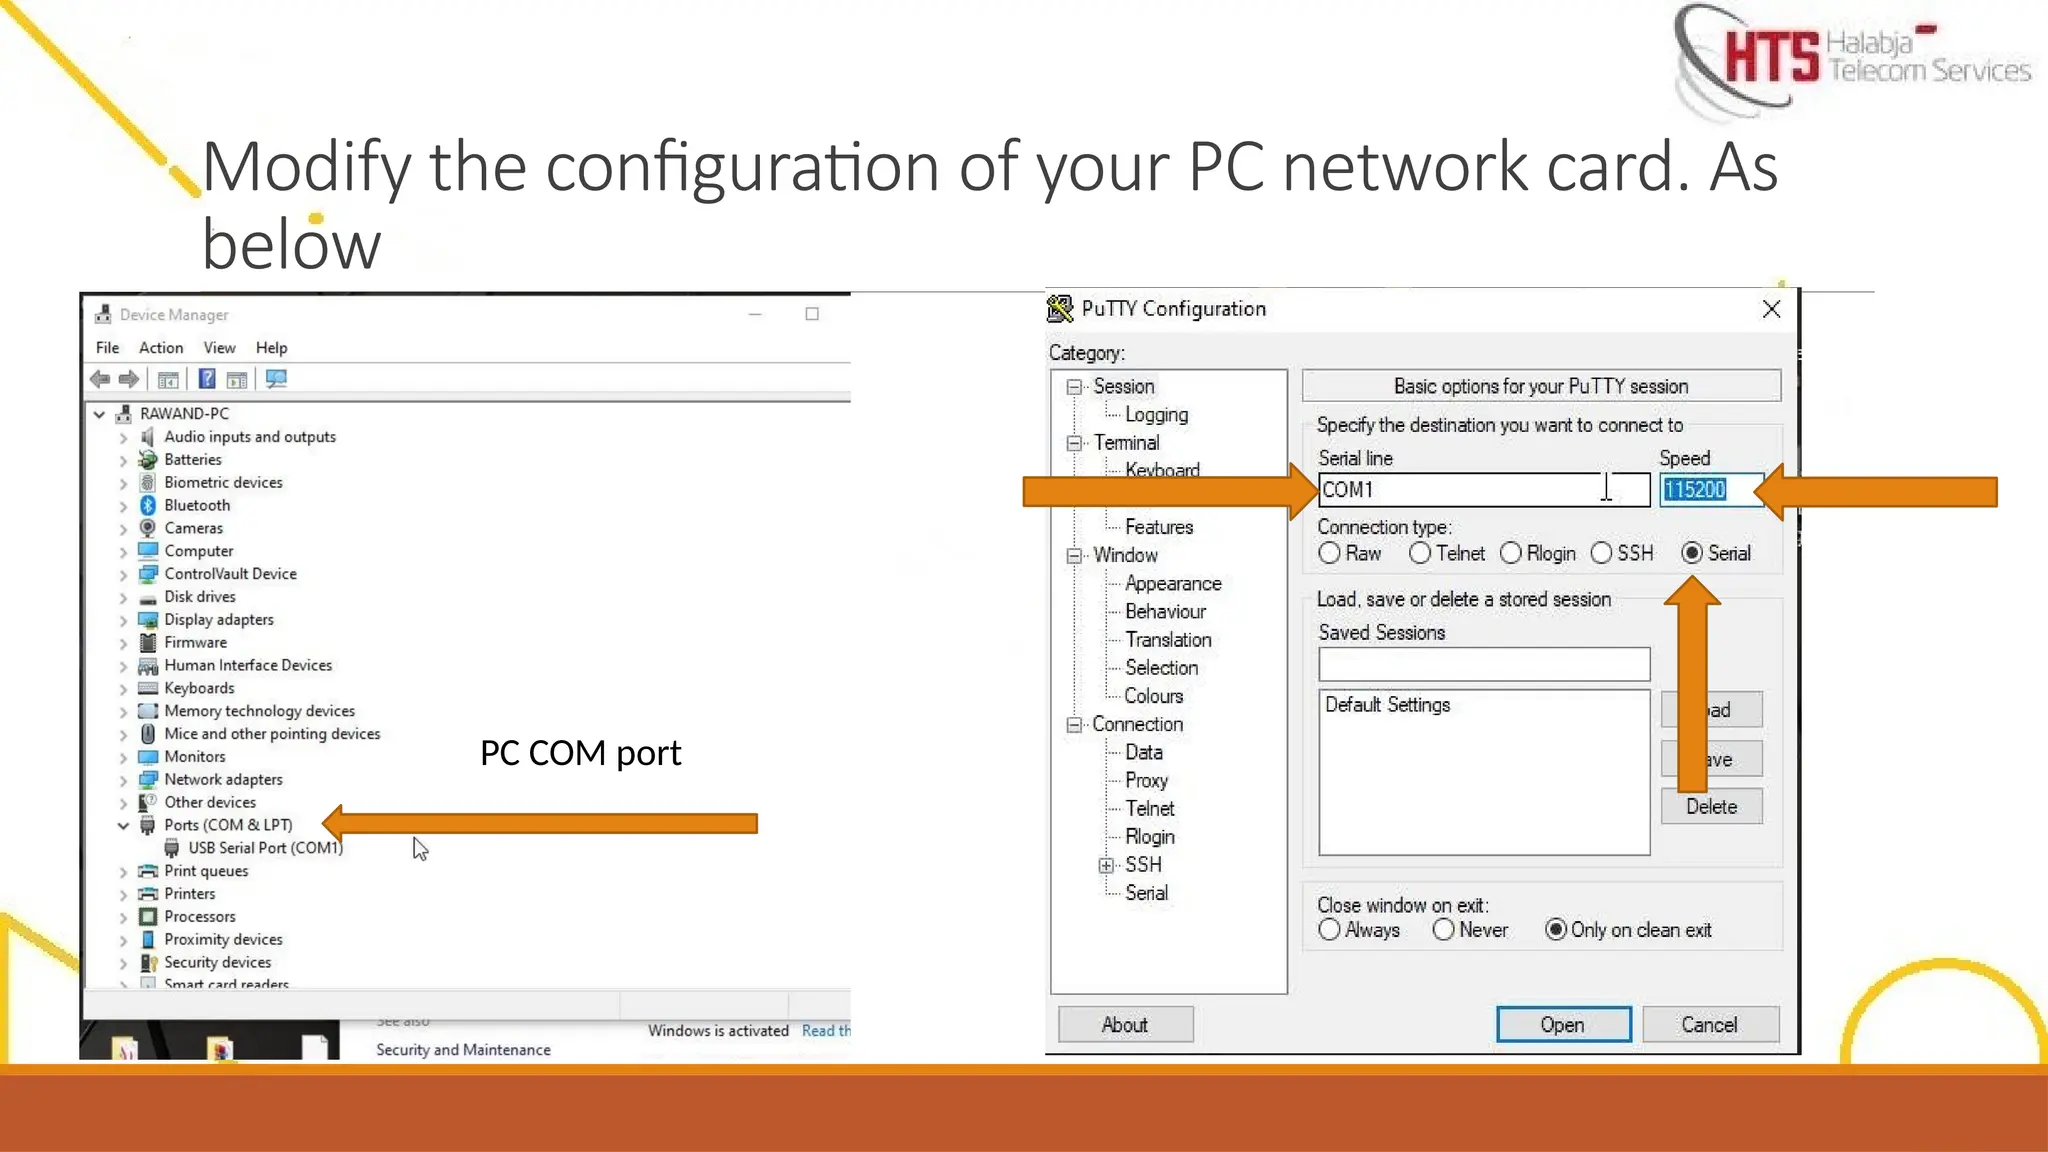
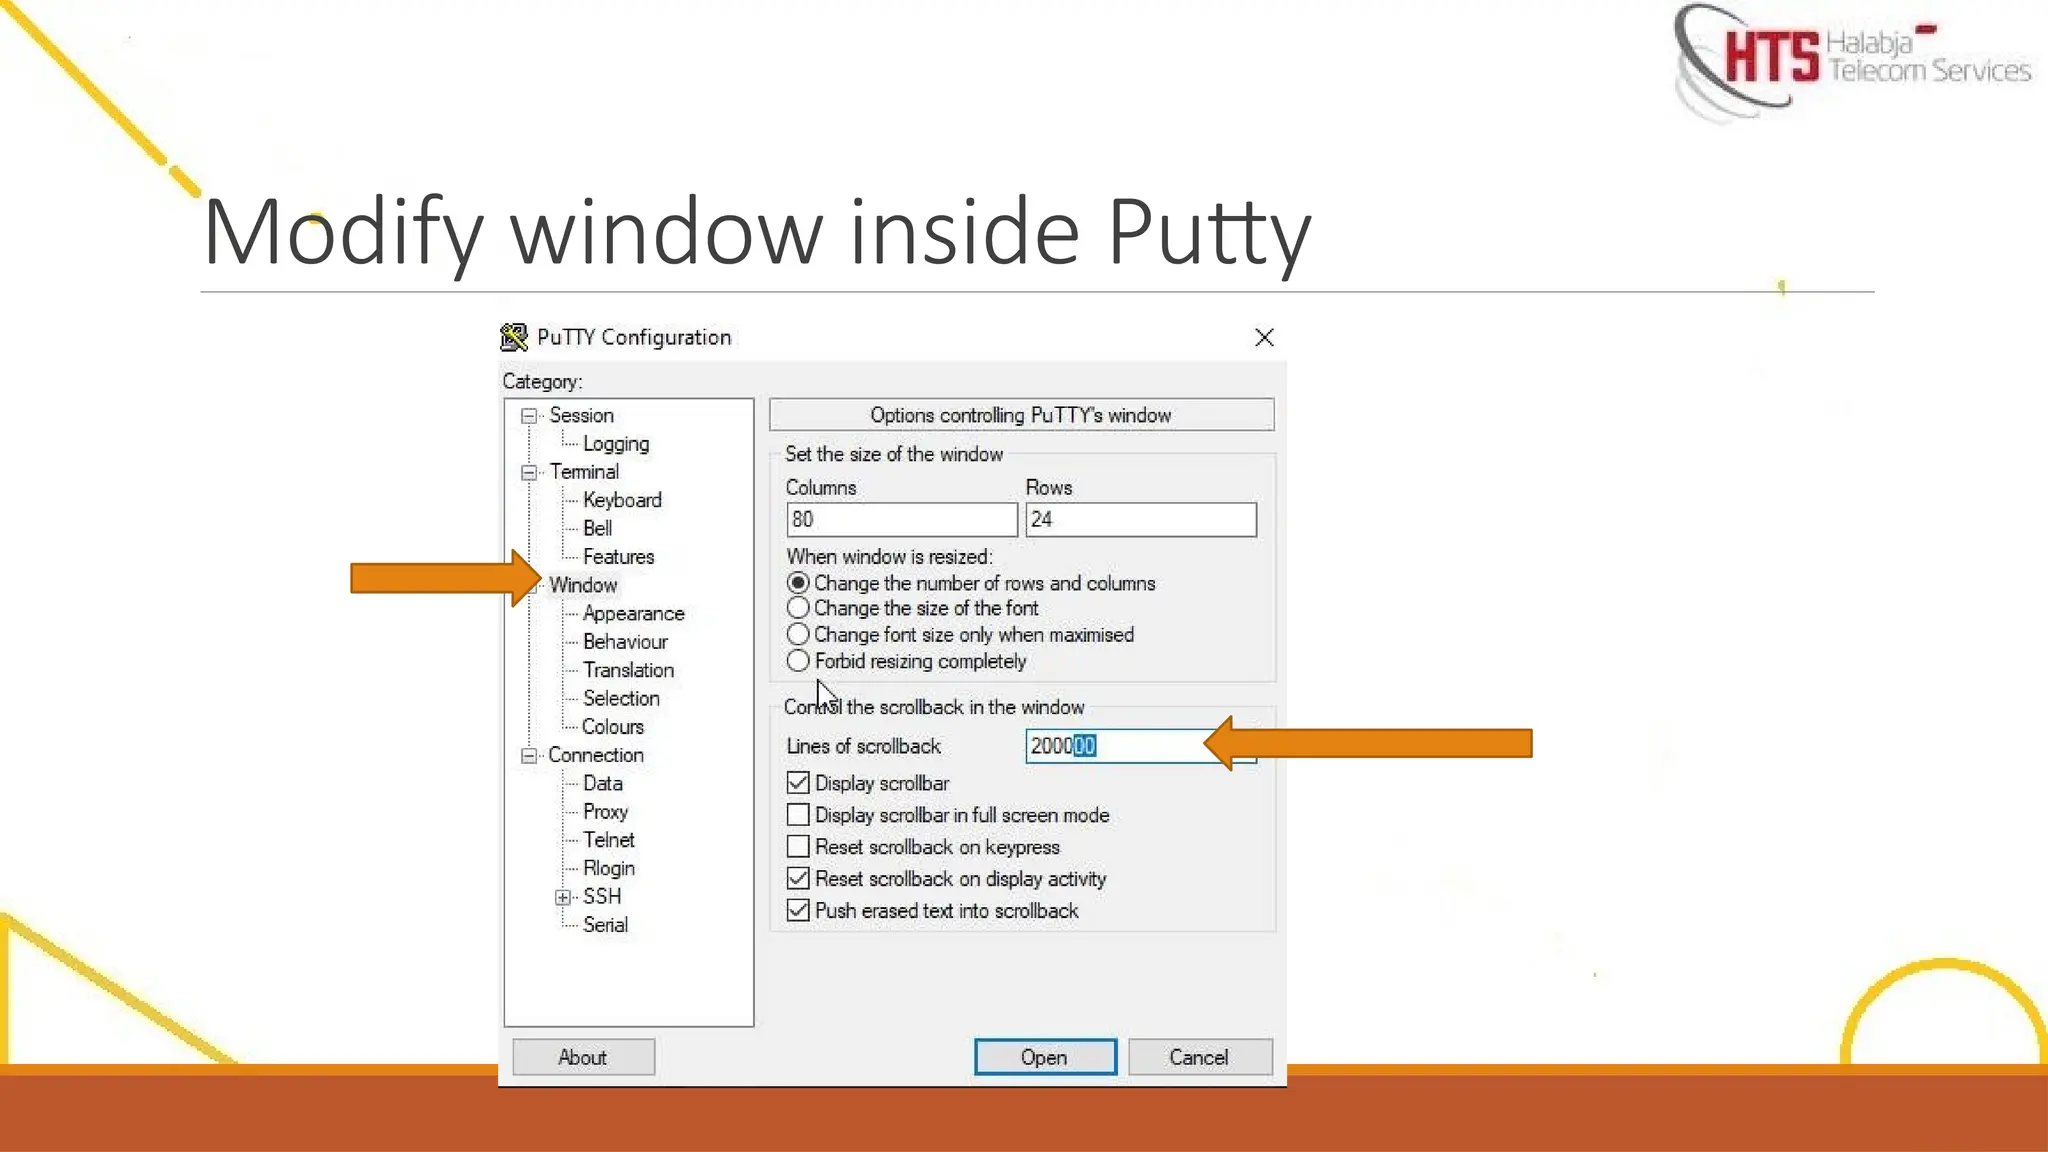
PC login port by putty or Tera
Term
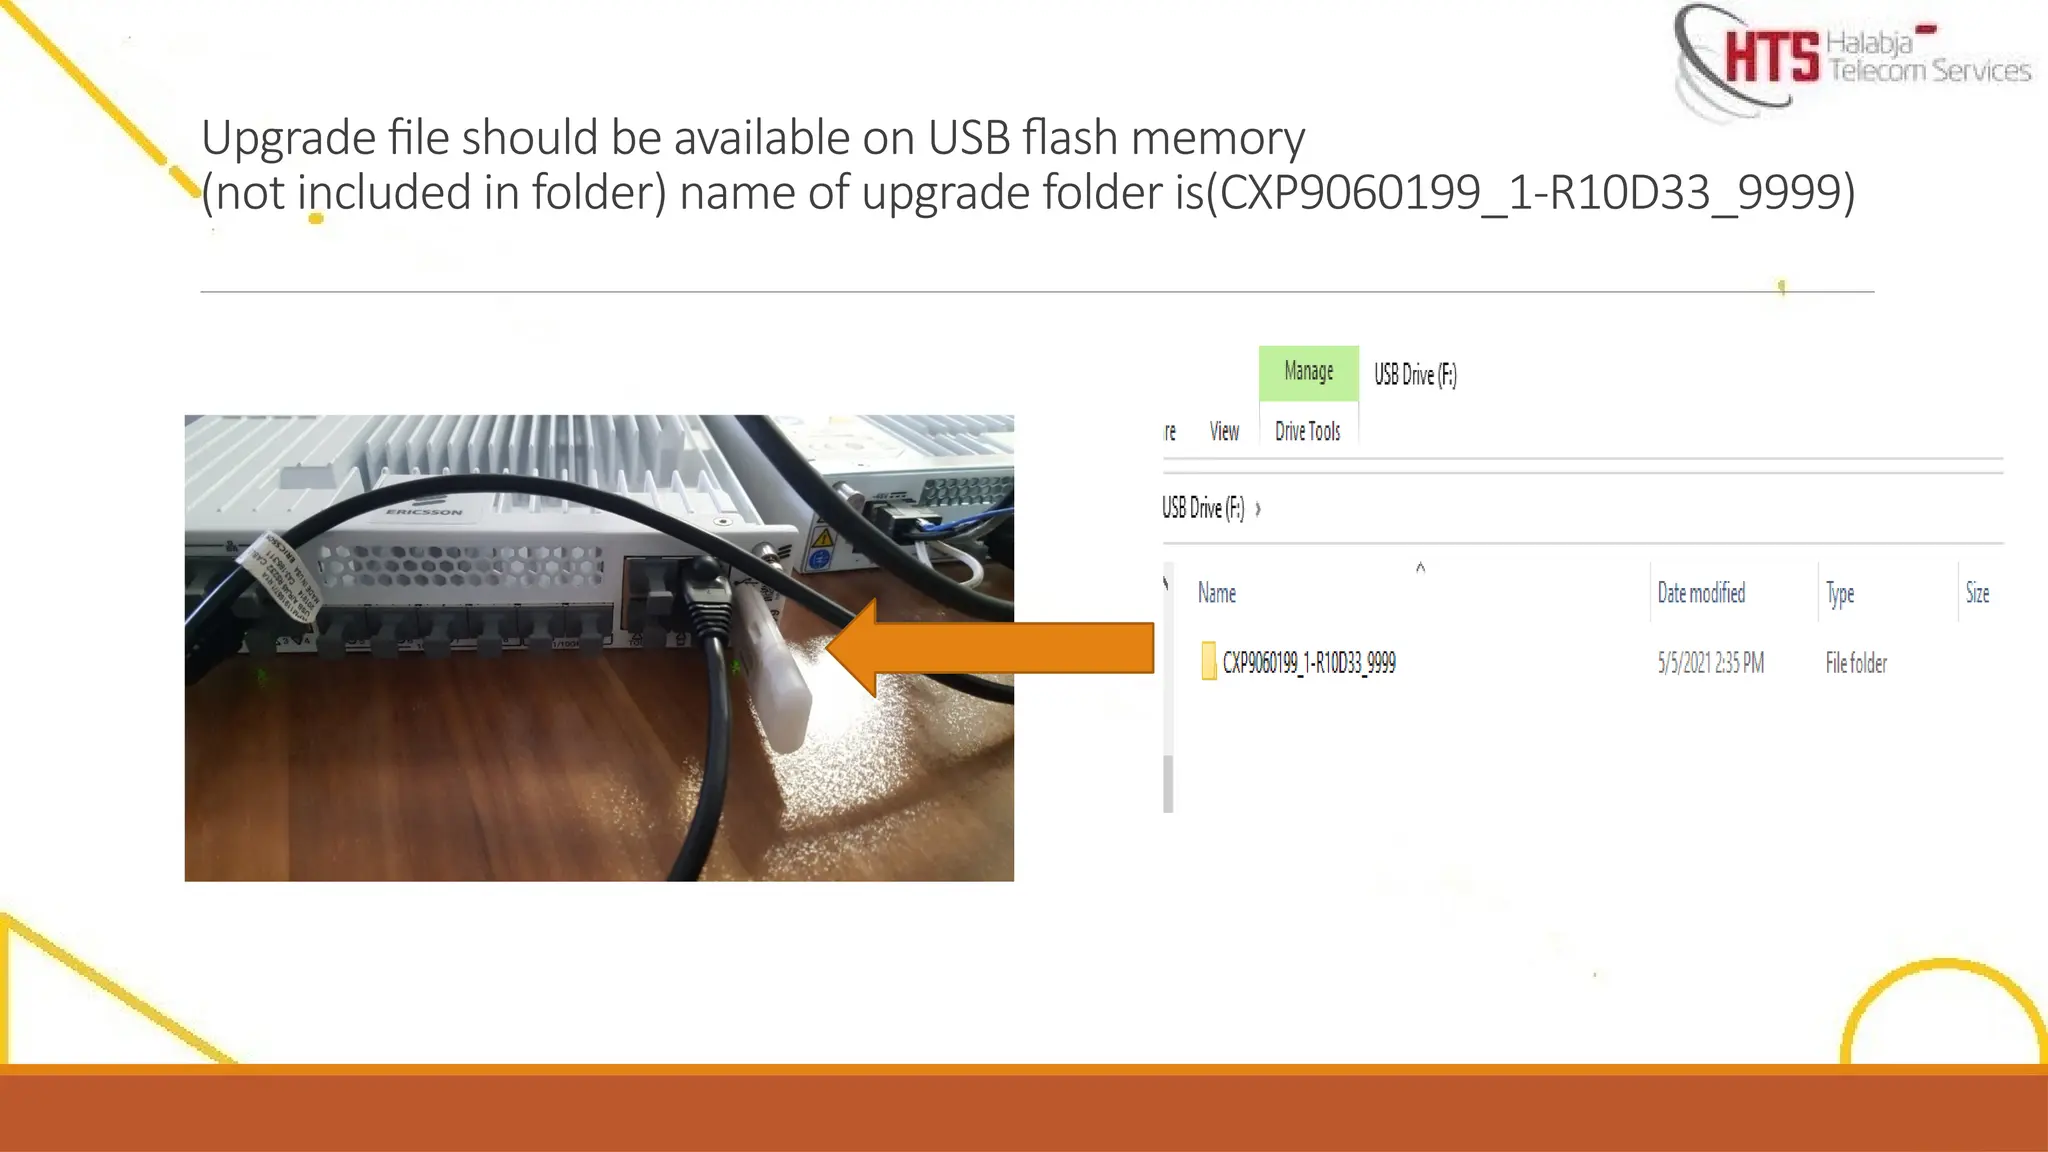
Upgrade file should be available on USB flash
memory (not included in folder) name of upgrade
folder is(CXP9060199_1-R10D33_9999)
USB port for upgrade version by usb flash memory
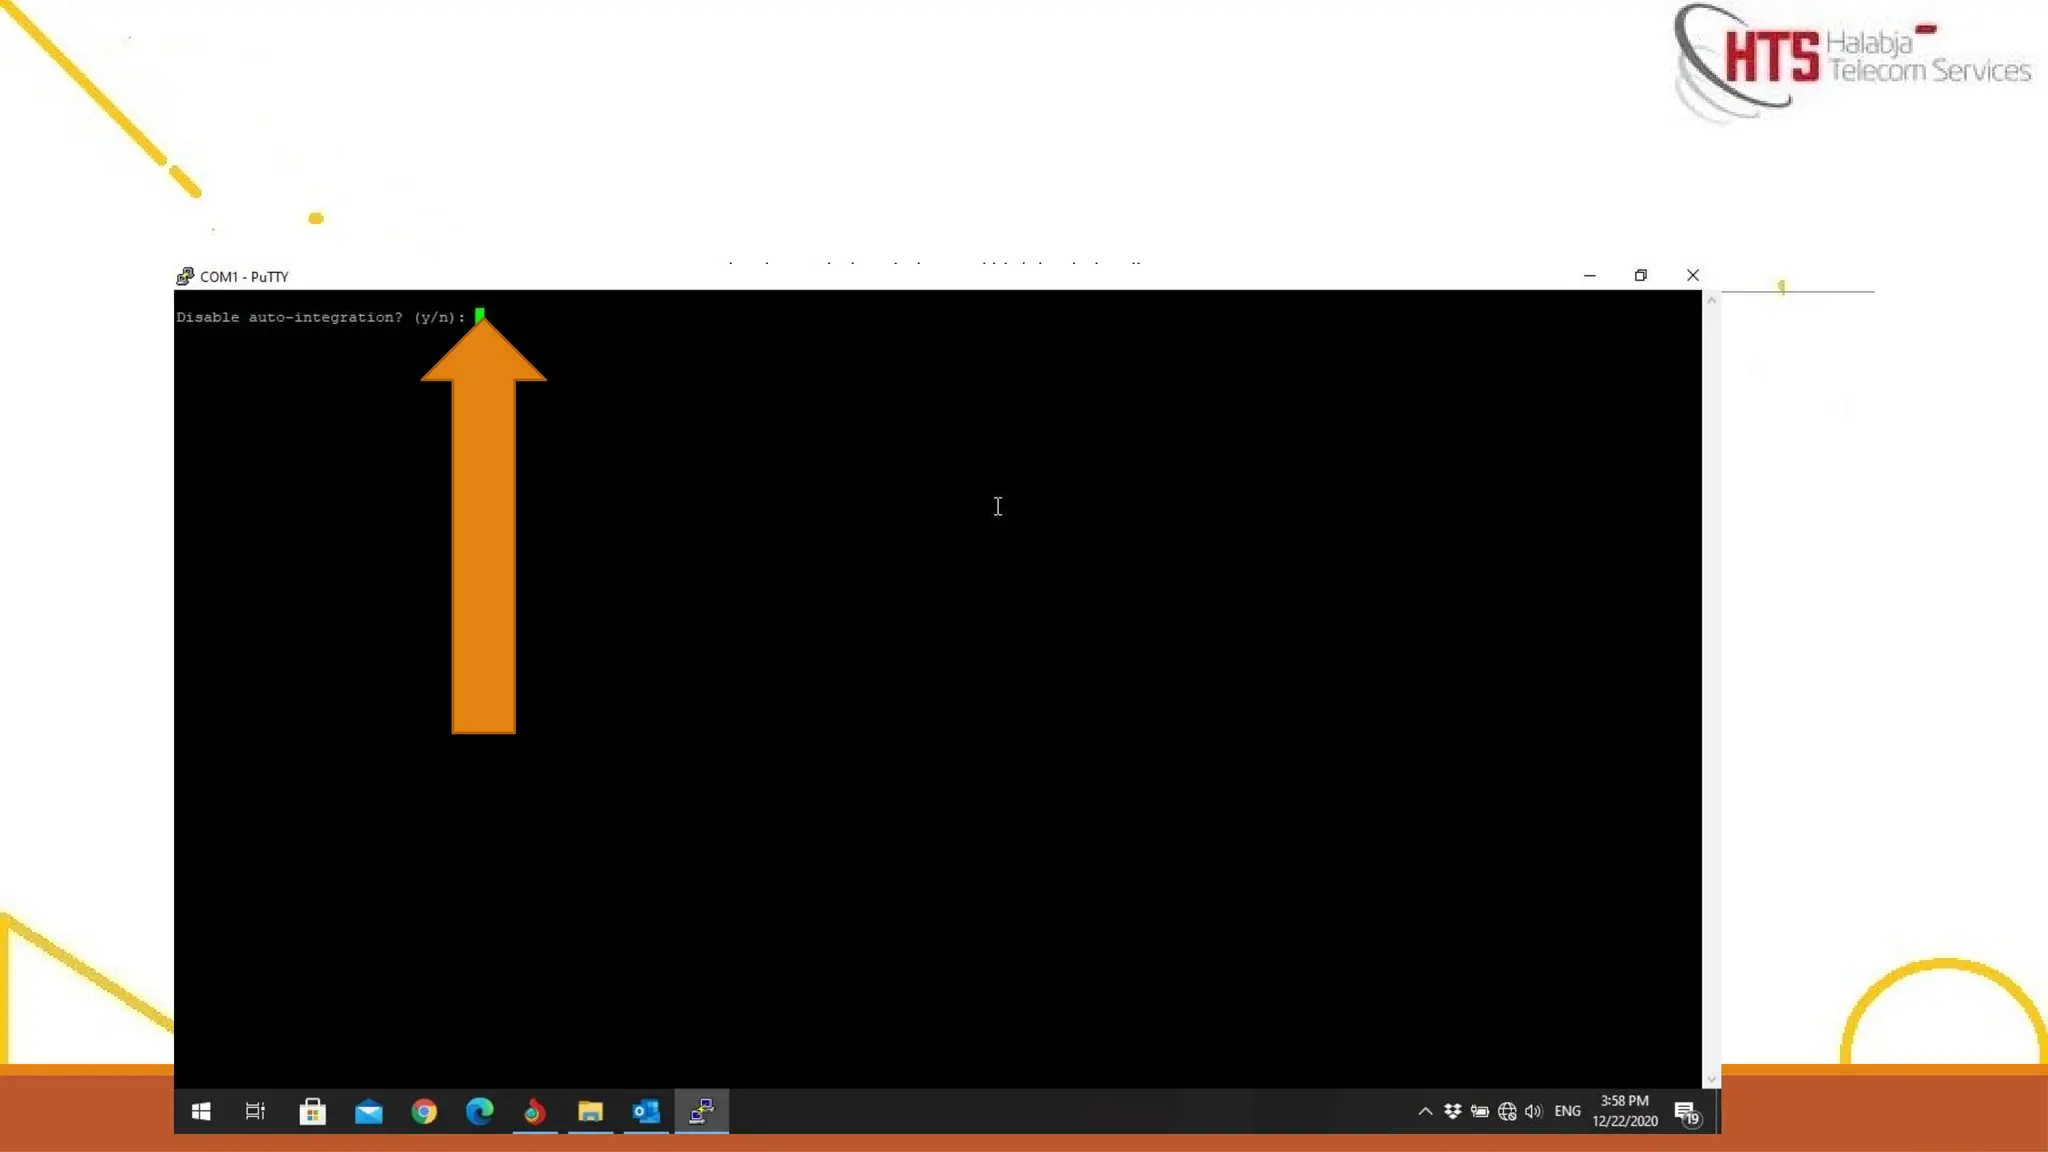
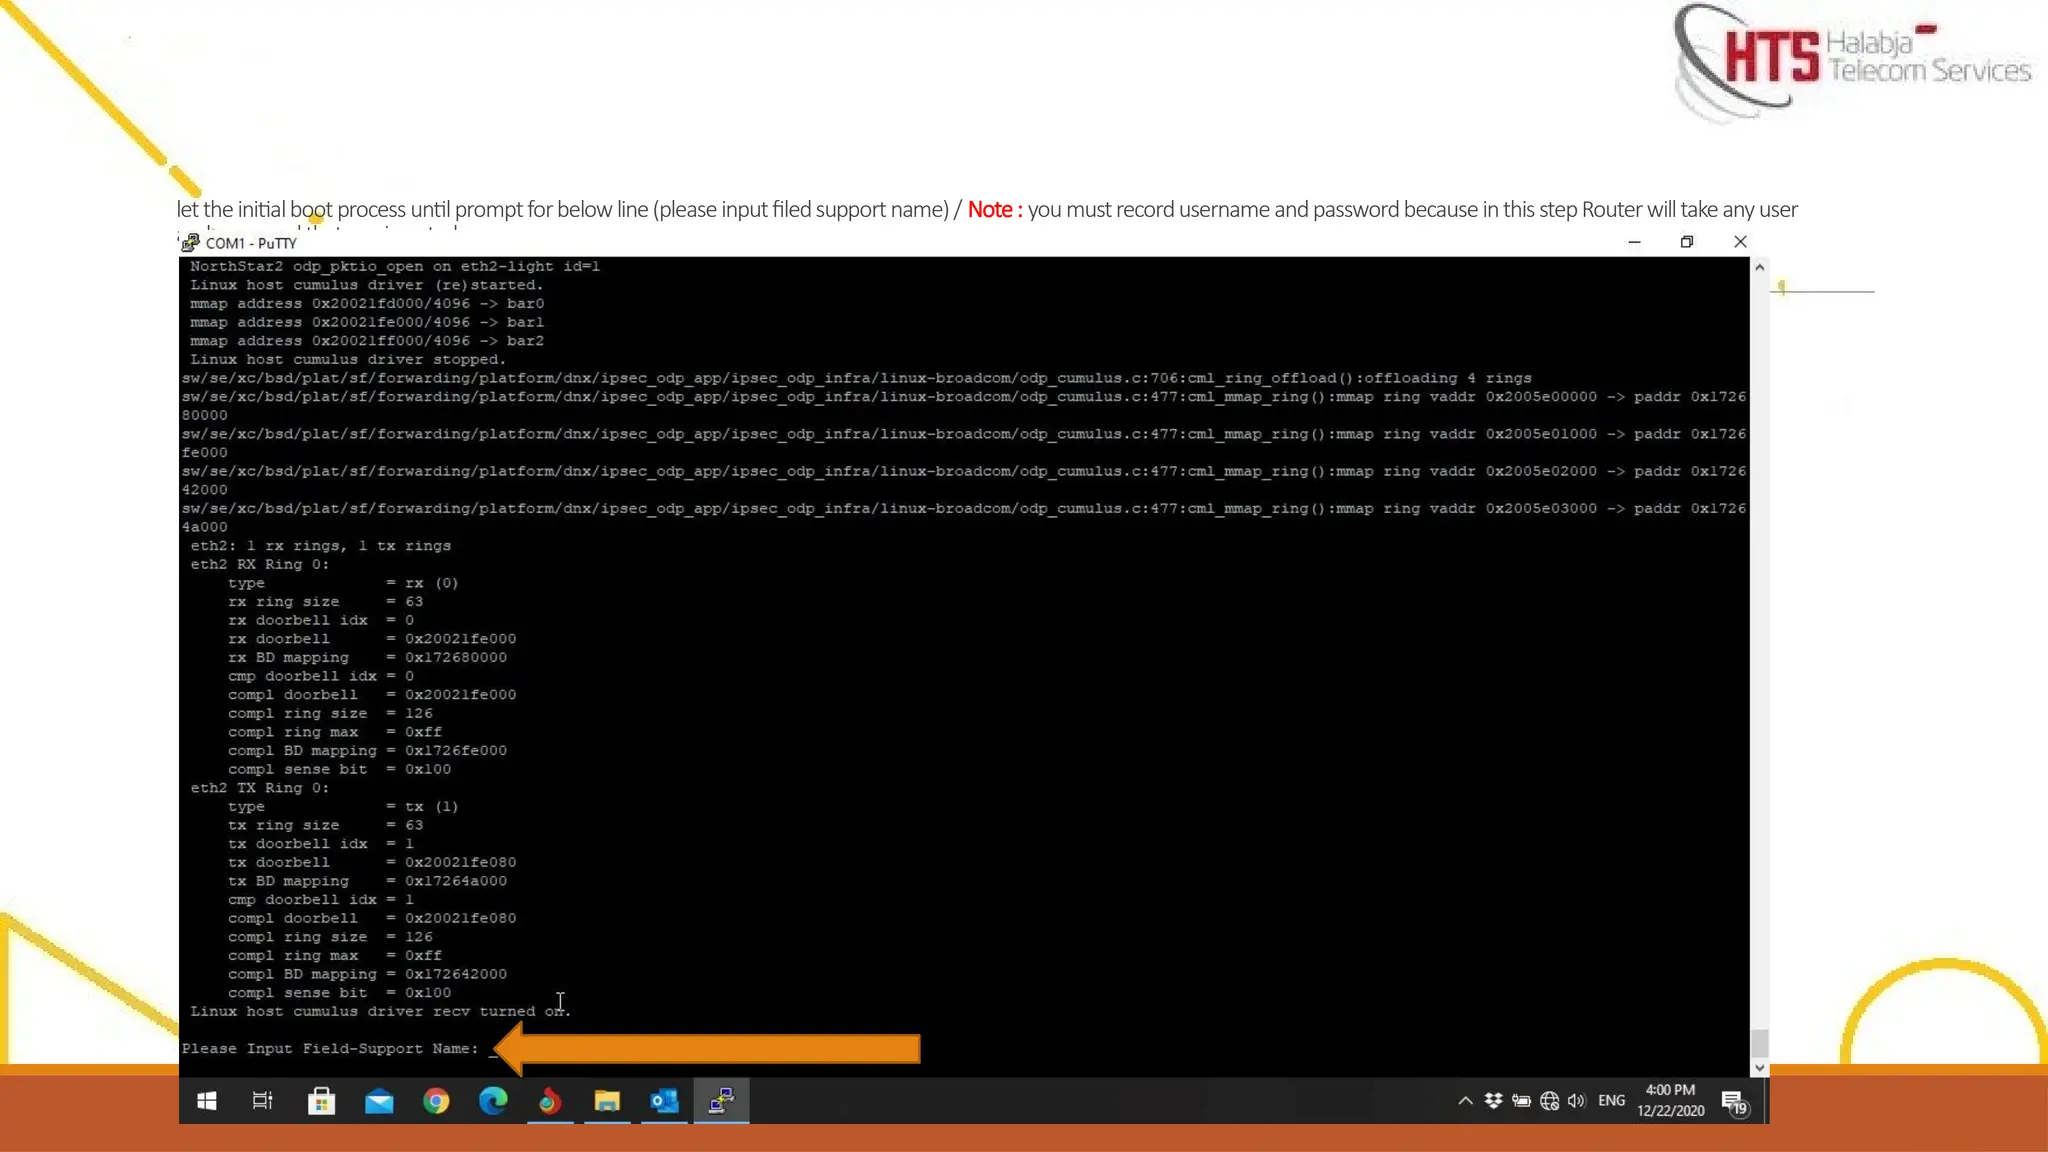
Closely watch thewindow and hit ‘Y’ as below line appears
Disable Auto integration:(Y/N) chose Y
**Please note that the following only happens on a new router, we will not need to do this step for used devices**
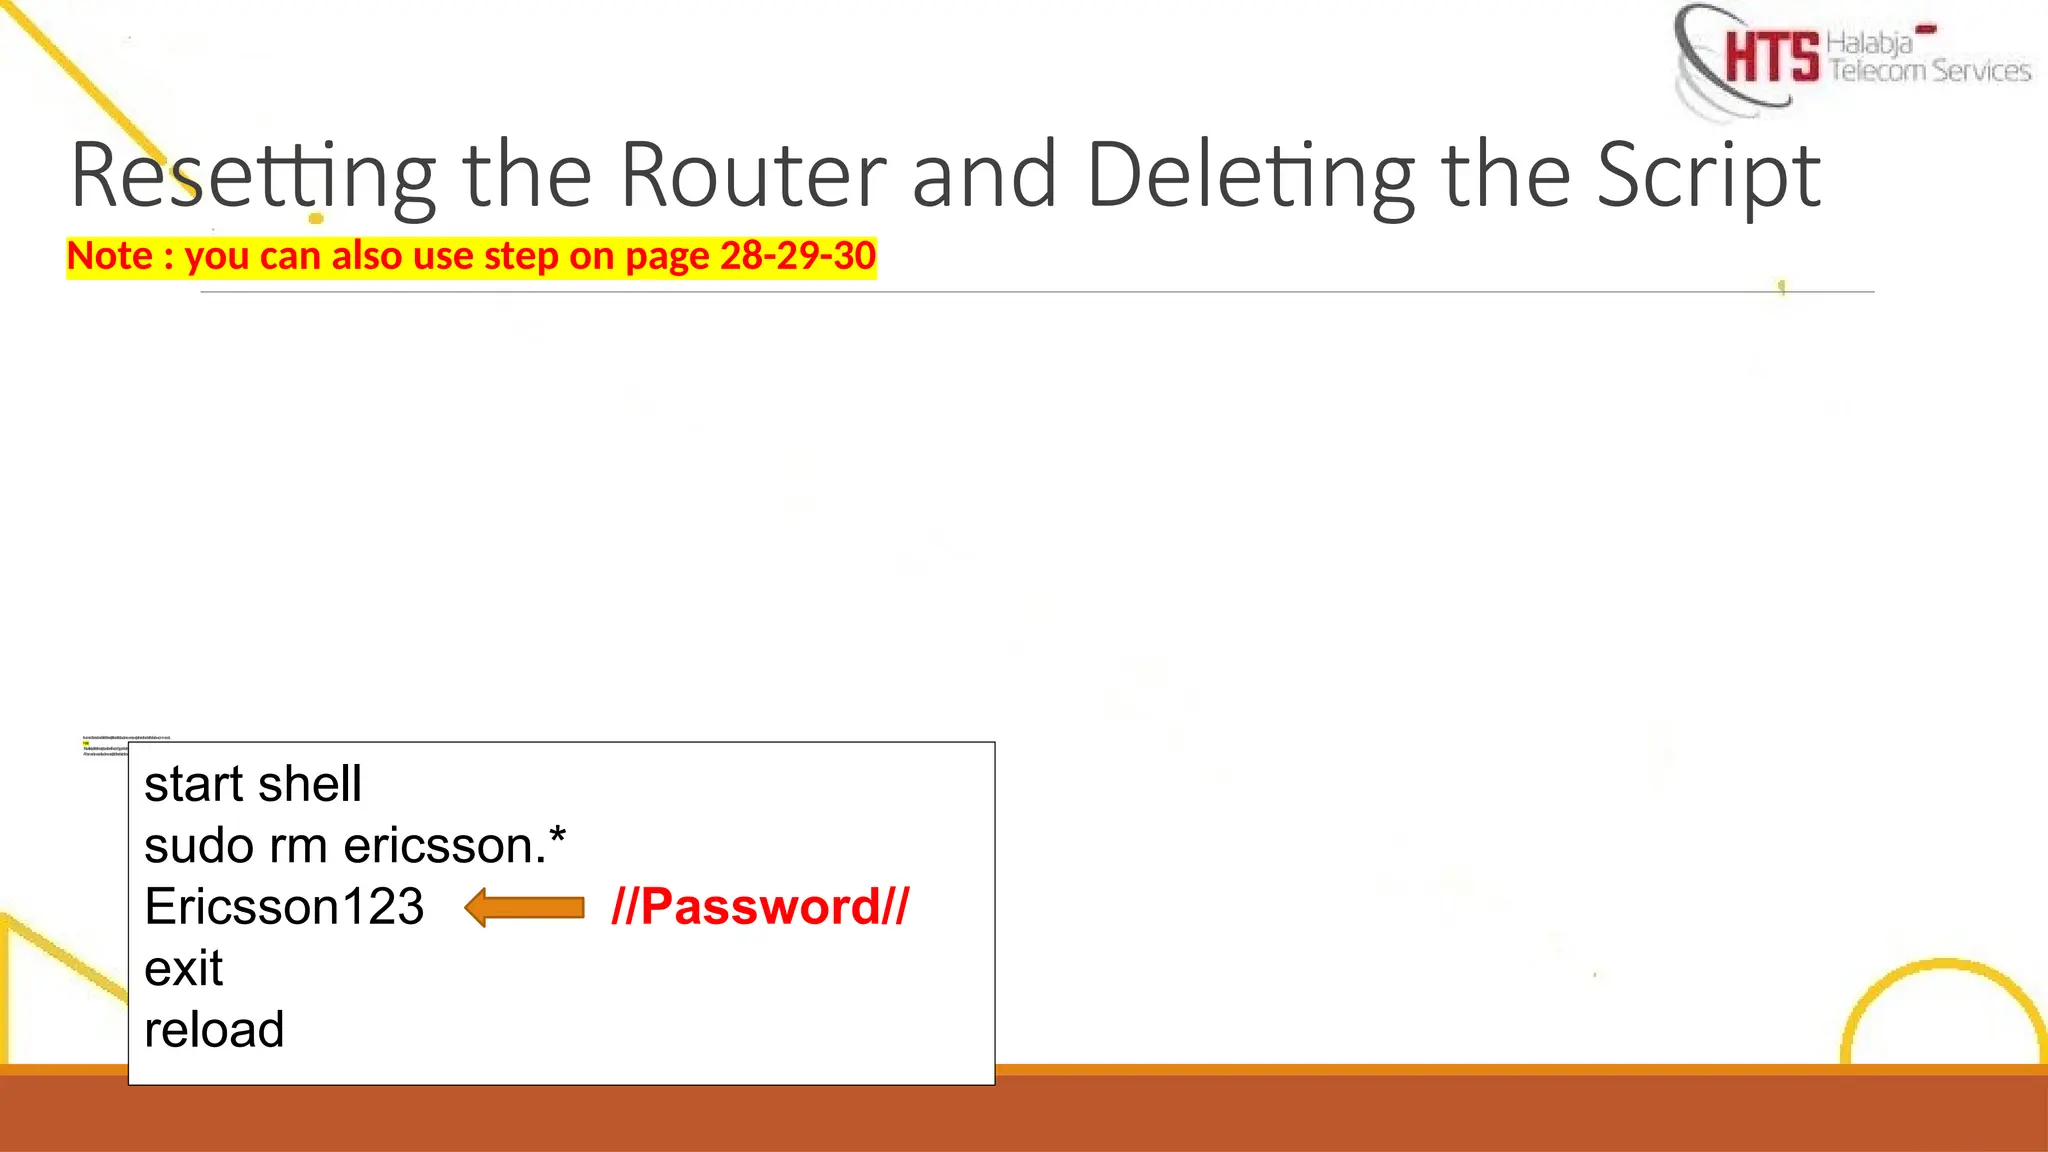
If you insertthe Password and fail or R6K
password recover incase you forget the
username or password
, you have to reset the password but site will
delete the existing script and came to down , but
Software will be available .
This step also be used for formatting the router
29.
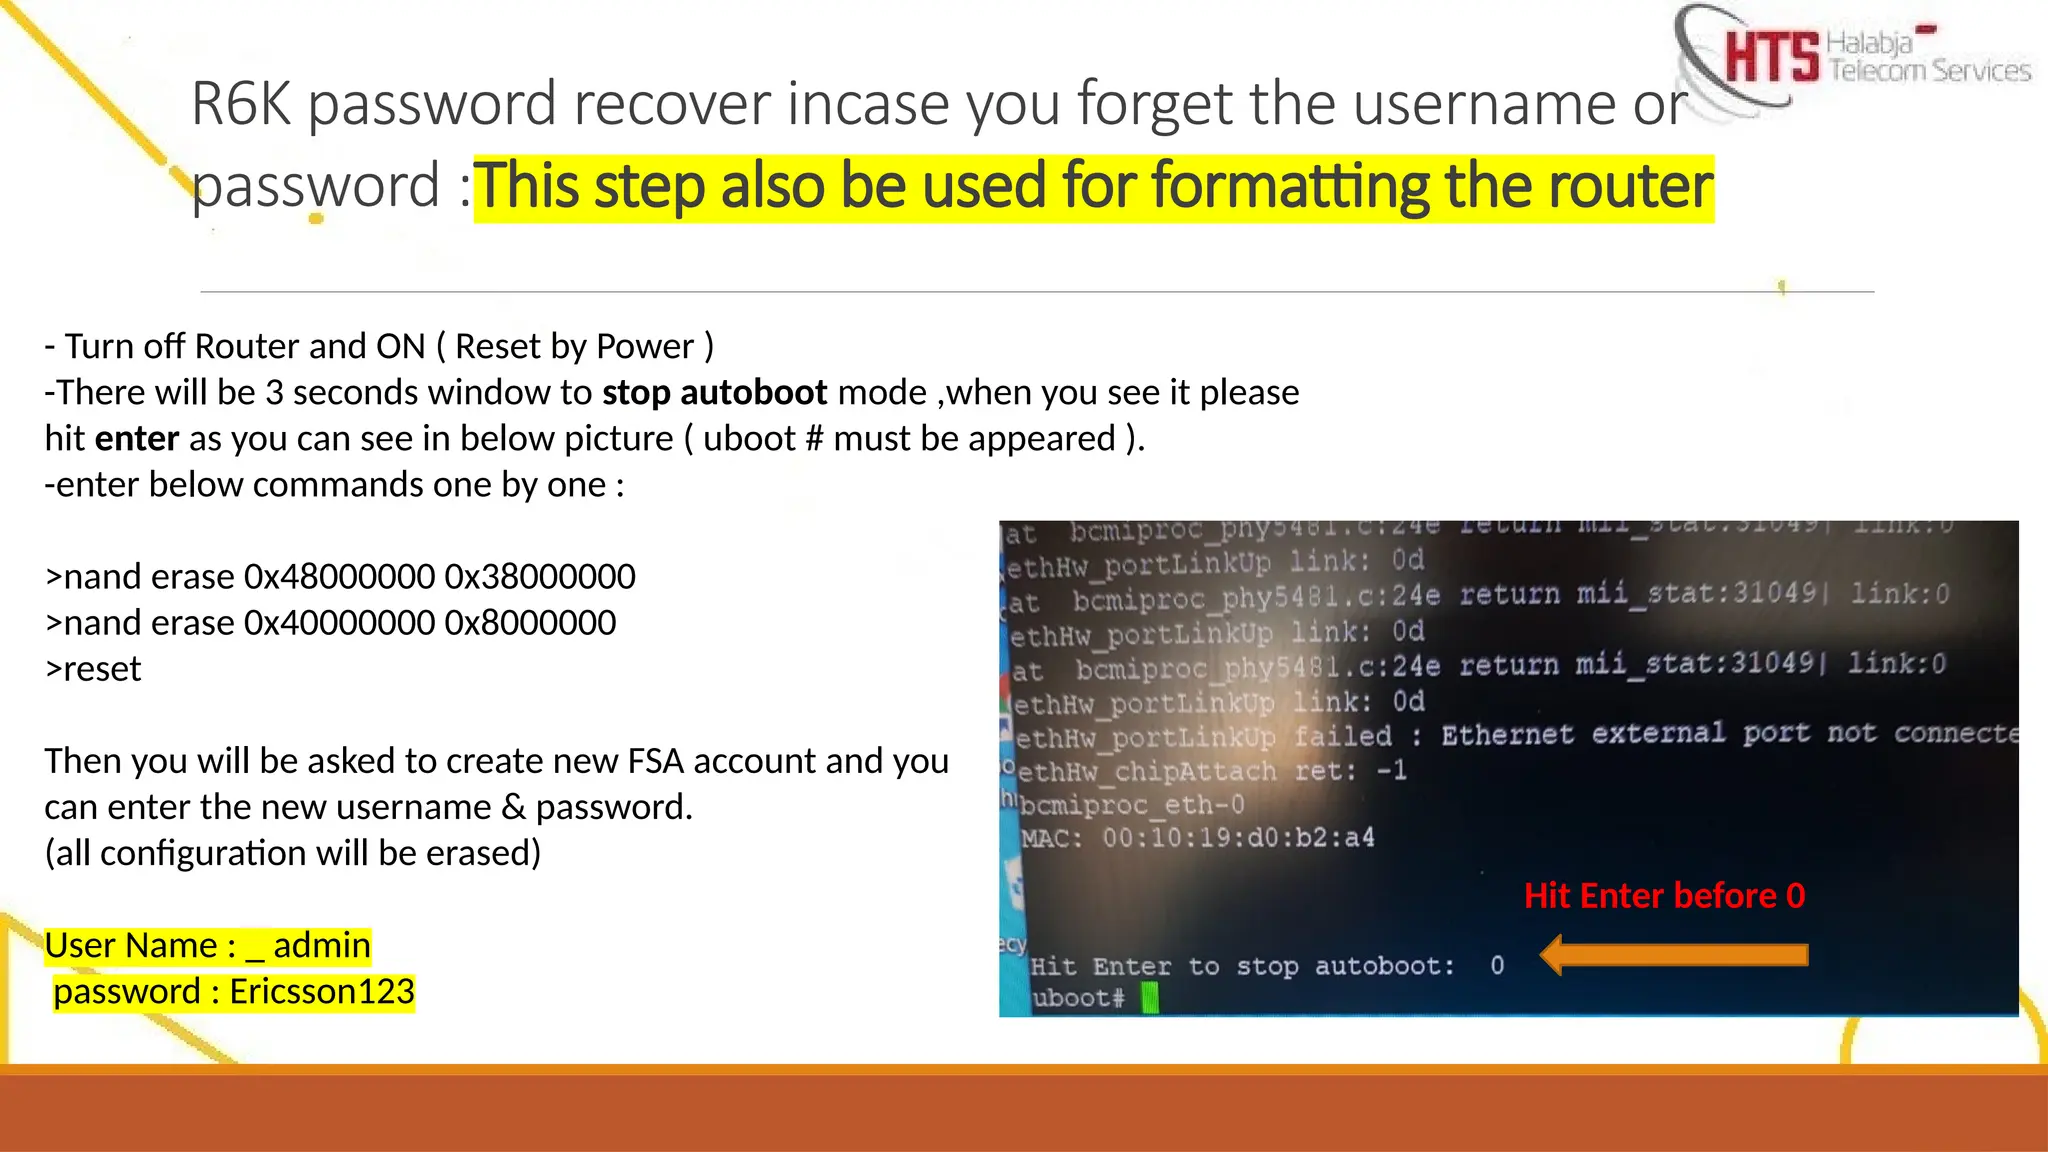
R6K password recoverincase you forget the username or
password :This step also be used for formatting the router
- Turn off Router and ON ( Reset by Power )
-There will be 3 seconds window to stop autoboot mode ,when you see it please
hit enter as you can see in below picture ( uboot # must be appeared ).
-enter below commands one by one :
>nand erase 0x48000000 0x38000000
>nand erase 0x40000000 0x8000000
>reset
Then you will be asked to create new FSA account and you
can enter the new username & password.
(all configuration will be erased)
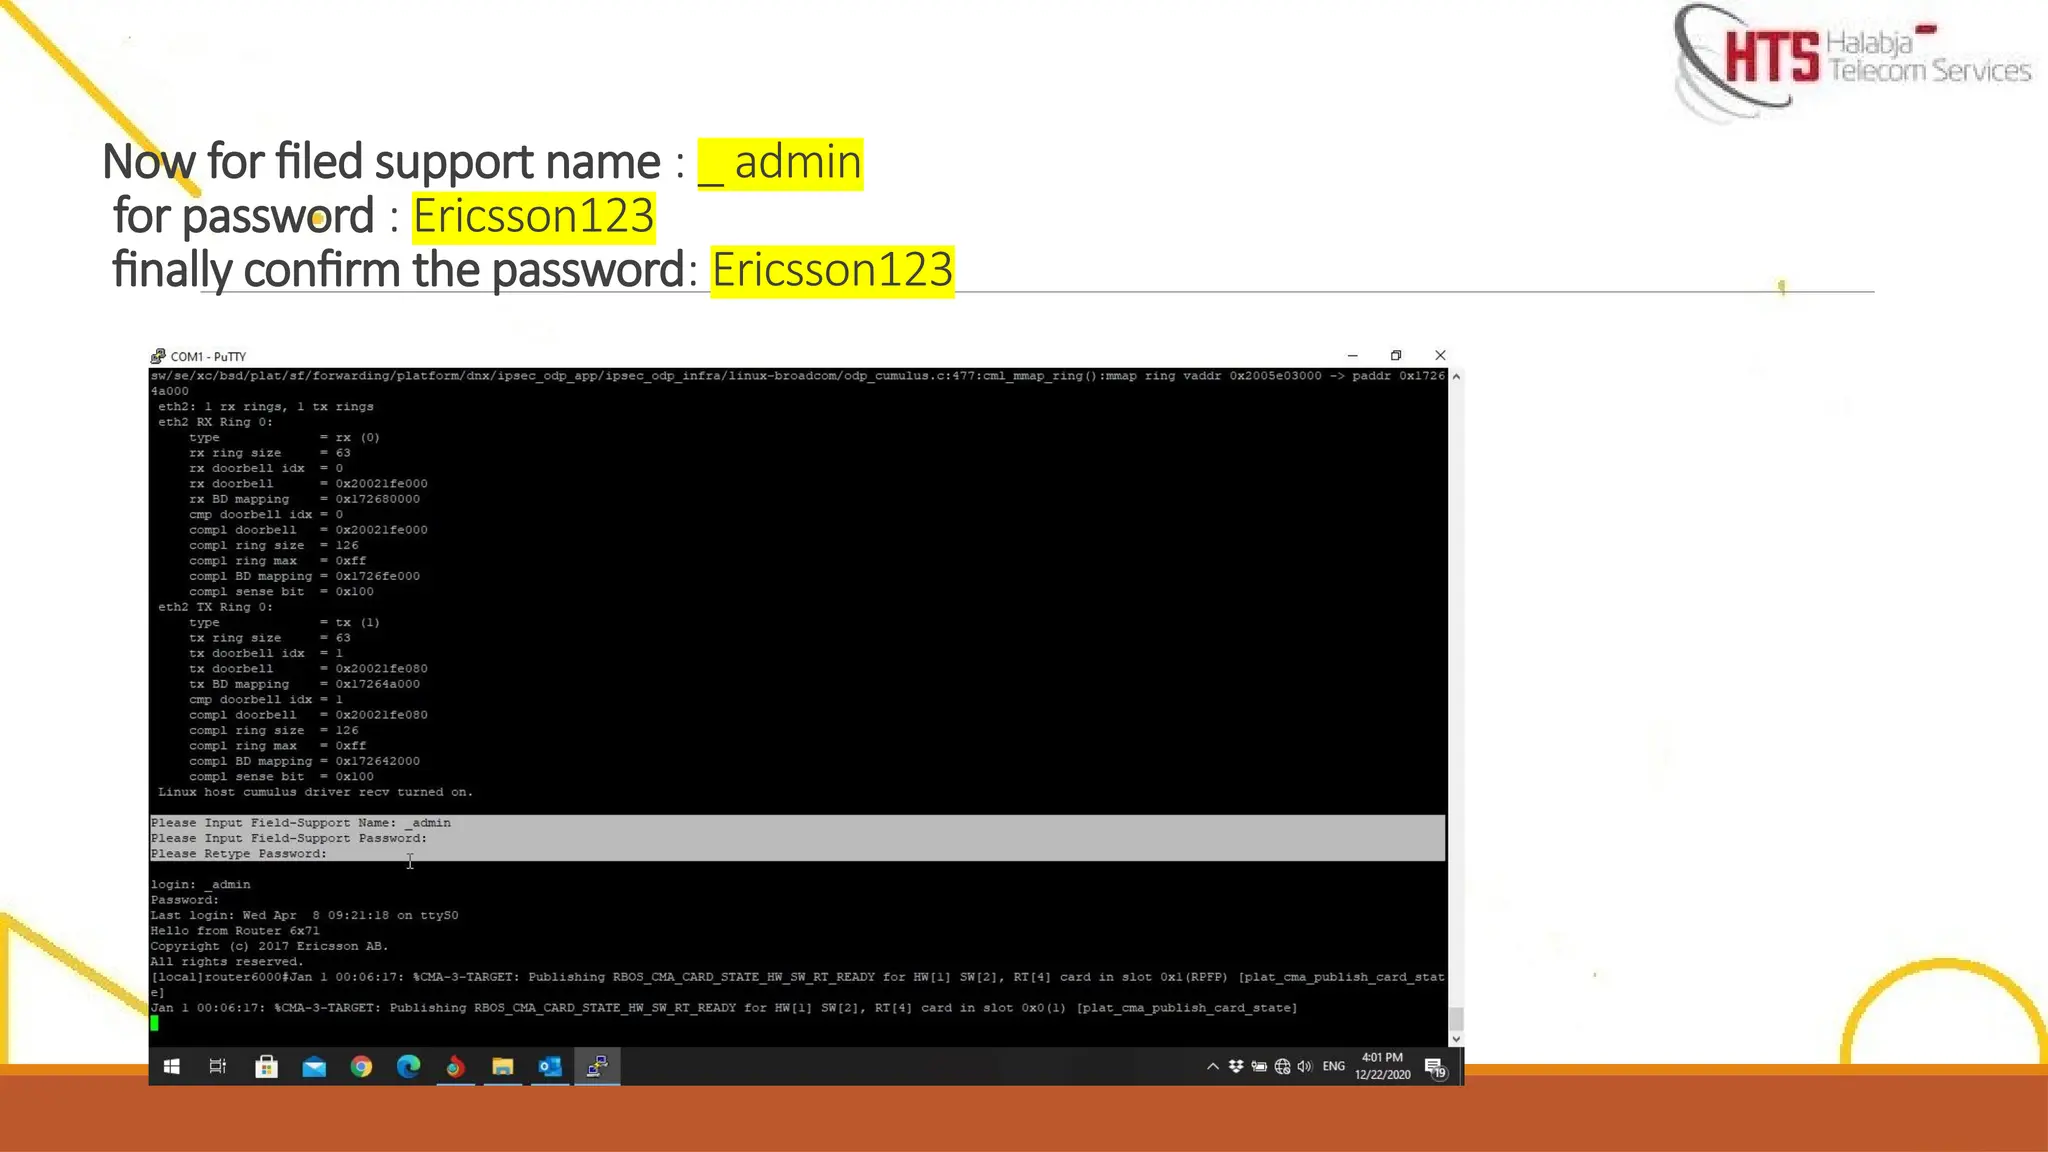
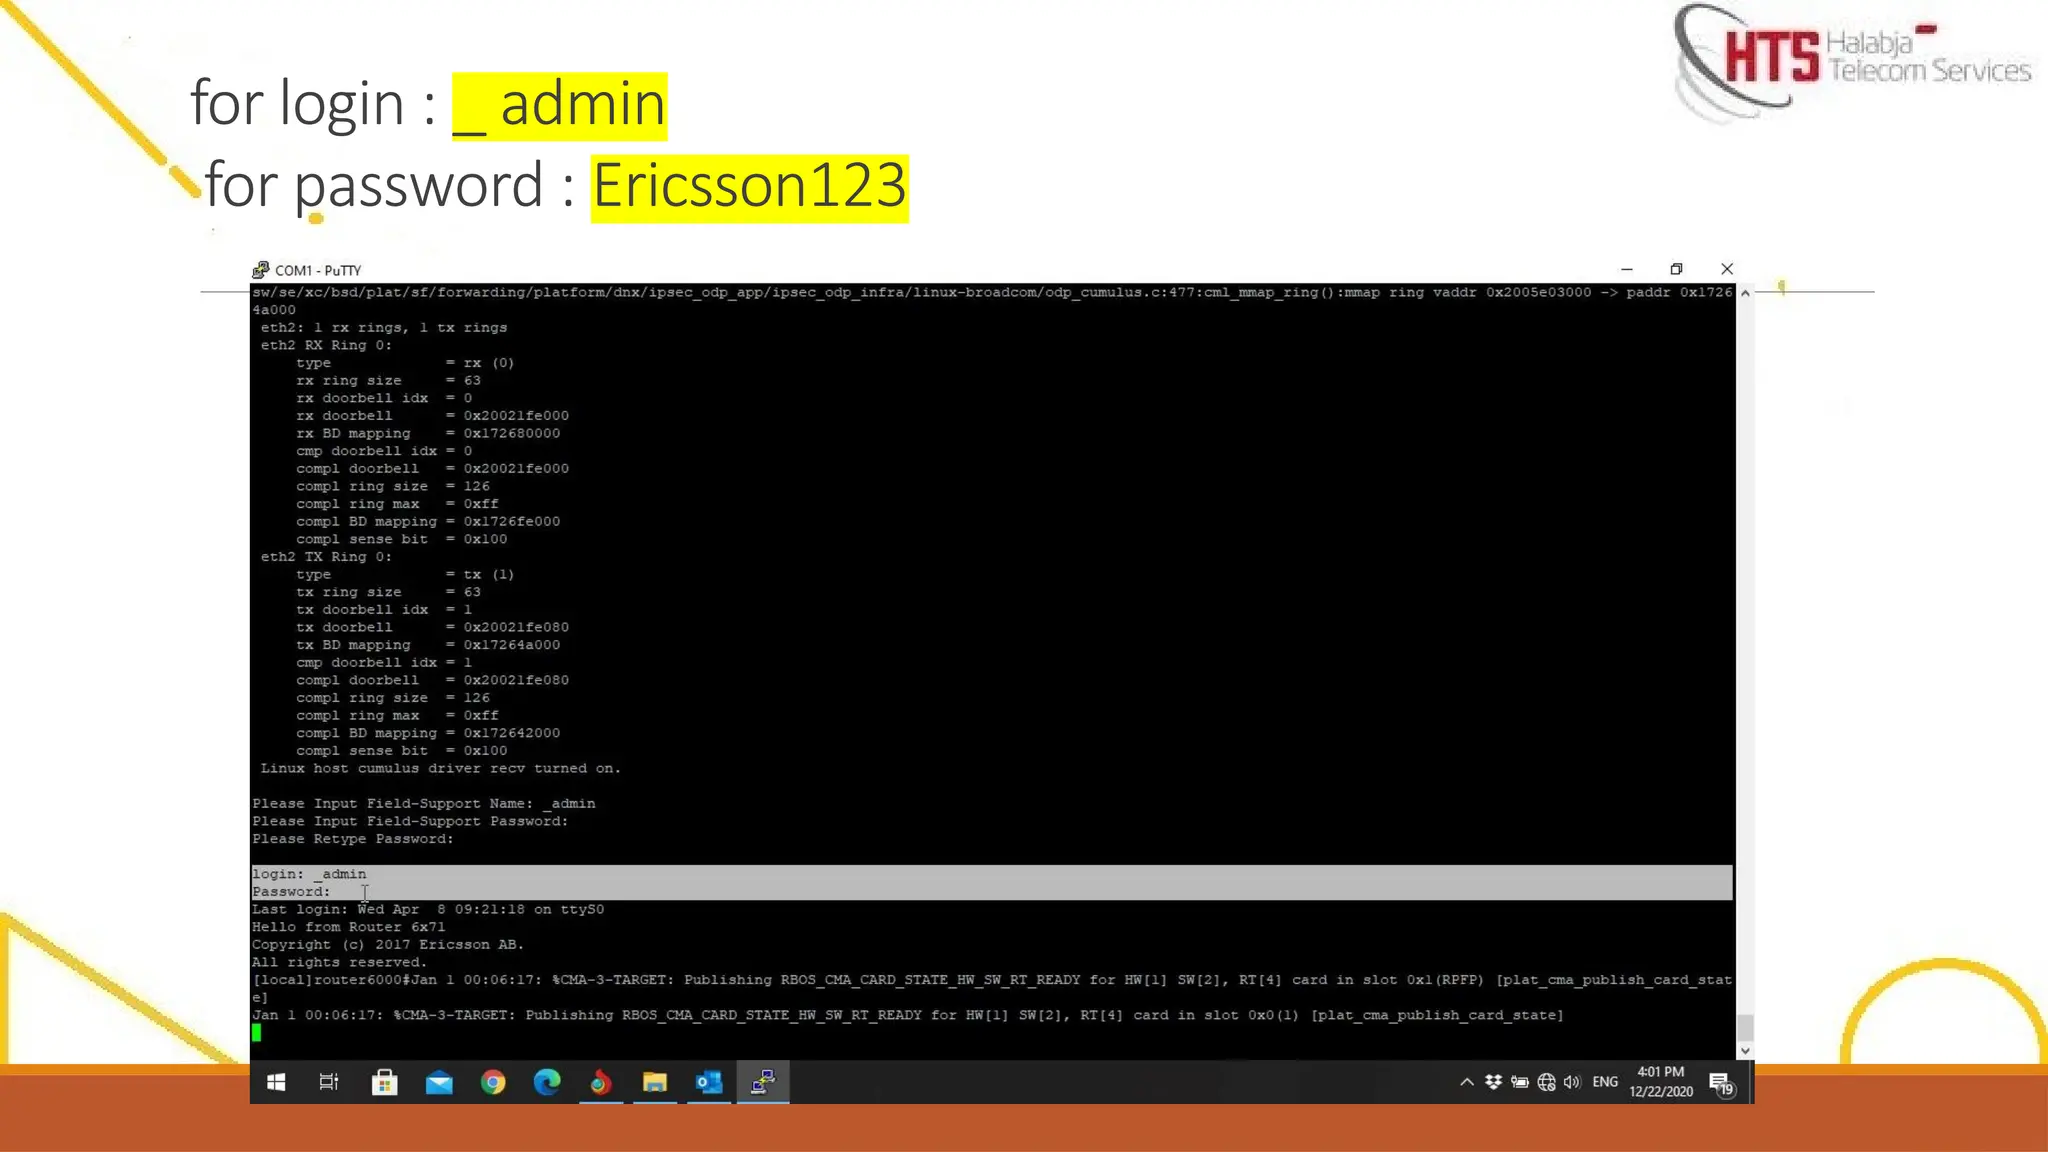
User Name : _ admin
password : Ericsson123
Hit Enter before 0
30.
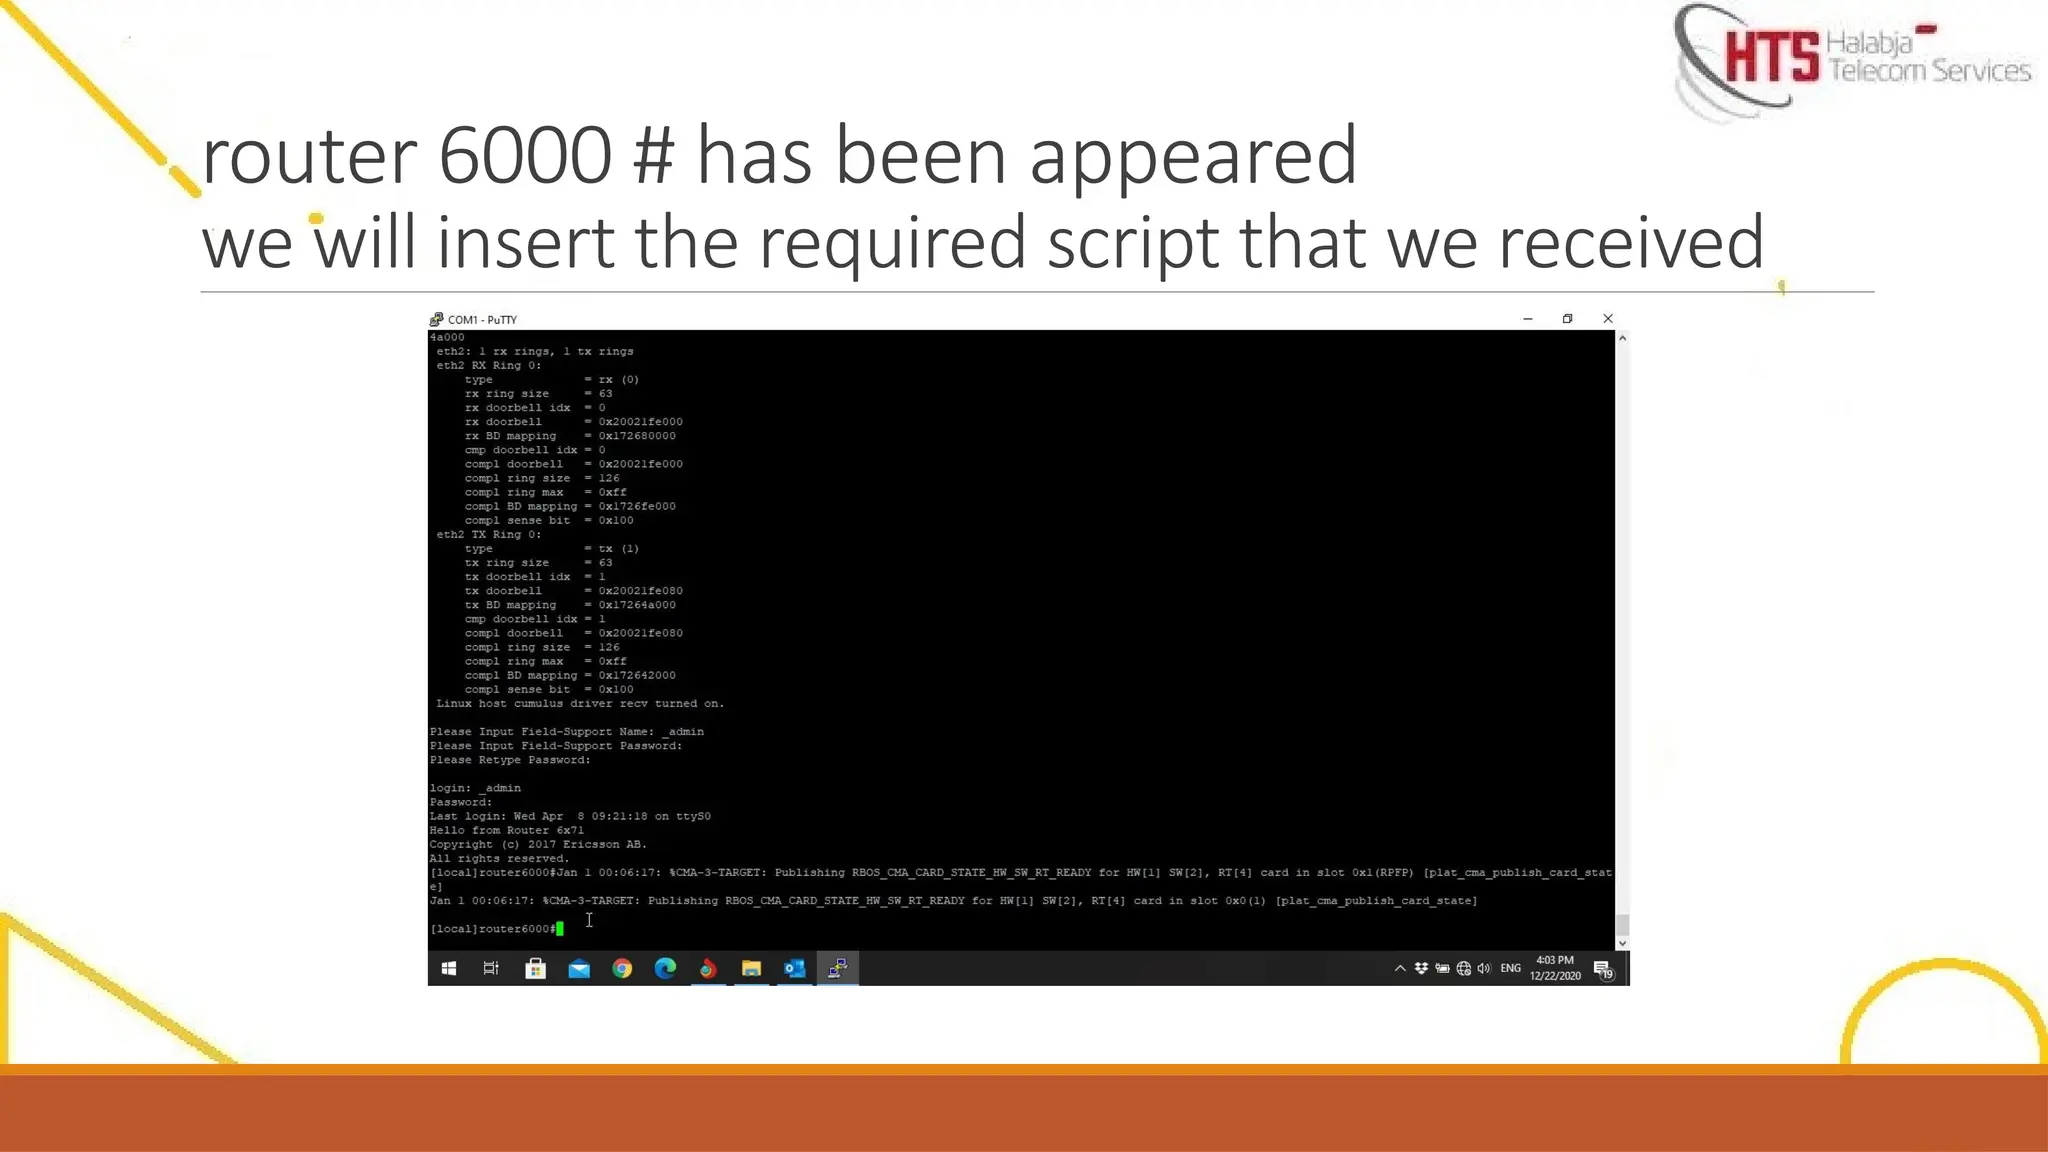
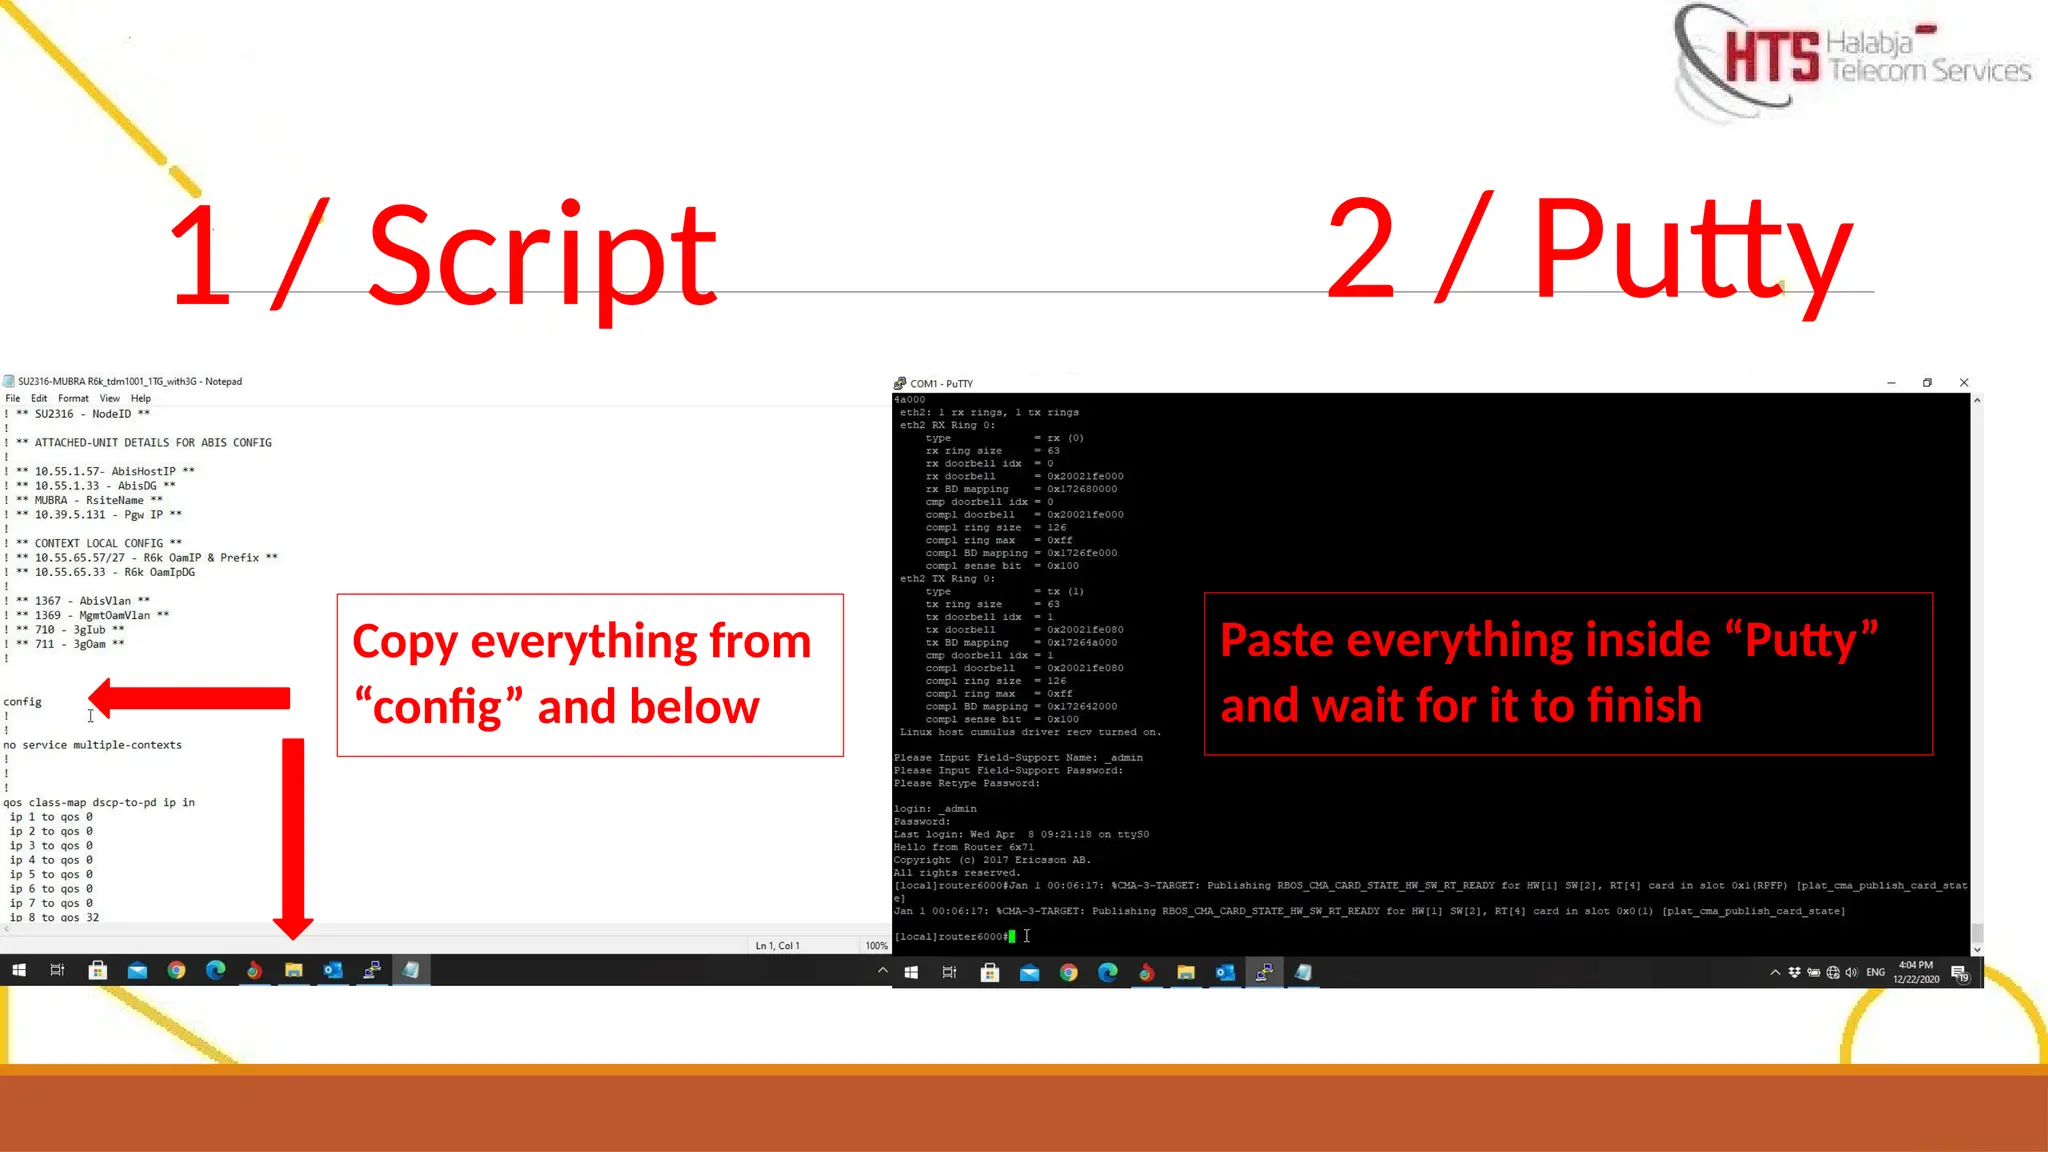
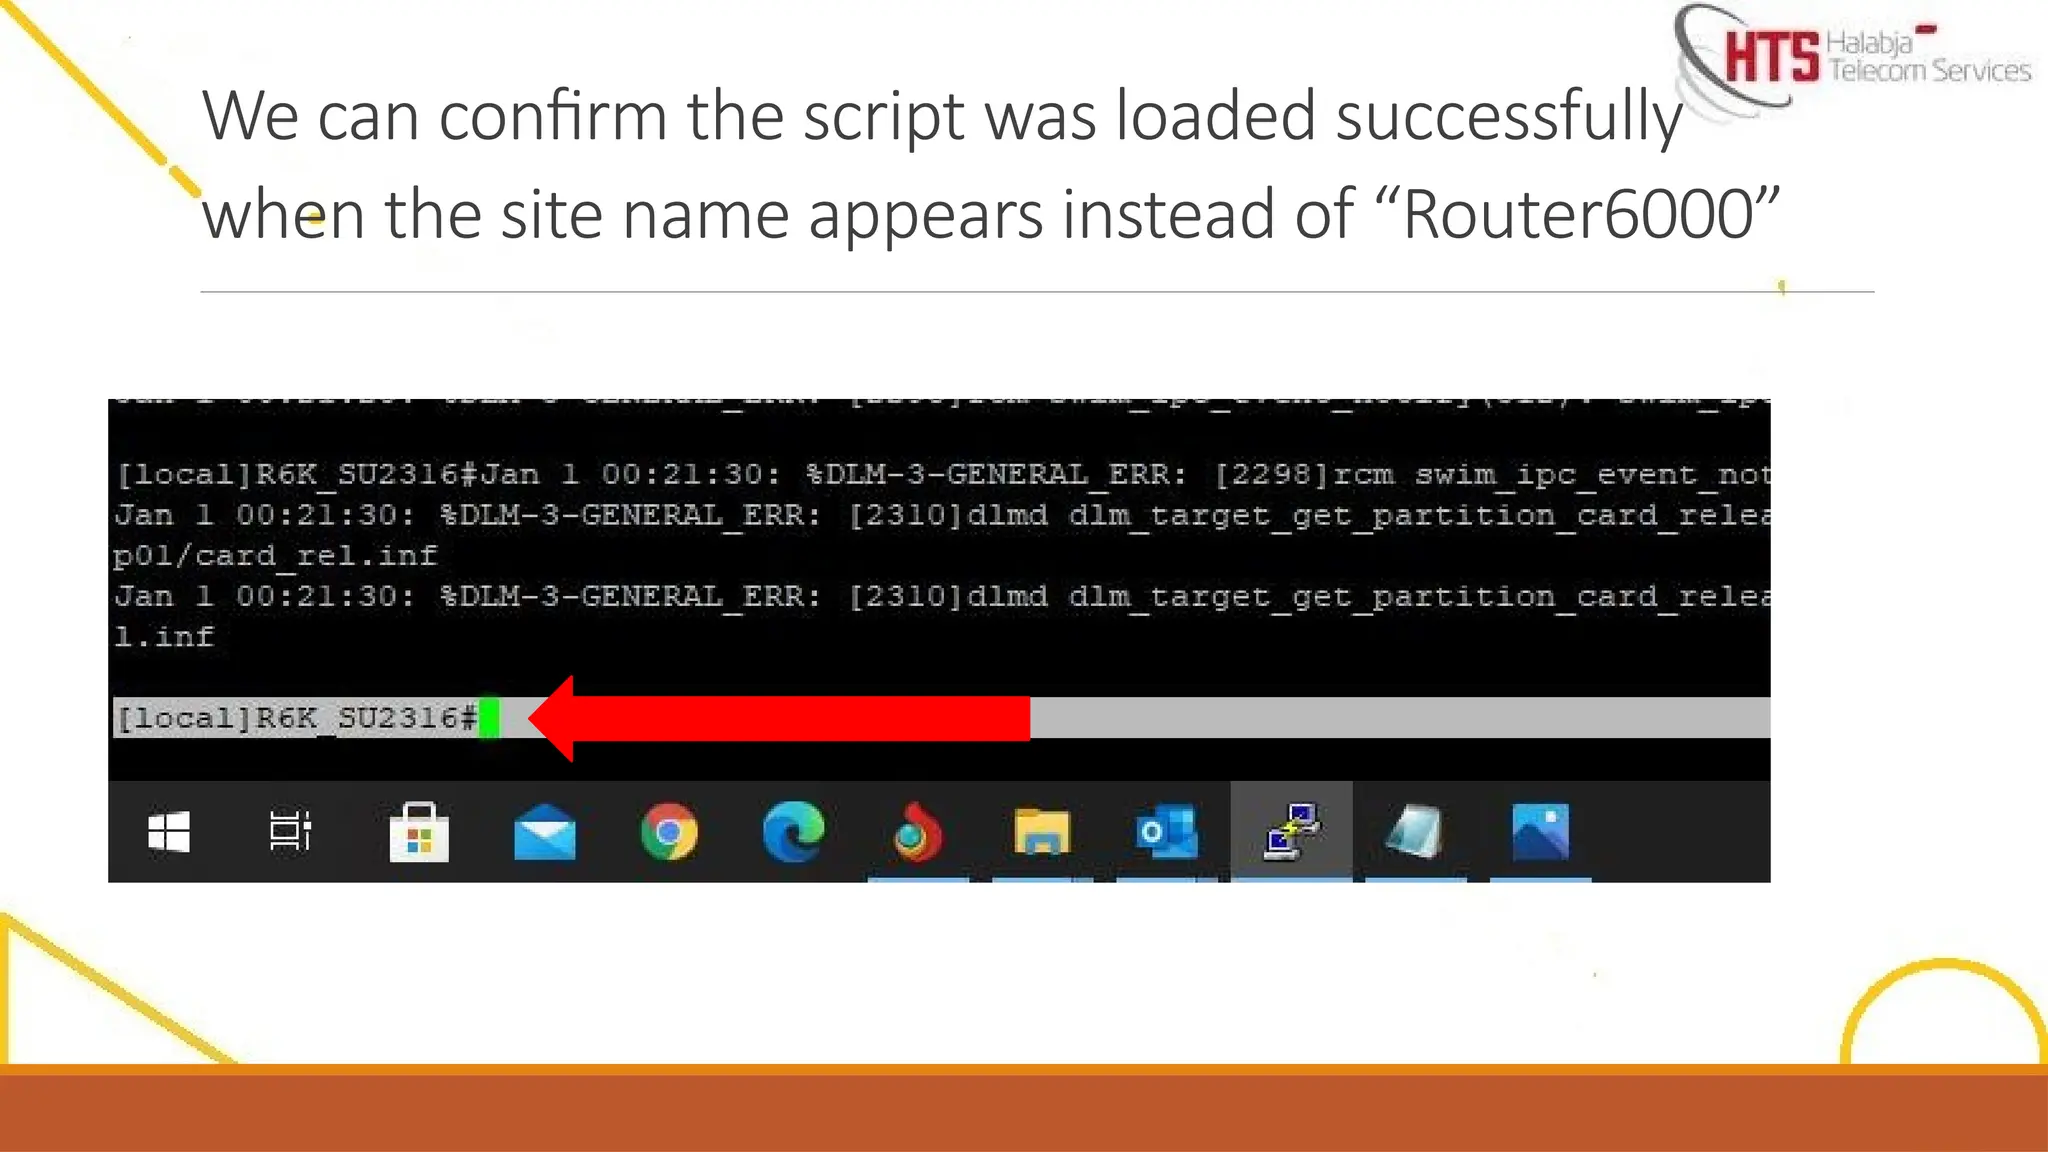
router 6000 #has been appeared
we will insert the required script that we received
Upgrade file shouldbe available on USB flash memory
(not included in folder) name of upgrade folder is(CXP9060199_1-R10D33_9999)
37.
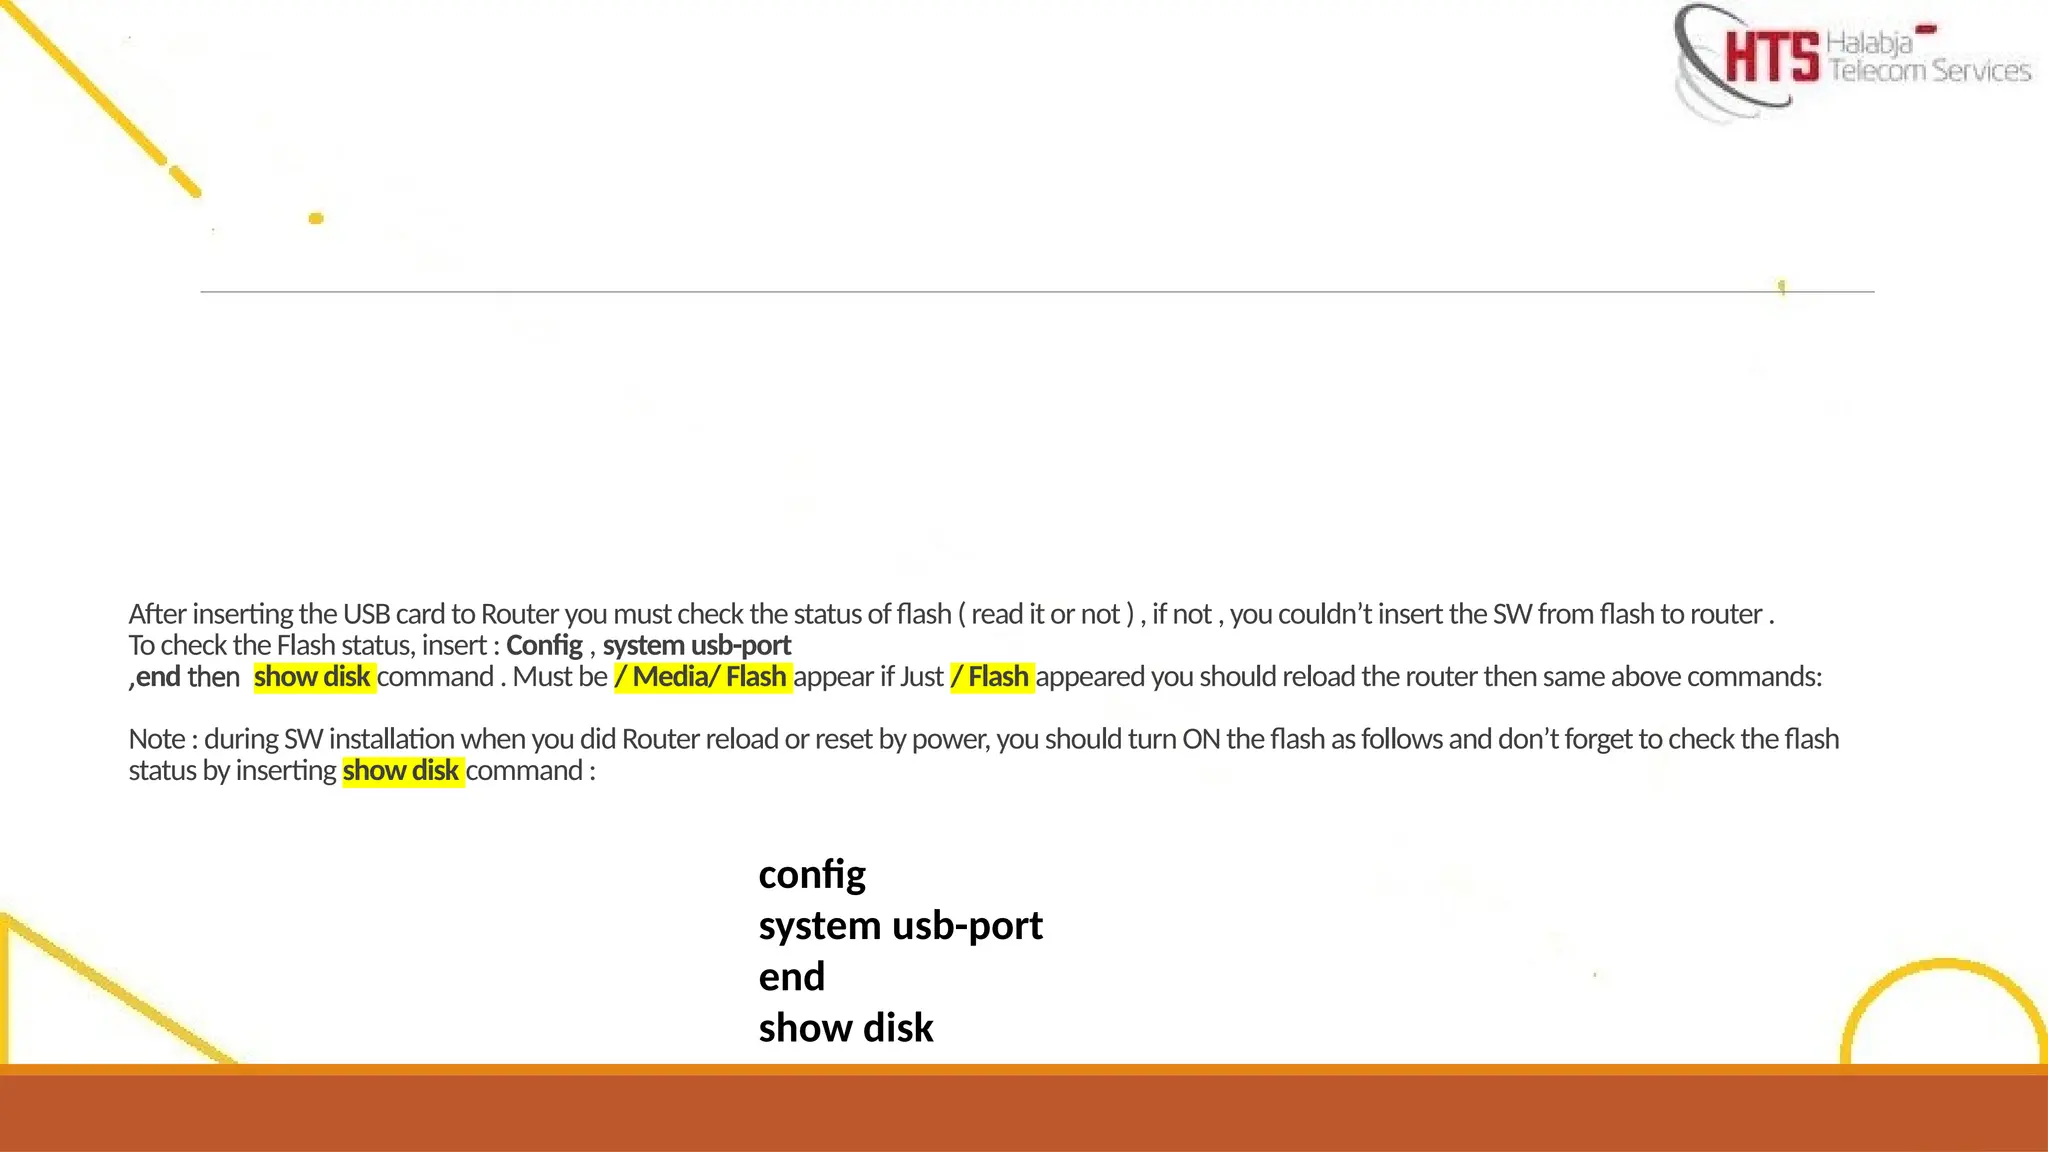
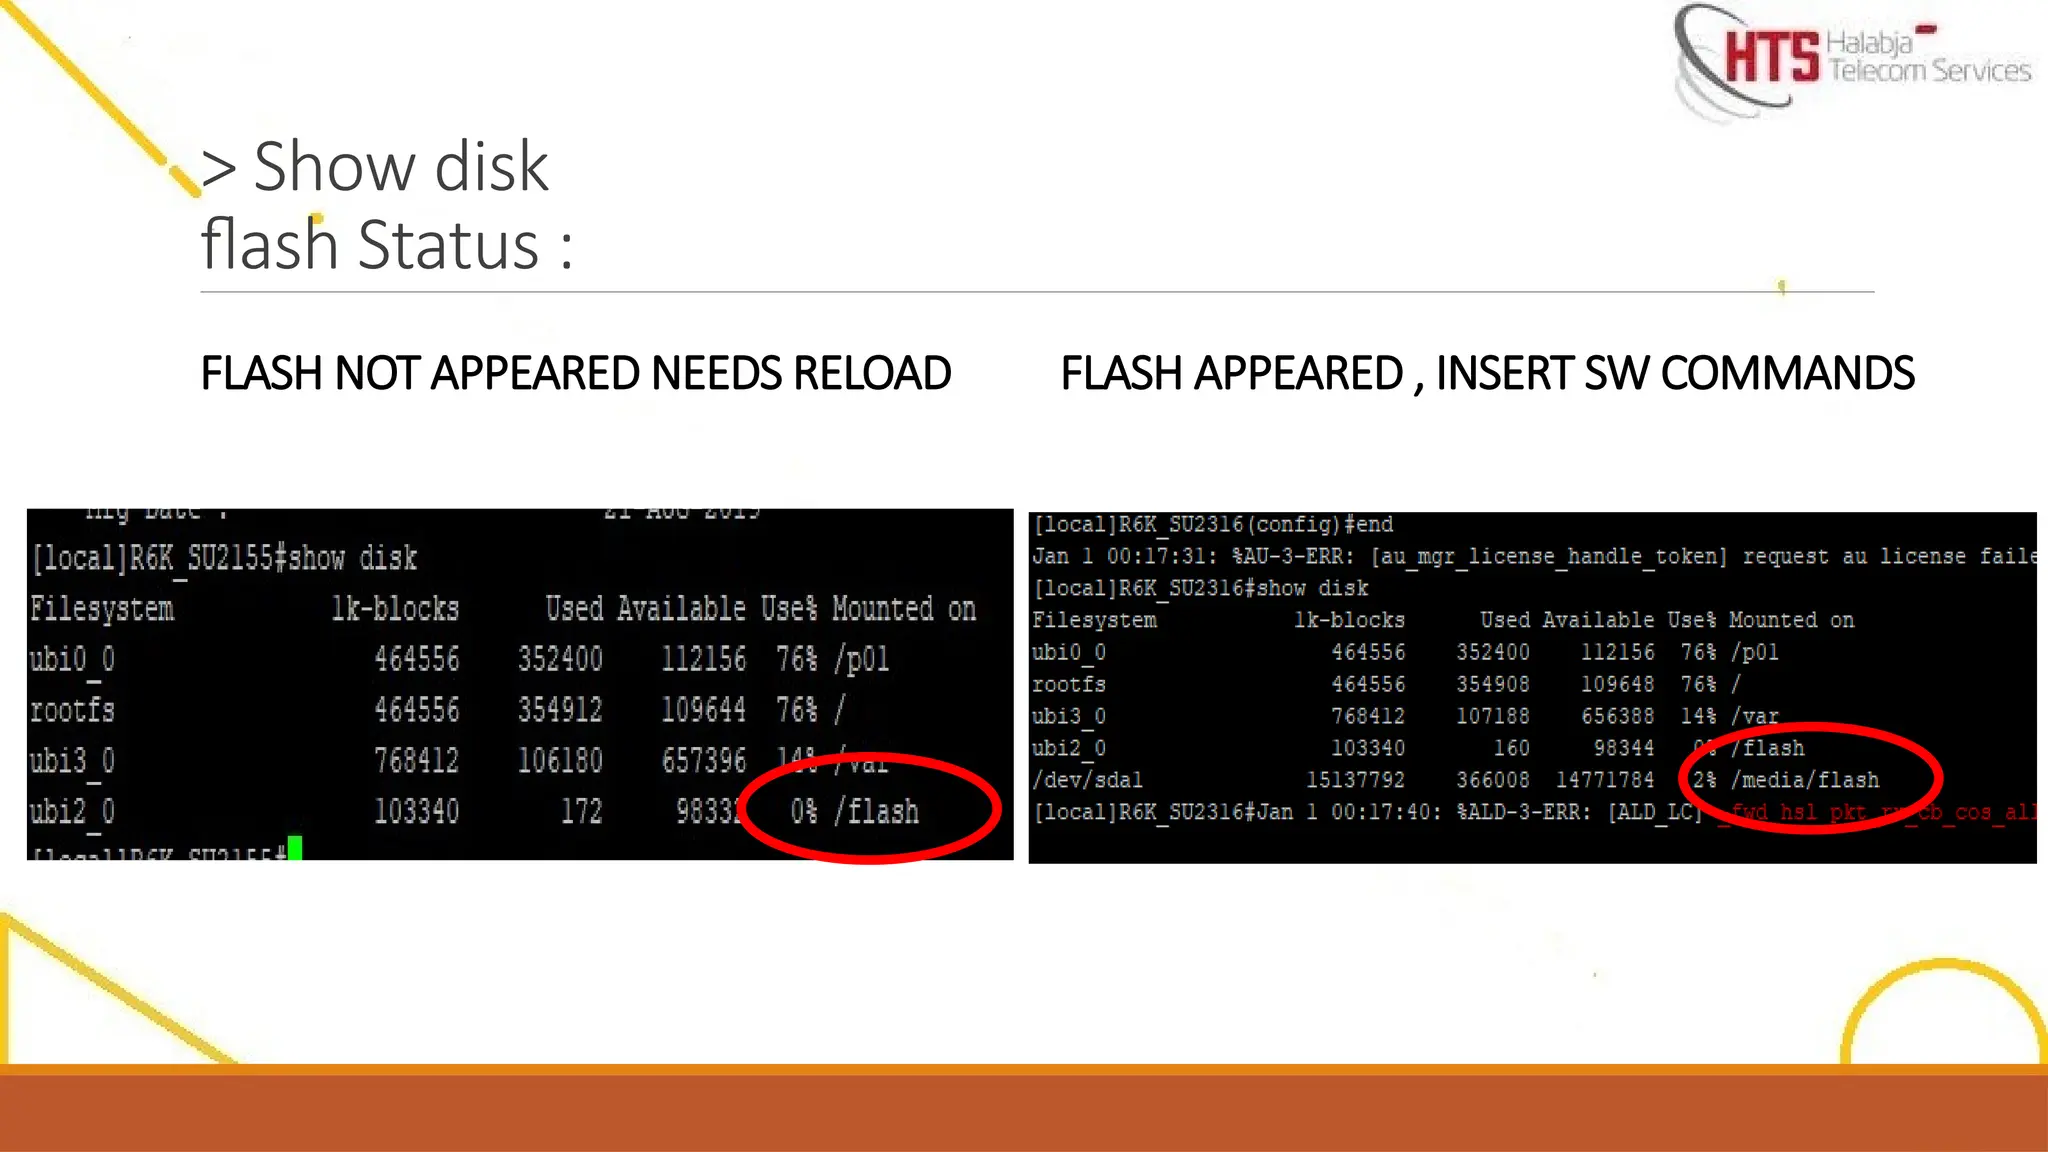
After insertingthe USBcard to Router you must check the status of flash( read it or not ), if not , youcouldn’t insert the SW from flash to router .
To check the Flash status, insert : Config , system usb-port
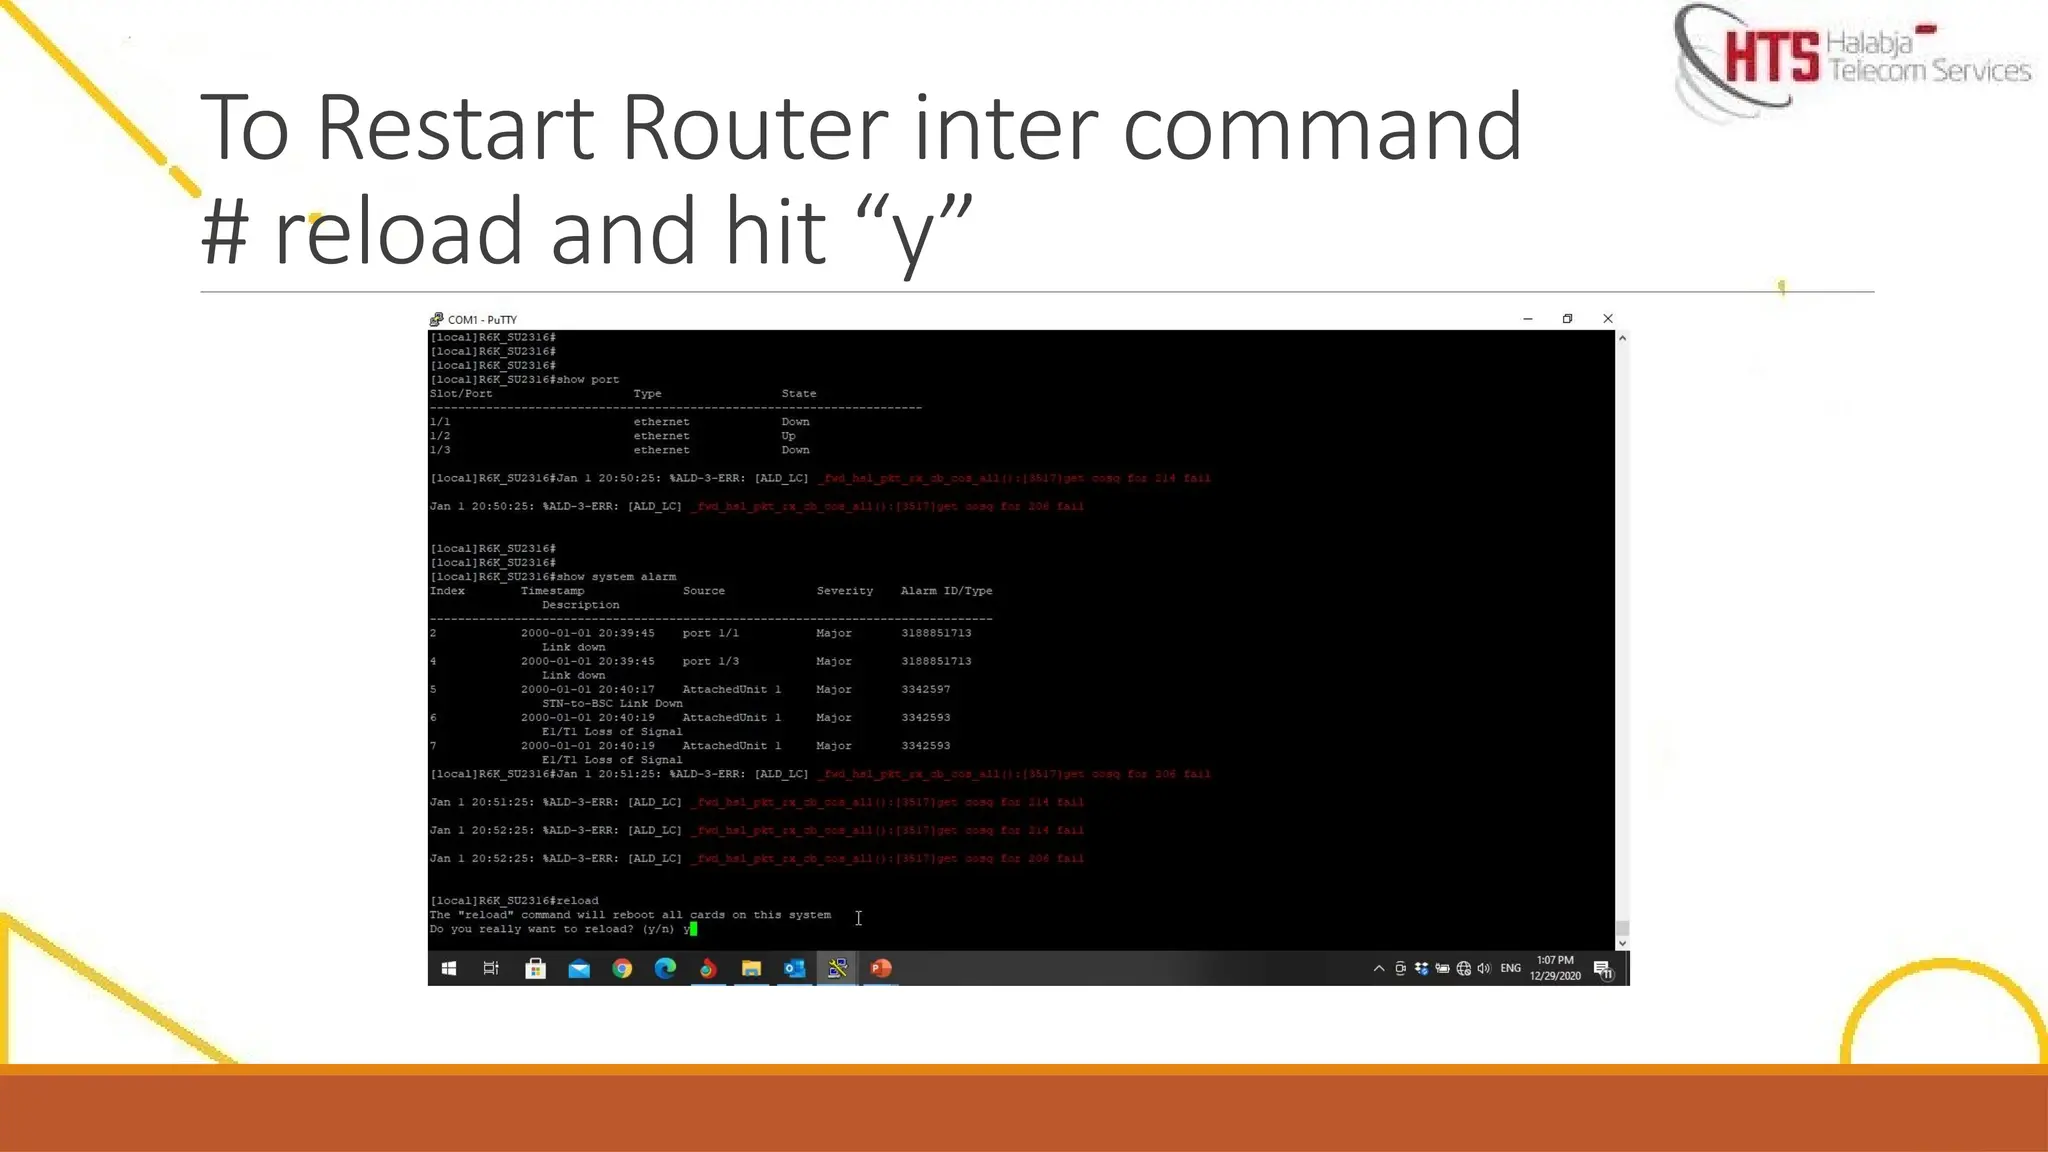
,end then show disk command . Must be / Media/ Flash appear if Just / Flash appeared you should reload the router thensame above commands:
Note : during SW installation when you did Router reloador reset bypower, you should turn ON the flash as follows and don’t forget to check the flash
status by inserting showdisk command :
config
system usb-port
end
show disk
38.
> Show disk
flashStatus :
FLASH NOT APPEARED NEEDS RELOAD FLASH APPEARED , INSERT SW COMMANDS
39.
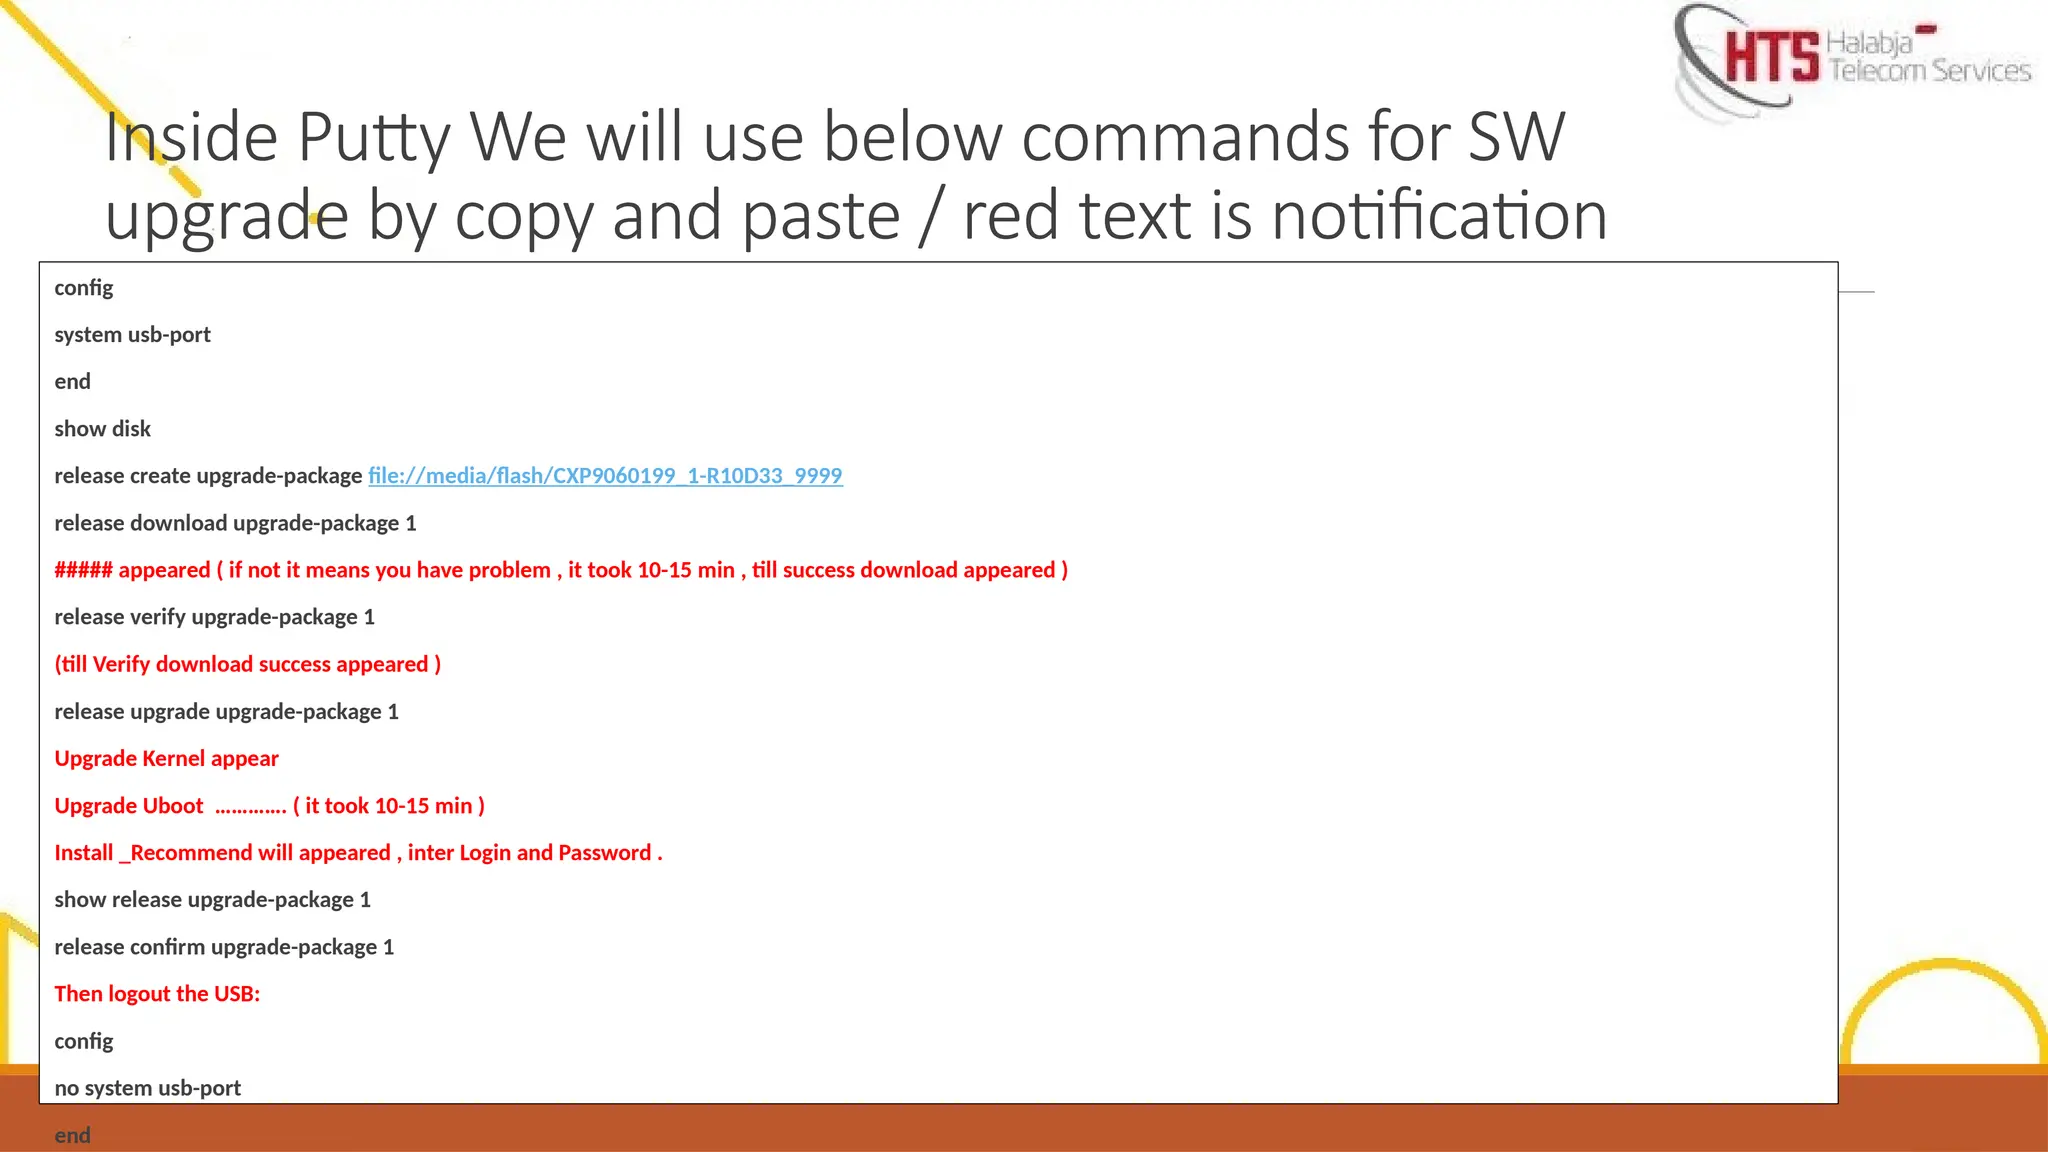
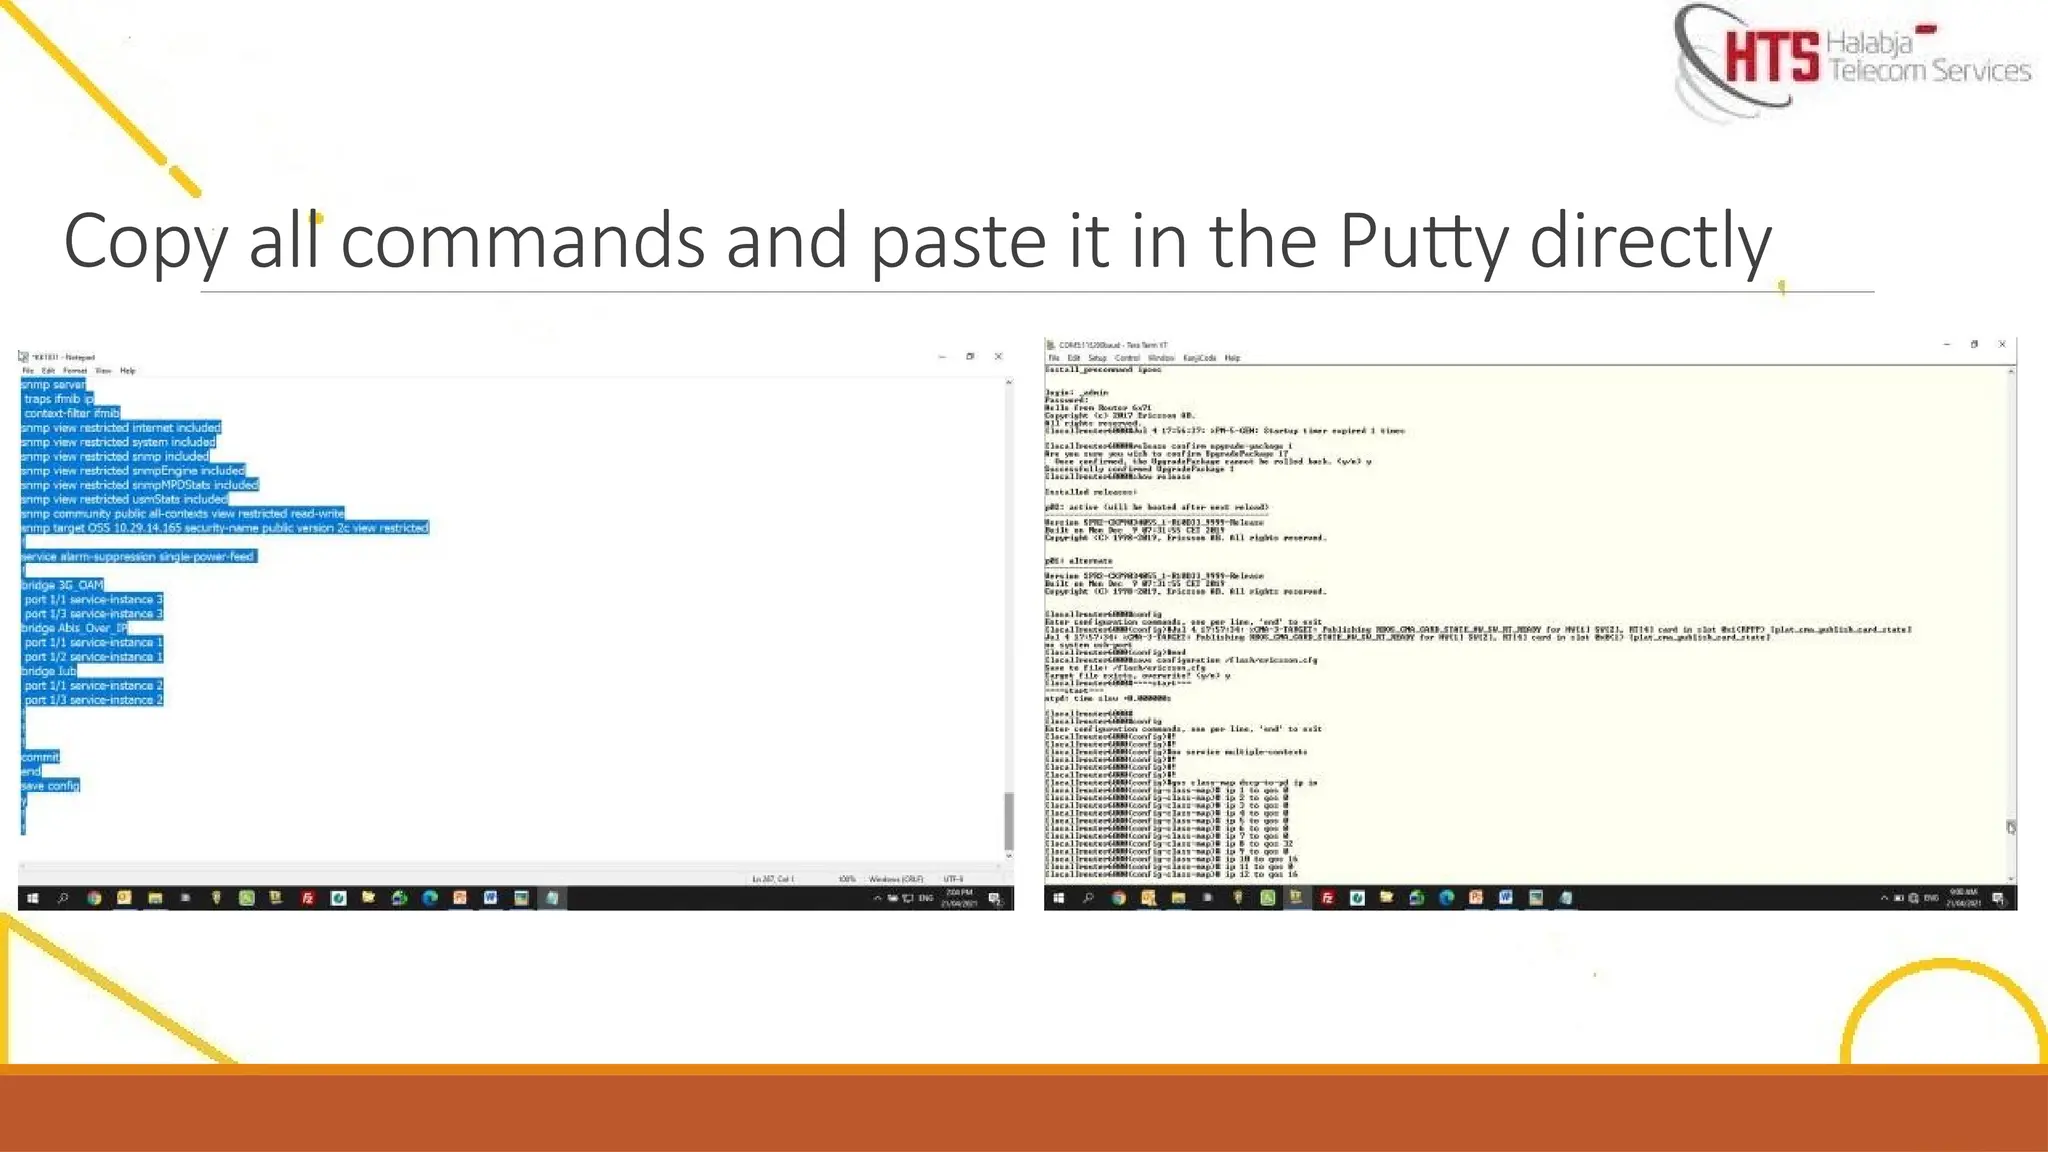
Inside Putty Wewill use below commands for SW
upgrade by copy and paste / red text is notification
config
system usb-port
end
show disk
release create upgrade-package file://media/flash/CXP9060199_1-R10D33_9999
release download upgrade-package 1
##### appeared ( if not it means you have problem , it took 10-15 min , till success download appeared )
release verify upgrade-package 1
(till Verify download success appeared )
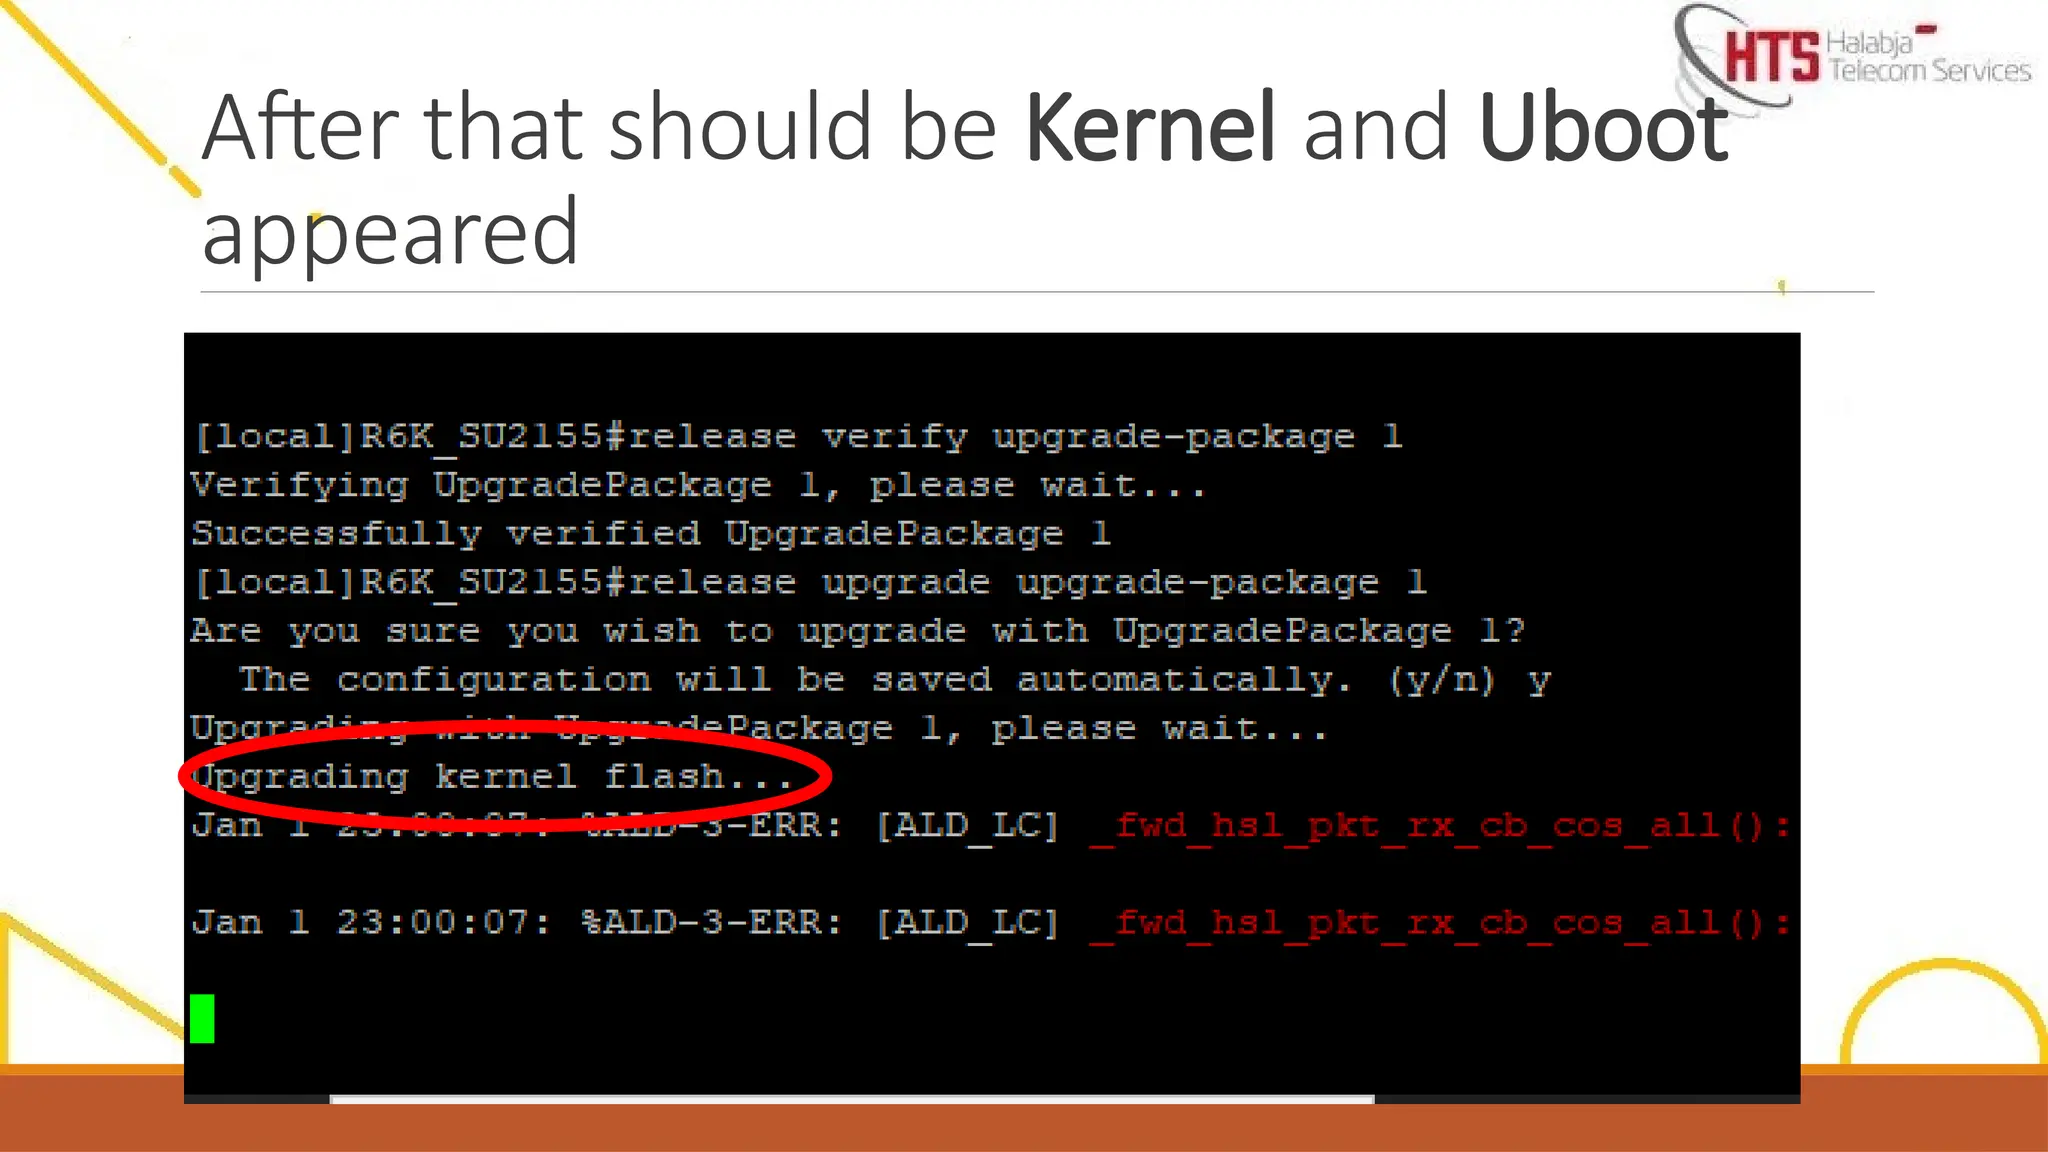
release upgrade upgrade-package 1
Upgrade Kernel appear
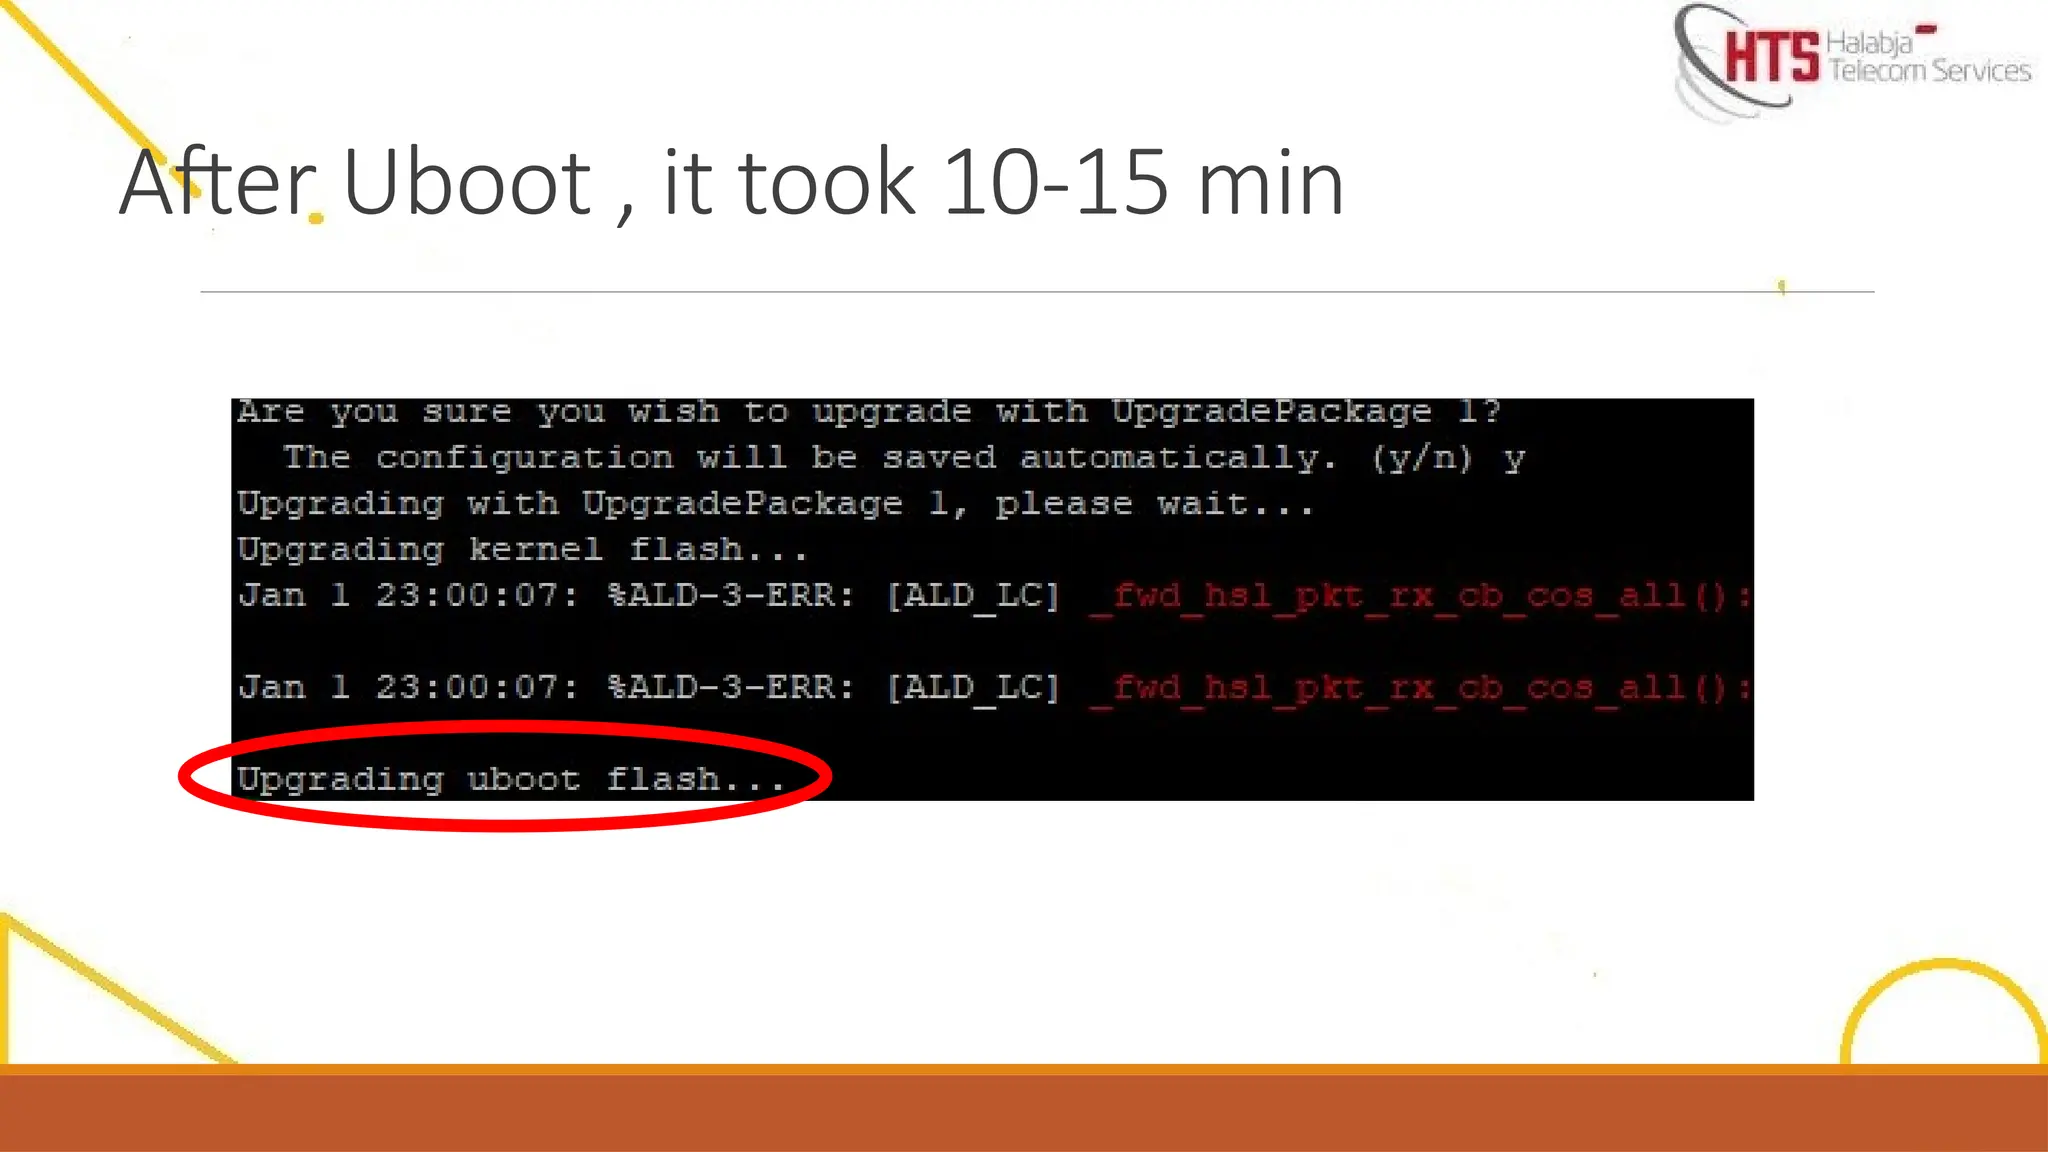
Upgrade Uboot …………. ( it took 10-15 min )
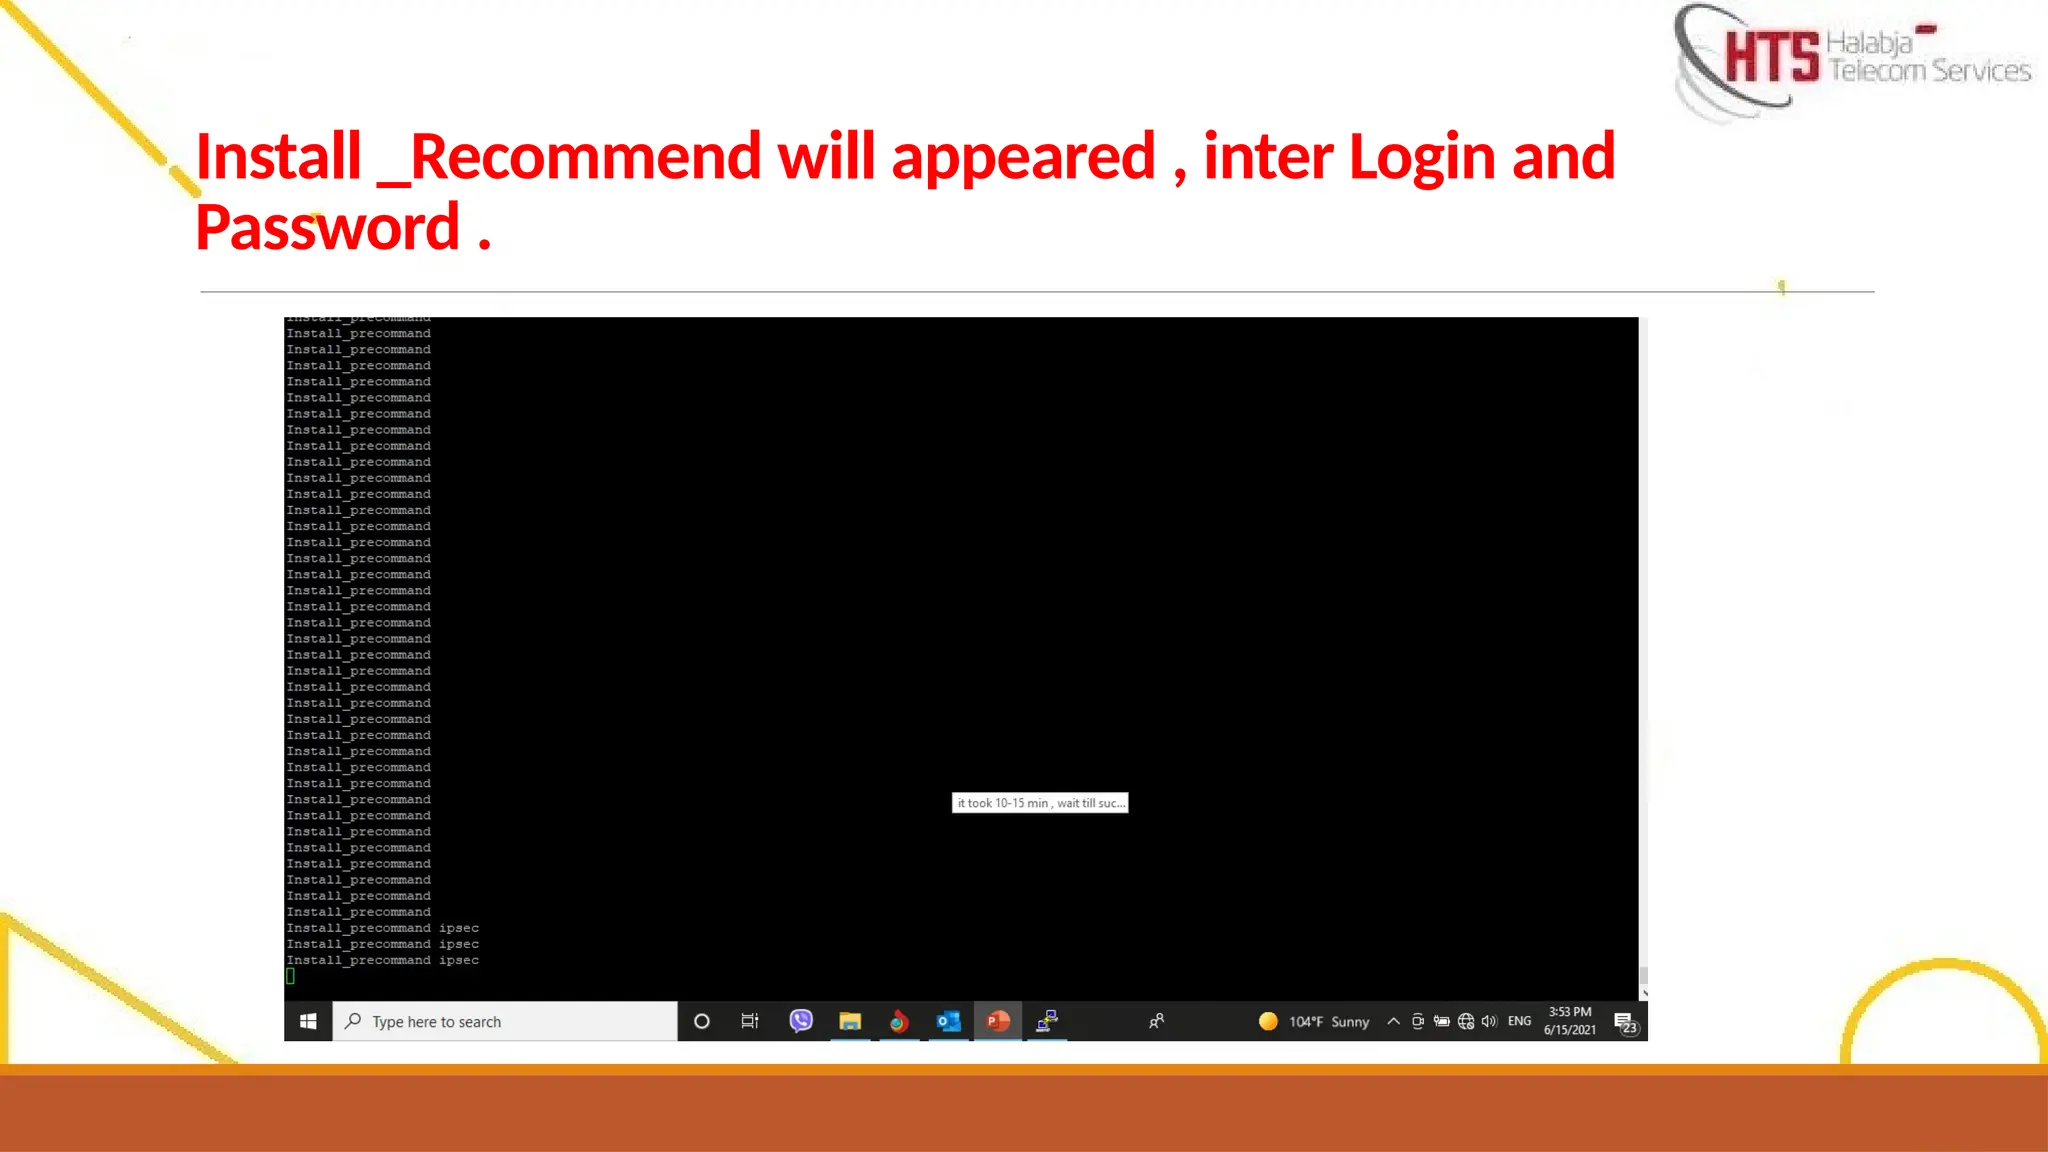
Install _Recommend will appeared , inter Login and Password .
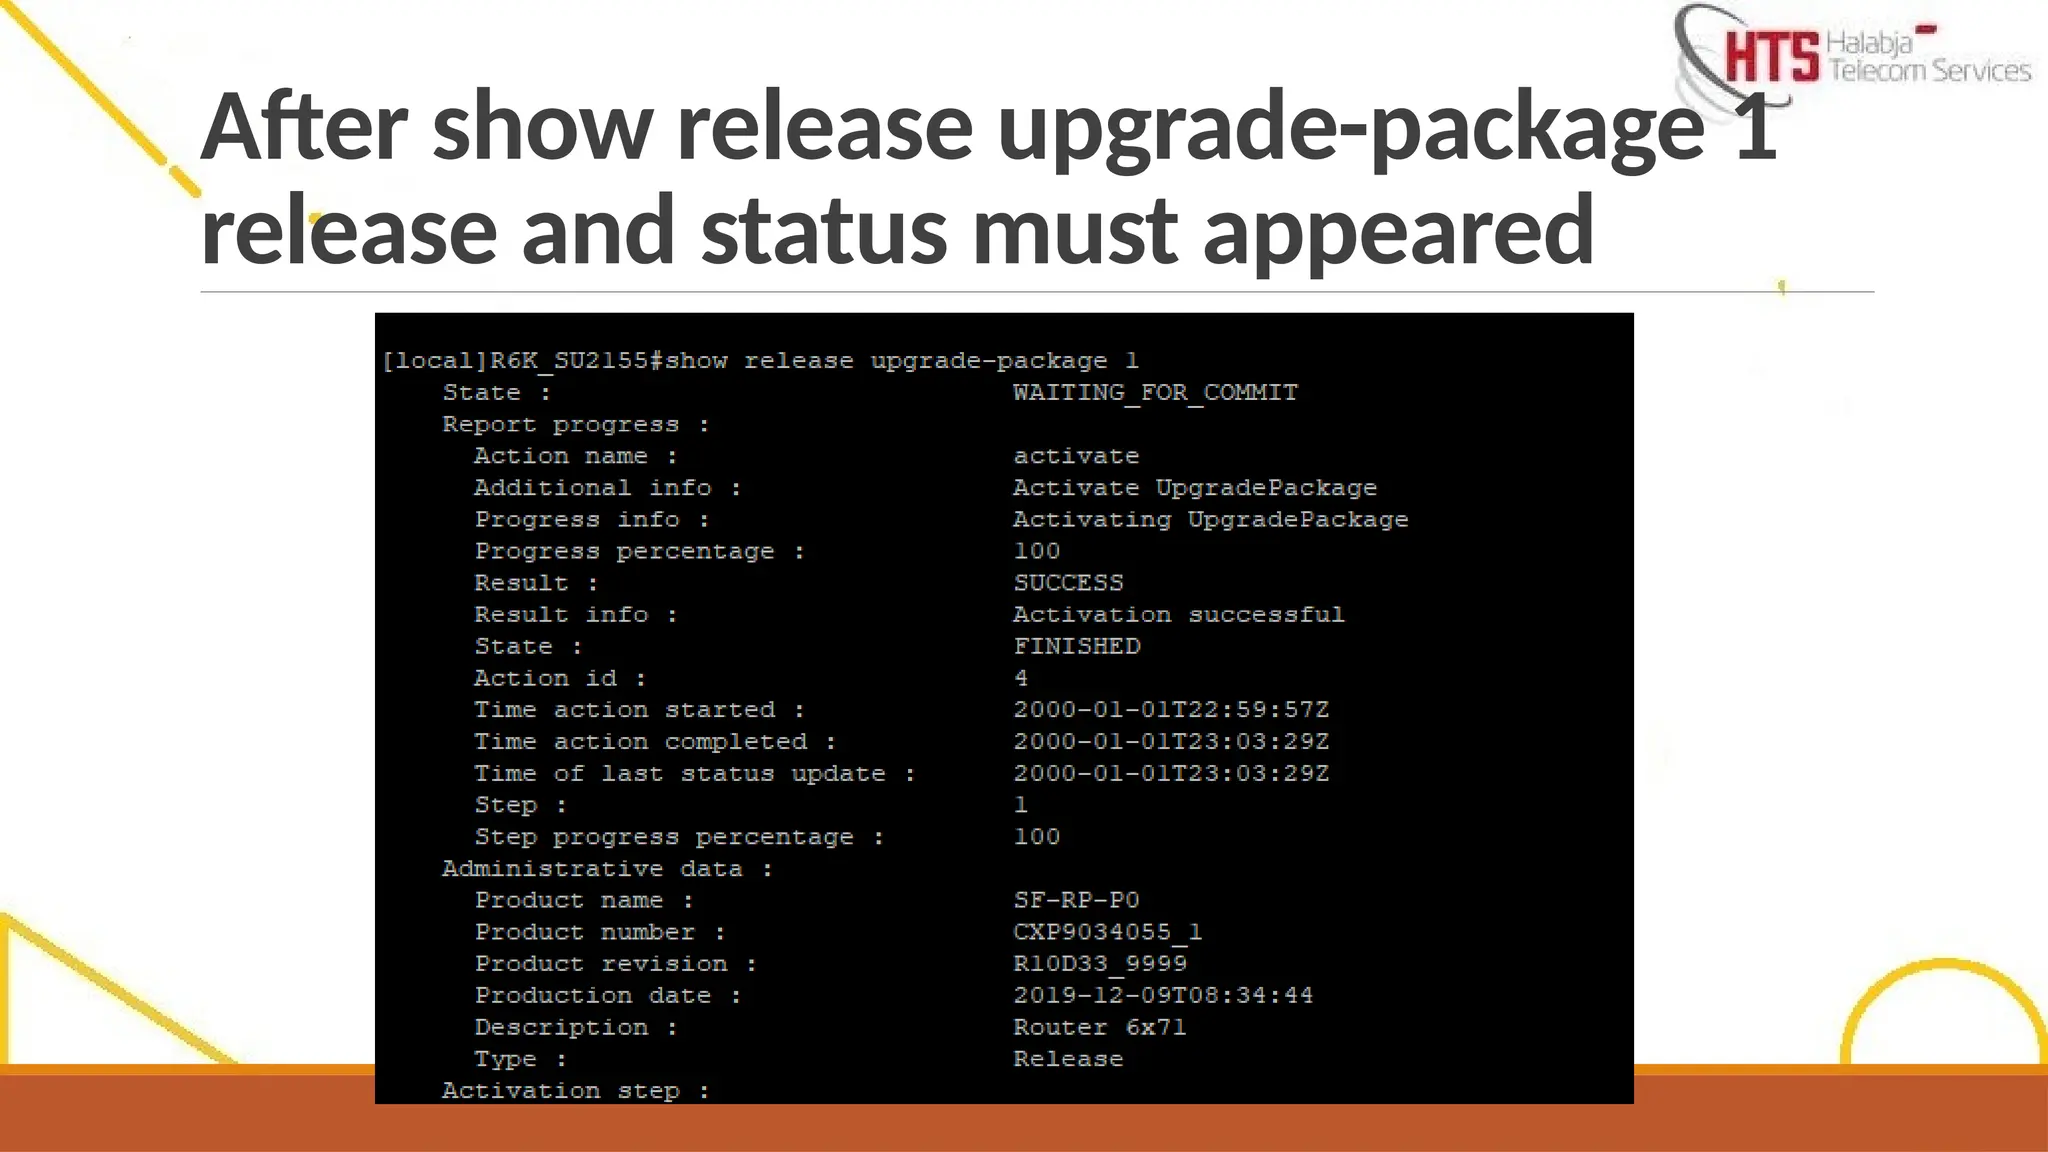
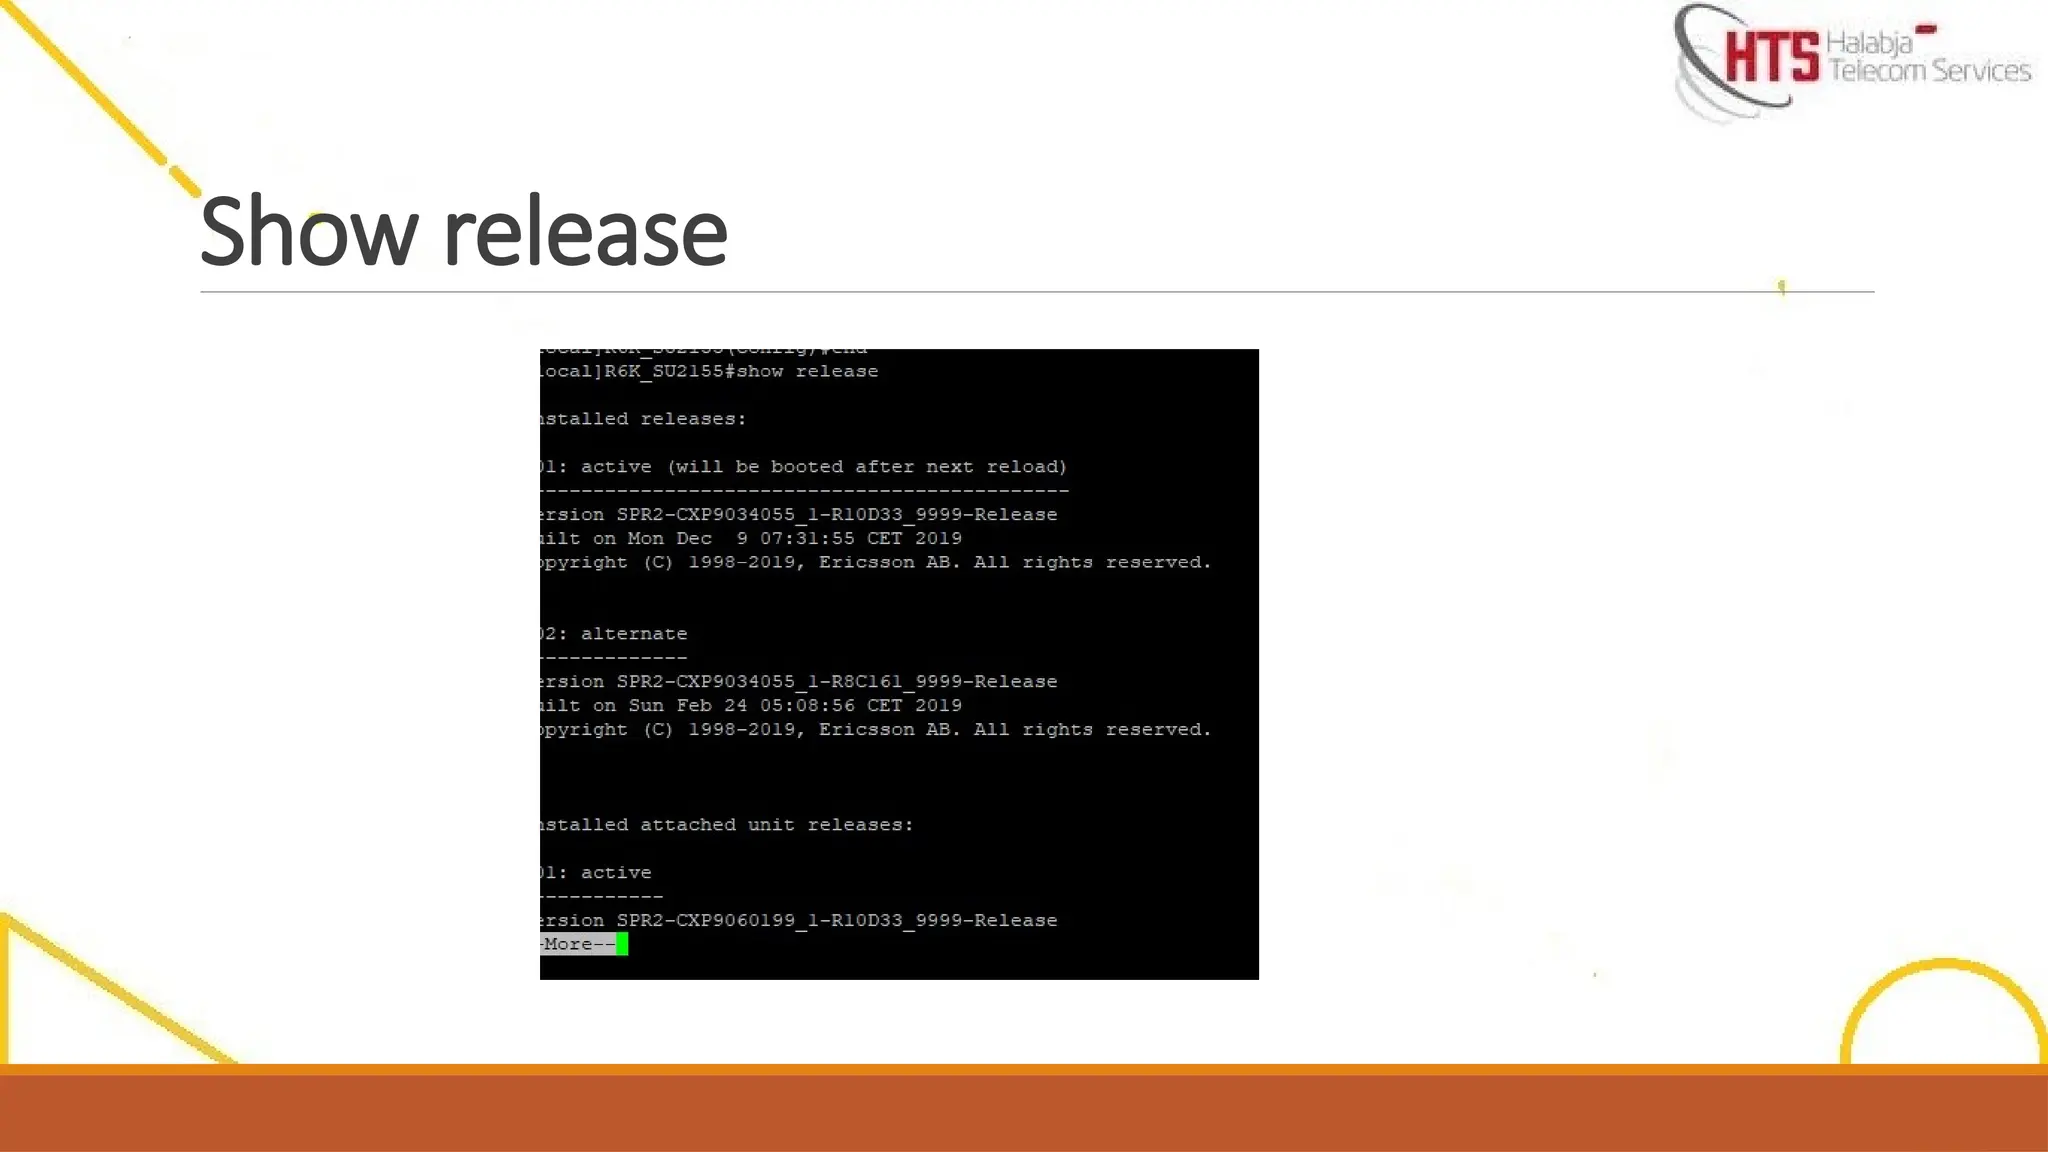
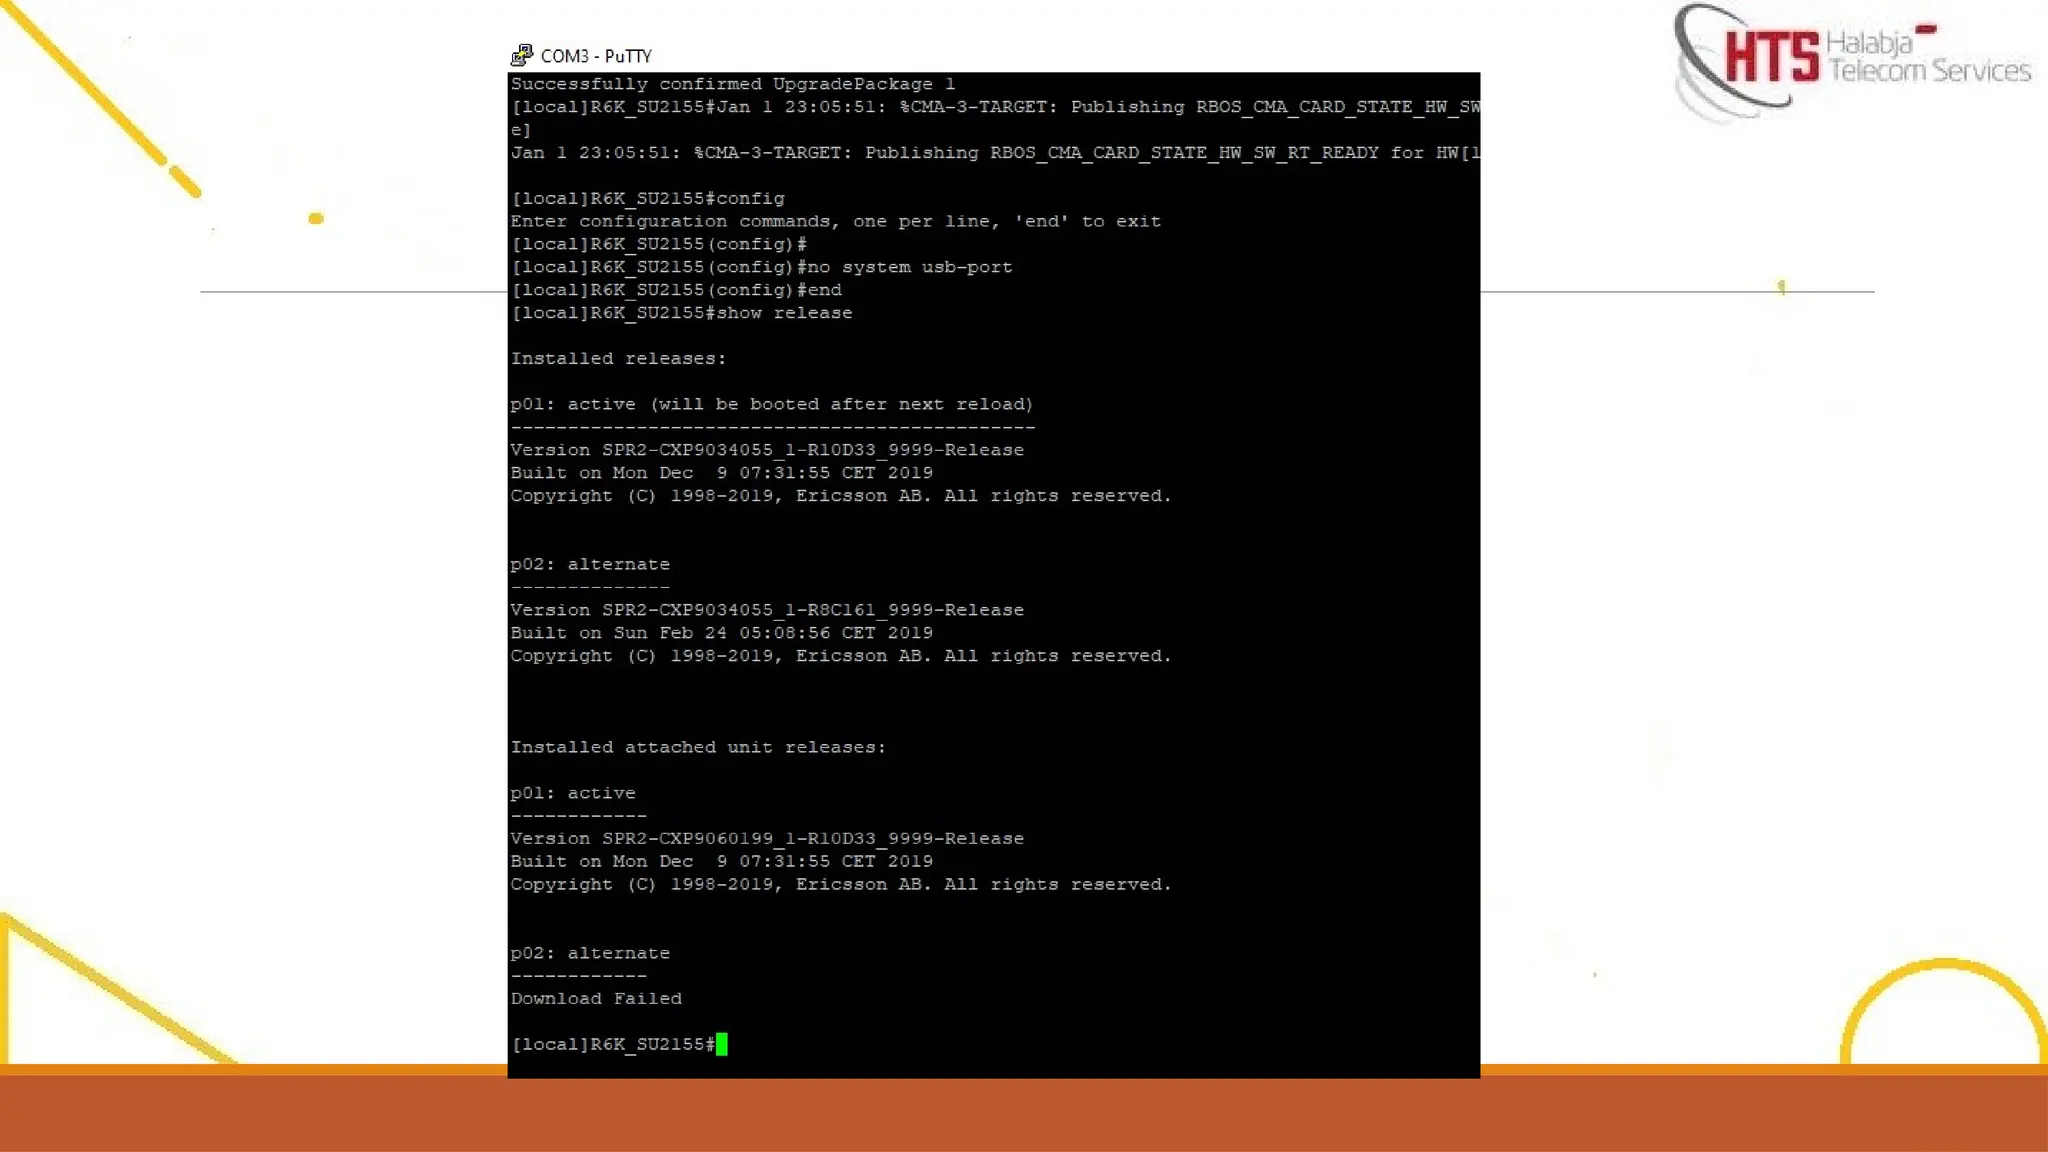
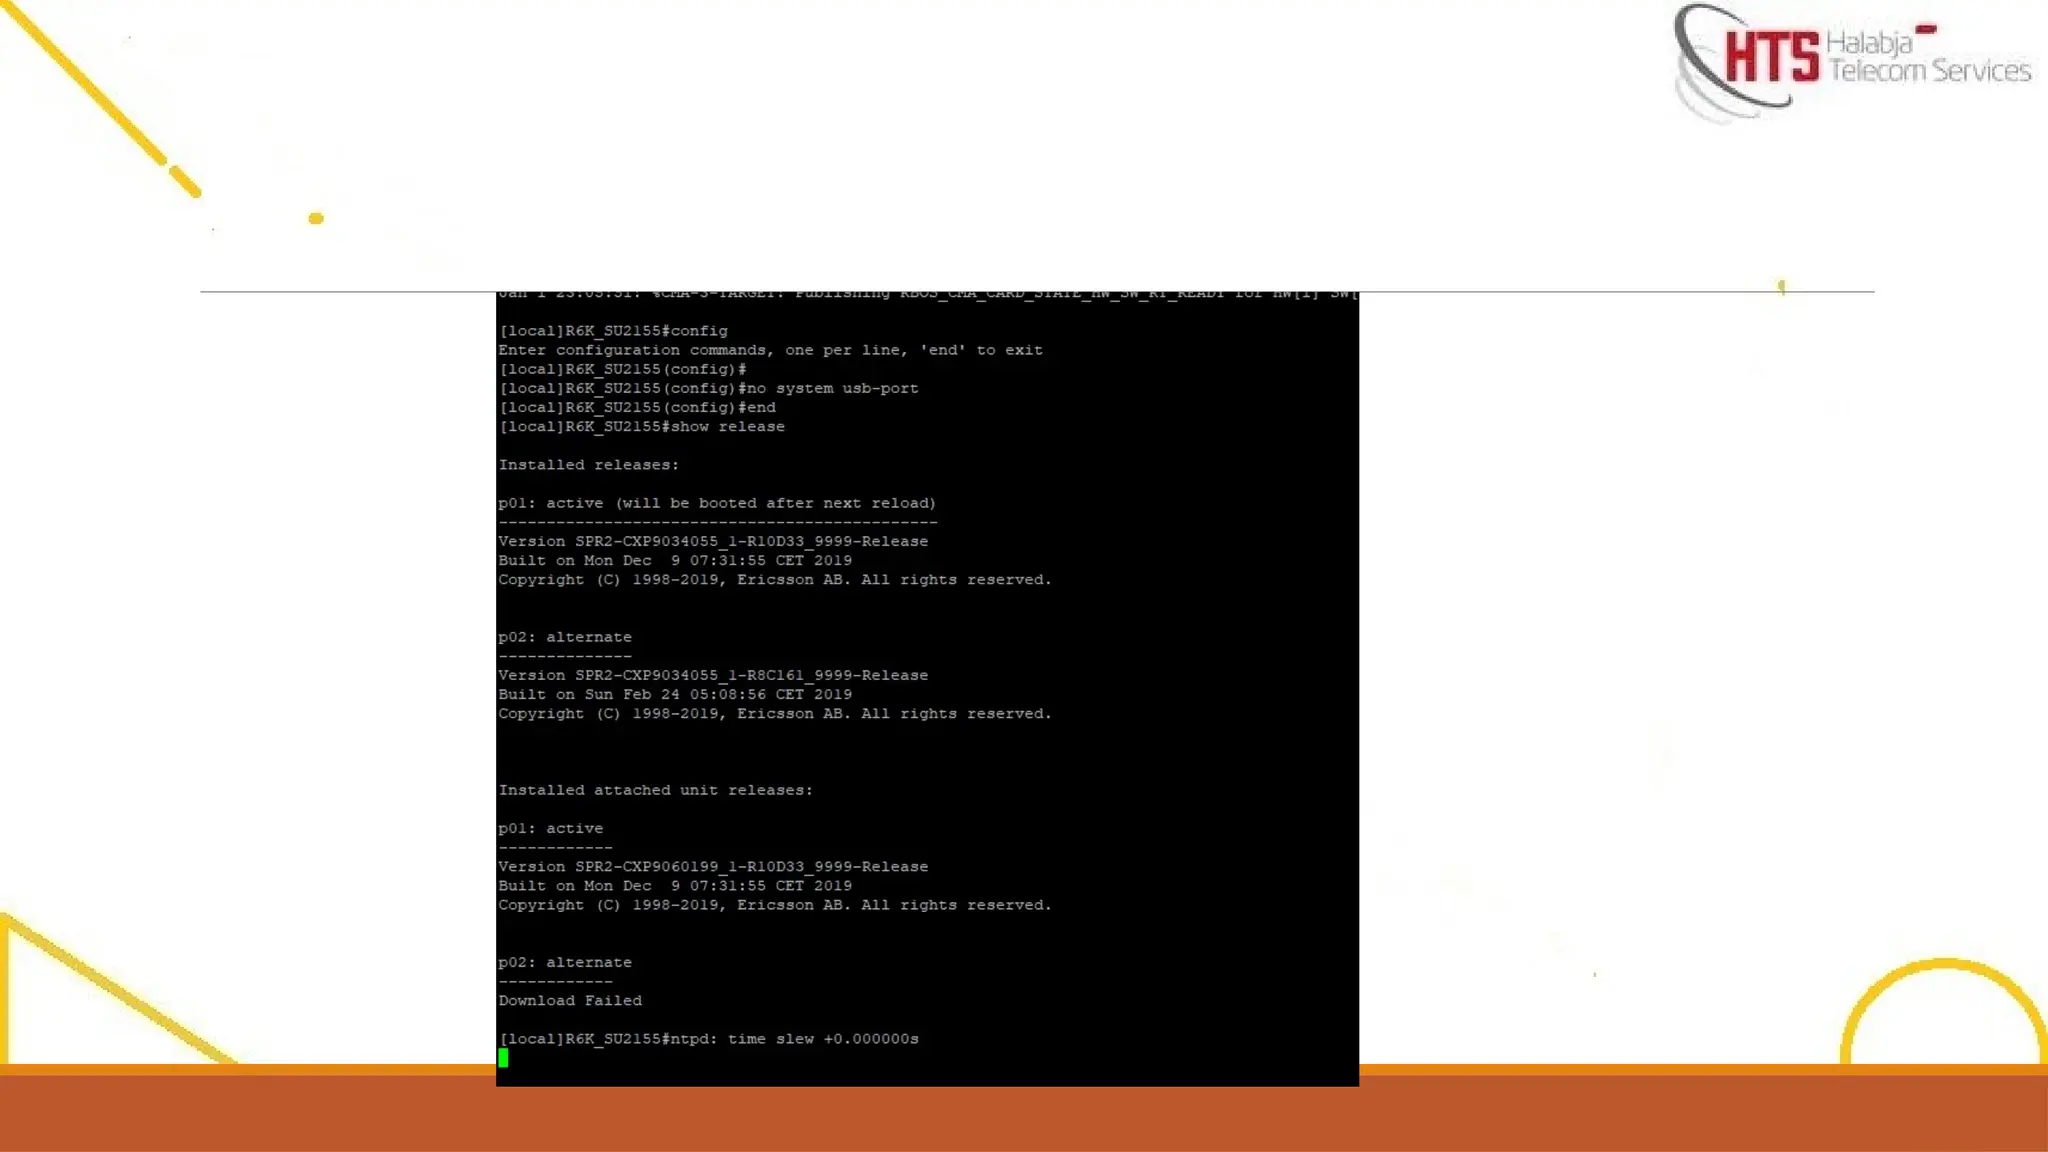
show release upgrade-package 1
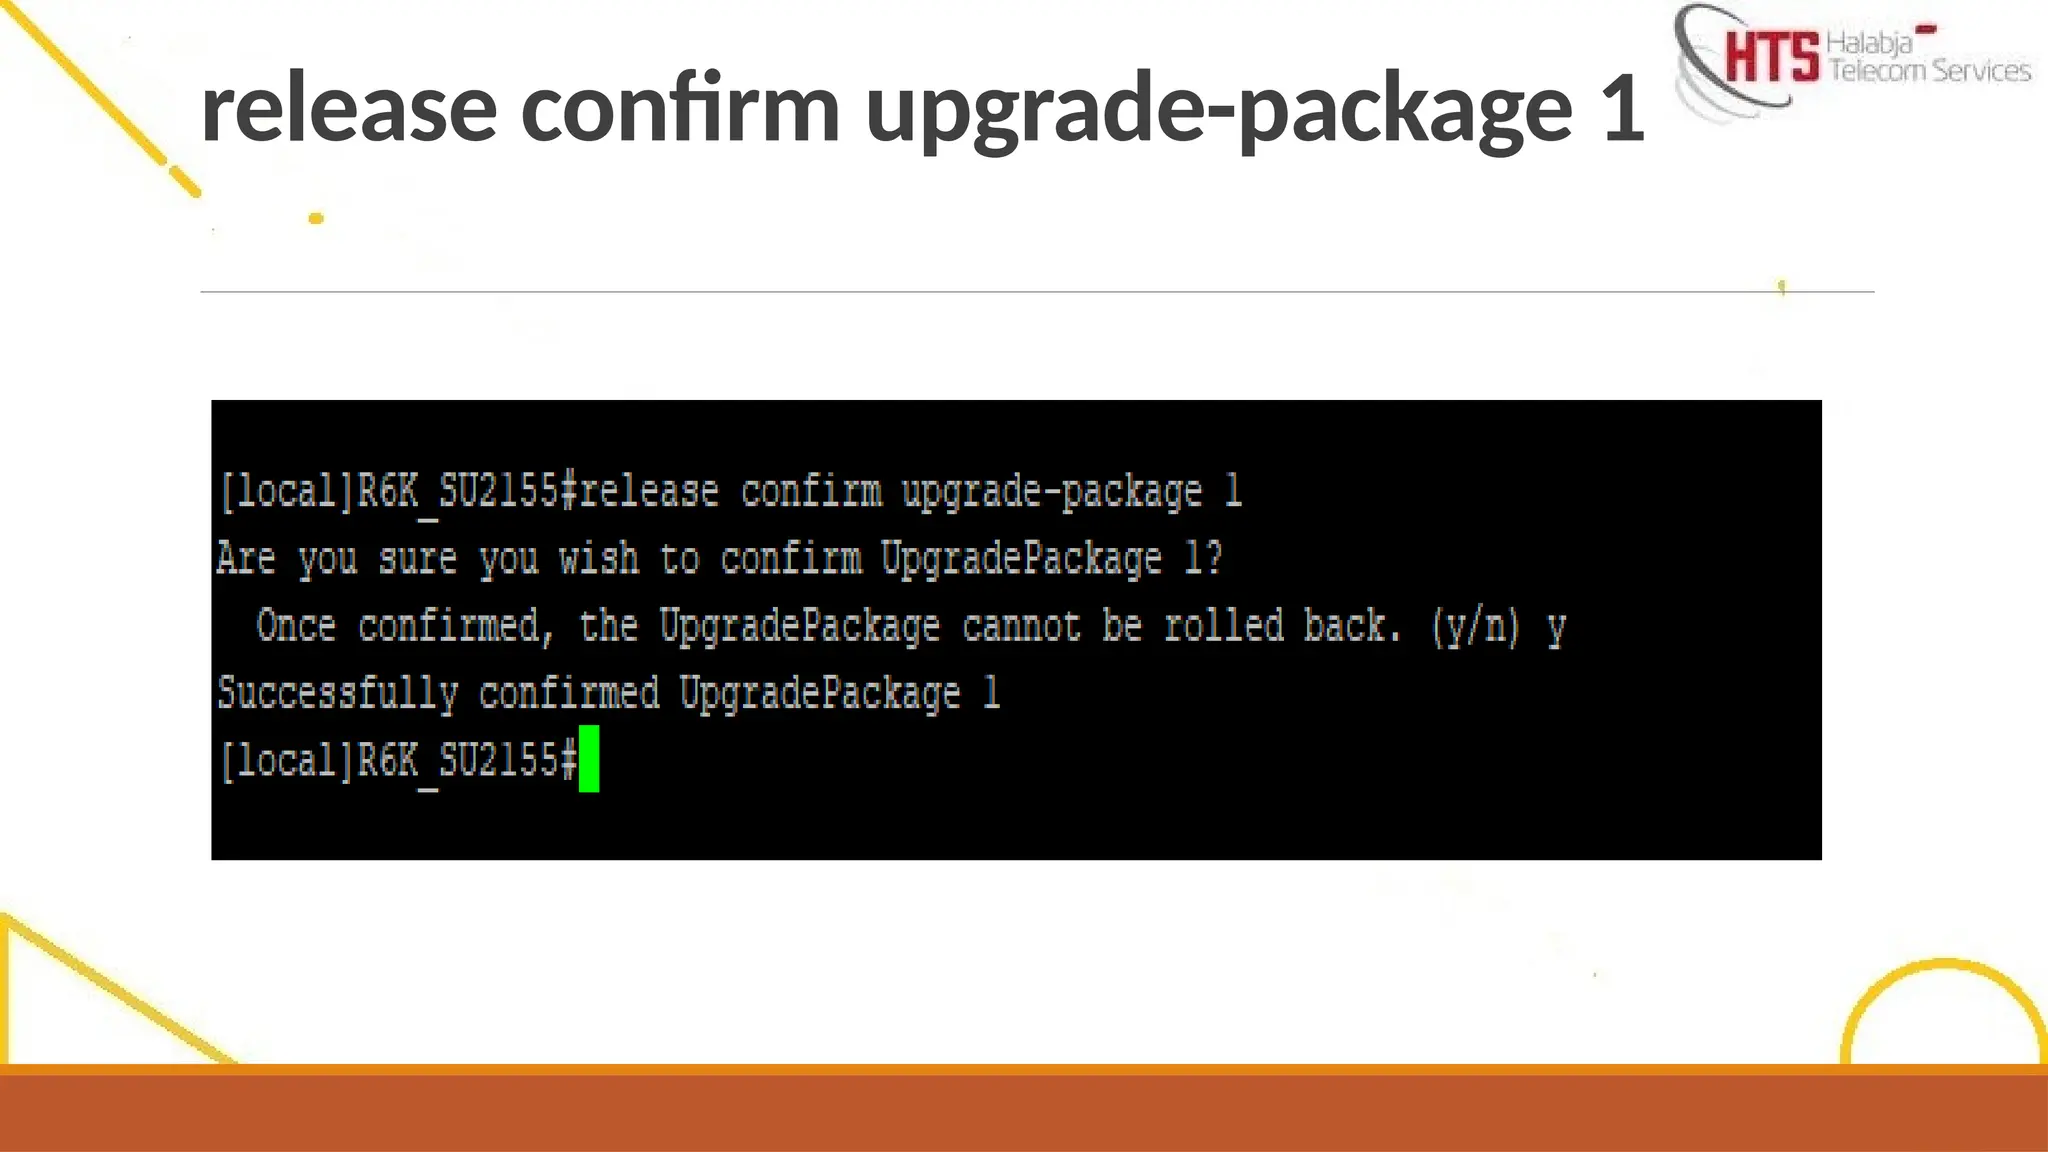
release confirm upgrade-package 1
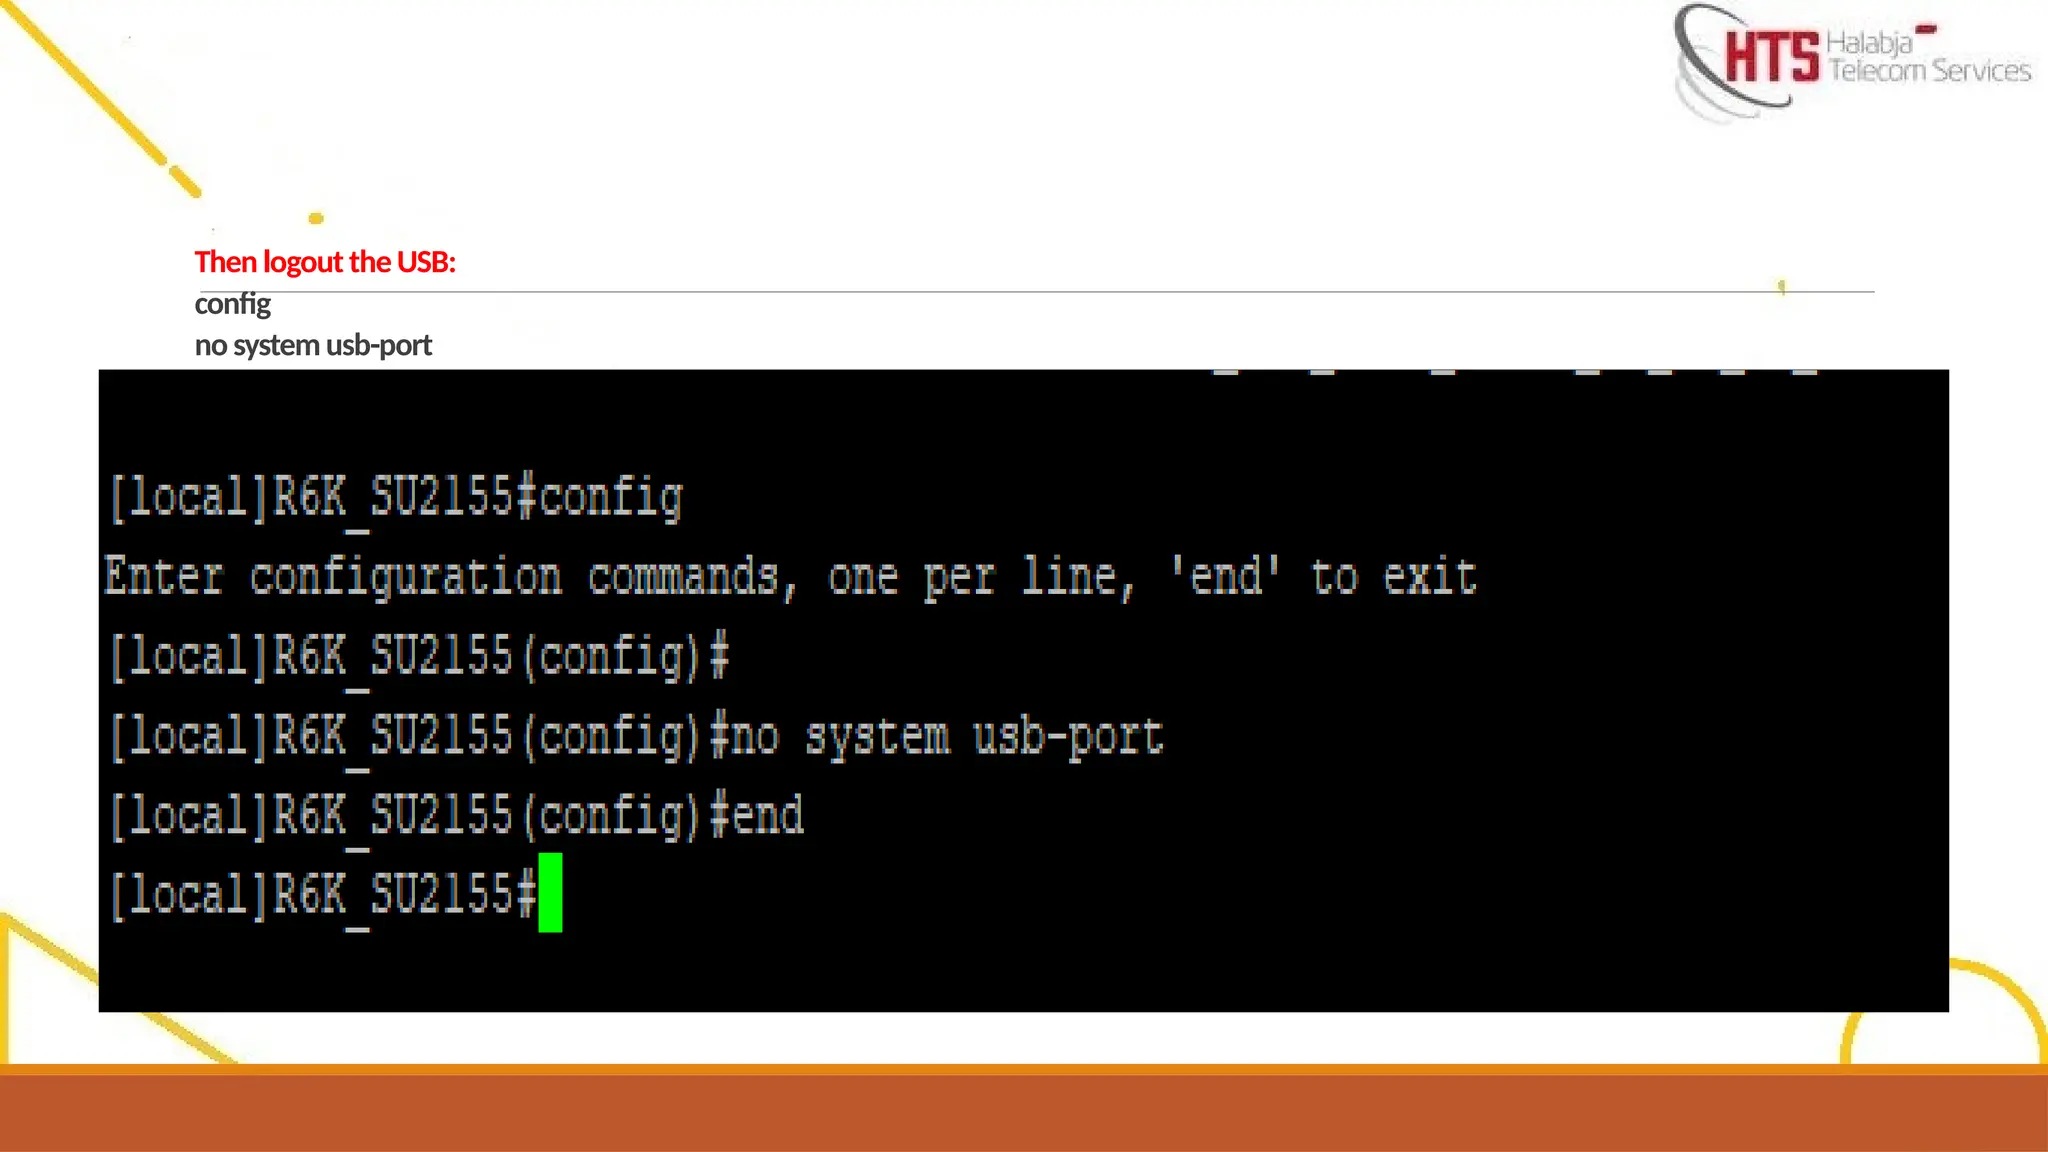
Then logout the USB:
config
no system usb-port
end
40.
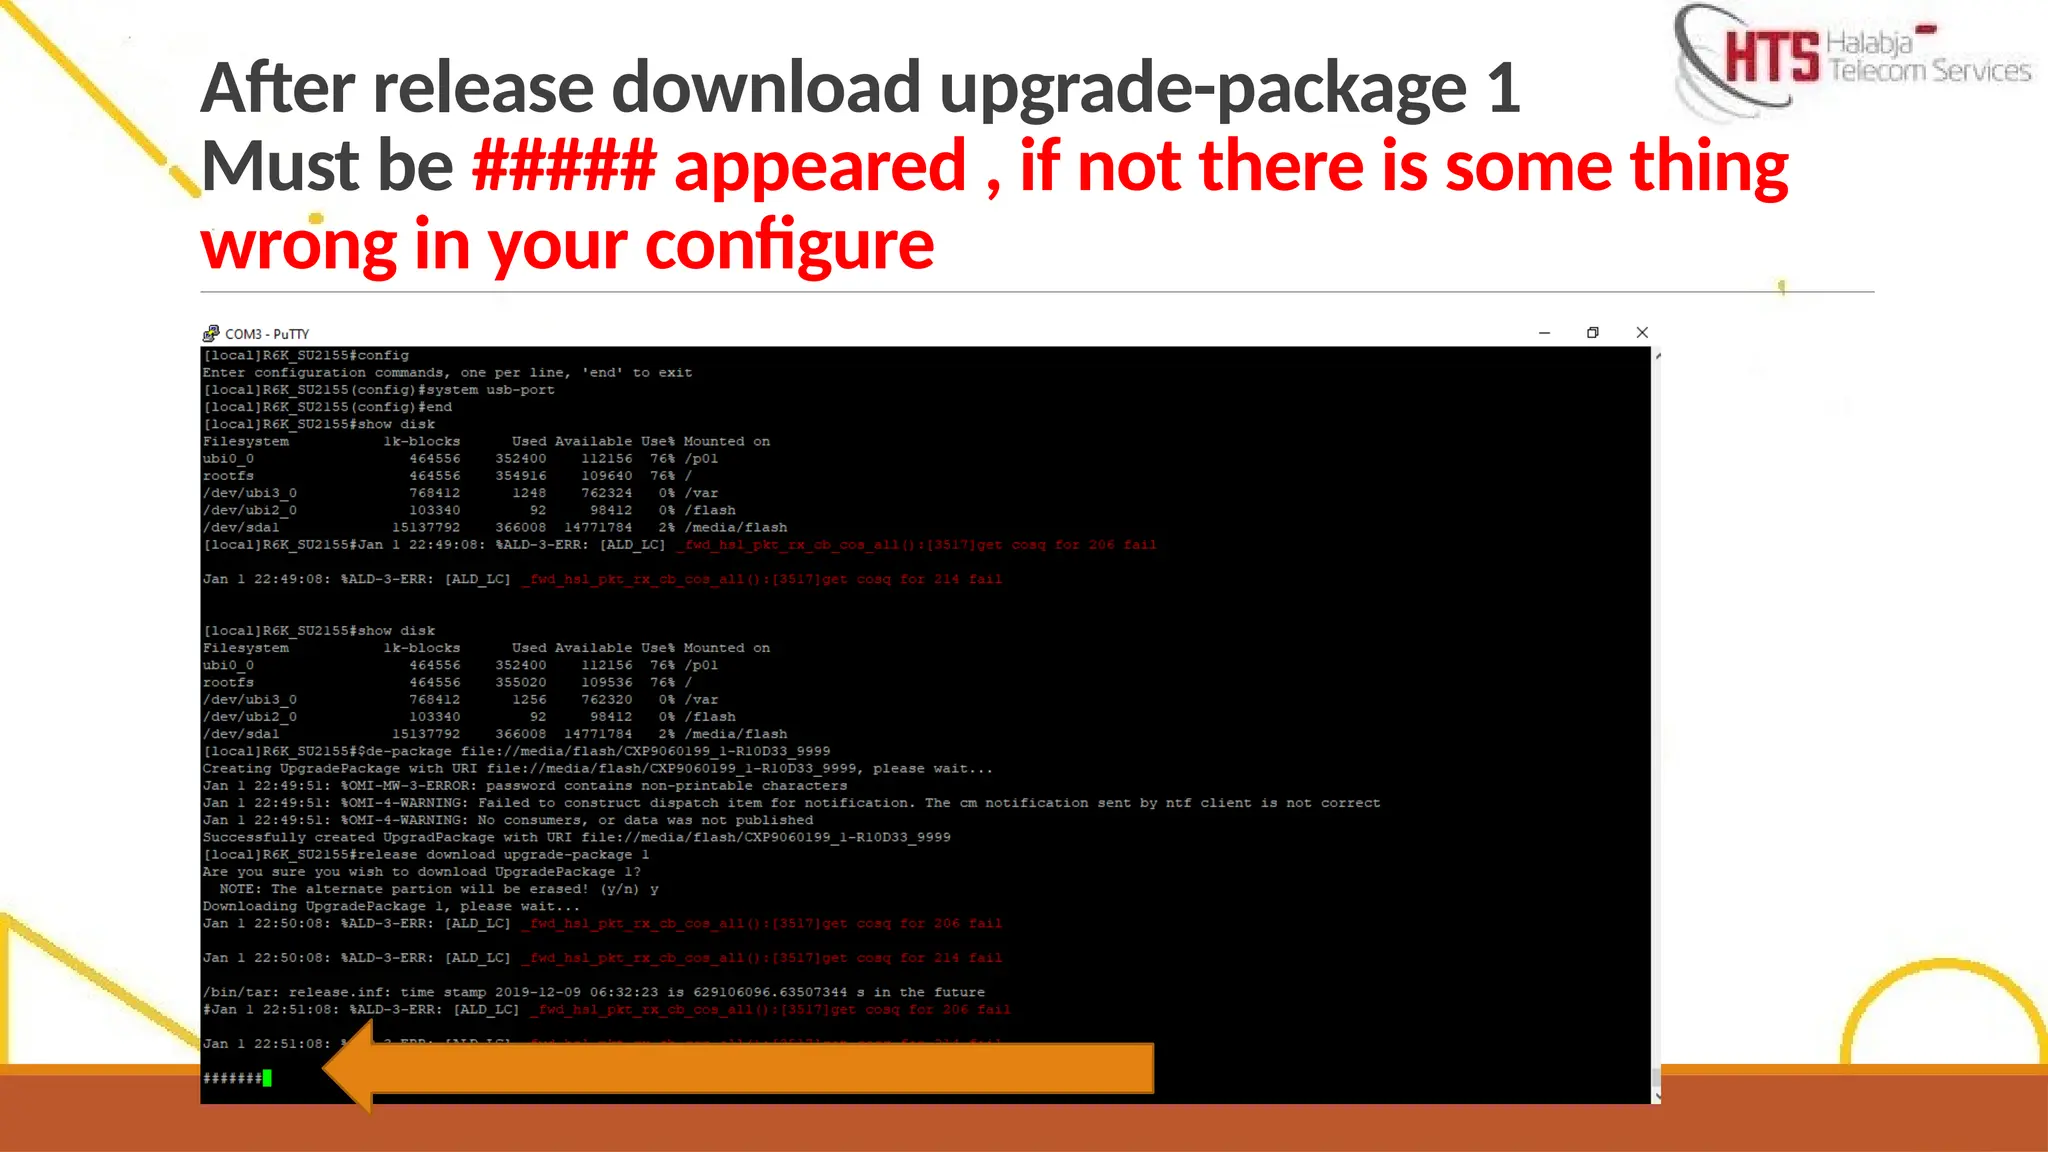
After release downloadupgrade-package 1
Must be ##### appeared , if not there is some thing
wrong in your configure
41.
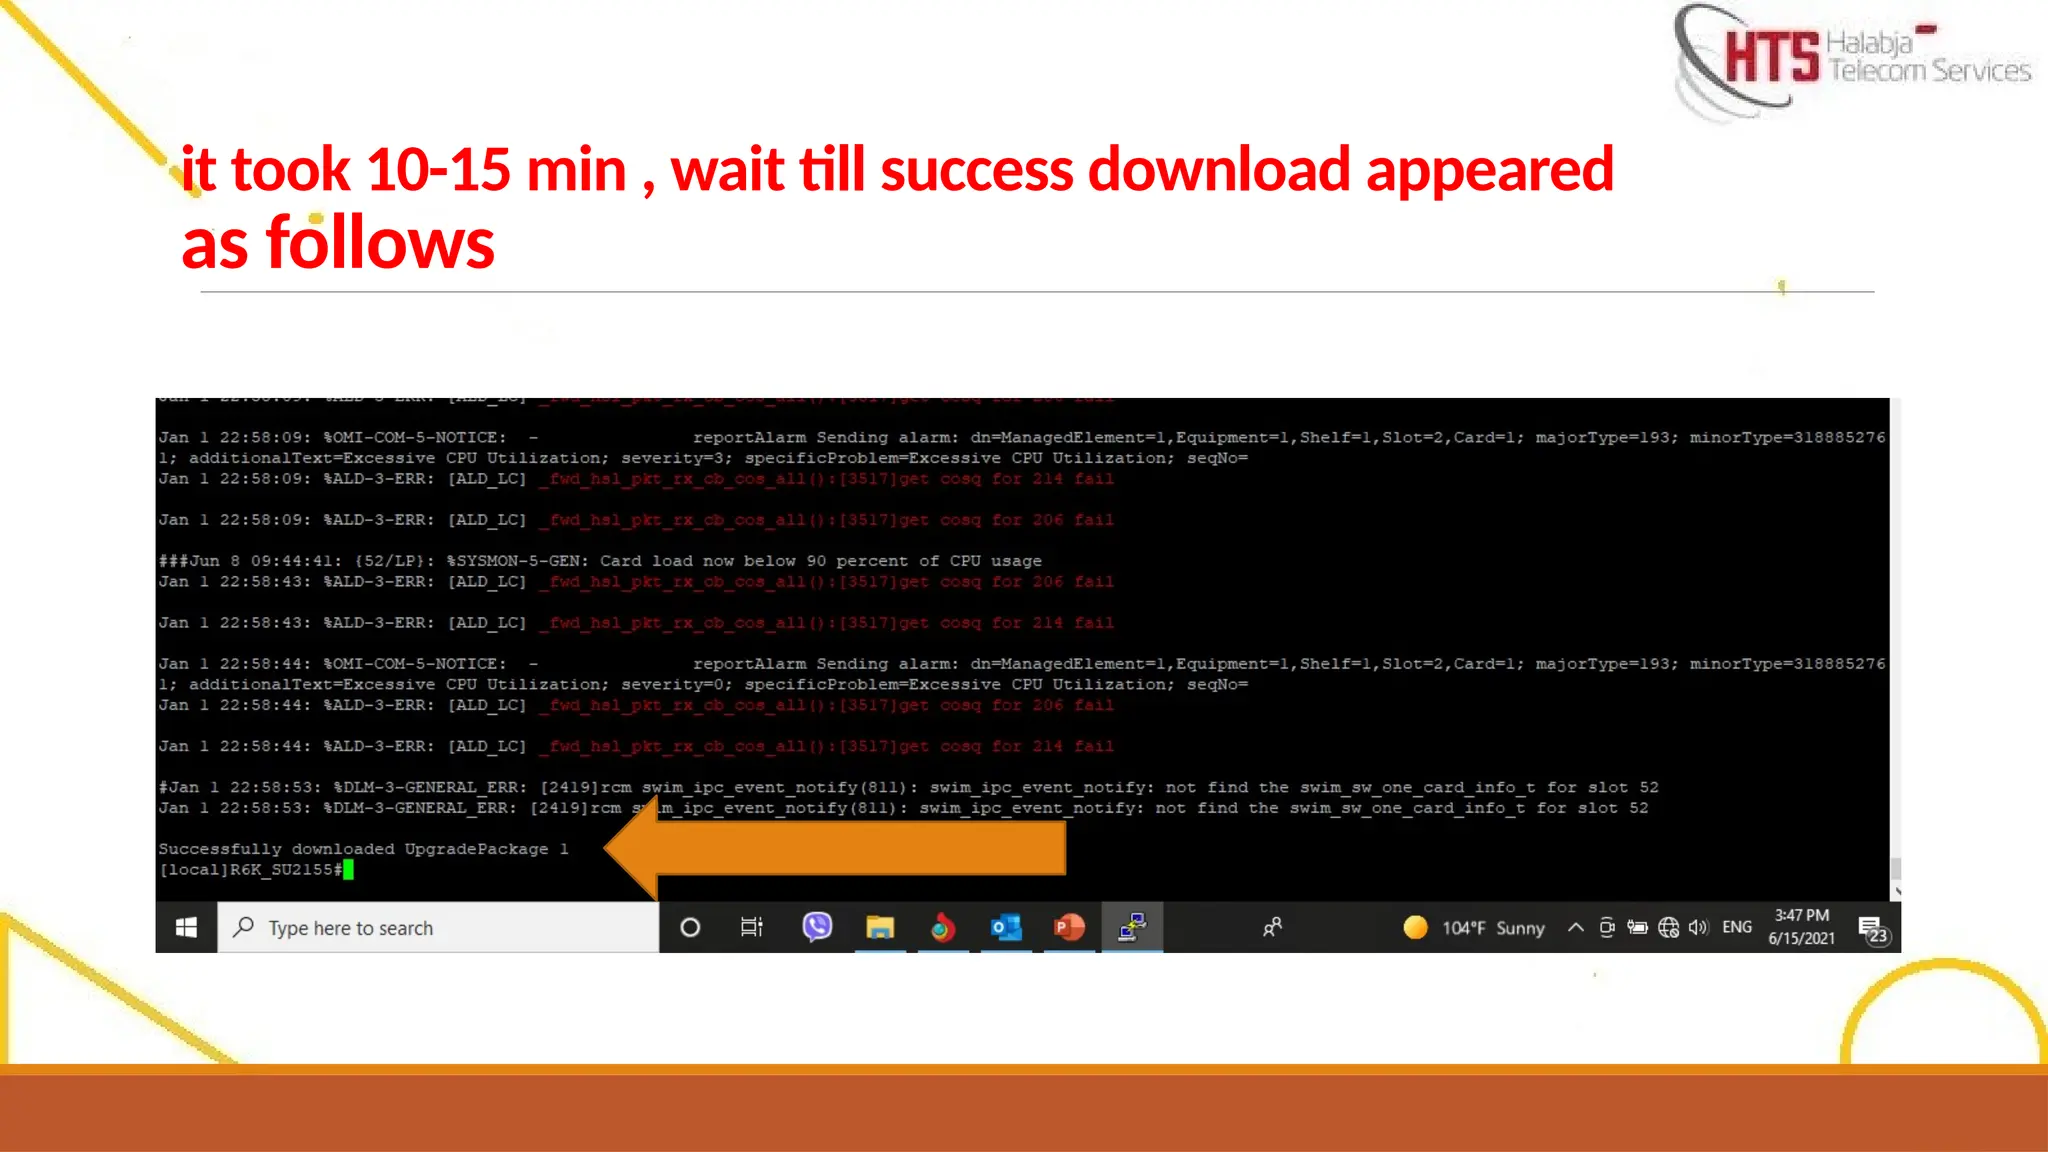
it took 10-15min , wait till success download appeared
as follows
42.
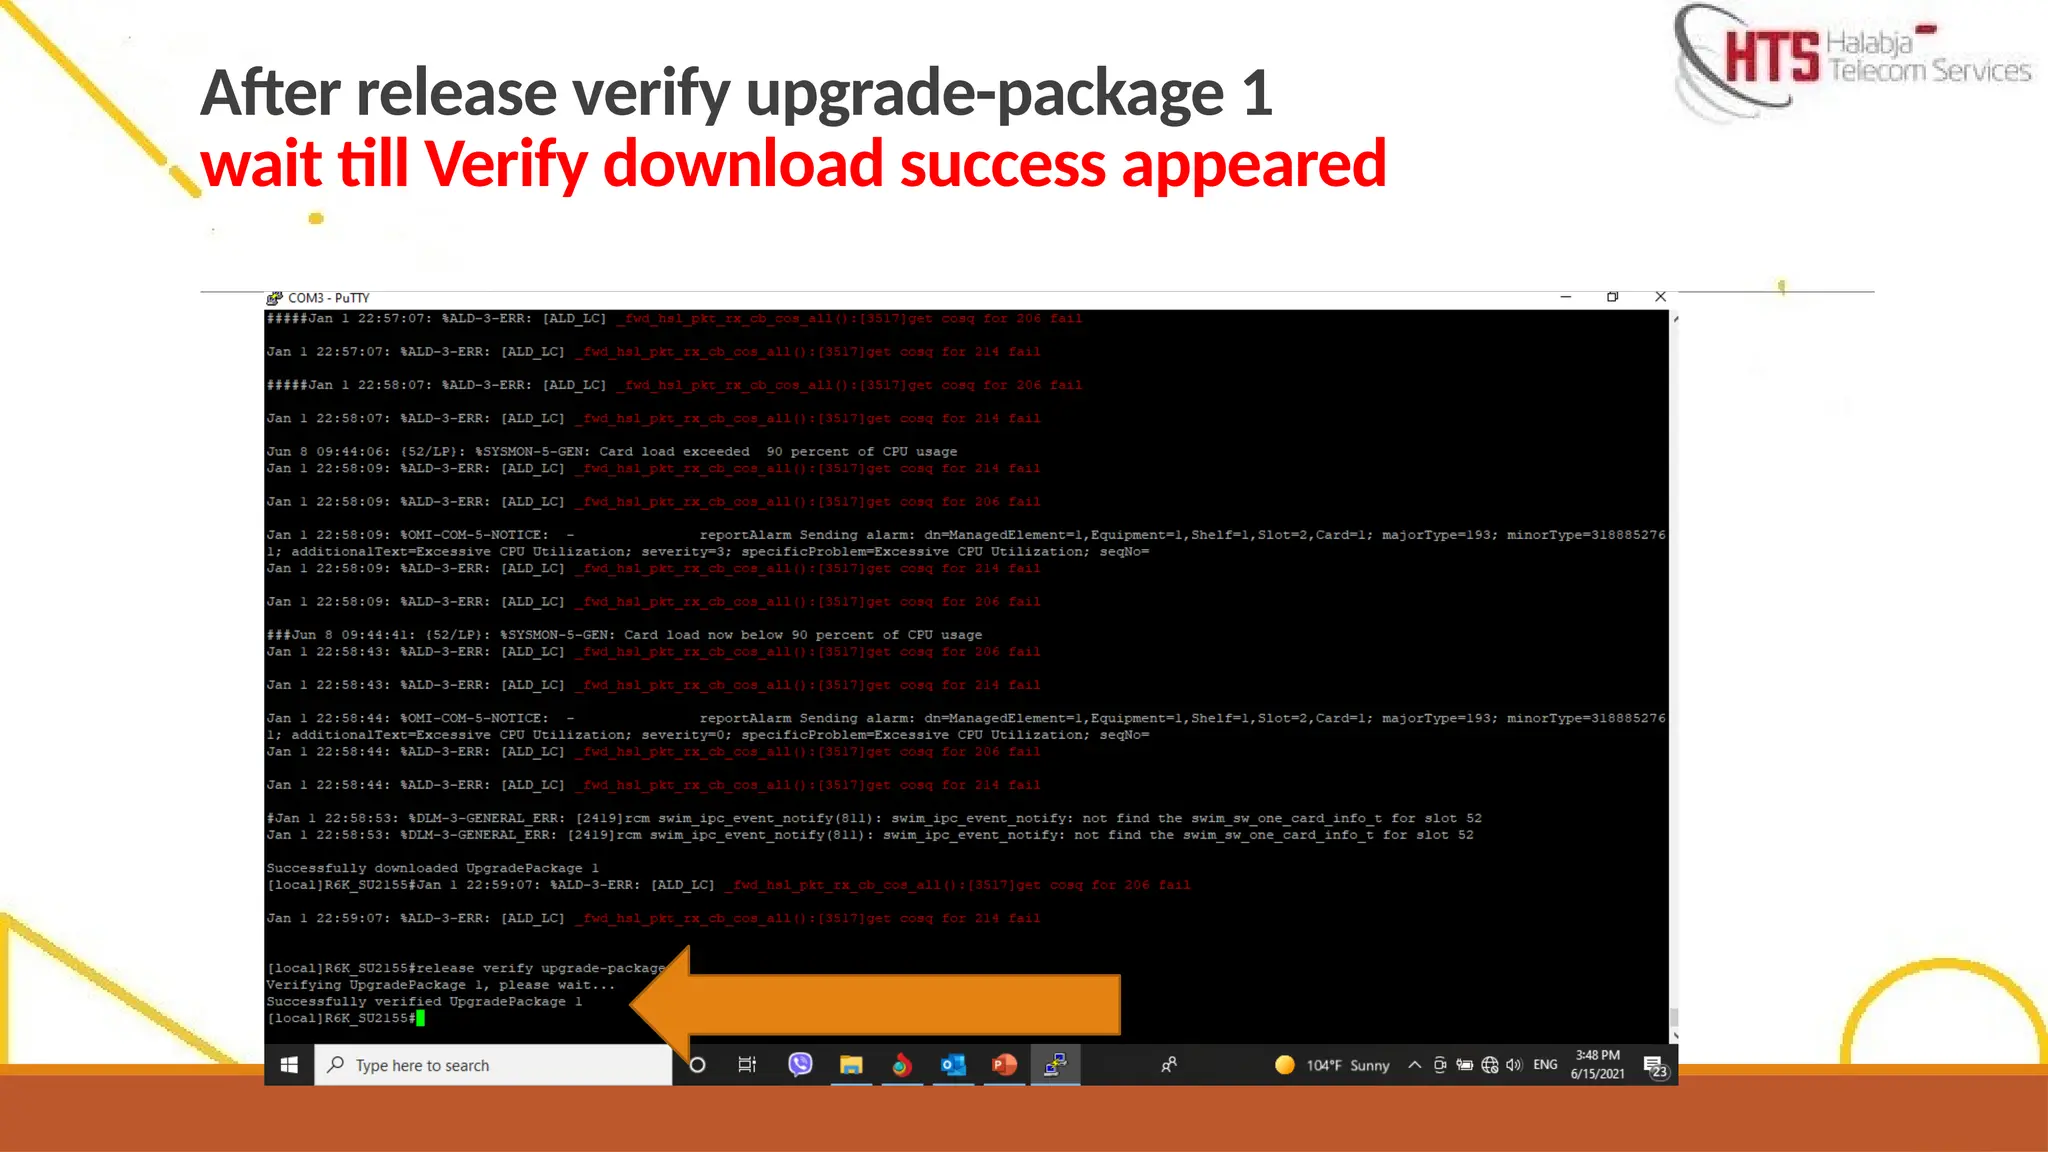
After release verifyupgrade-package 1
wait till Verify download success appeared
Note :
- whenyou did Router Upgrade , TDM will took the upgrade from router .
- some times if you couldn’t upgrade the Router you can reset it by reset password key ( see page No.28-
29-30) then you start to install the software .
- Not need to adjust the Router Time , Time will be corrected by default when the router inserted to live
network .
- TDM and Router Must have the same SW upgrade package version , otherwise 2G will be down .
- TDM will be reset by power .
- if you want to take script of Router, you have to insert show config command then take the script
from : qos till before license
- P01 / is SW that activated ( that you installed )
- P02 / is other SW version
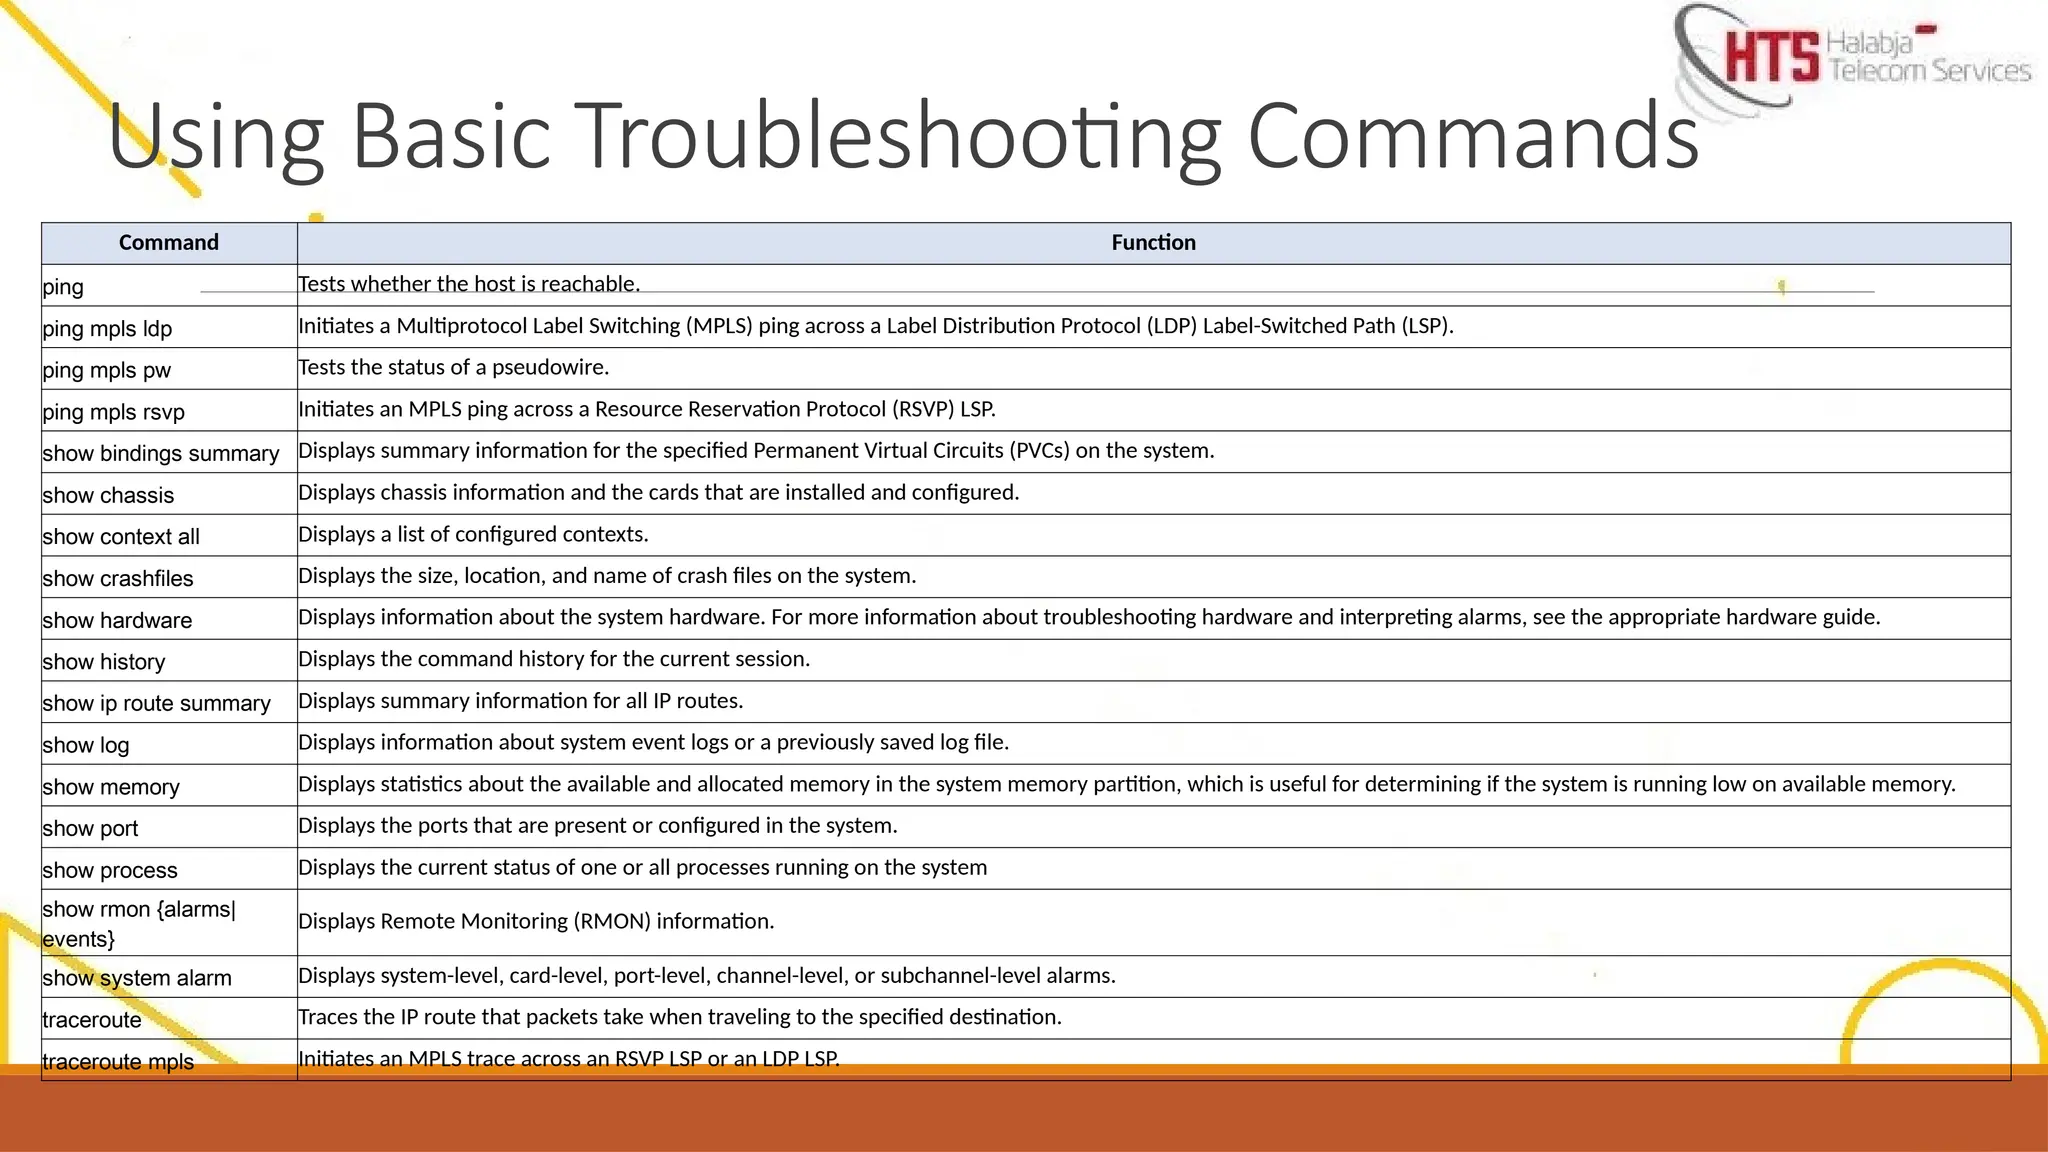
Command Function
ping Testswhether the host is reachable.
ping mpls ldp Initiates a Multiprotocol Label Switching (MPLS) ping across a Label Distribution Protocol (LDP) Label-Switched Path (LSP).
ping mpls pw Tests the status of a pseudowire.
ping mpls rsvp Initiates an MPLS ping across a Resource Reservation Protocol (RSVP) LSP.
show bindings summary Displays summary information for the specified Permanent Virtual Circuits (PVCs) on the system.
show chassis Displays chassis information and the cards that are installed and configured.
show context all Displays a list of configured contexts.
show crashfiles Displays the size, location, and name of crash files on the system.
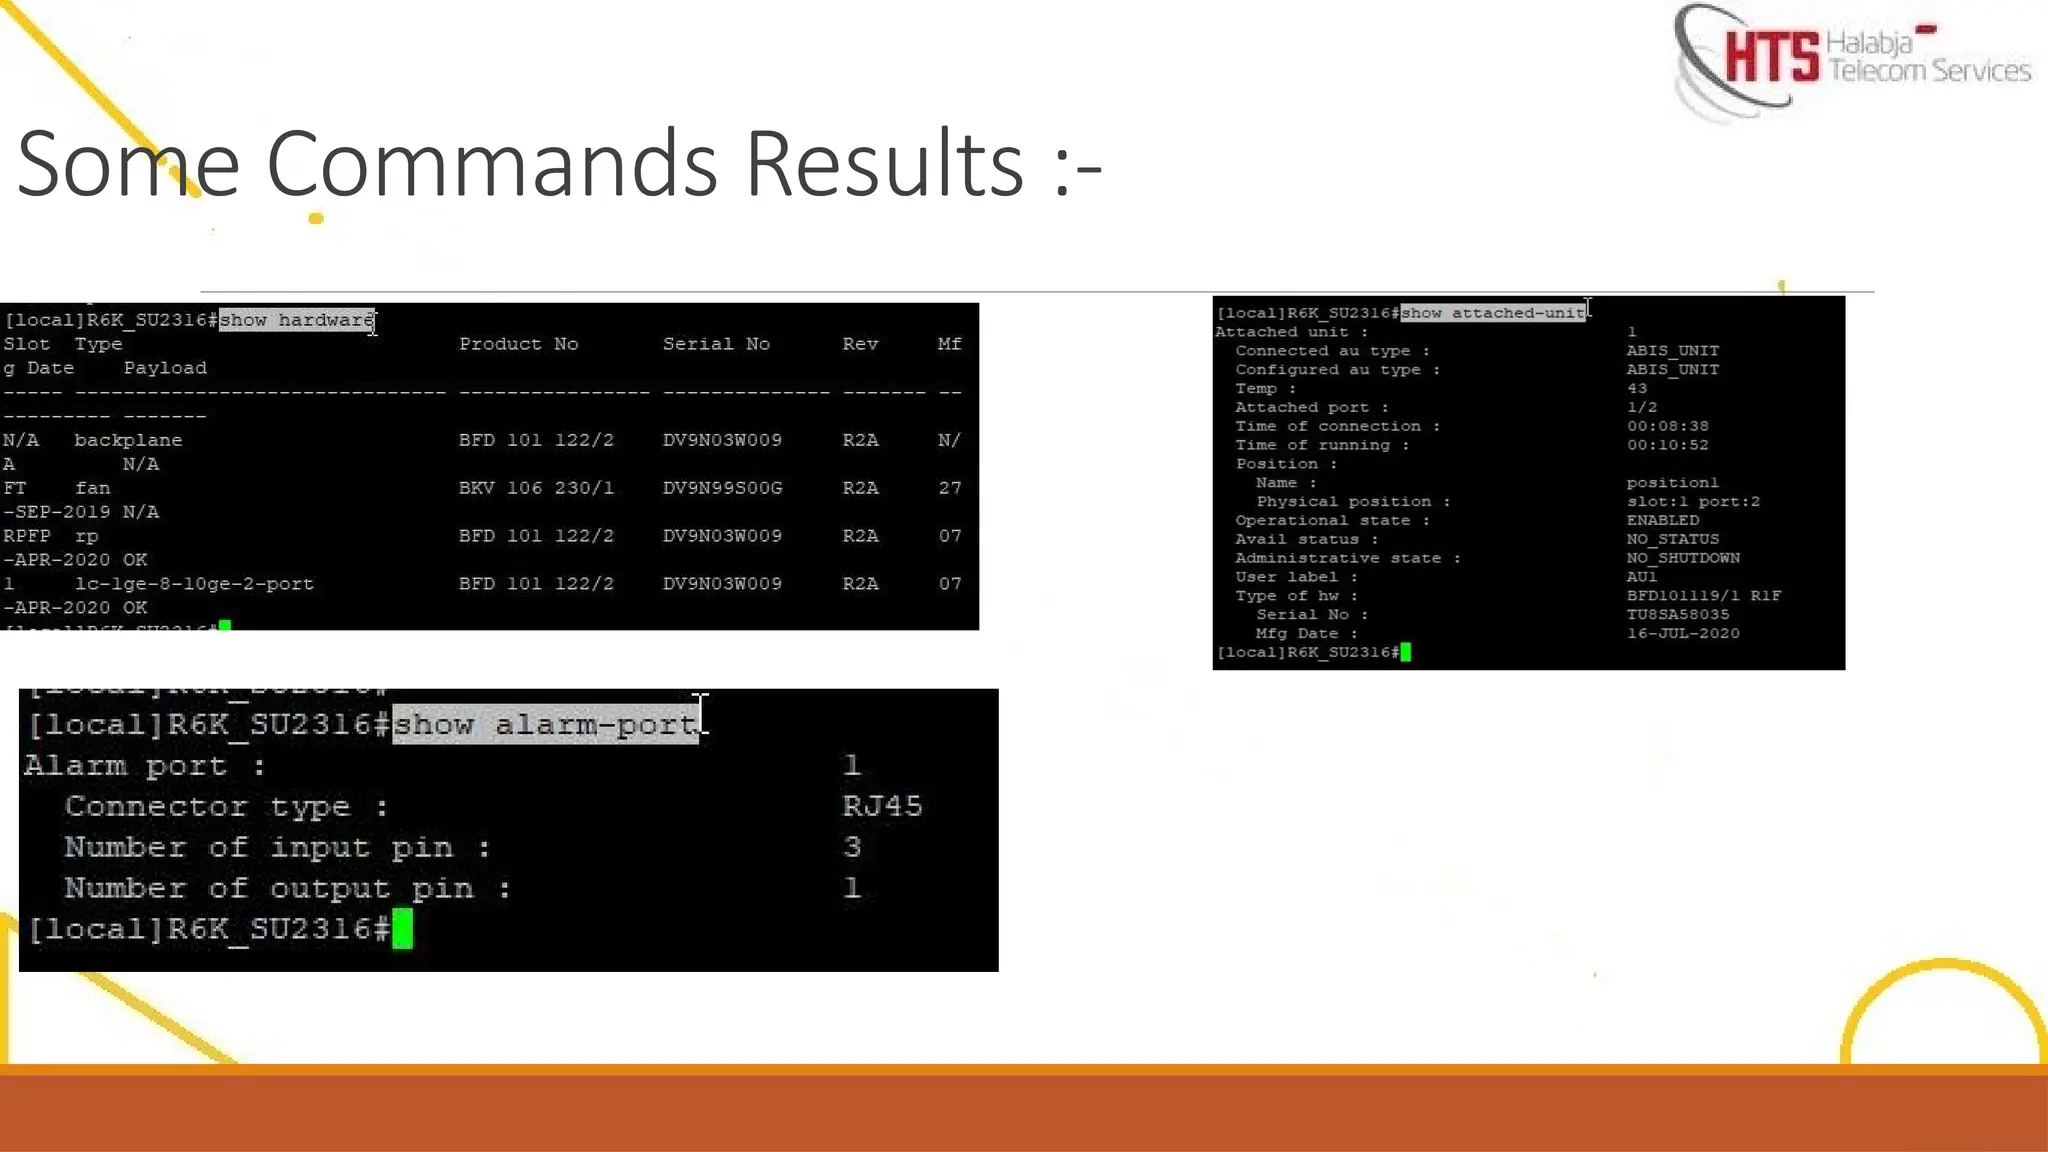
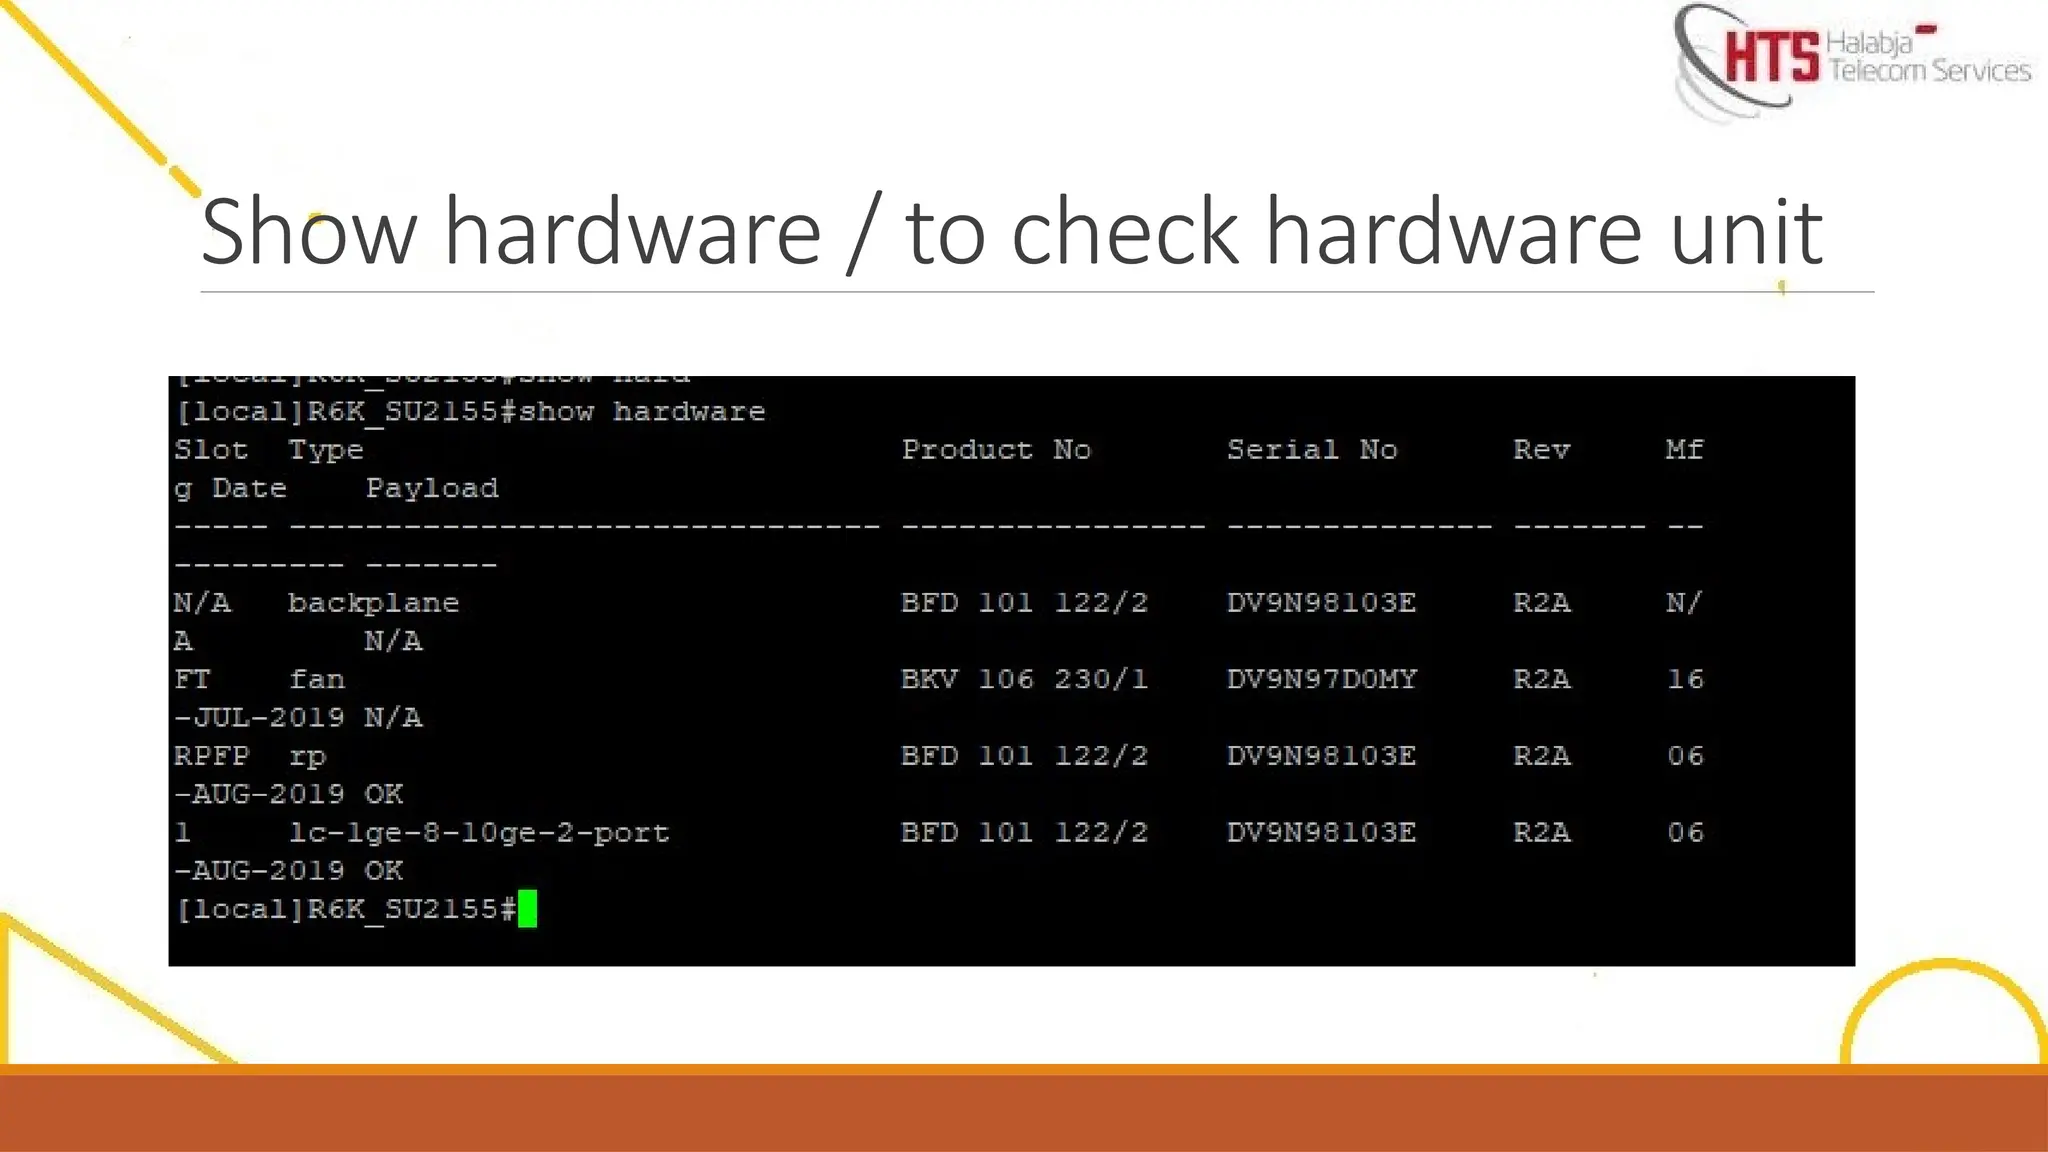
show hardware Displays information about the system hardware. For more information about troubleshooting hardware and interpreting alarms, see the appropriate hardware guide.
show history Displays the command history for the current session.
show ip route summary Displays summary information for all IP routes.
show log Displays information about system event logs or a previously saved log file.
show memory Displays statistics about the available and allocated memory in the system memory partition, which is useful for determining if the system is running low on available memory.
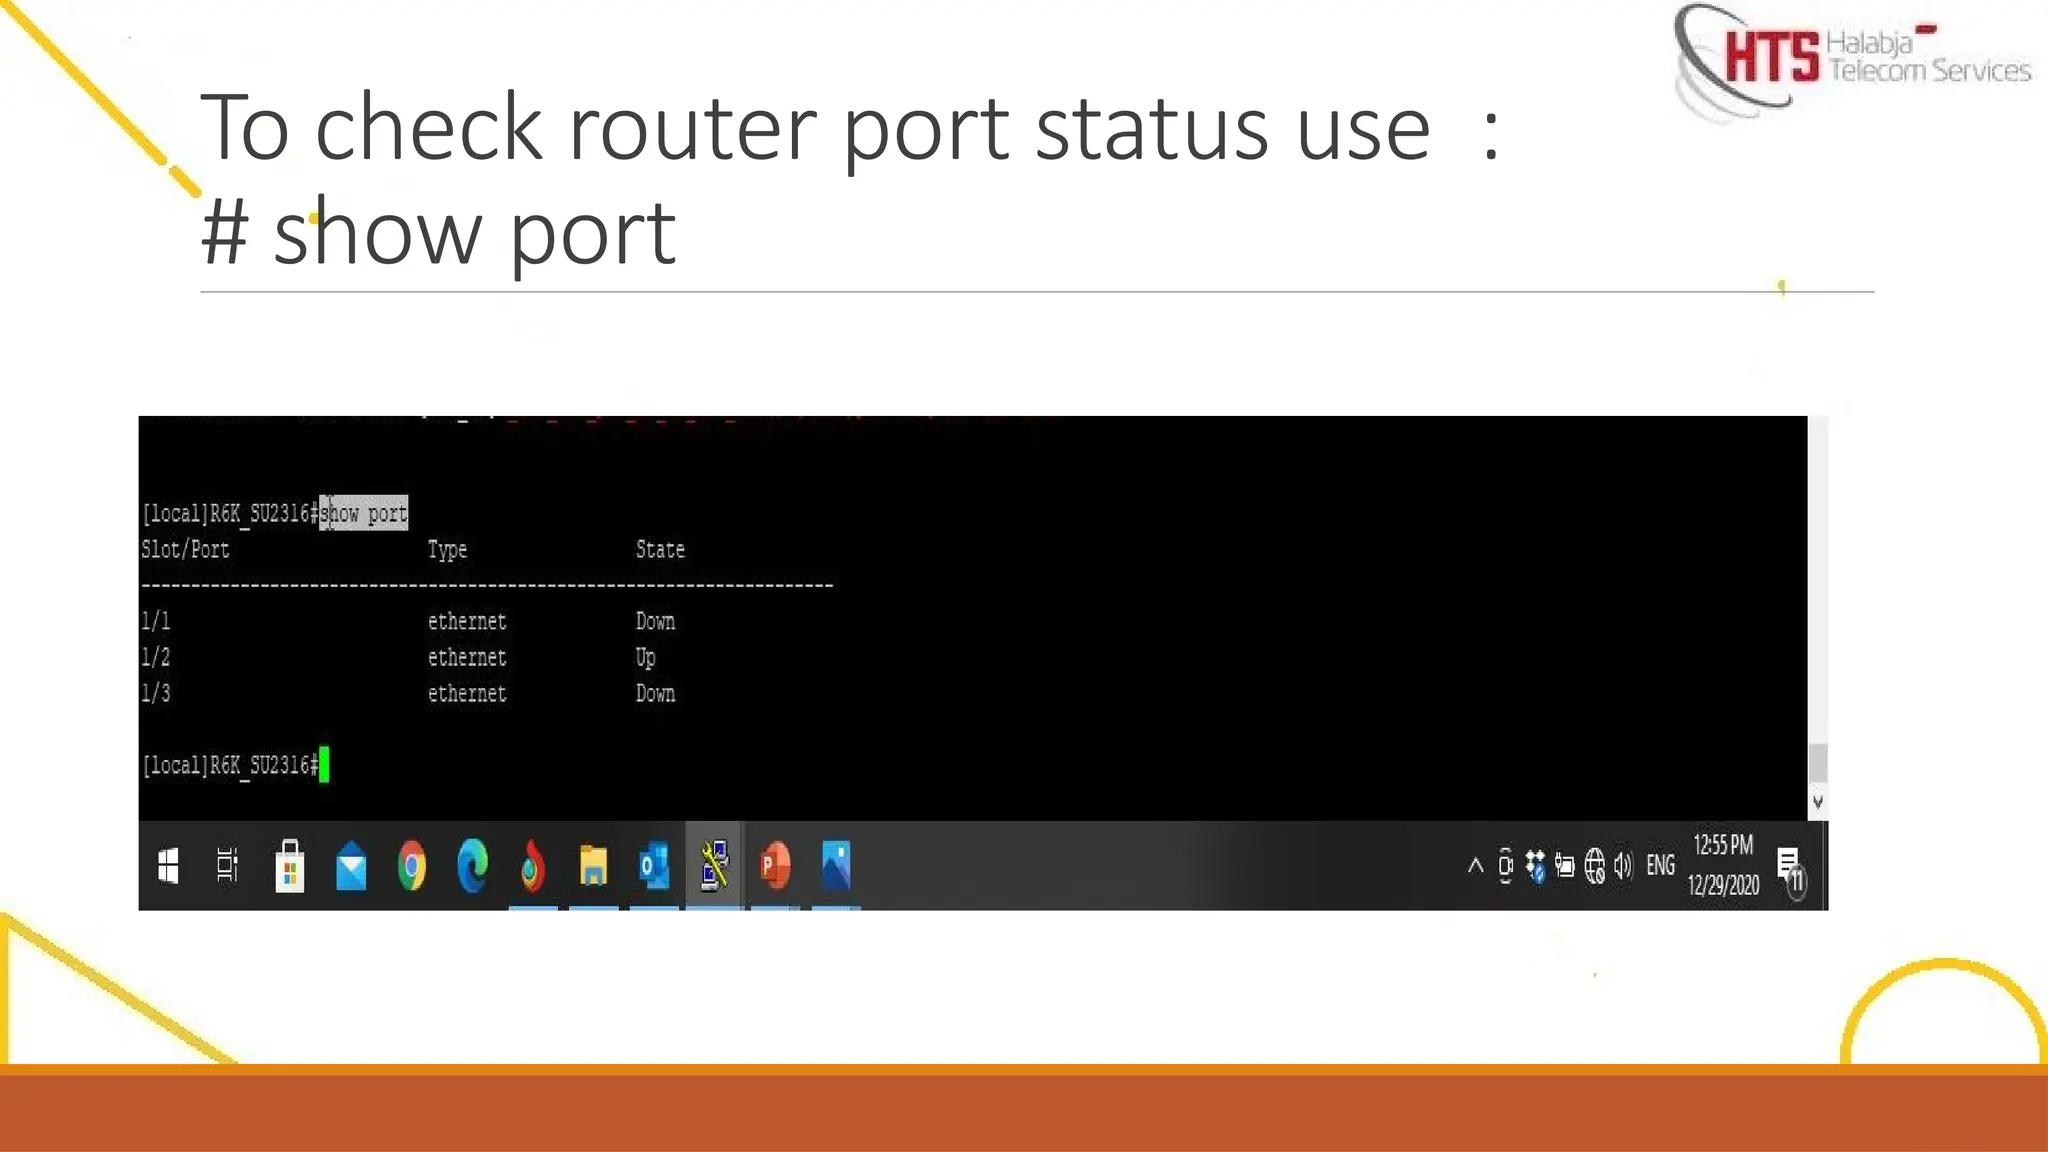
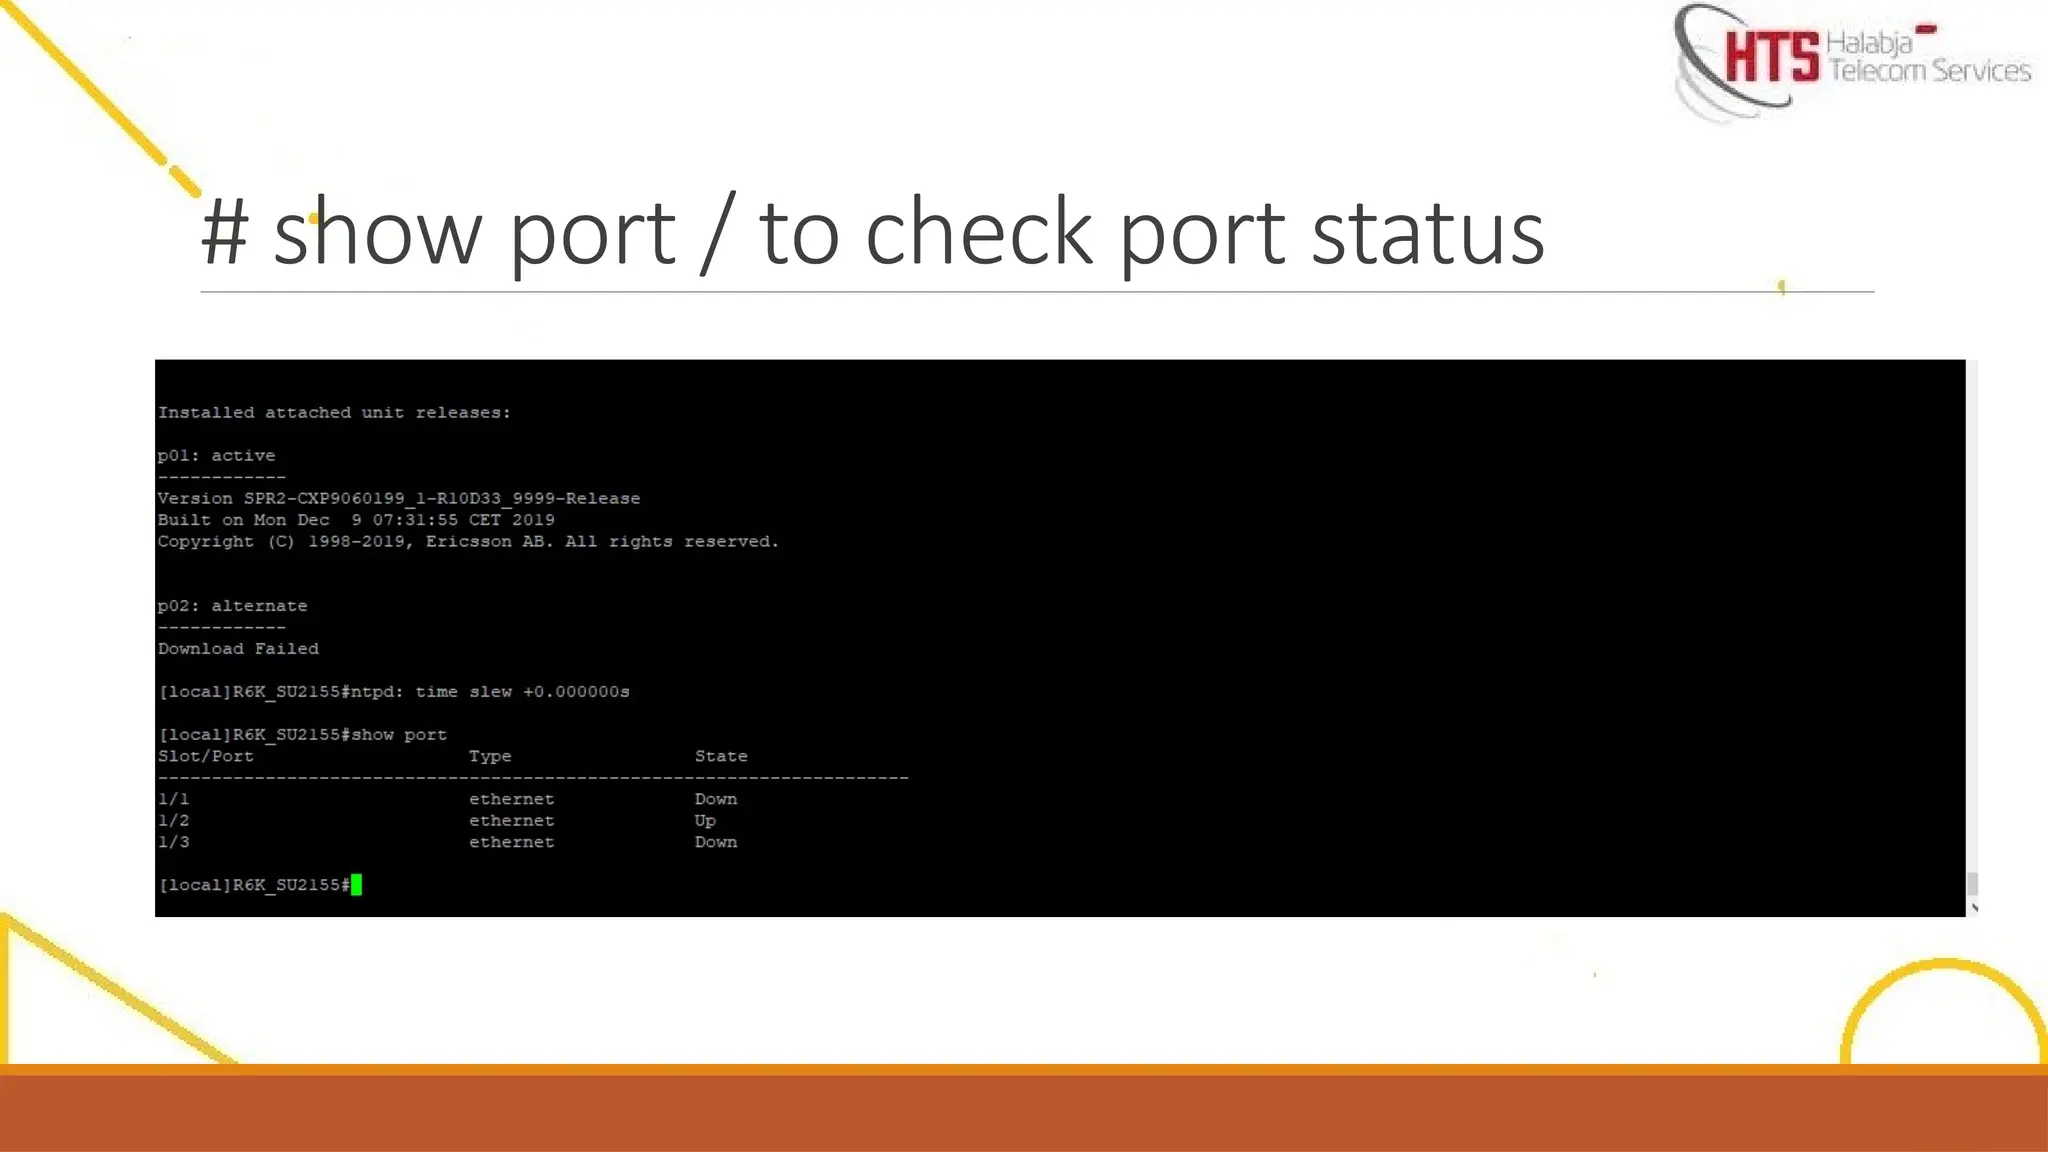
show port Displays the ports that are present or configured in the system.
show process Displays the current status of one or all processes running on the system
show rmon {alarms|
events}
Displays Remote Monitoring (RMON) information.
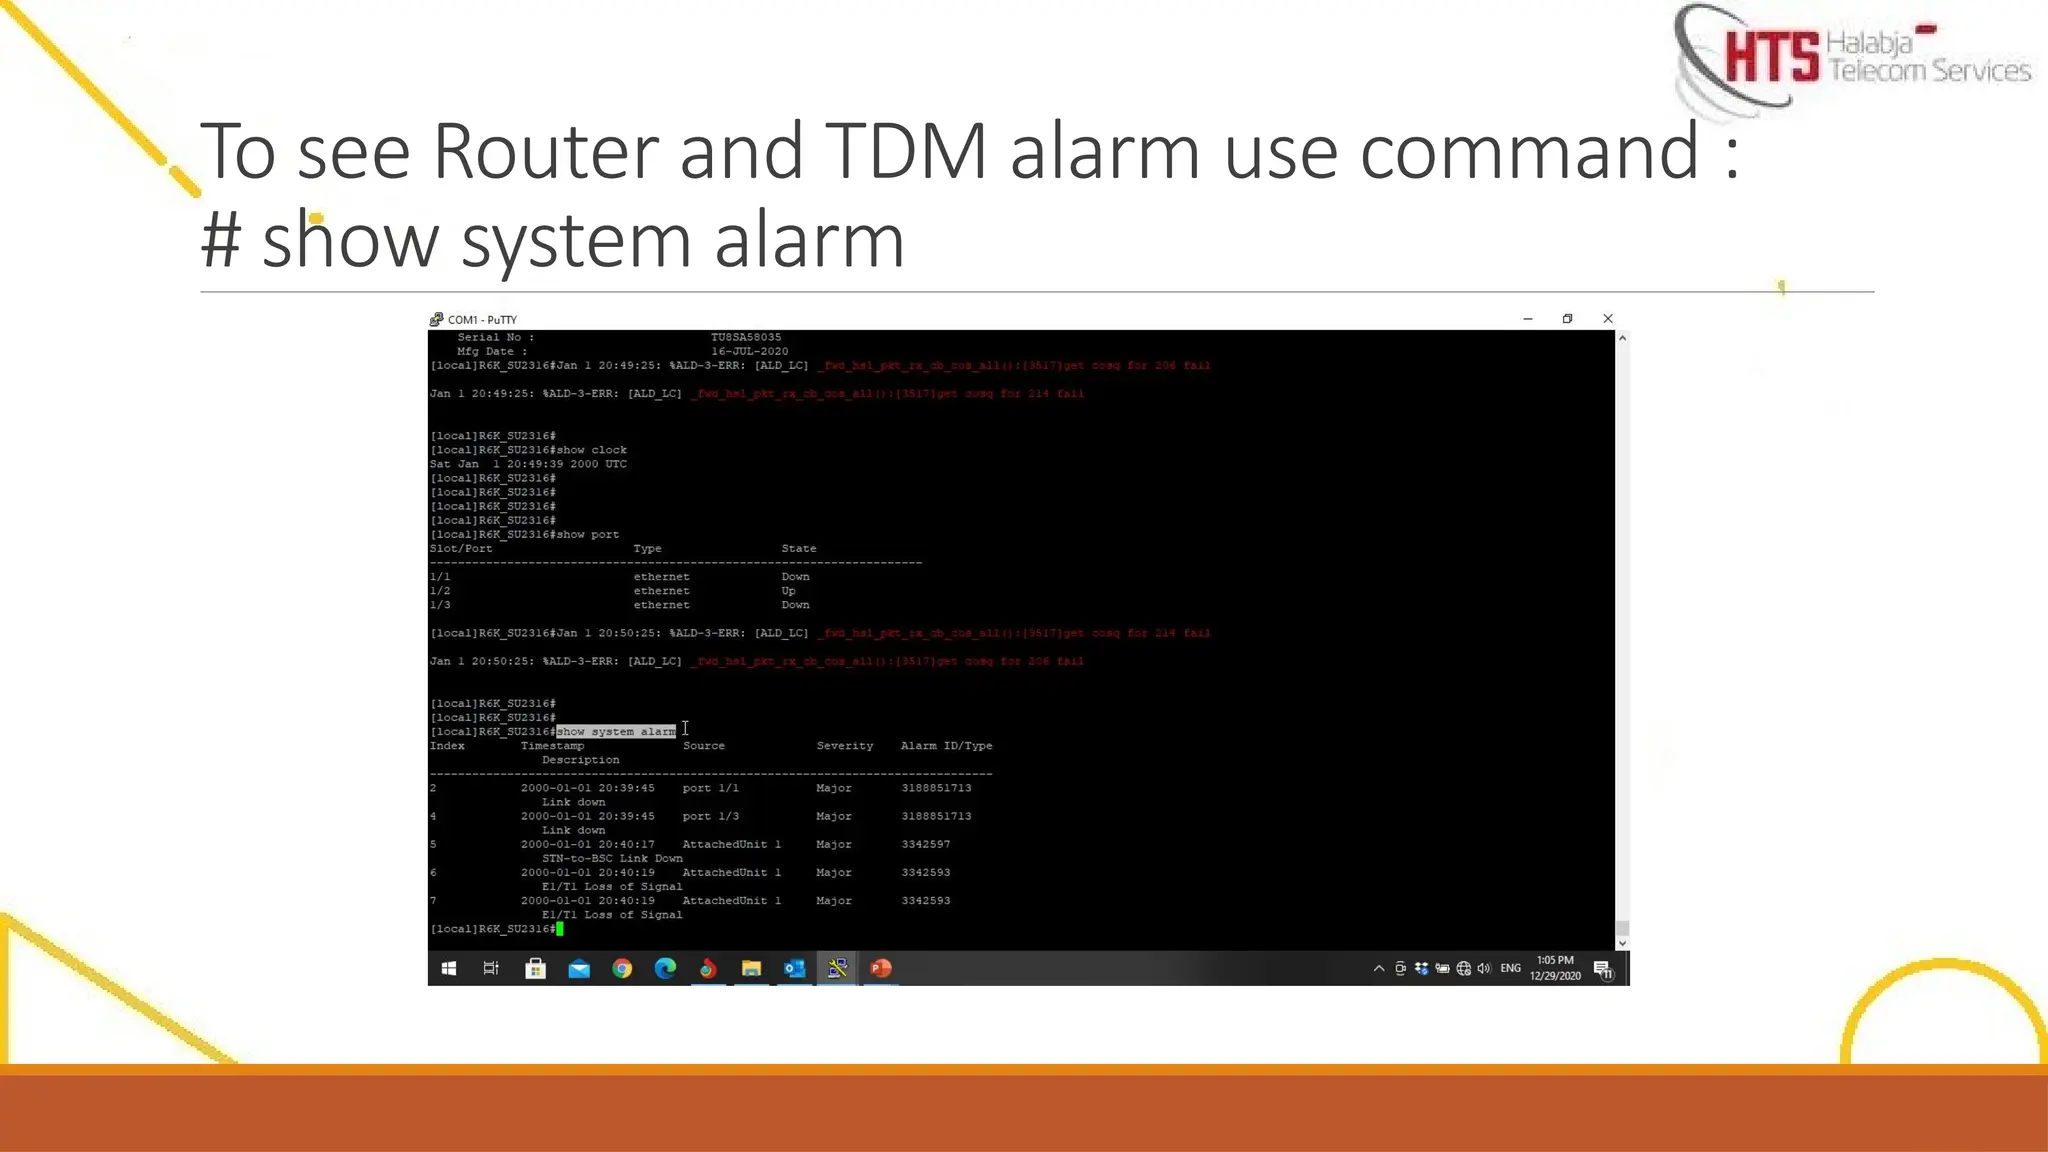
show system alarm Displays system-level, card-level, port-level, channel-level, or subchannel-level alarms.
traceroute Traces the IP route that packets take when traveling to the specified destination.
traceroute mpls Initiates an MPLS trace across an RSVP LSP or an LDP LSP.
Using Basic Troubleshooting Commands
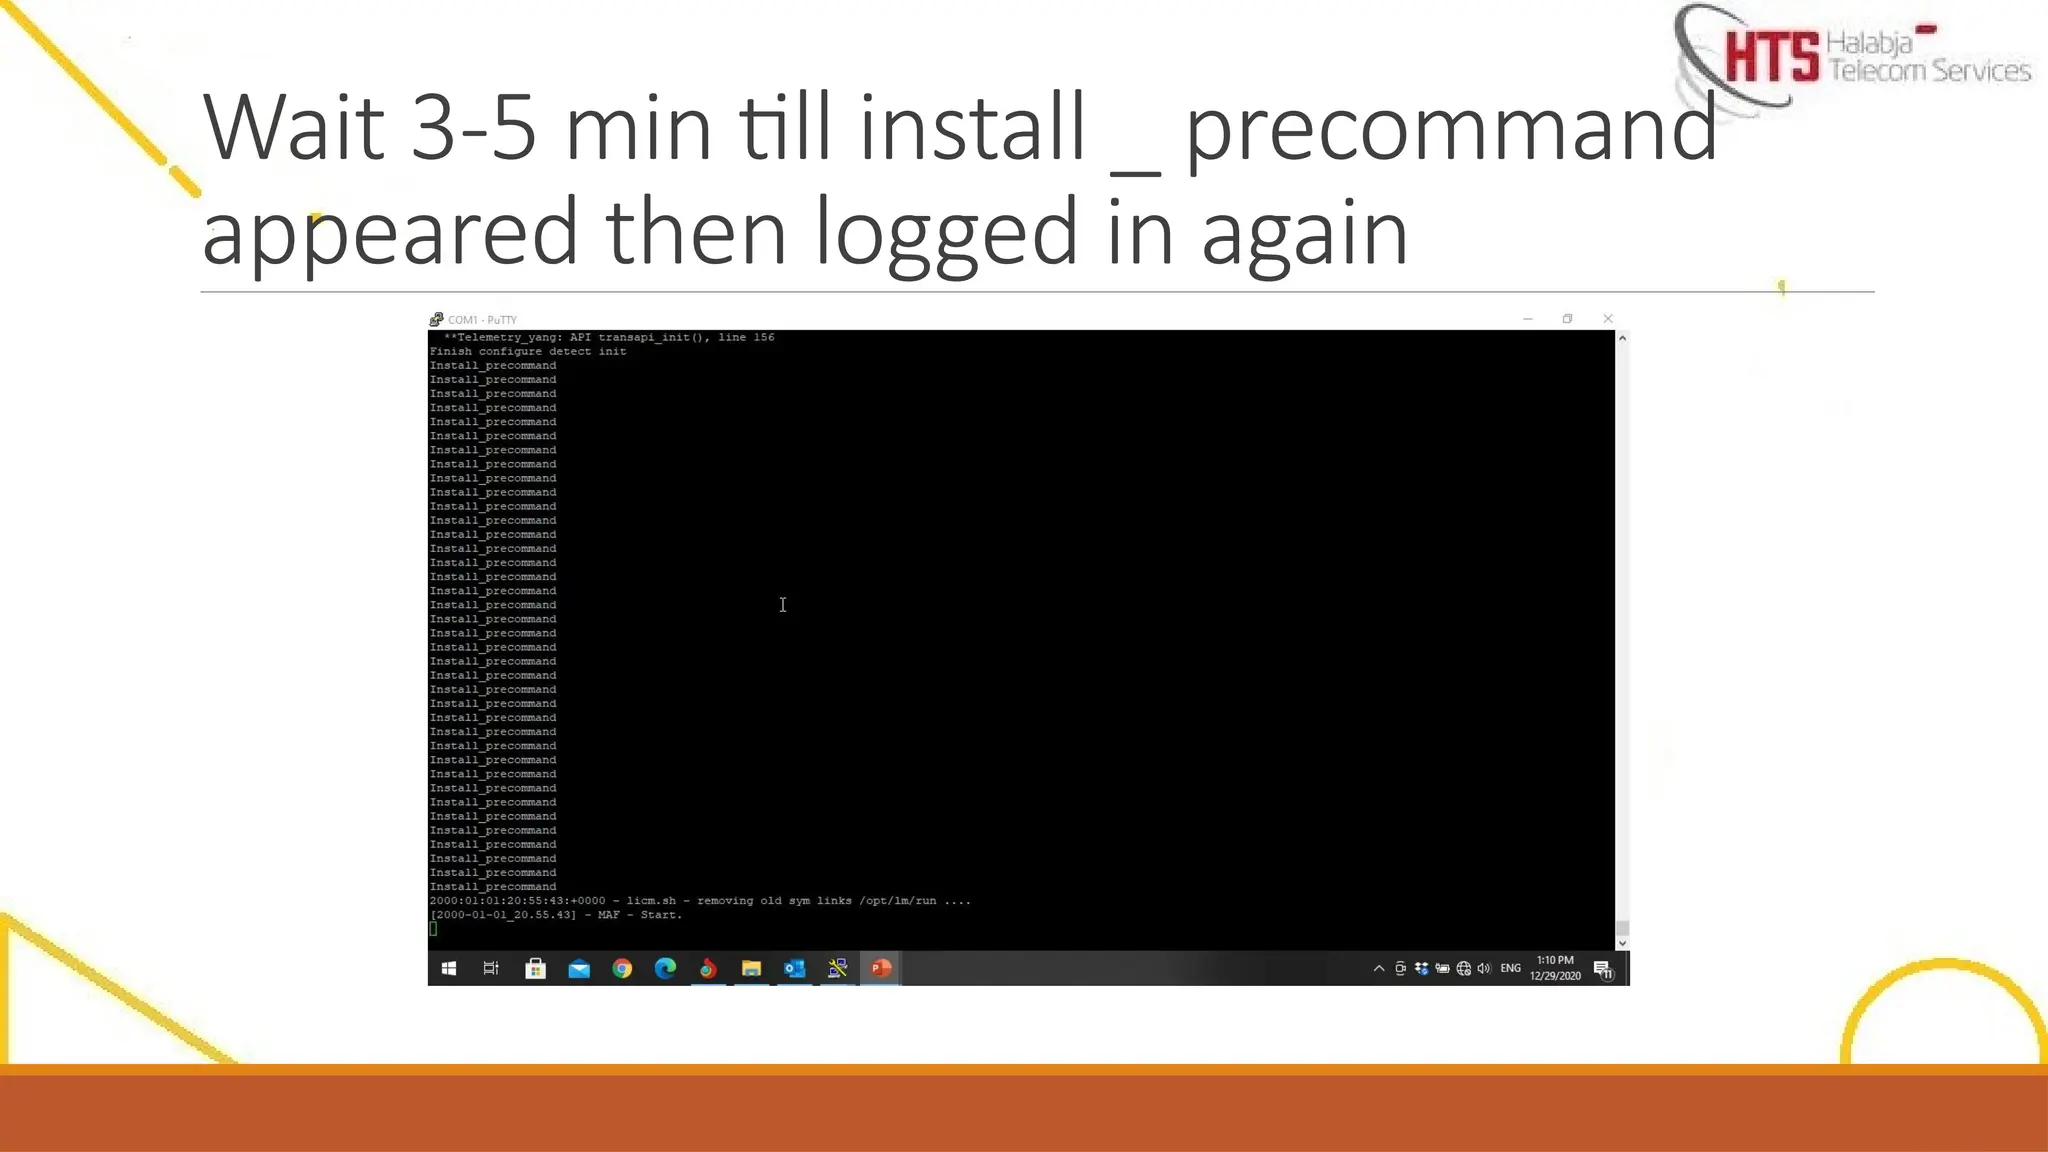
Wait 3-5 mintill install _ precommand
appeared then logged in again
65.
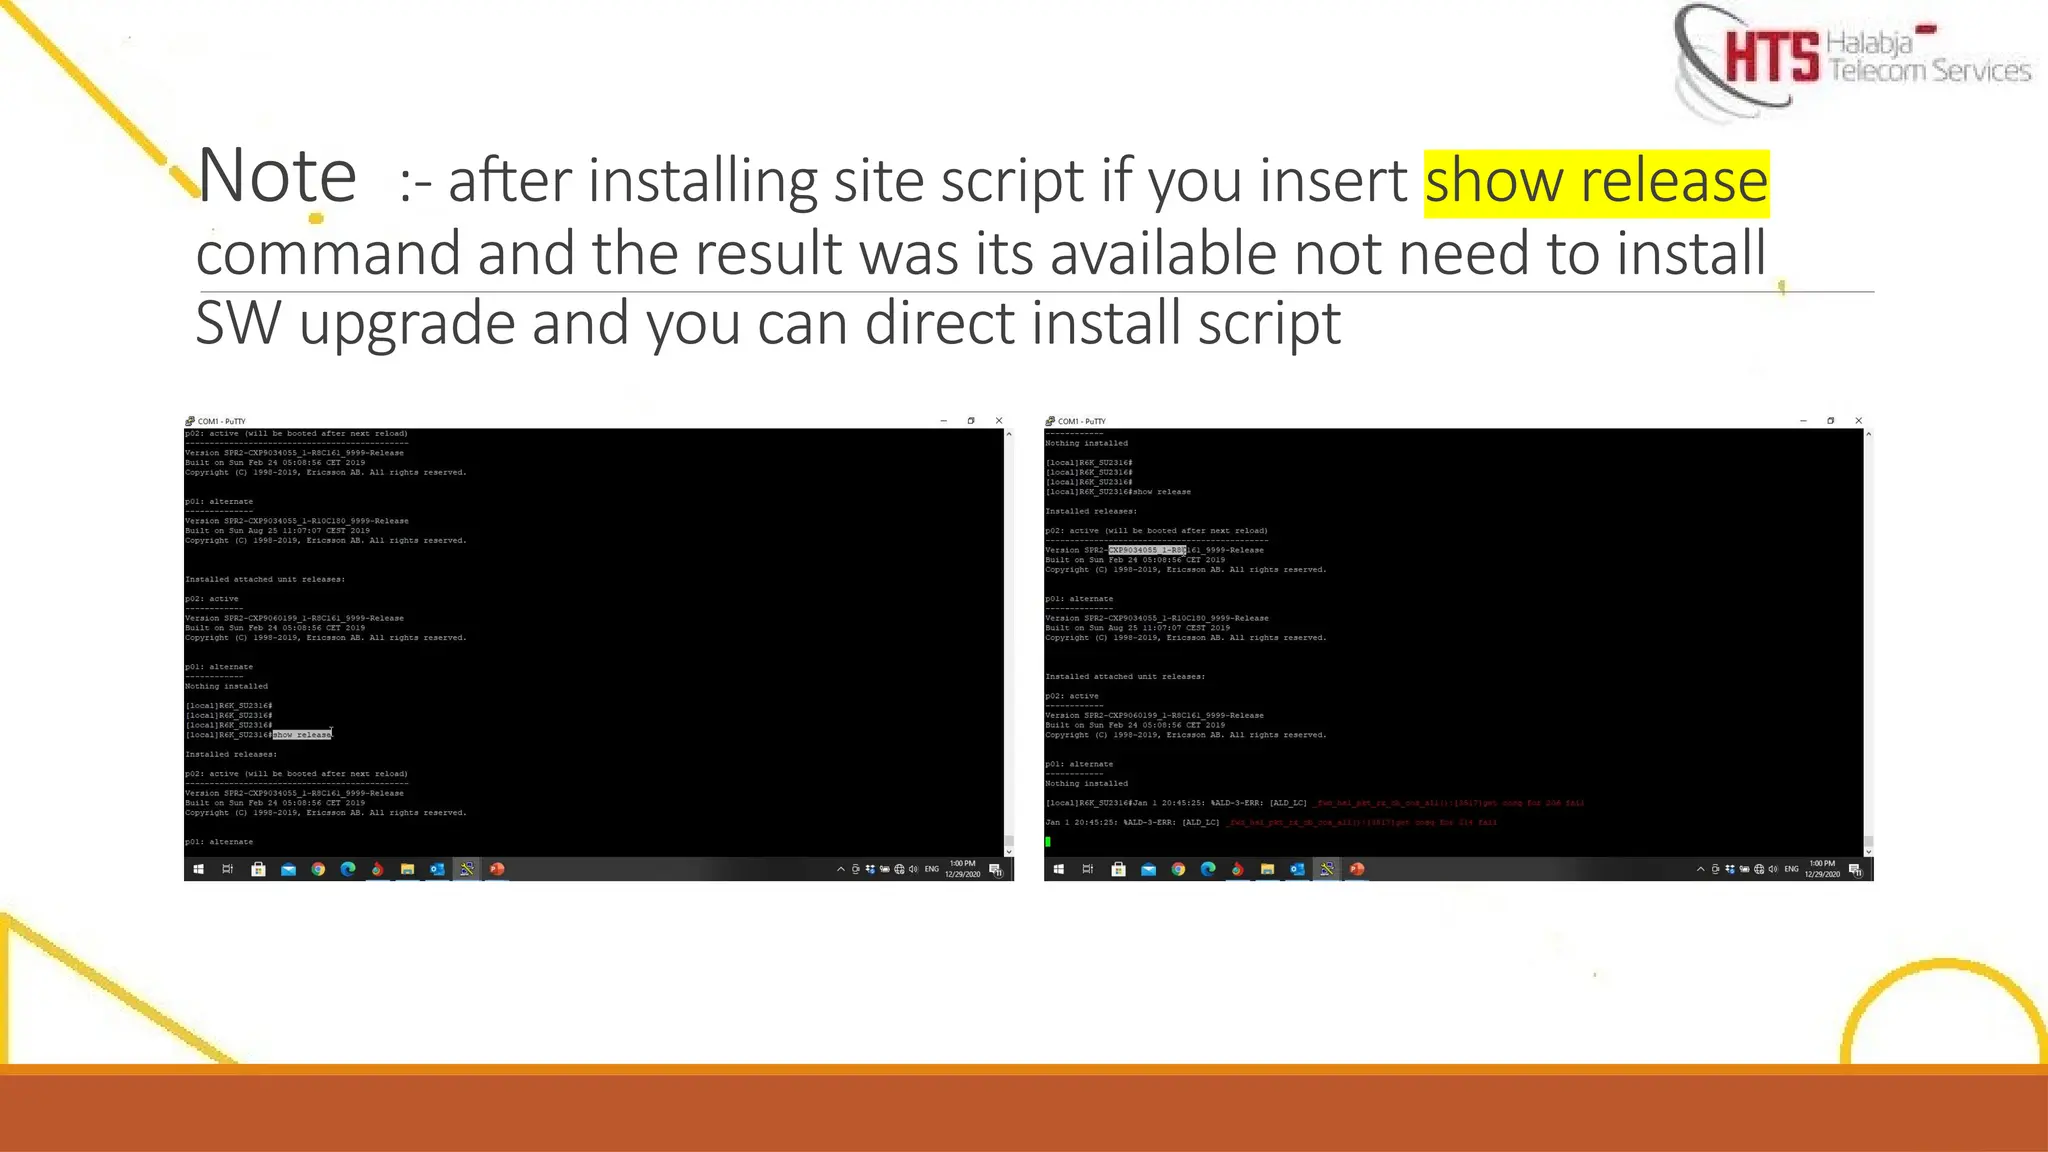
Note :- afterinstalling site script if you insert show release
command and the result was its available not need to install
SW upgrade and you can direct install script
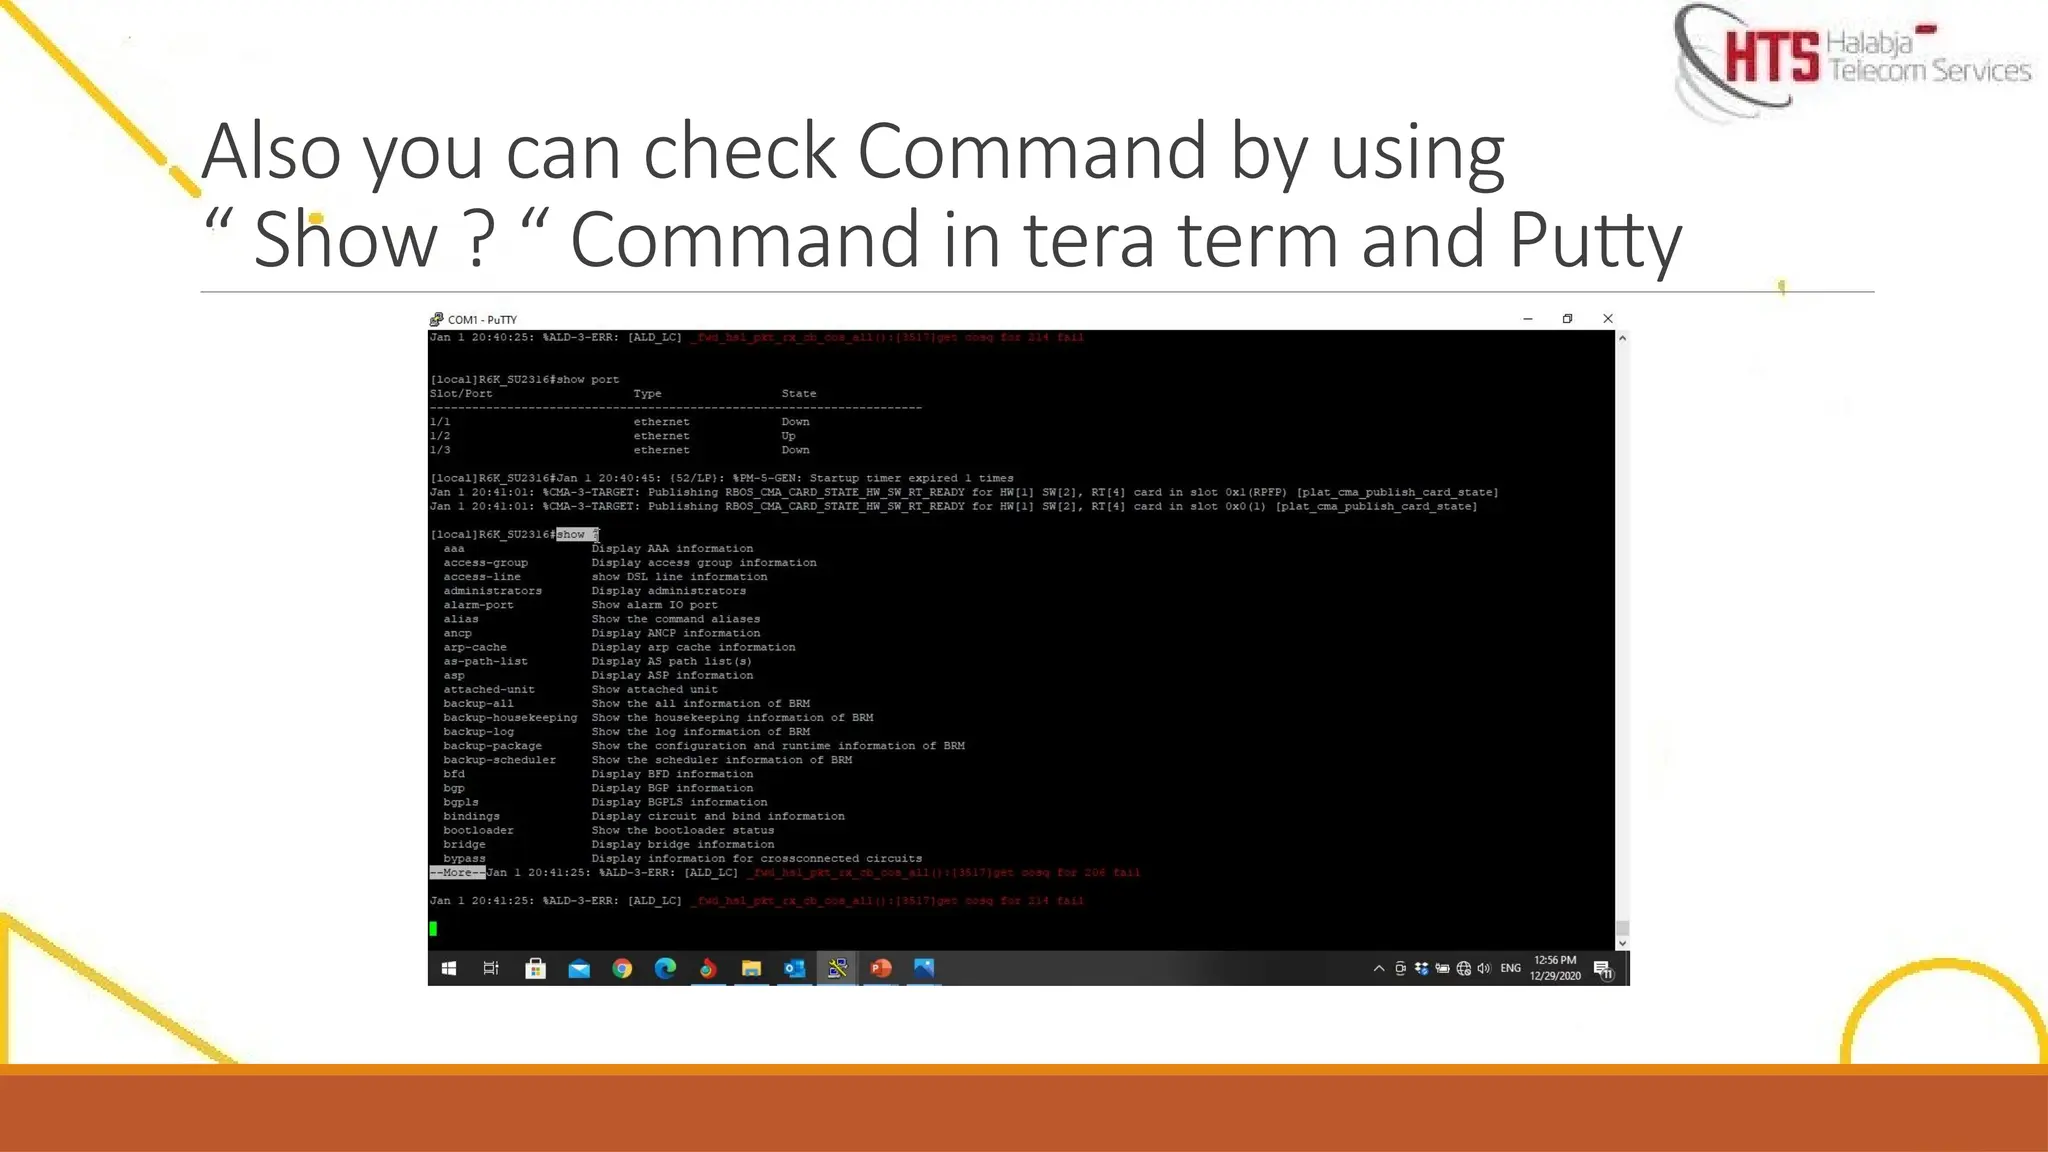
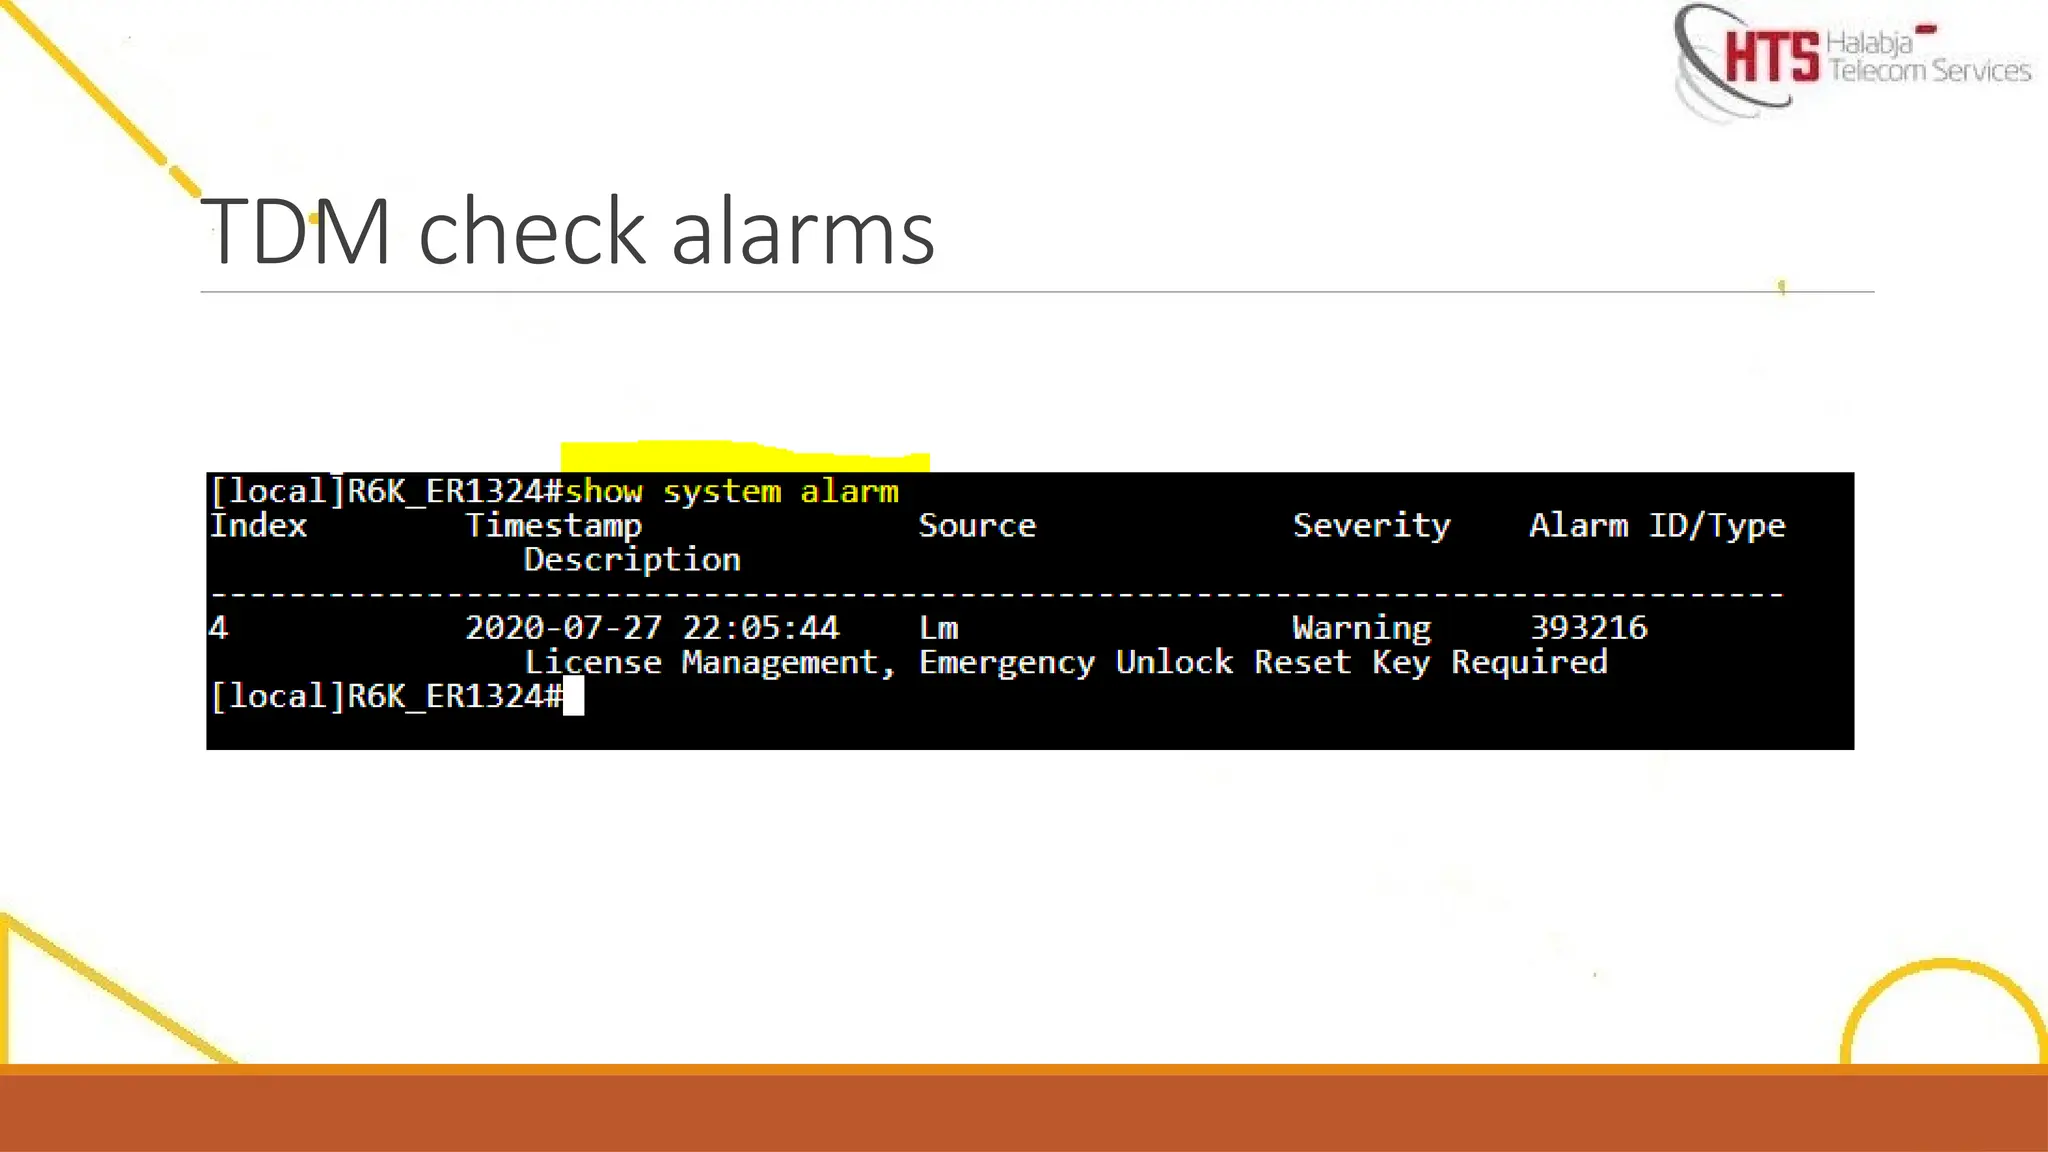
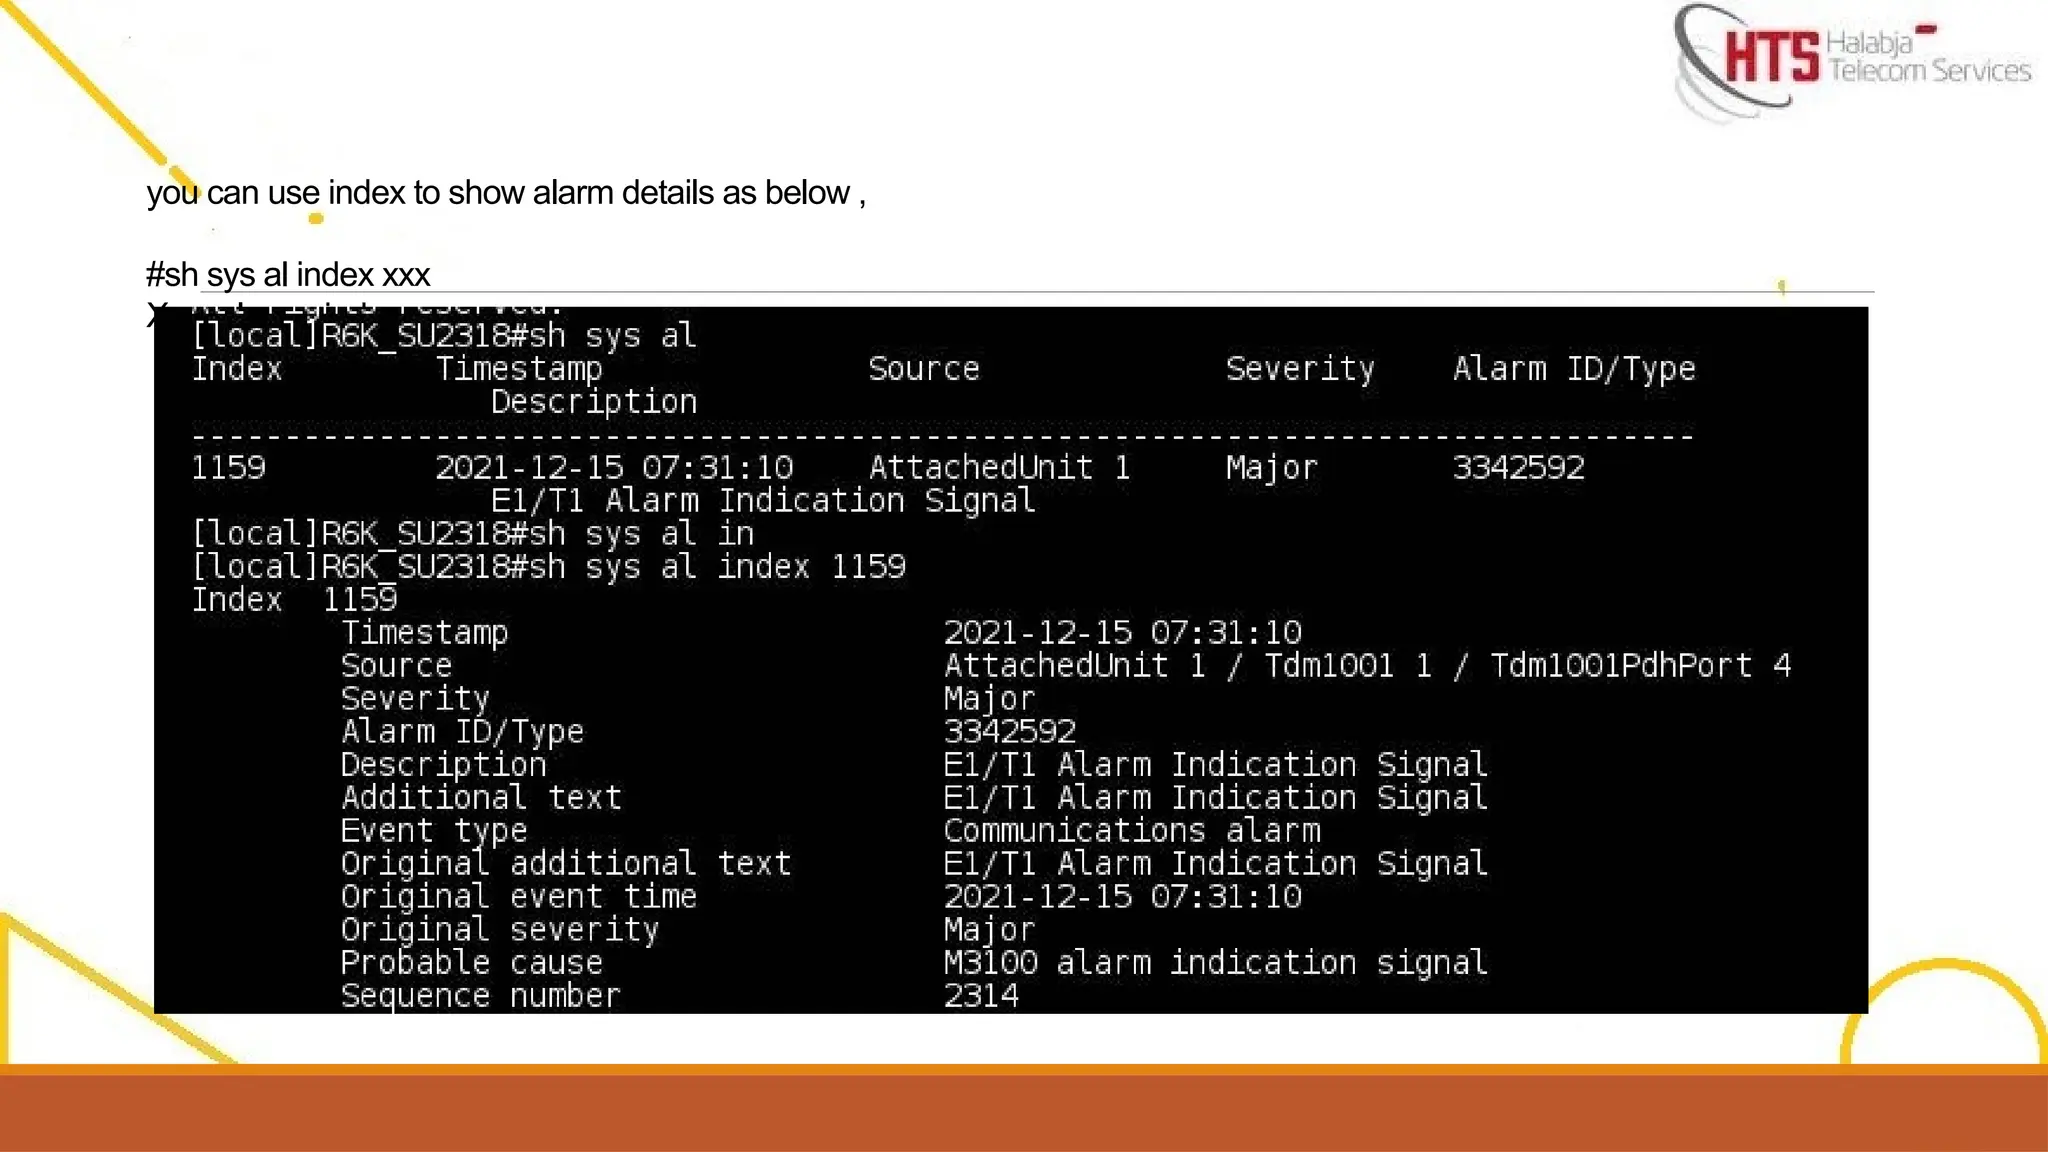
you can useindex to show alarm details as below ,
#sh sys al index xxx
Xxx=alarms index
72.
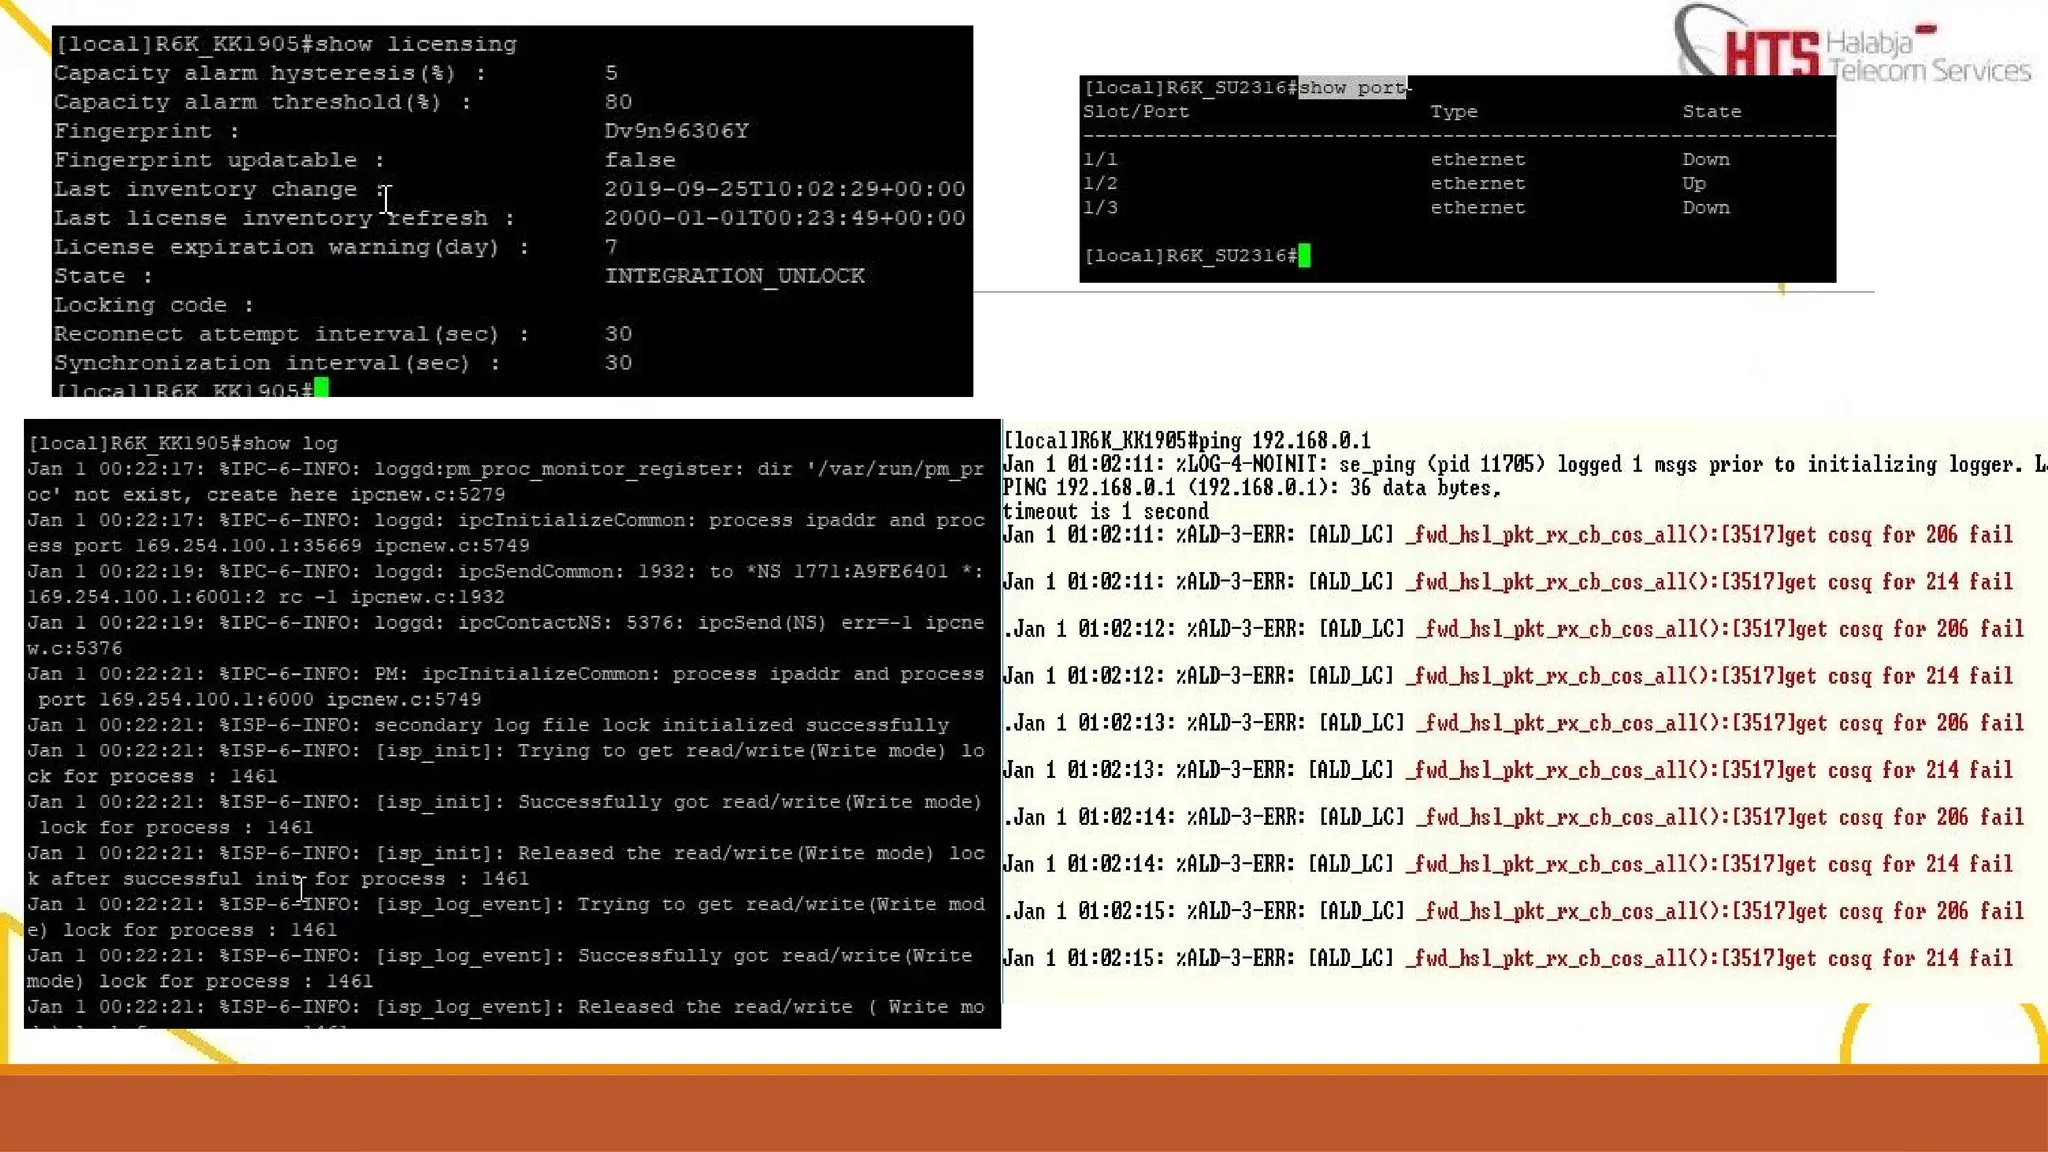
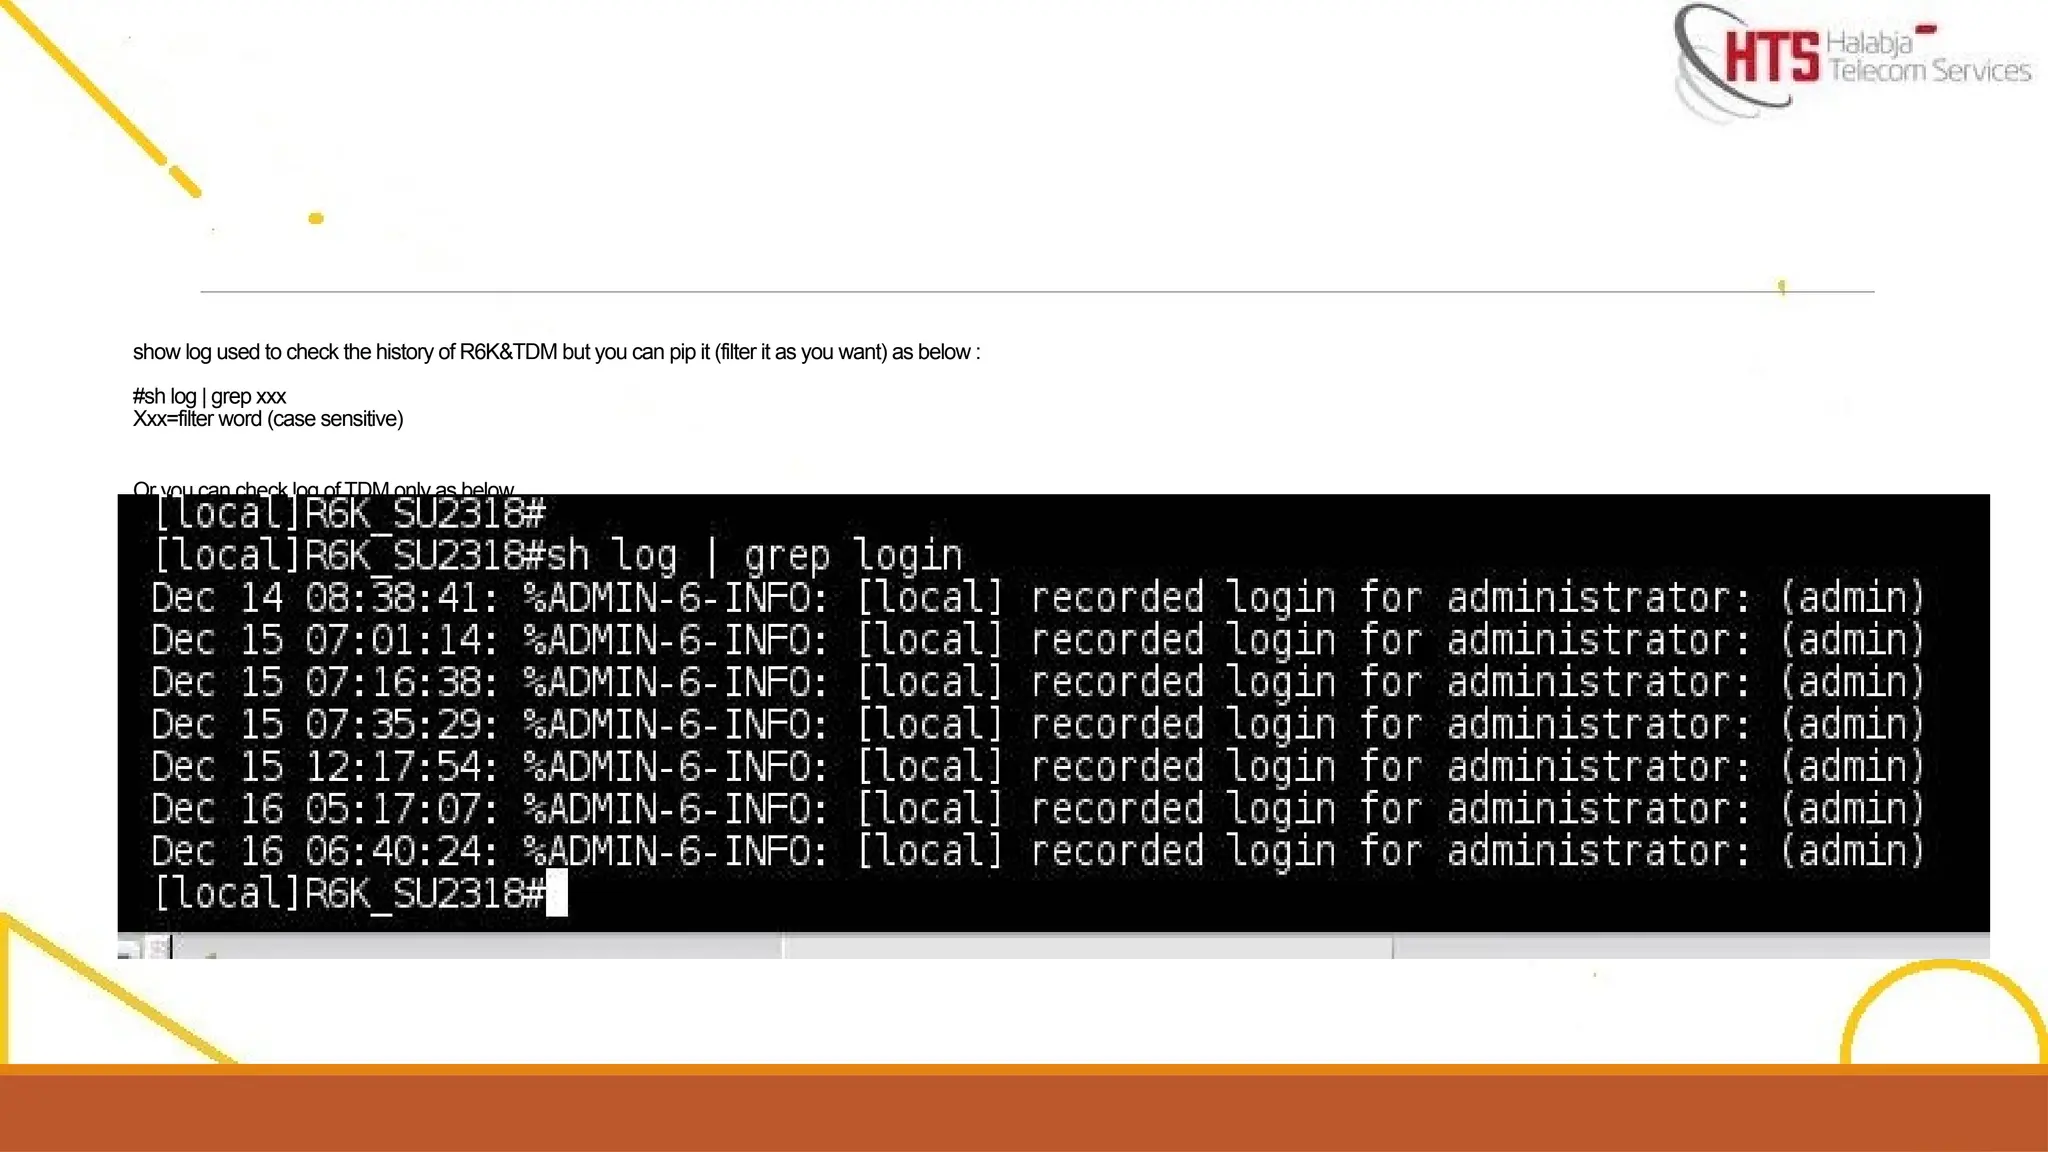
show log usedto check the history of R6K&TDM but you can pip it (filter it as you want) as below :
#sh log | grep xxx
Xxx=filter word (case sensitive)
Or you can check log of TDM only as below ,
#sh attached-unit 1 log
73.
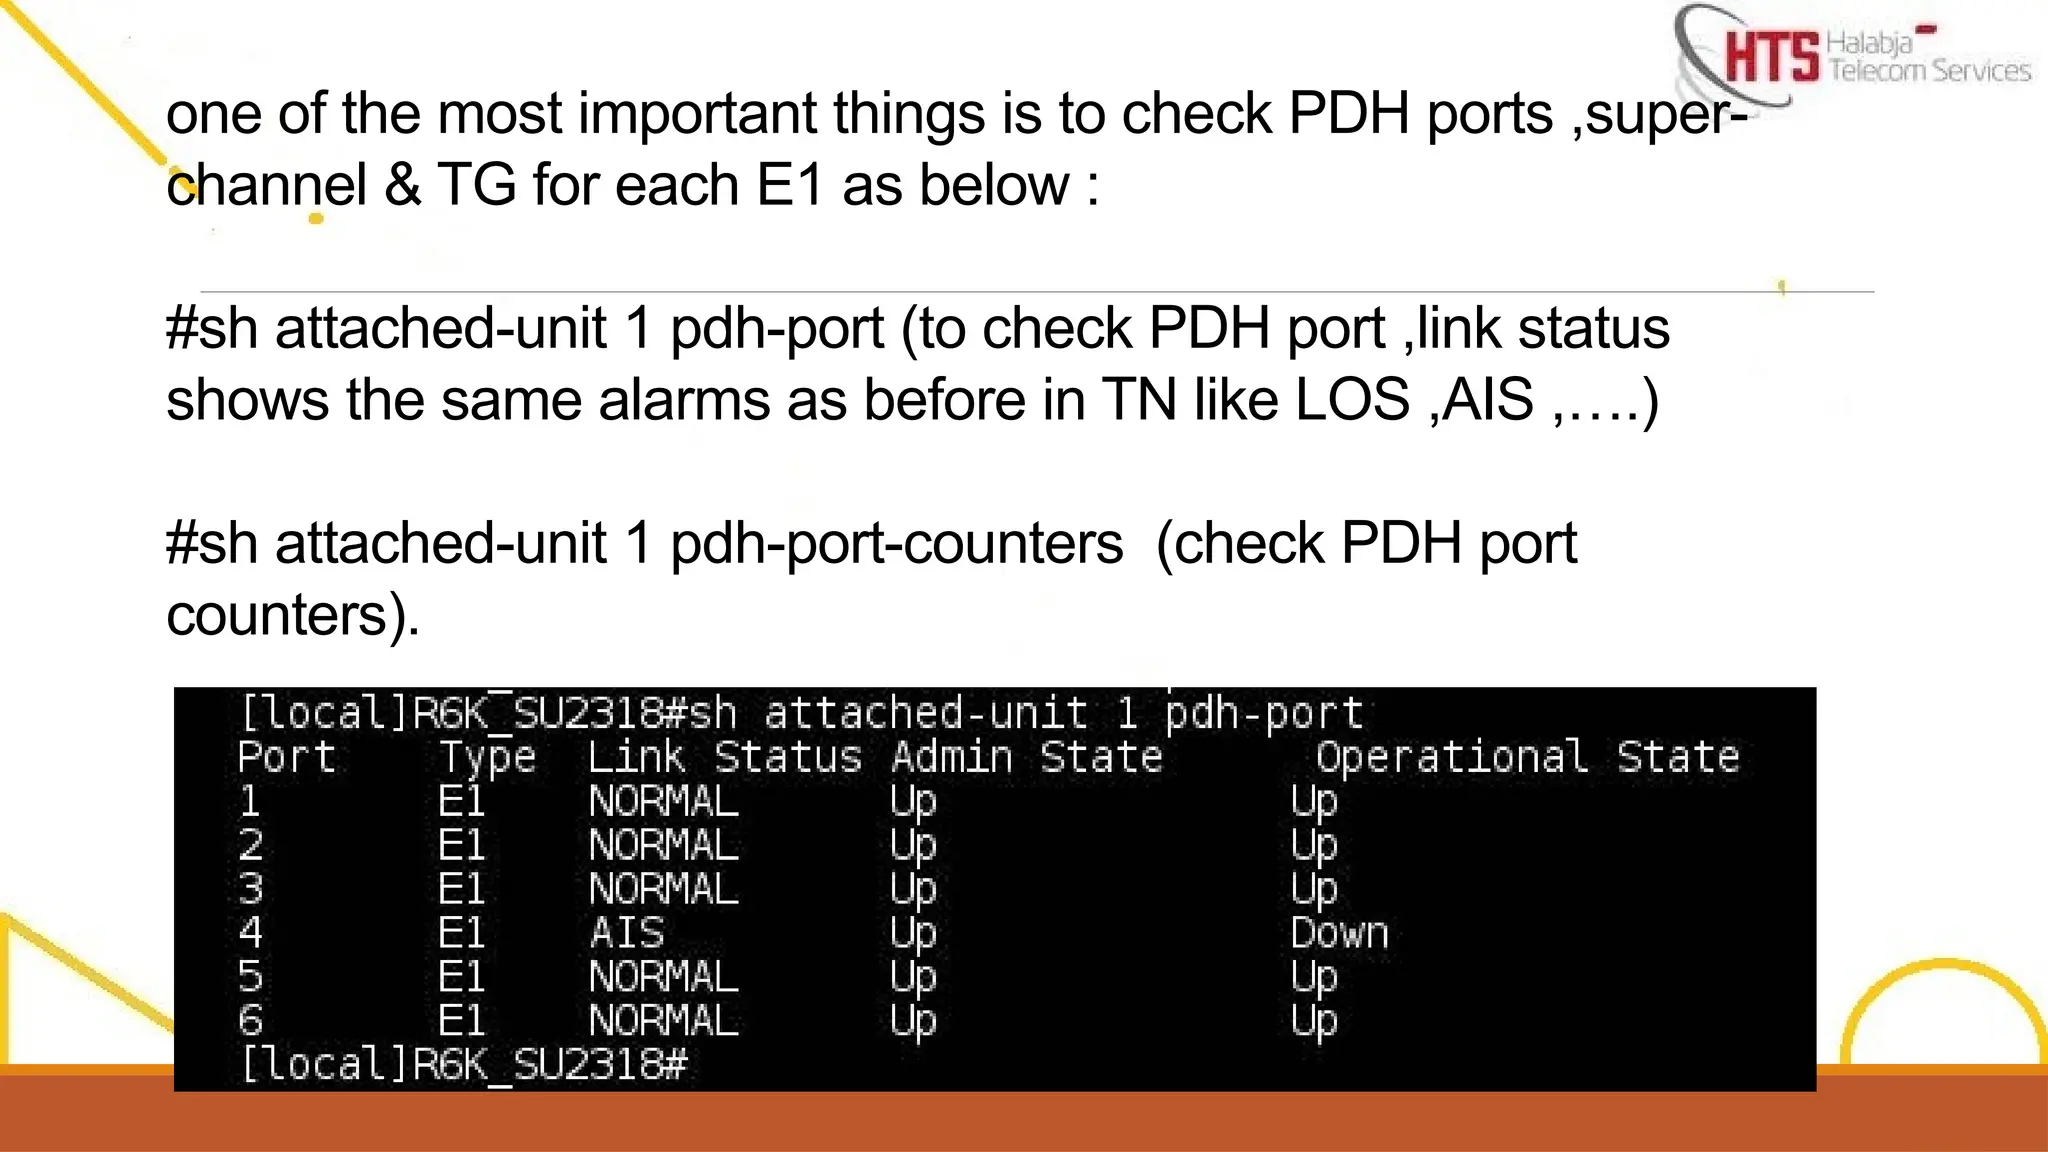
one of themost important things is to check PDH ports ,super-
channel & TG for each E1 as below :
#sh attached-unit 1 pdh-port (to check PDH port ,link status
shows the same alarms as before in TN like LOS ,AIS ,….)
#sh attached-unit 1 pdh-port-counters (check PDH port
counters).
74.
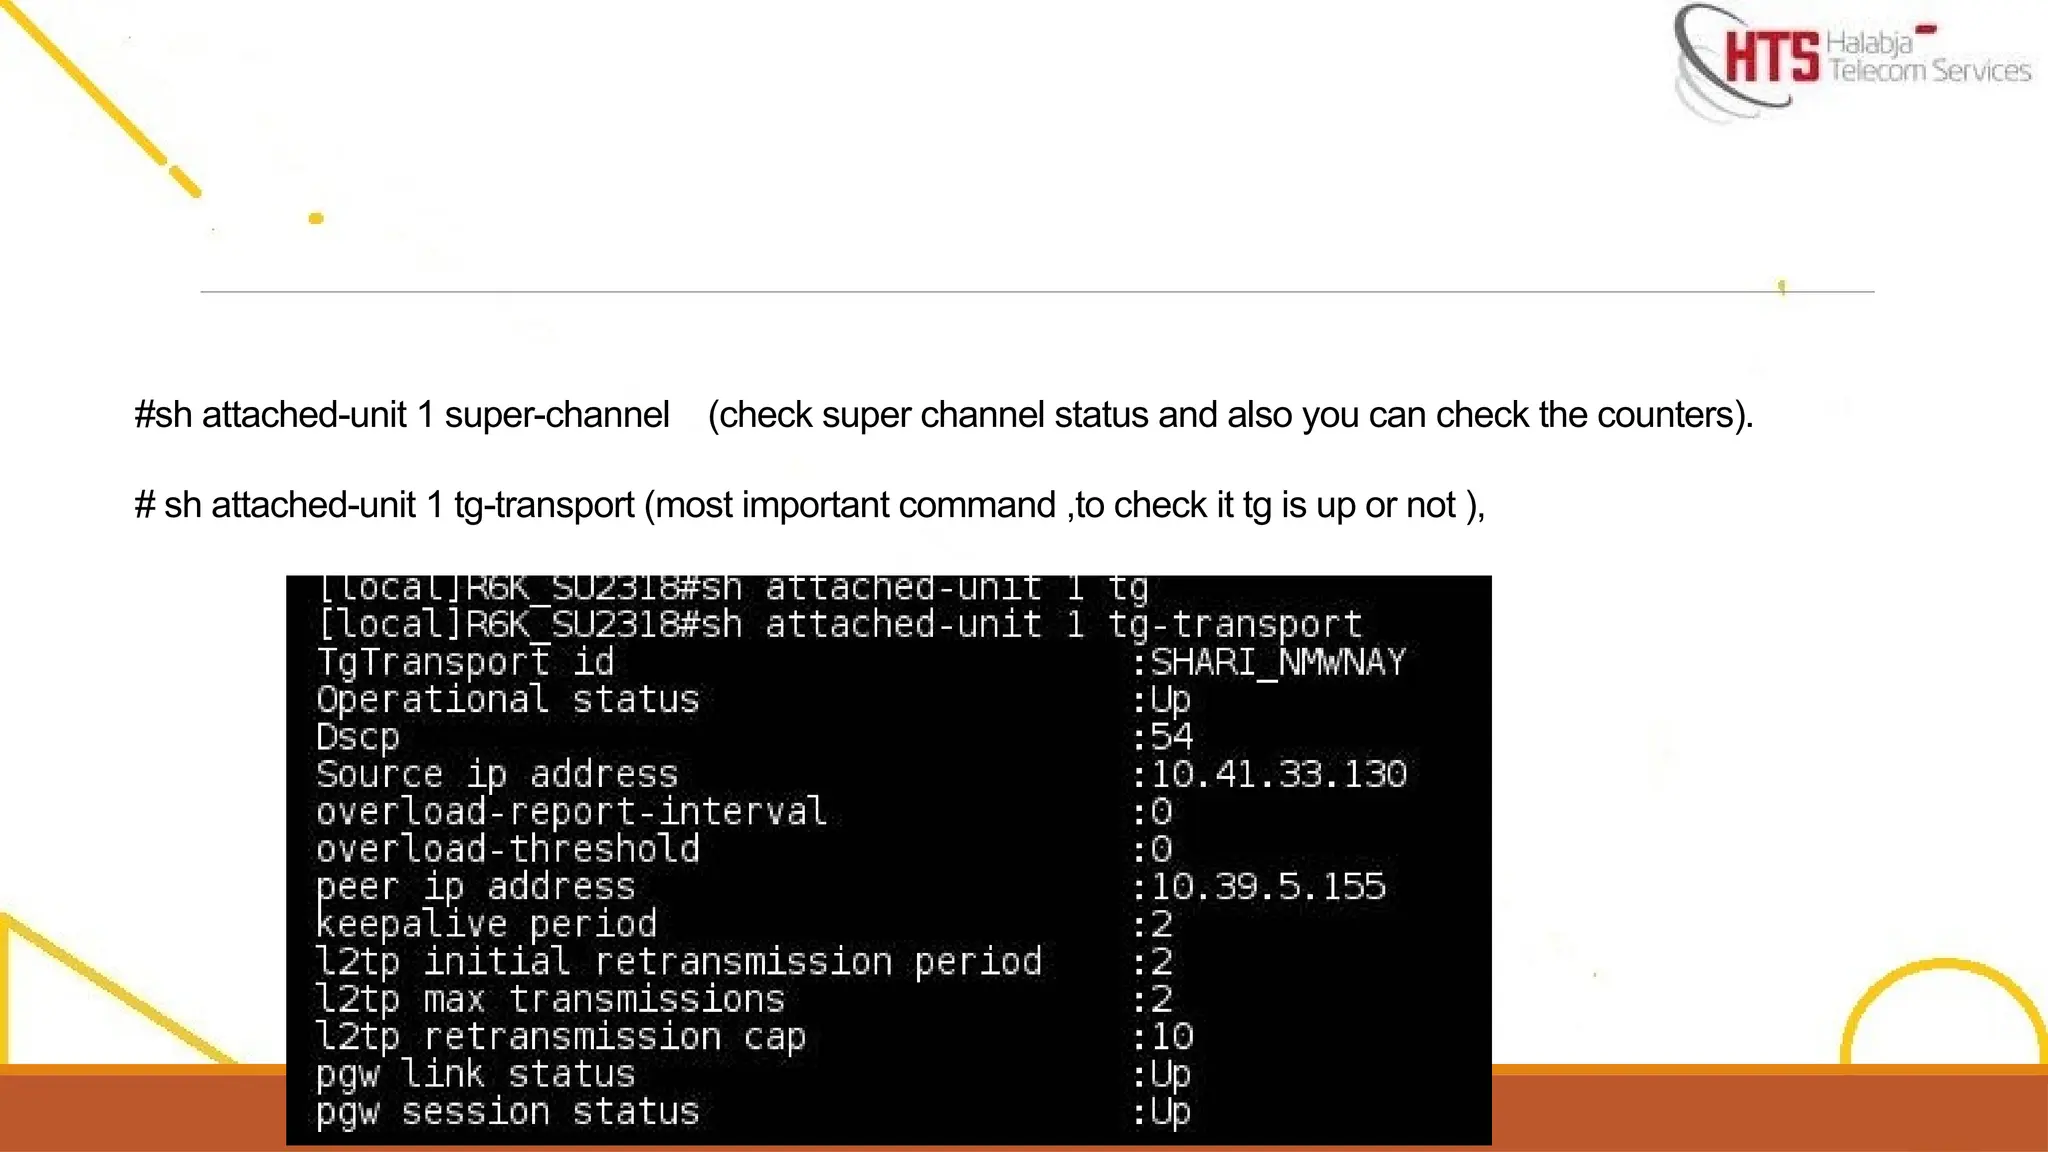
#sh attached-unit 1super-channel (check super channel status and also you can check the counters).
# sh attached-unit 1 tg-transport (most important command ,to check it tg is up or not ),
75.
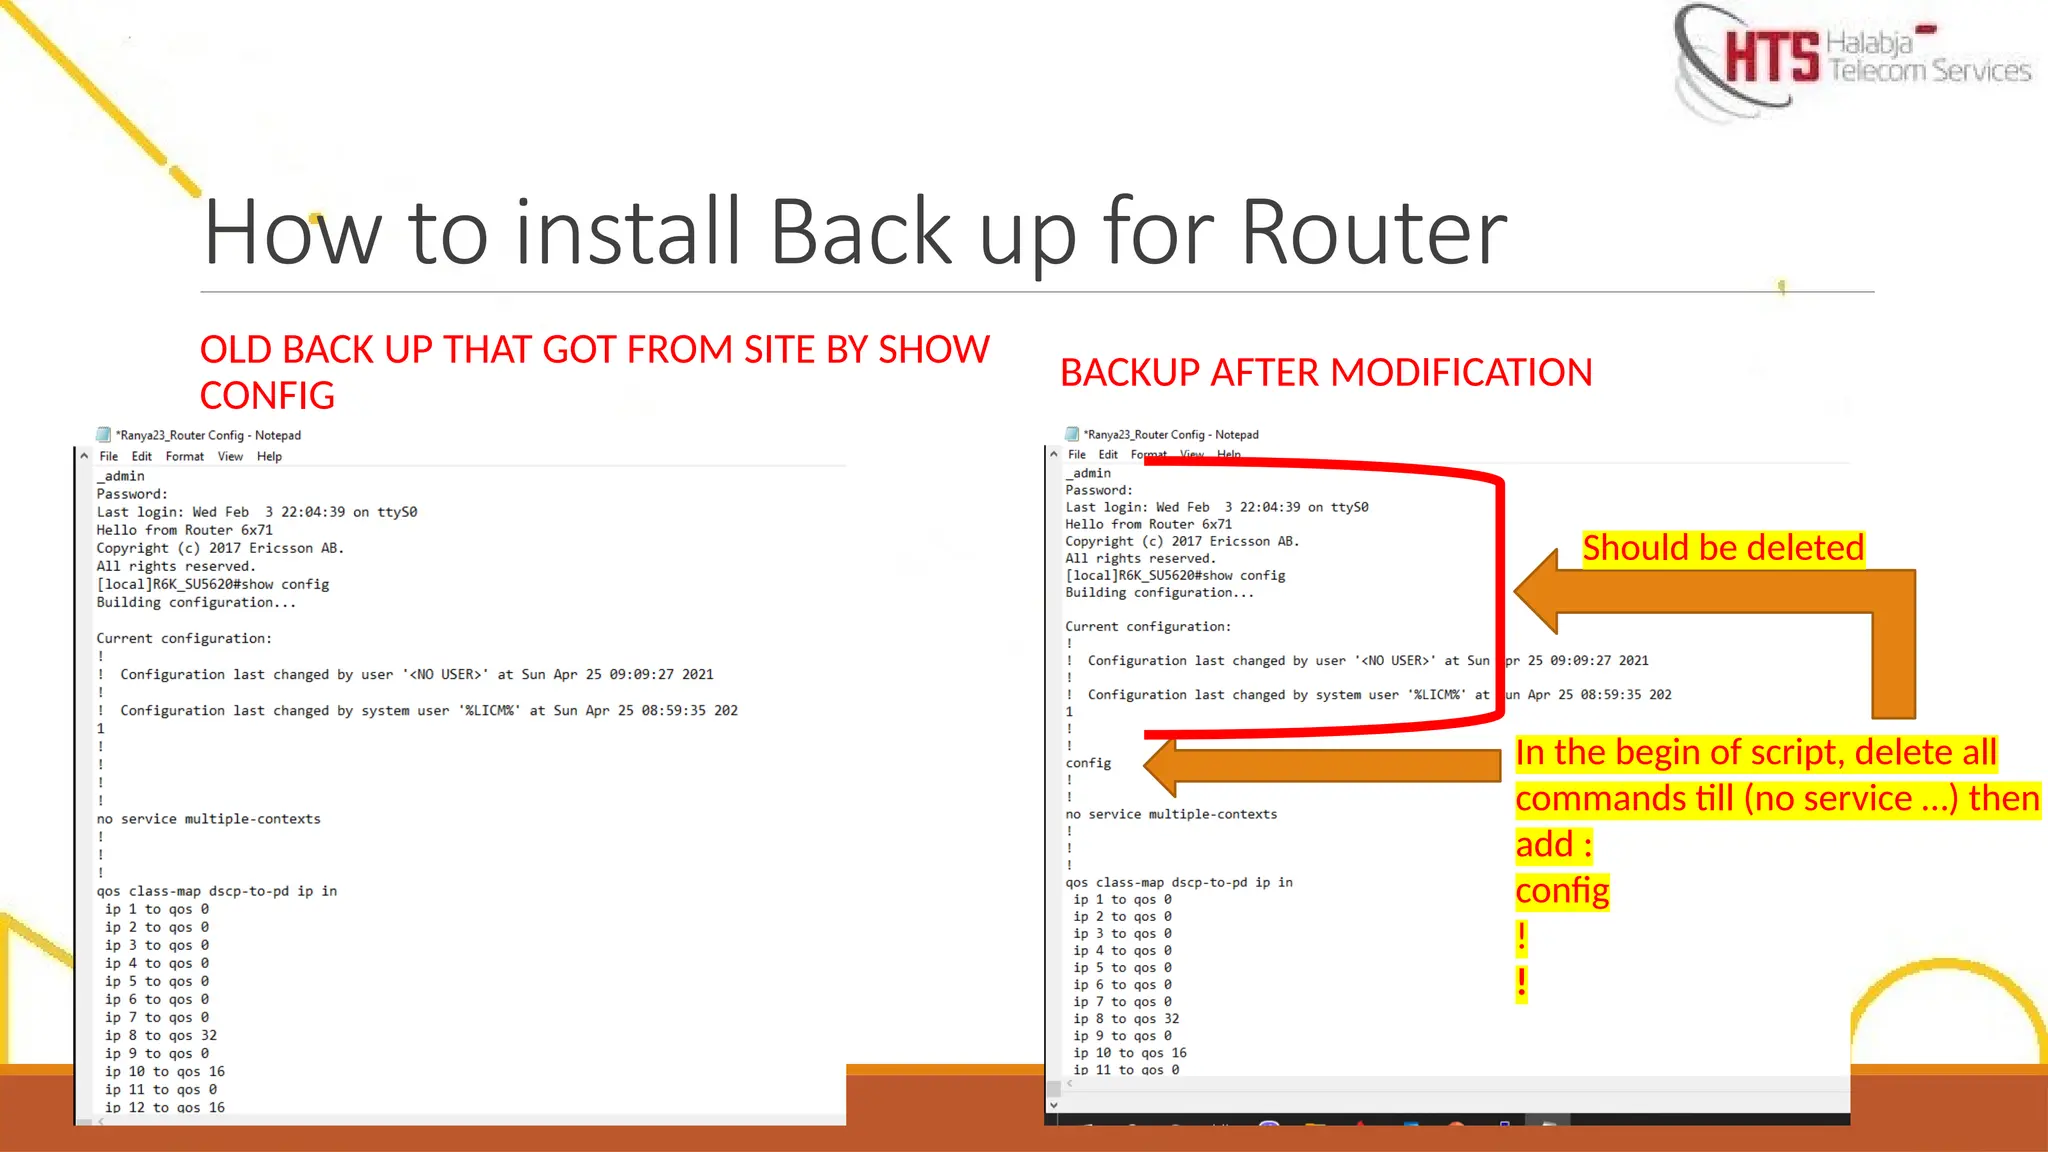
How to installBack up for Router
OLD BACK UP THAT GOT FROM SITE BY SHOW
CONFIG
BACKUP AFTER MODIFICATION
In the begin of script, delete all
commands till (no service …) then
add :
config
!
!
Should be deleted
76.
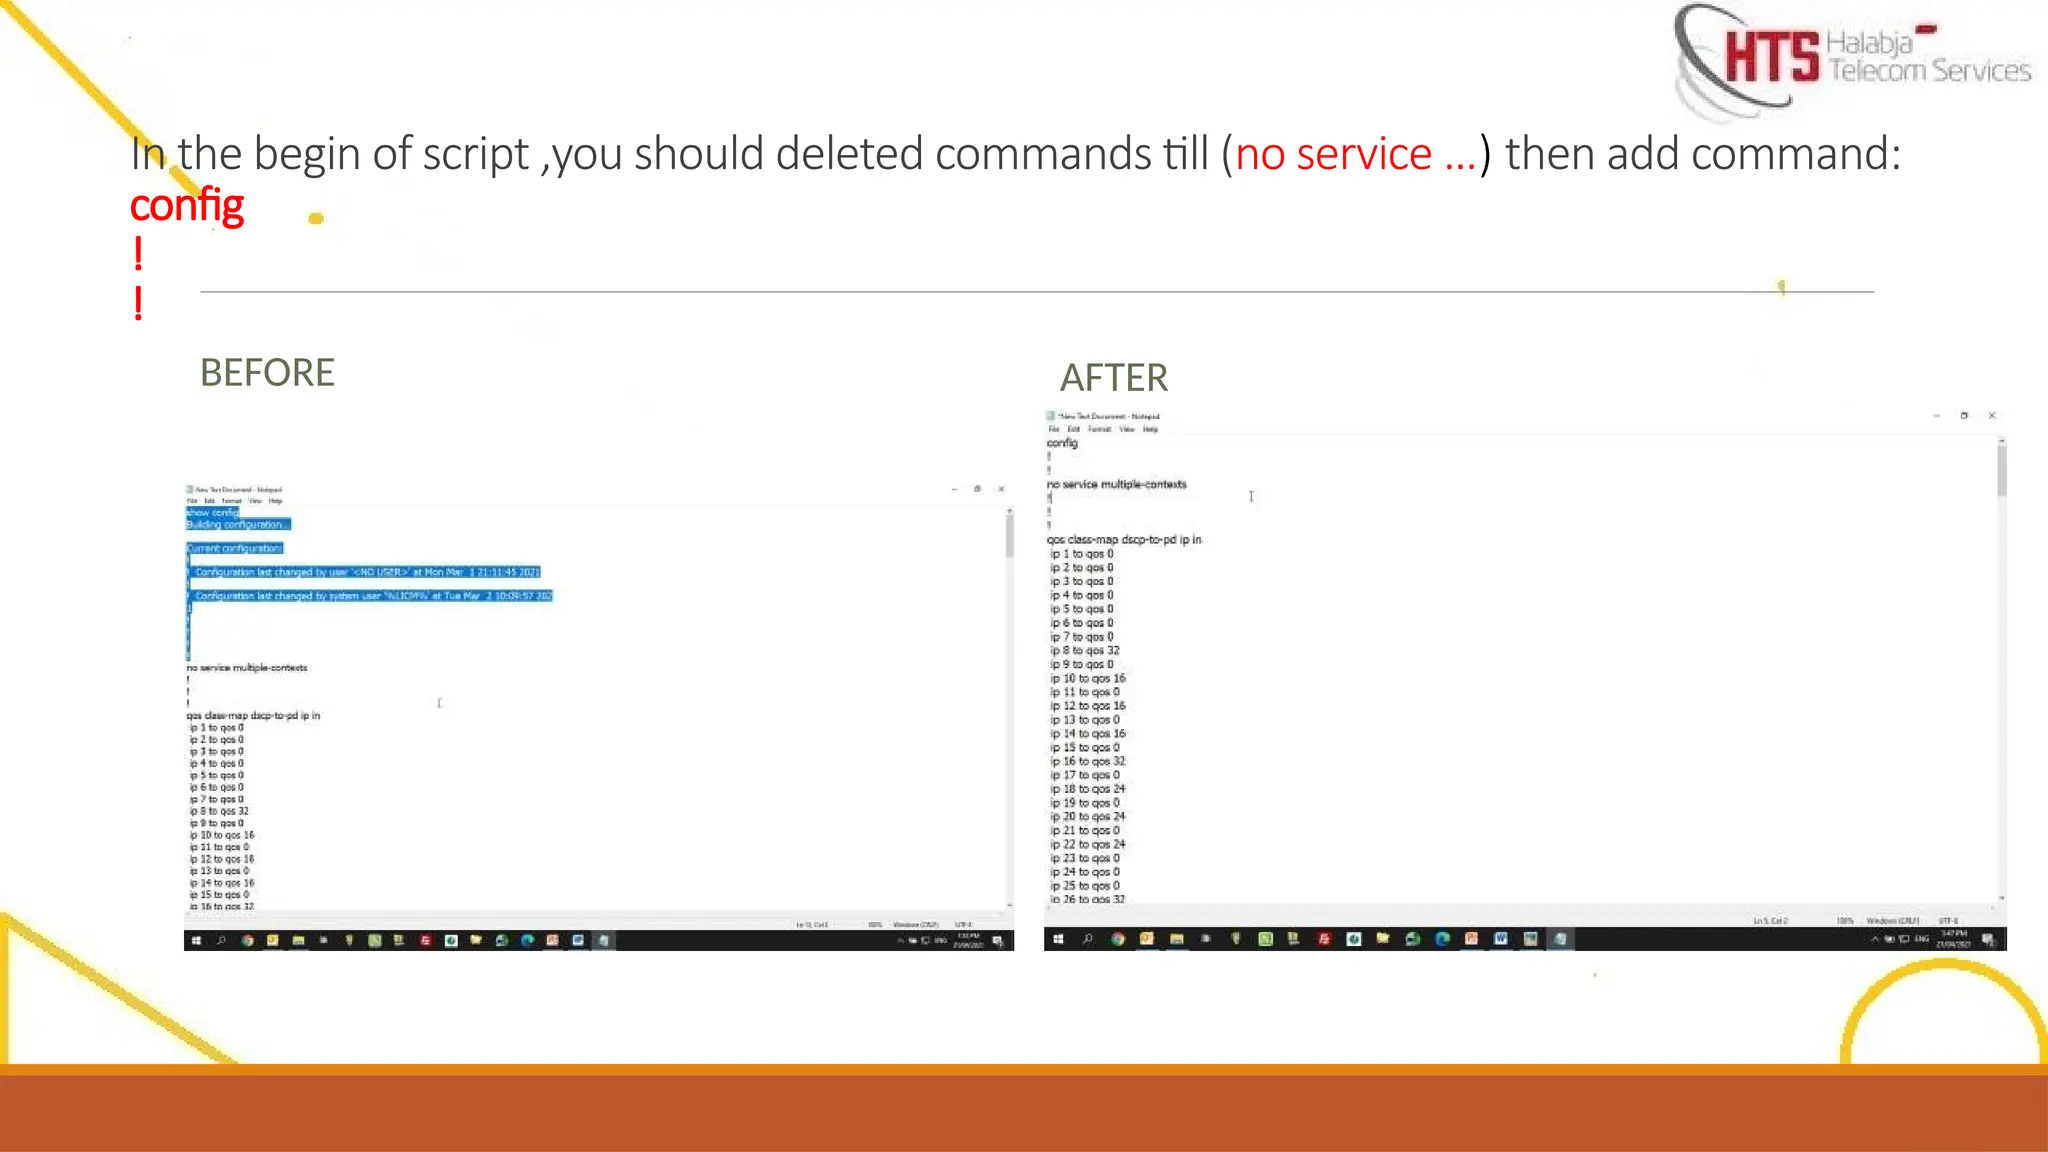
In the beginof script ,you should deleted commands till (no service …) then add command:
config
!
!
BEFORE AFTER
77.
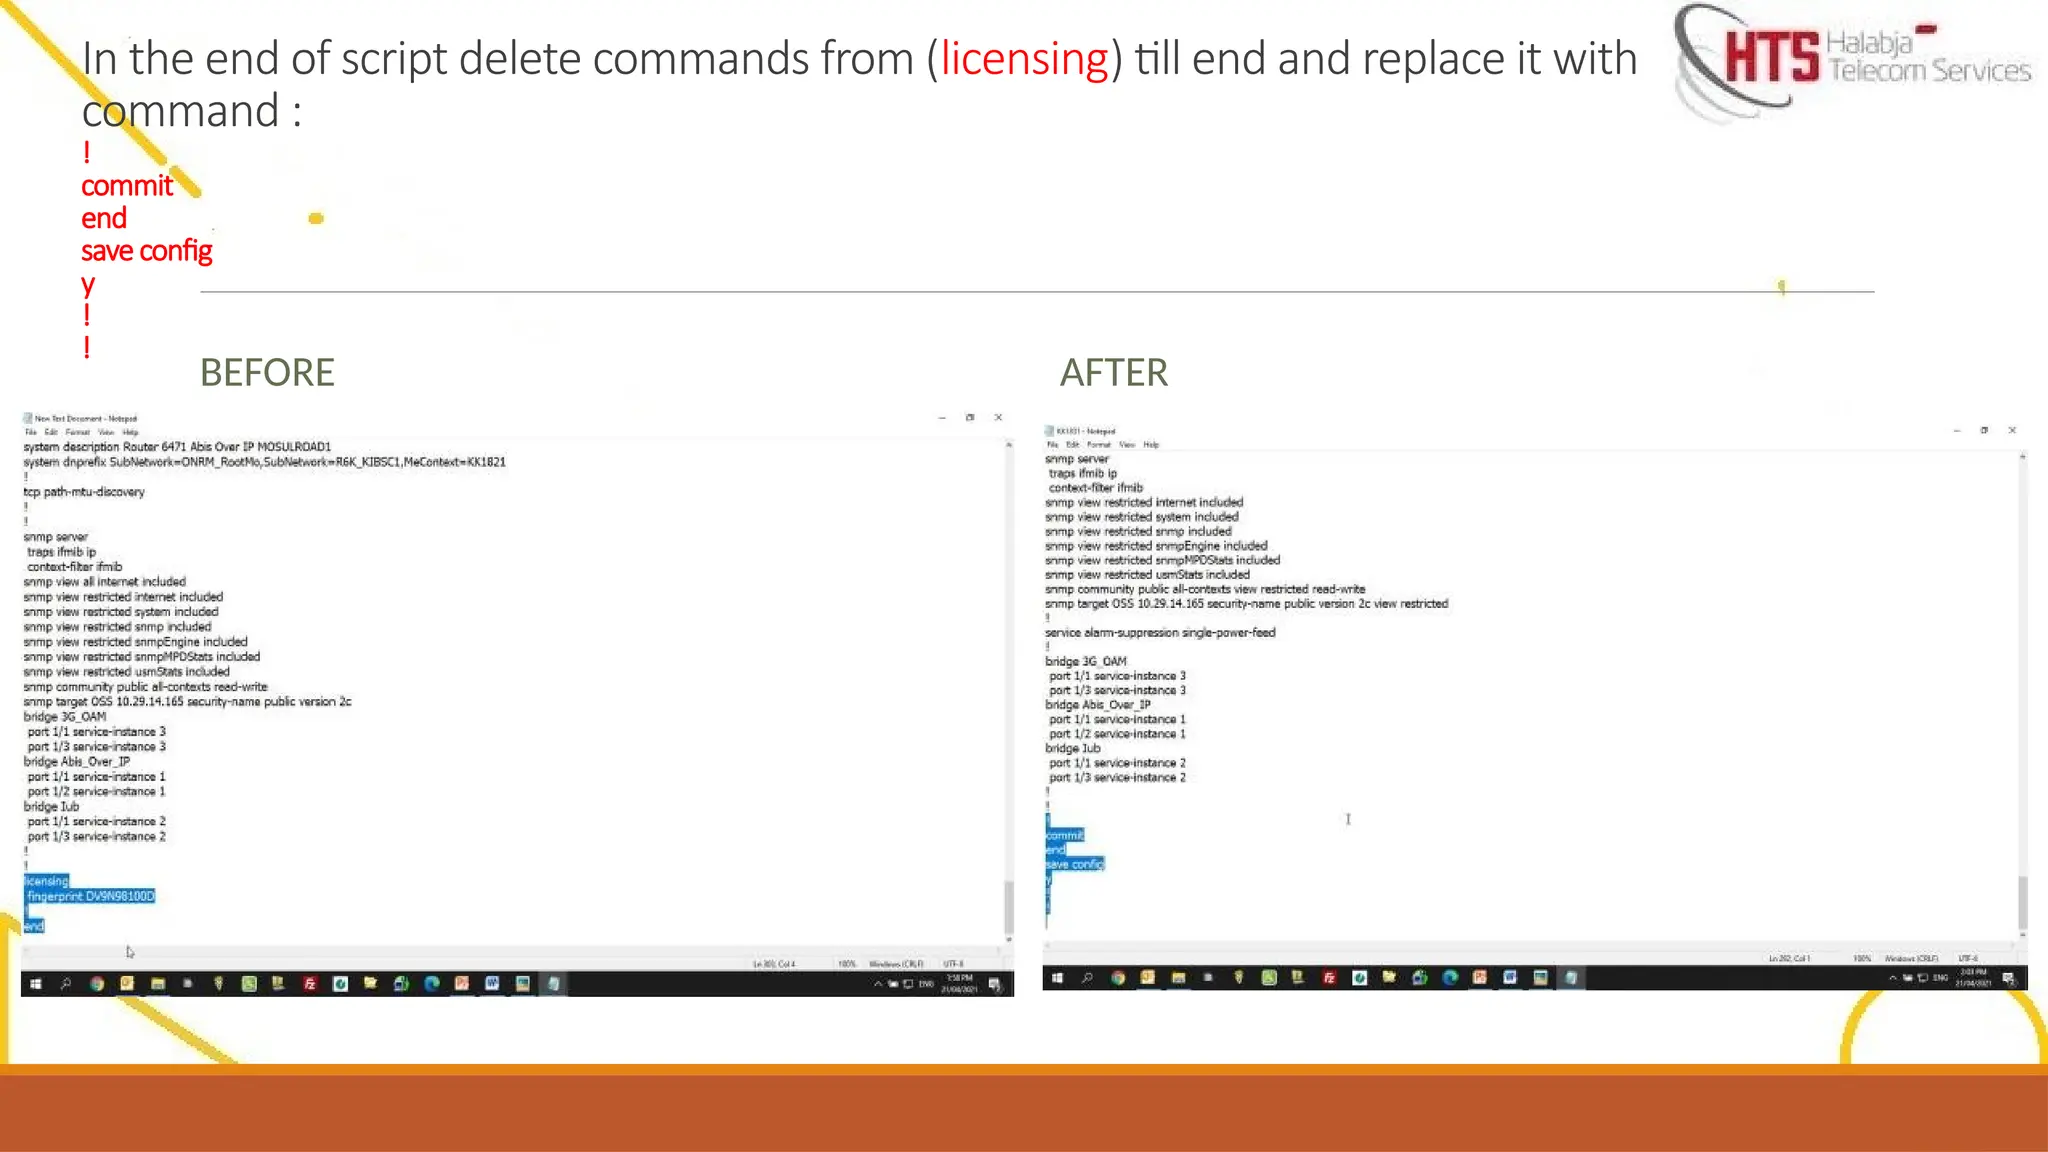
In the endof script delete commands from (licensing) till end and replace it with
command :
!
commit
end
save config
y
!
!
BEFORE AFTER