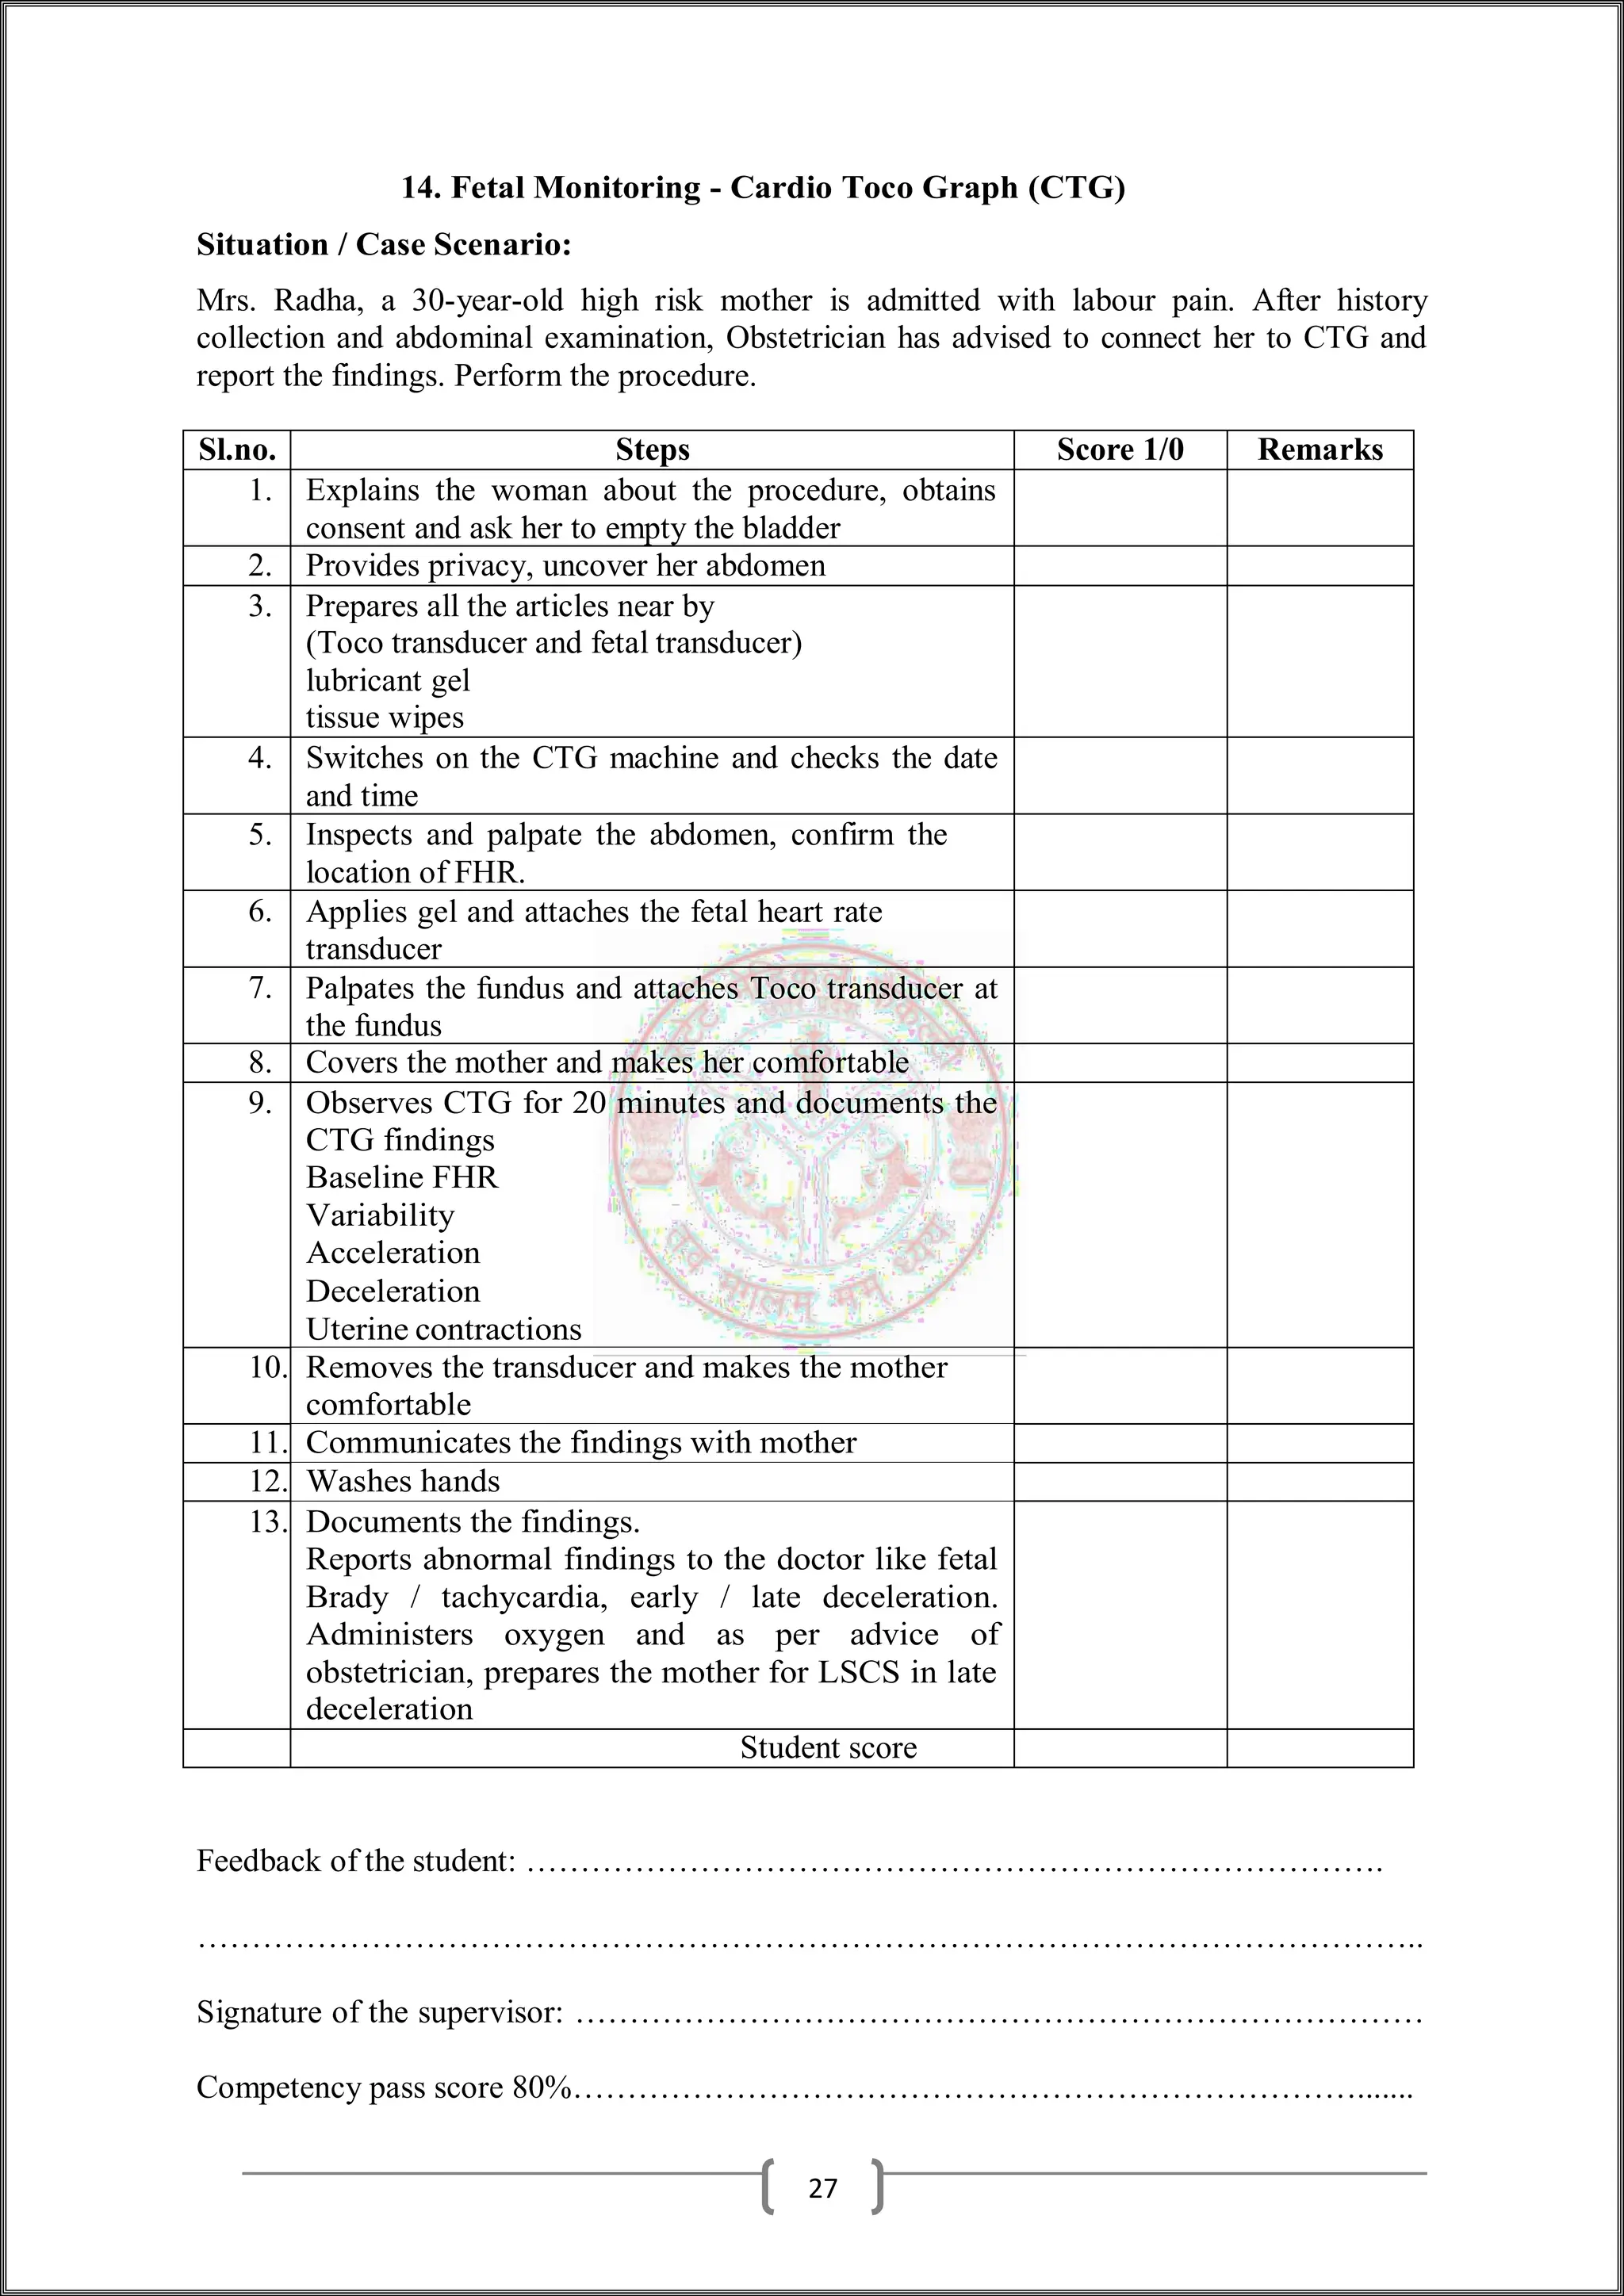
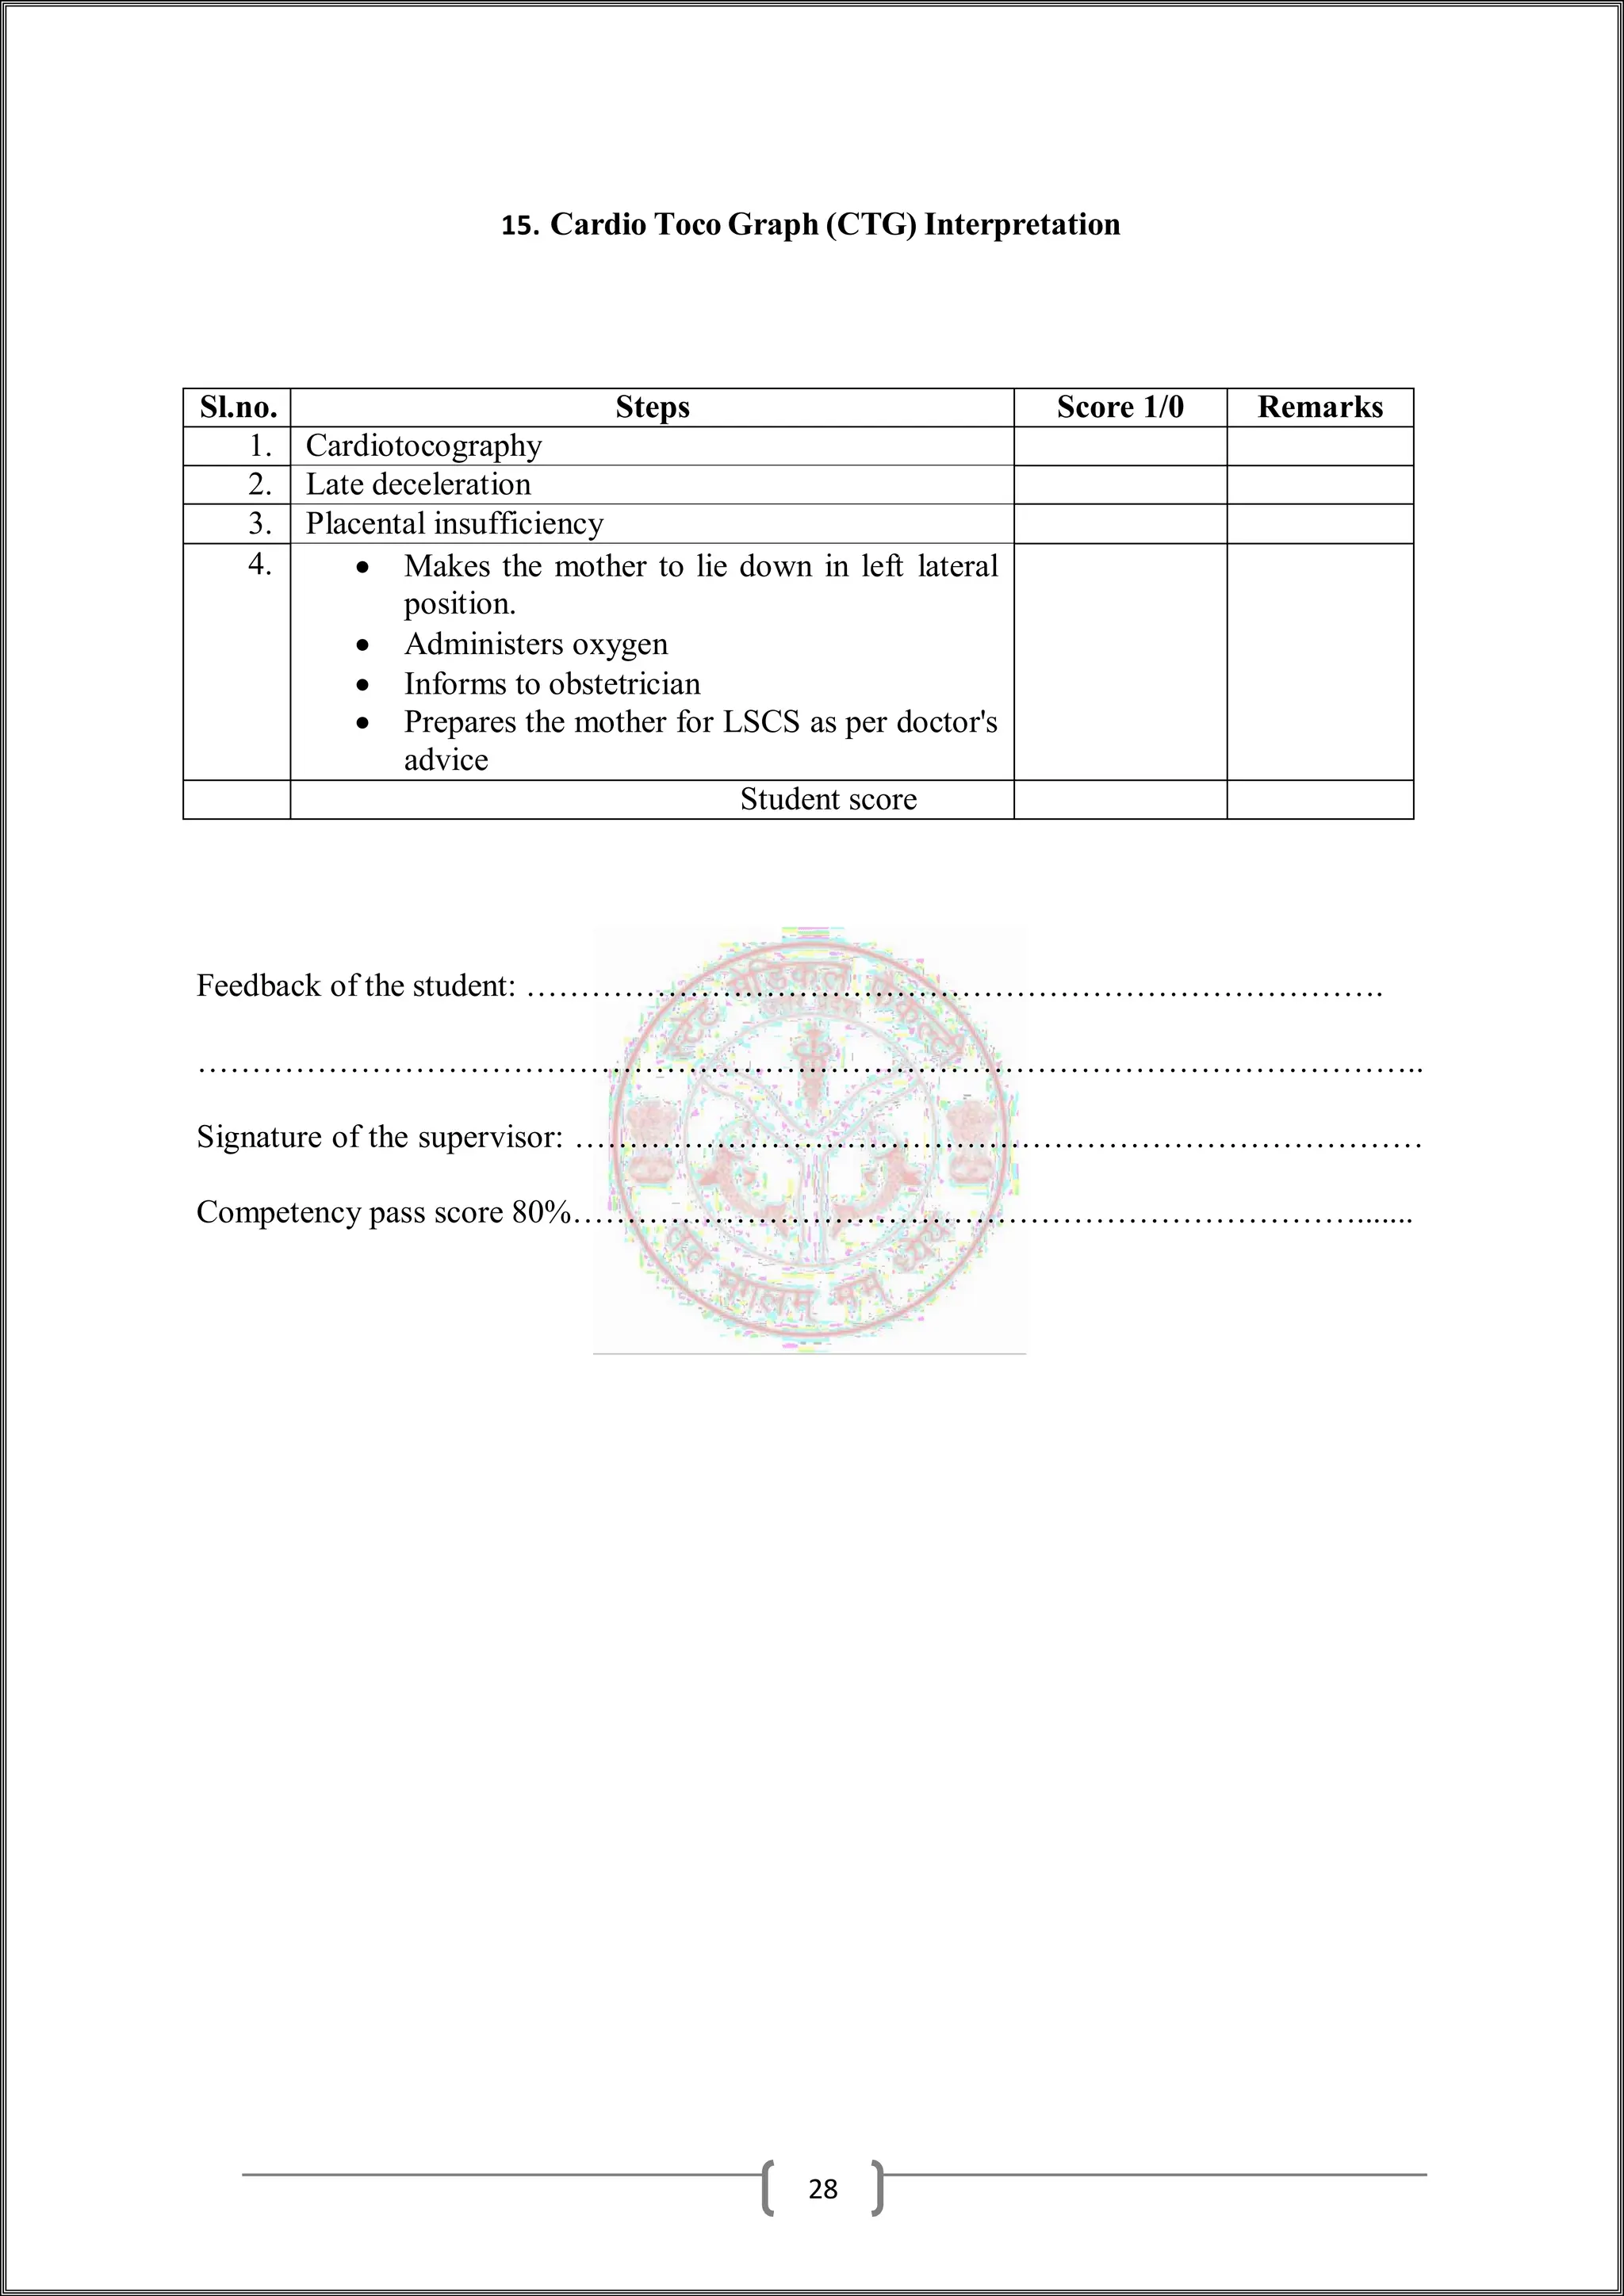
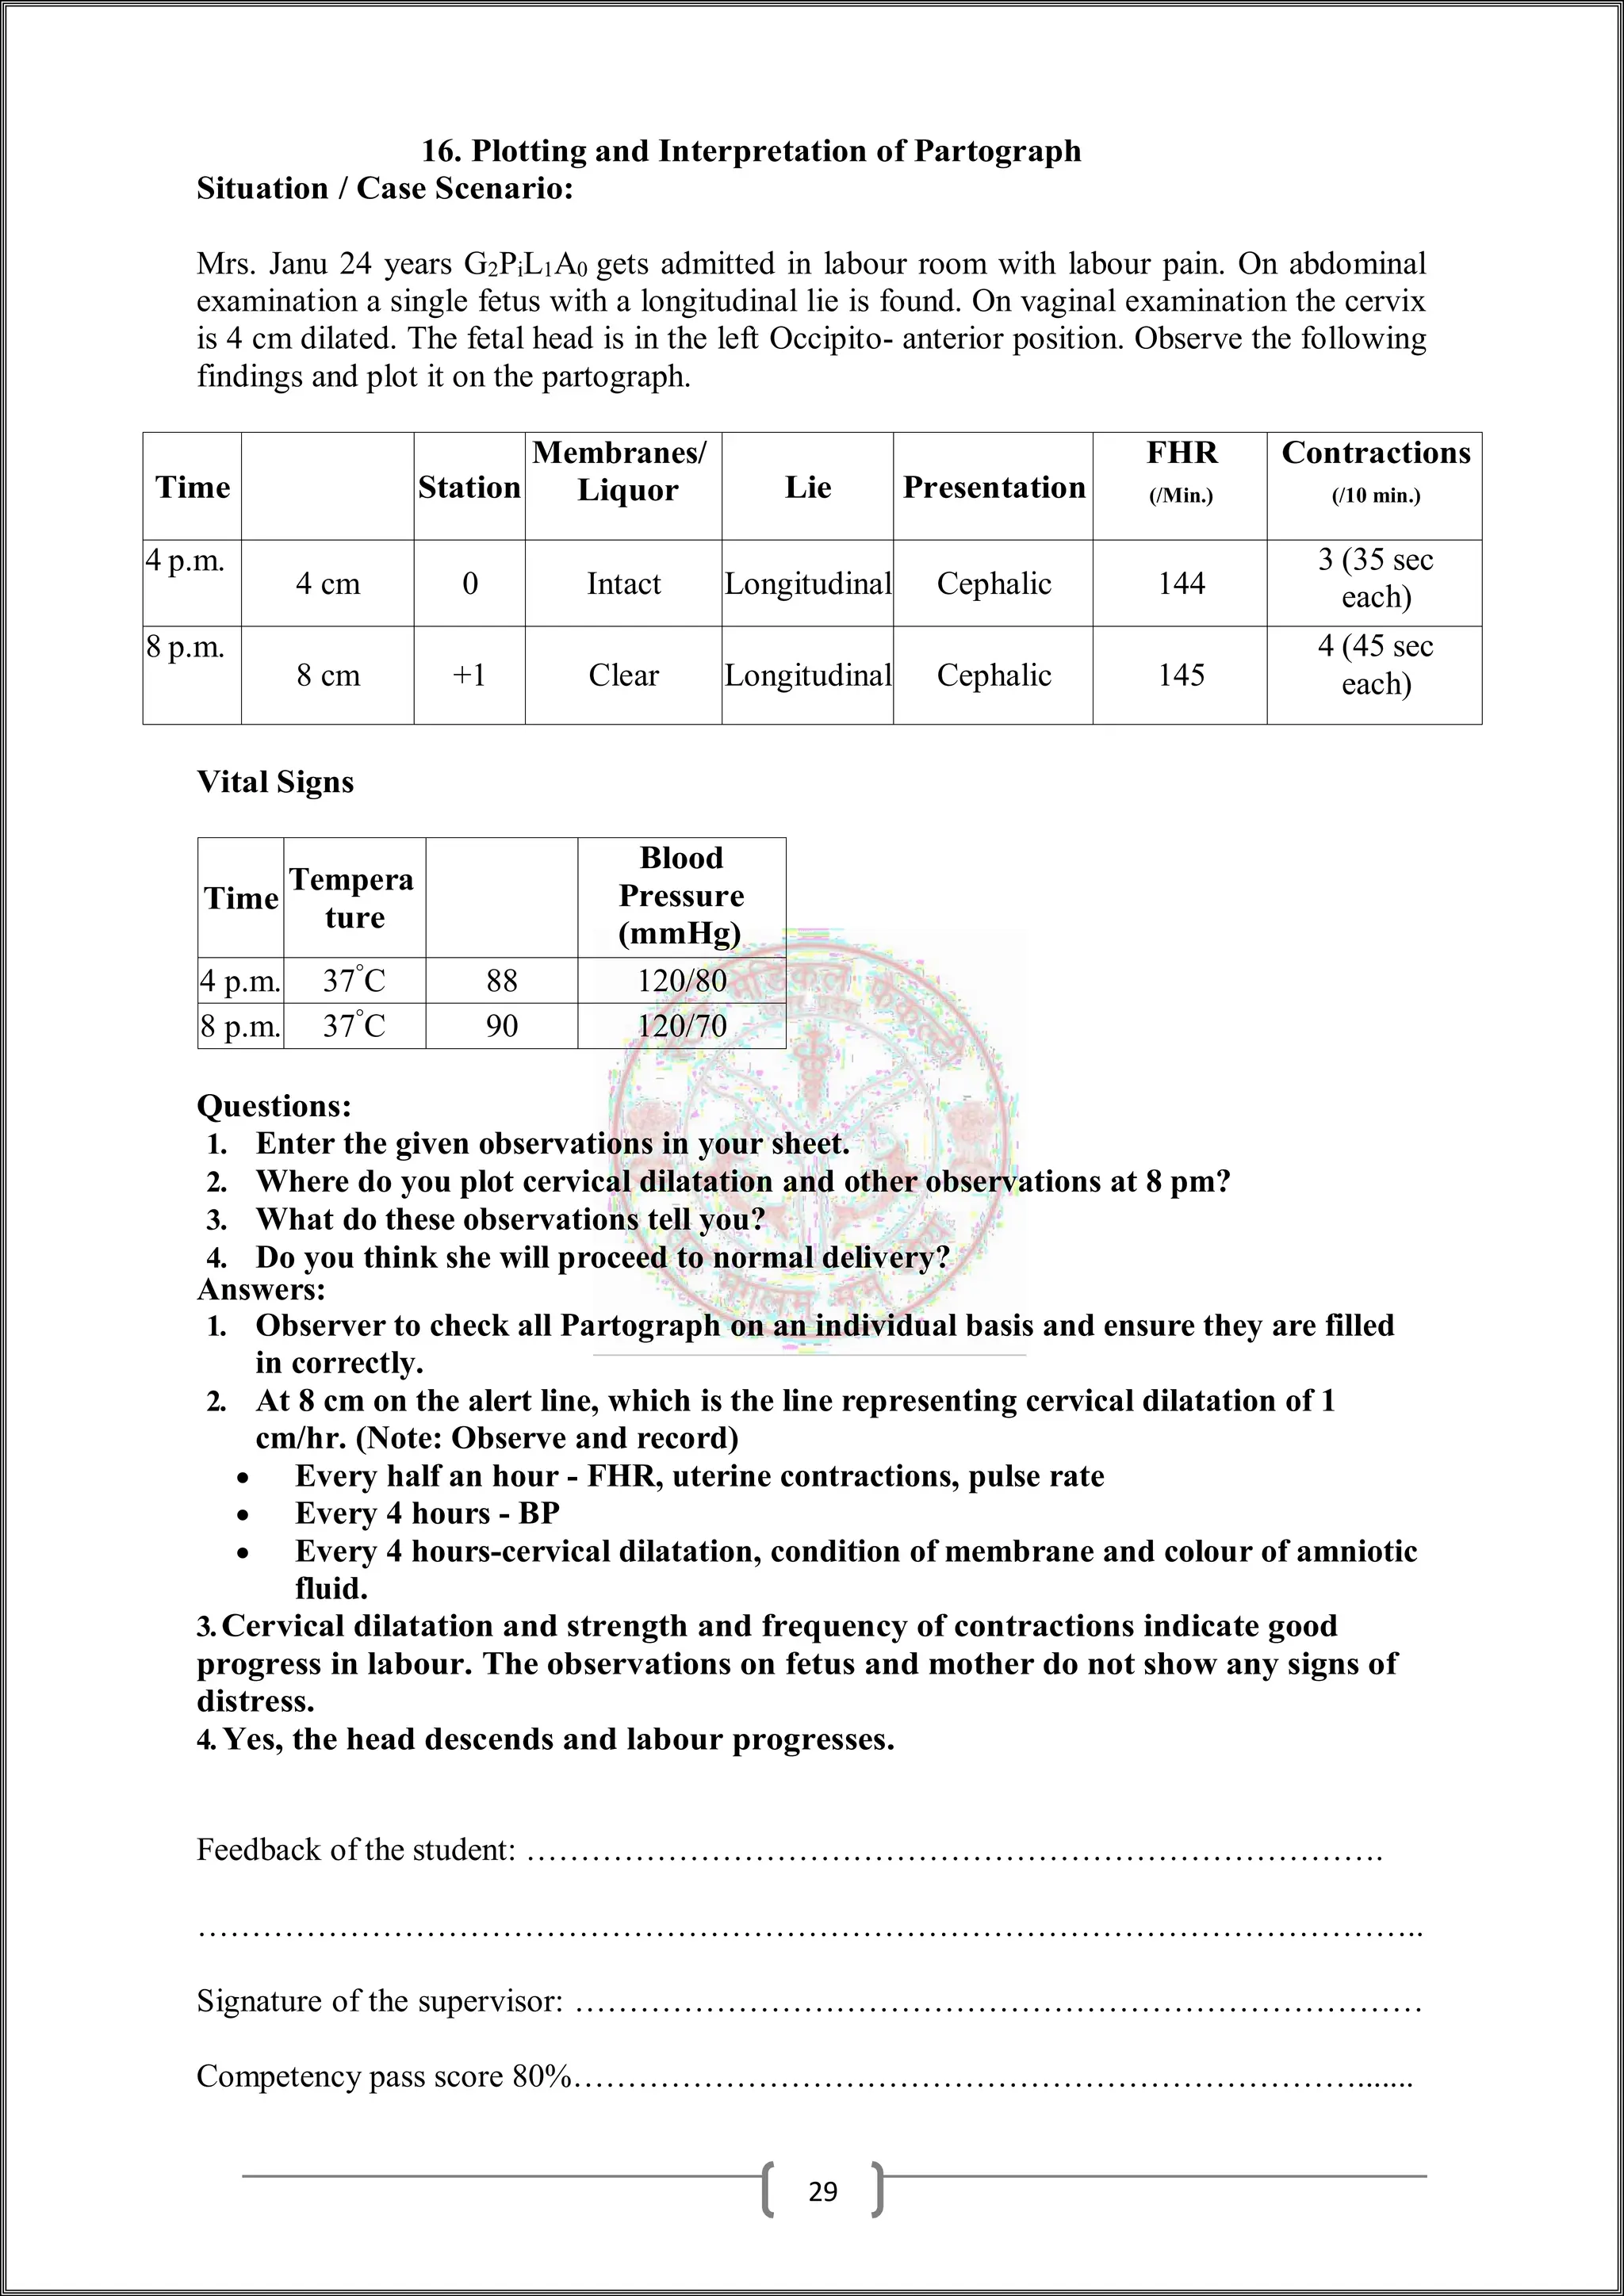
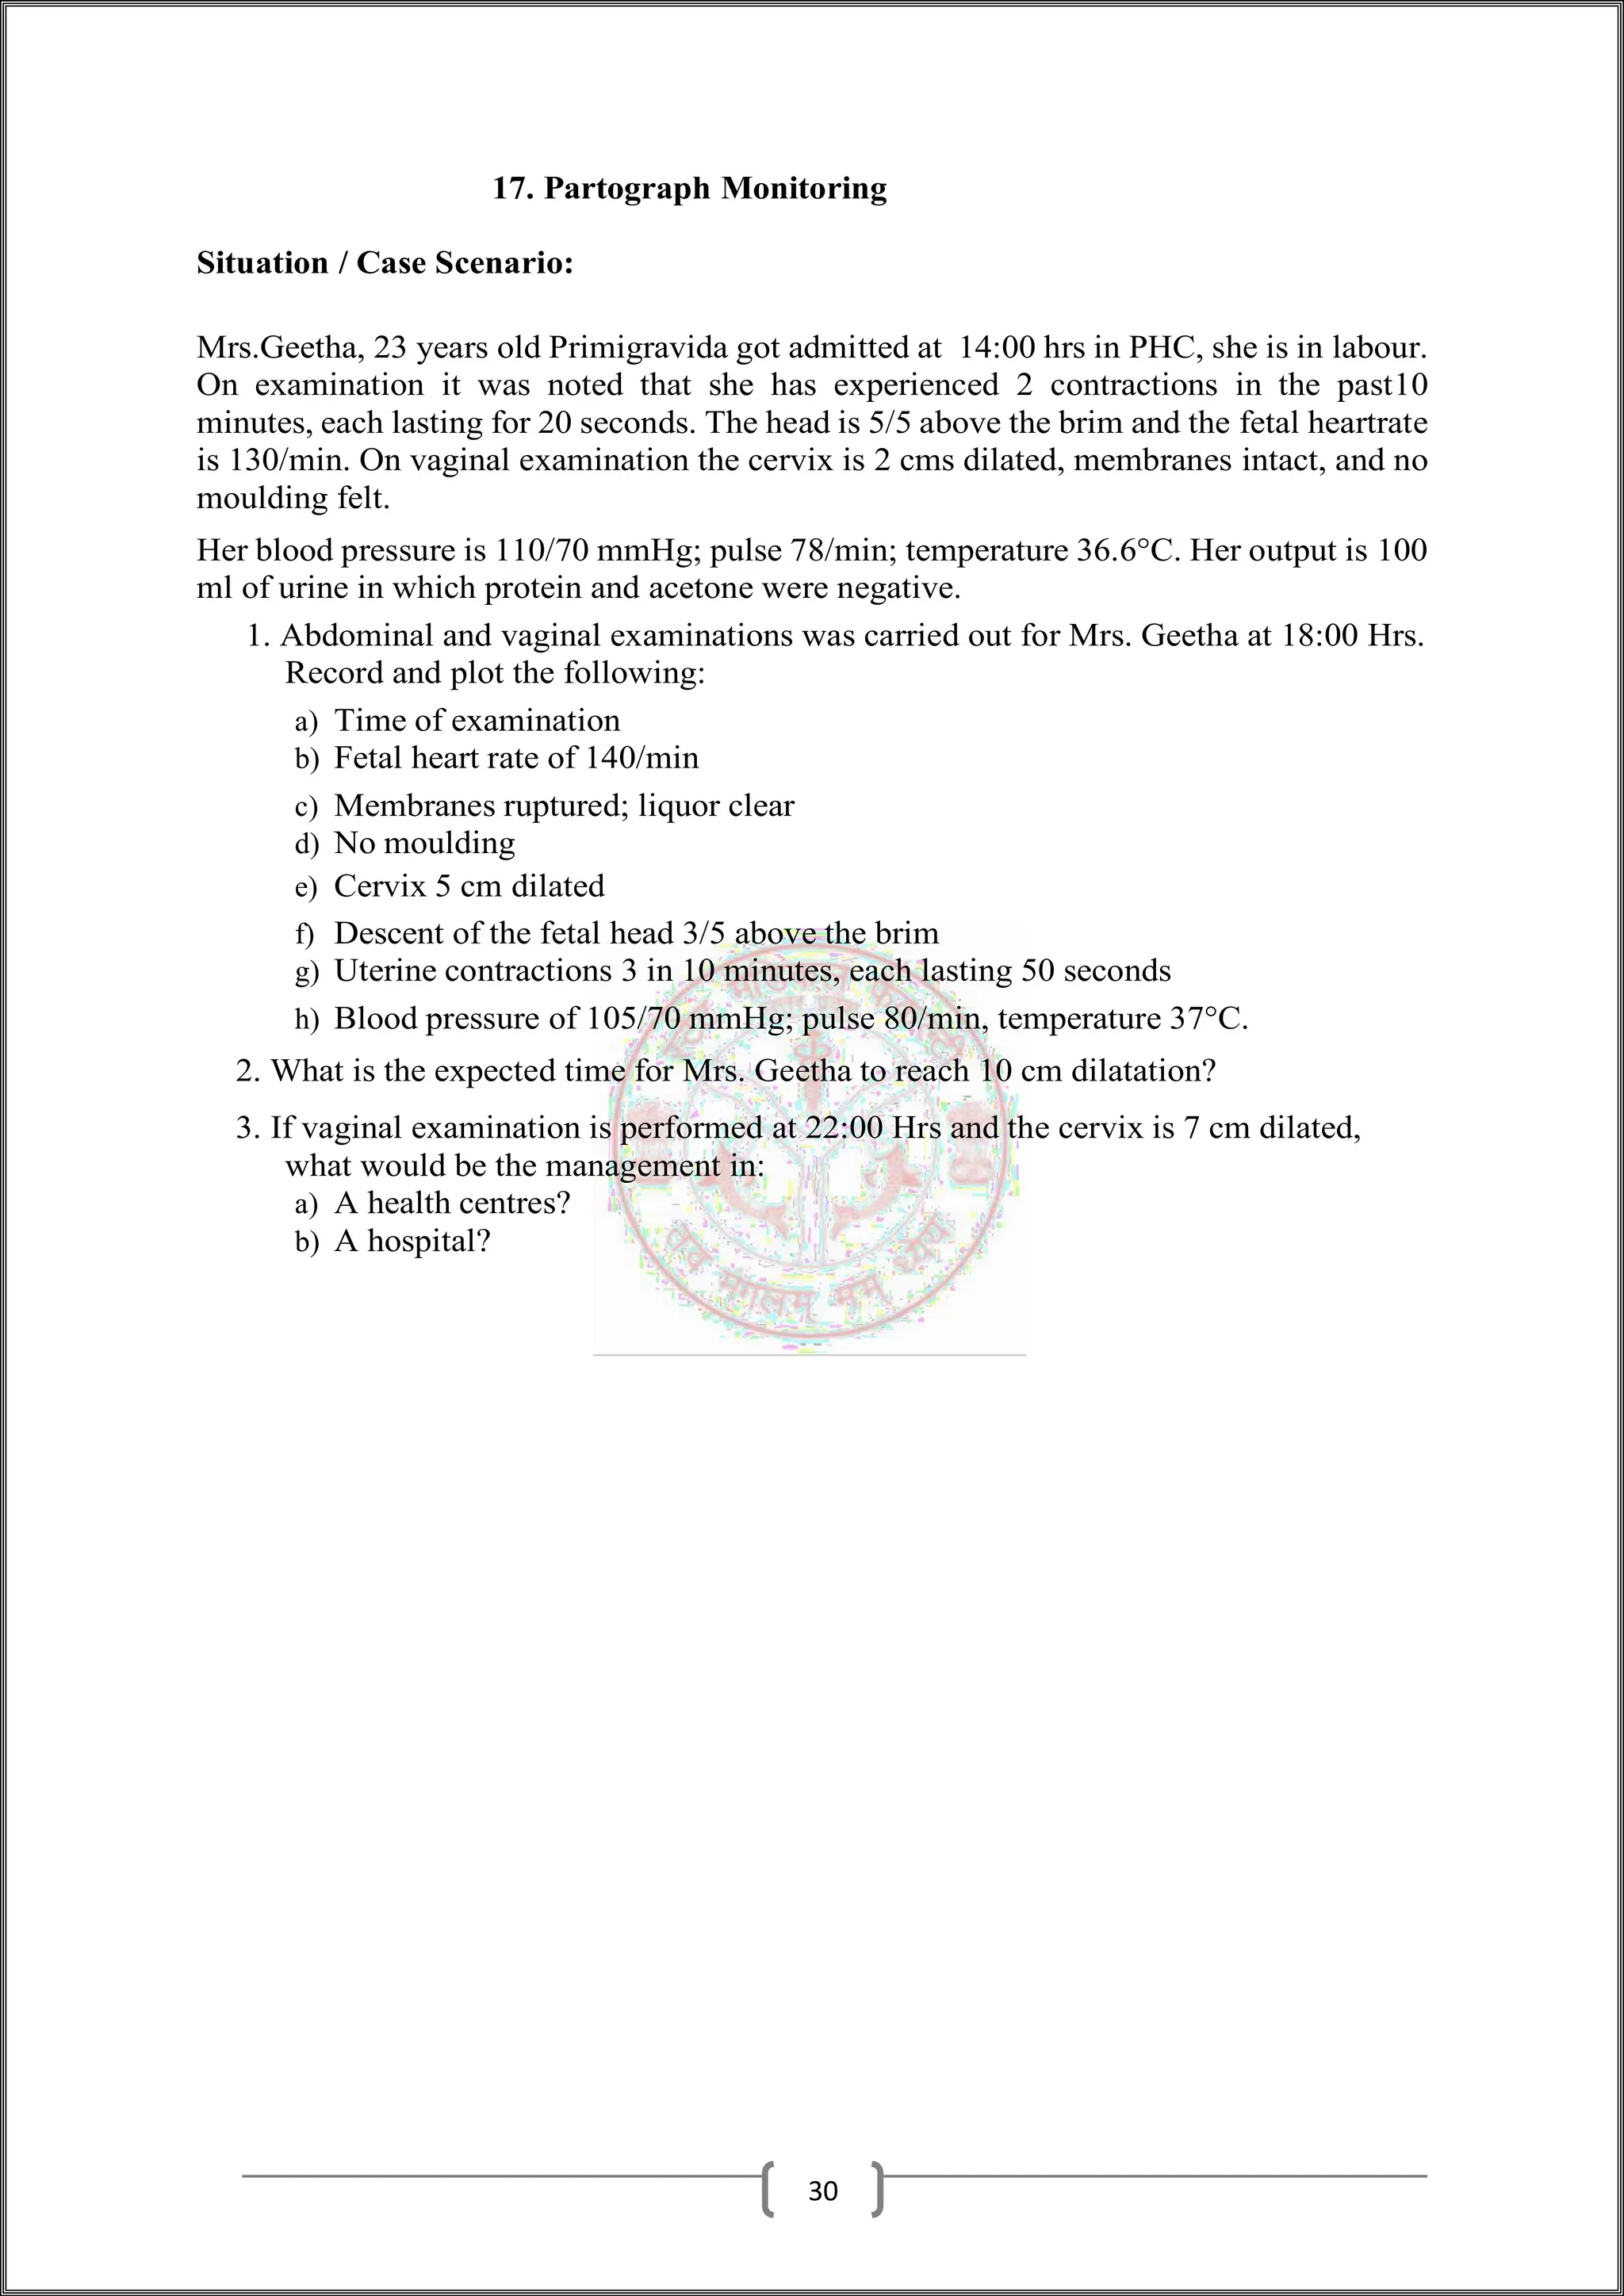
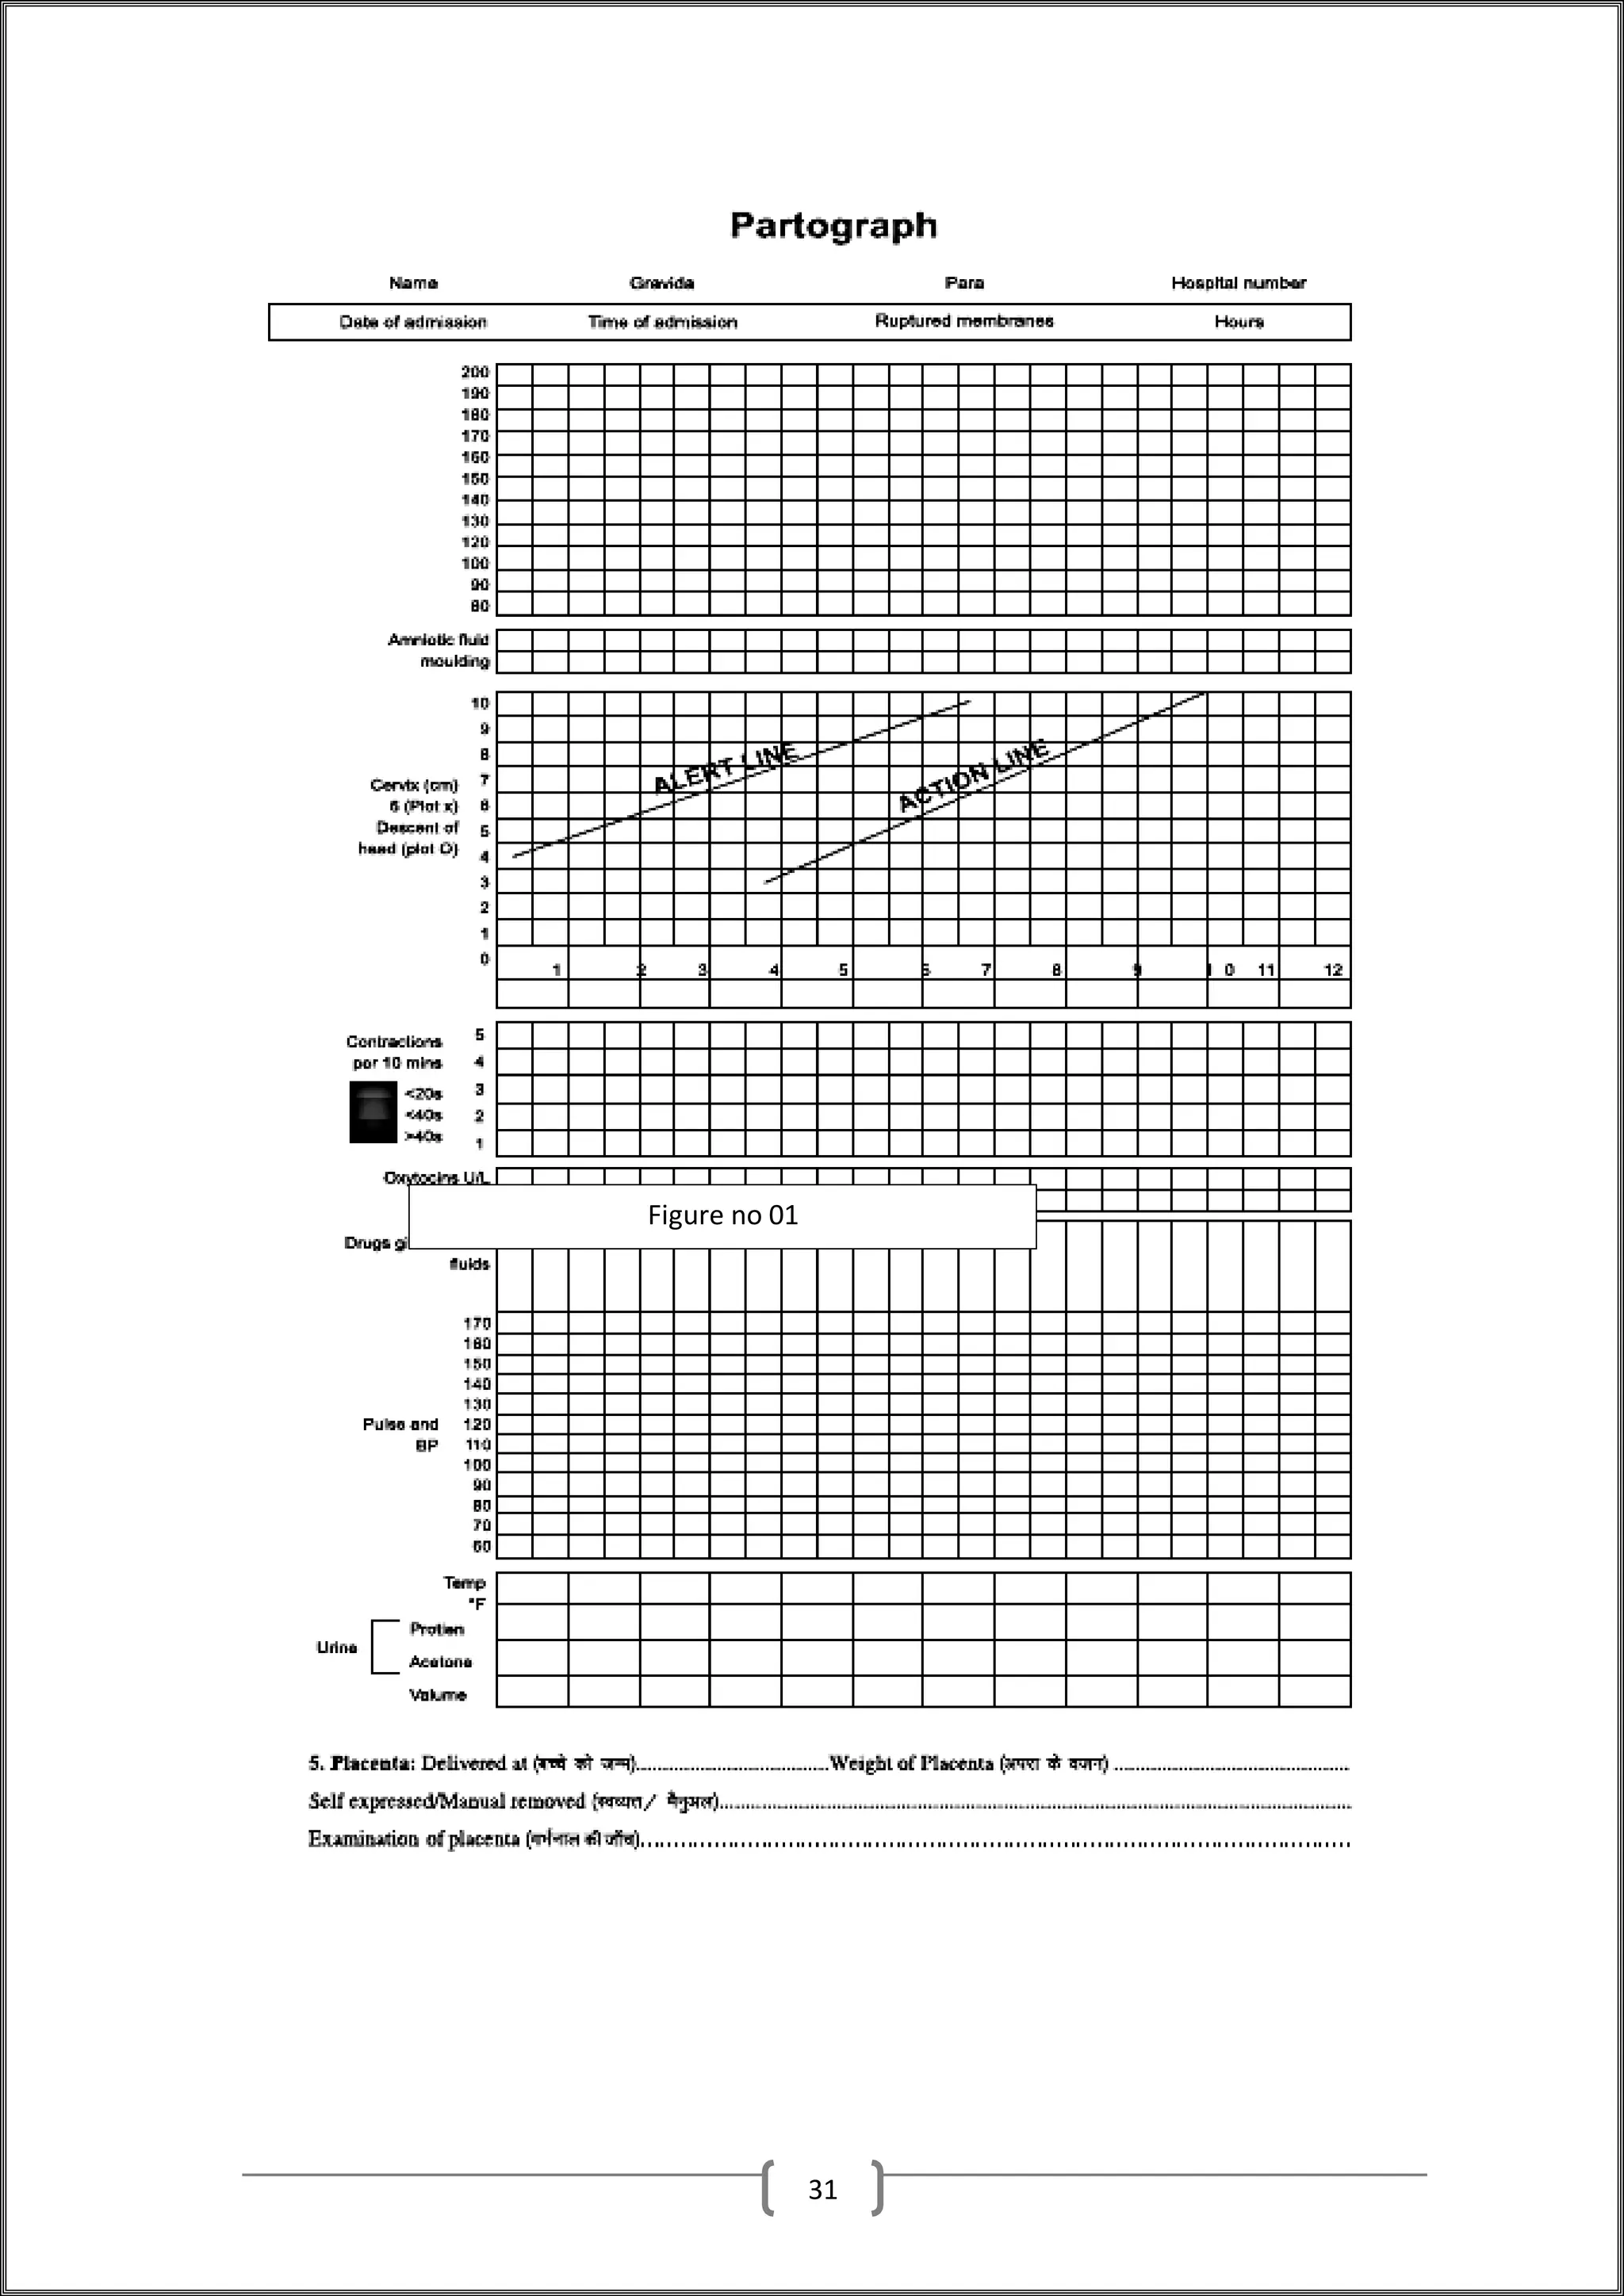
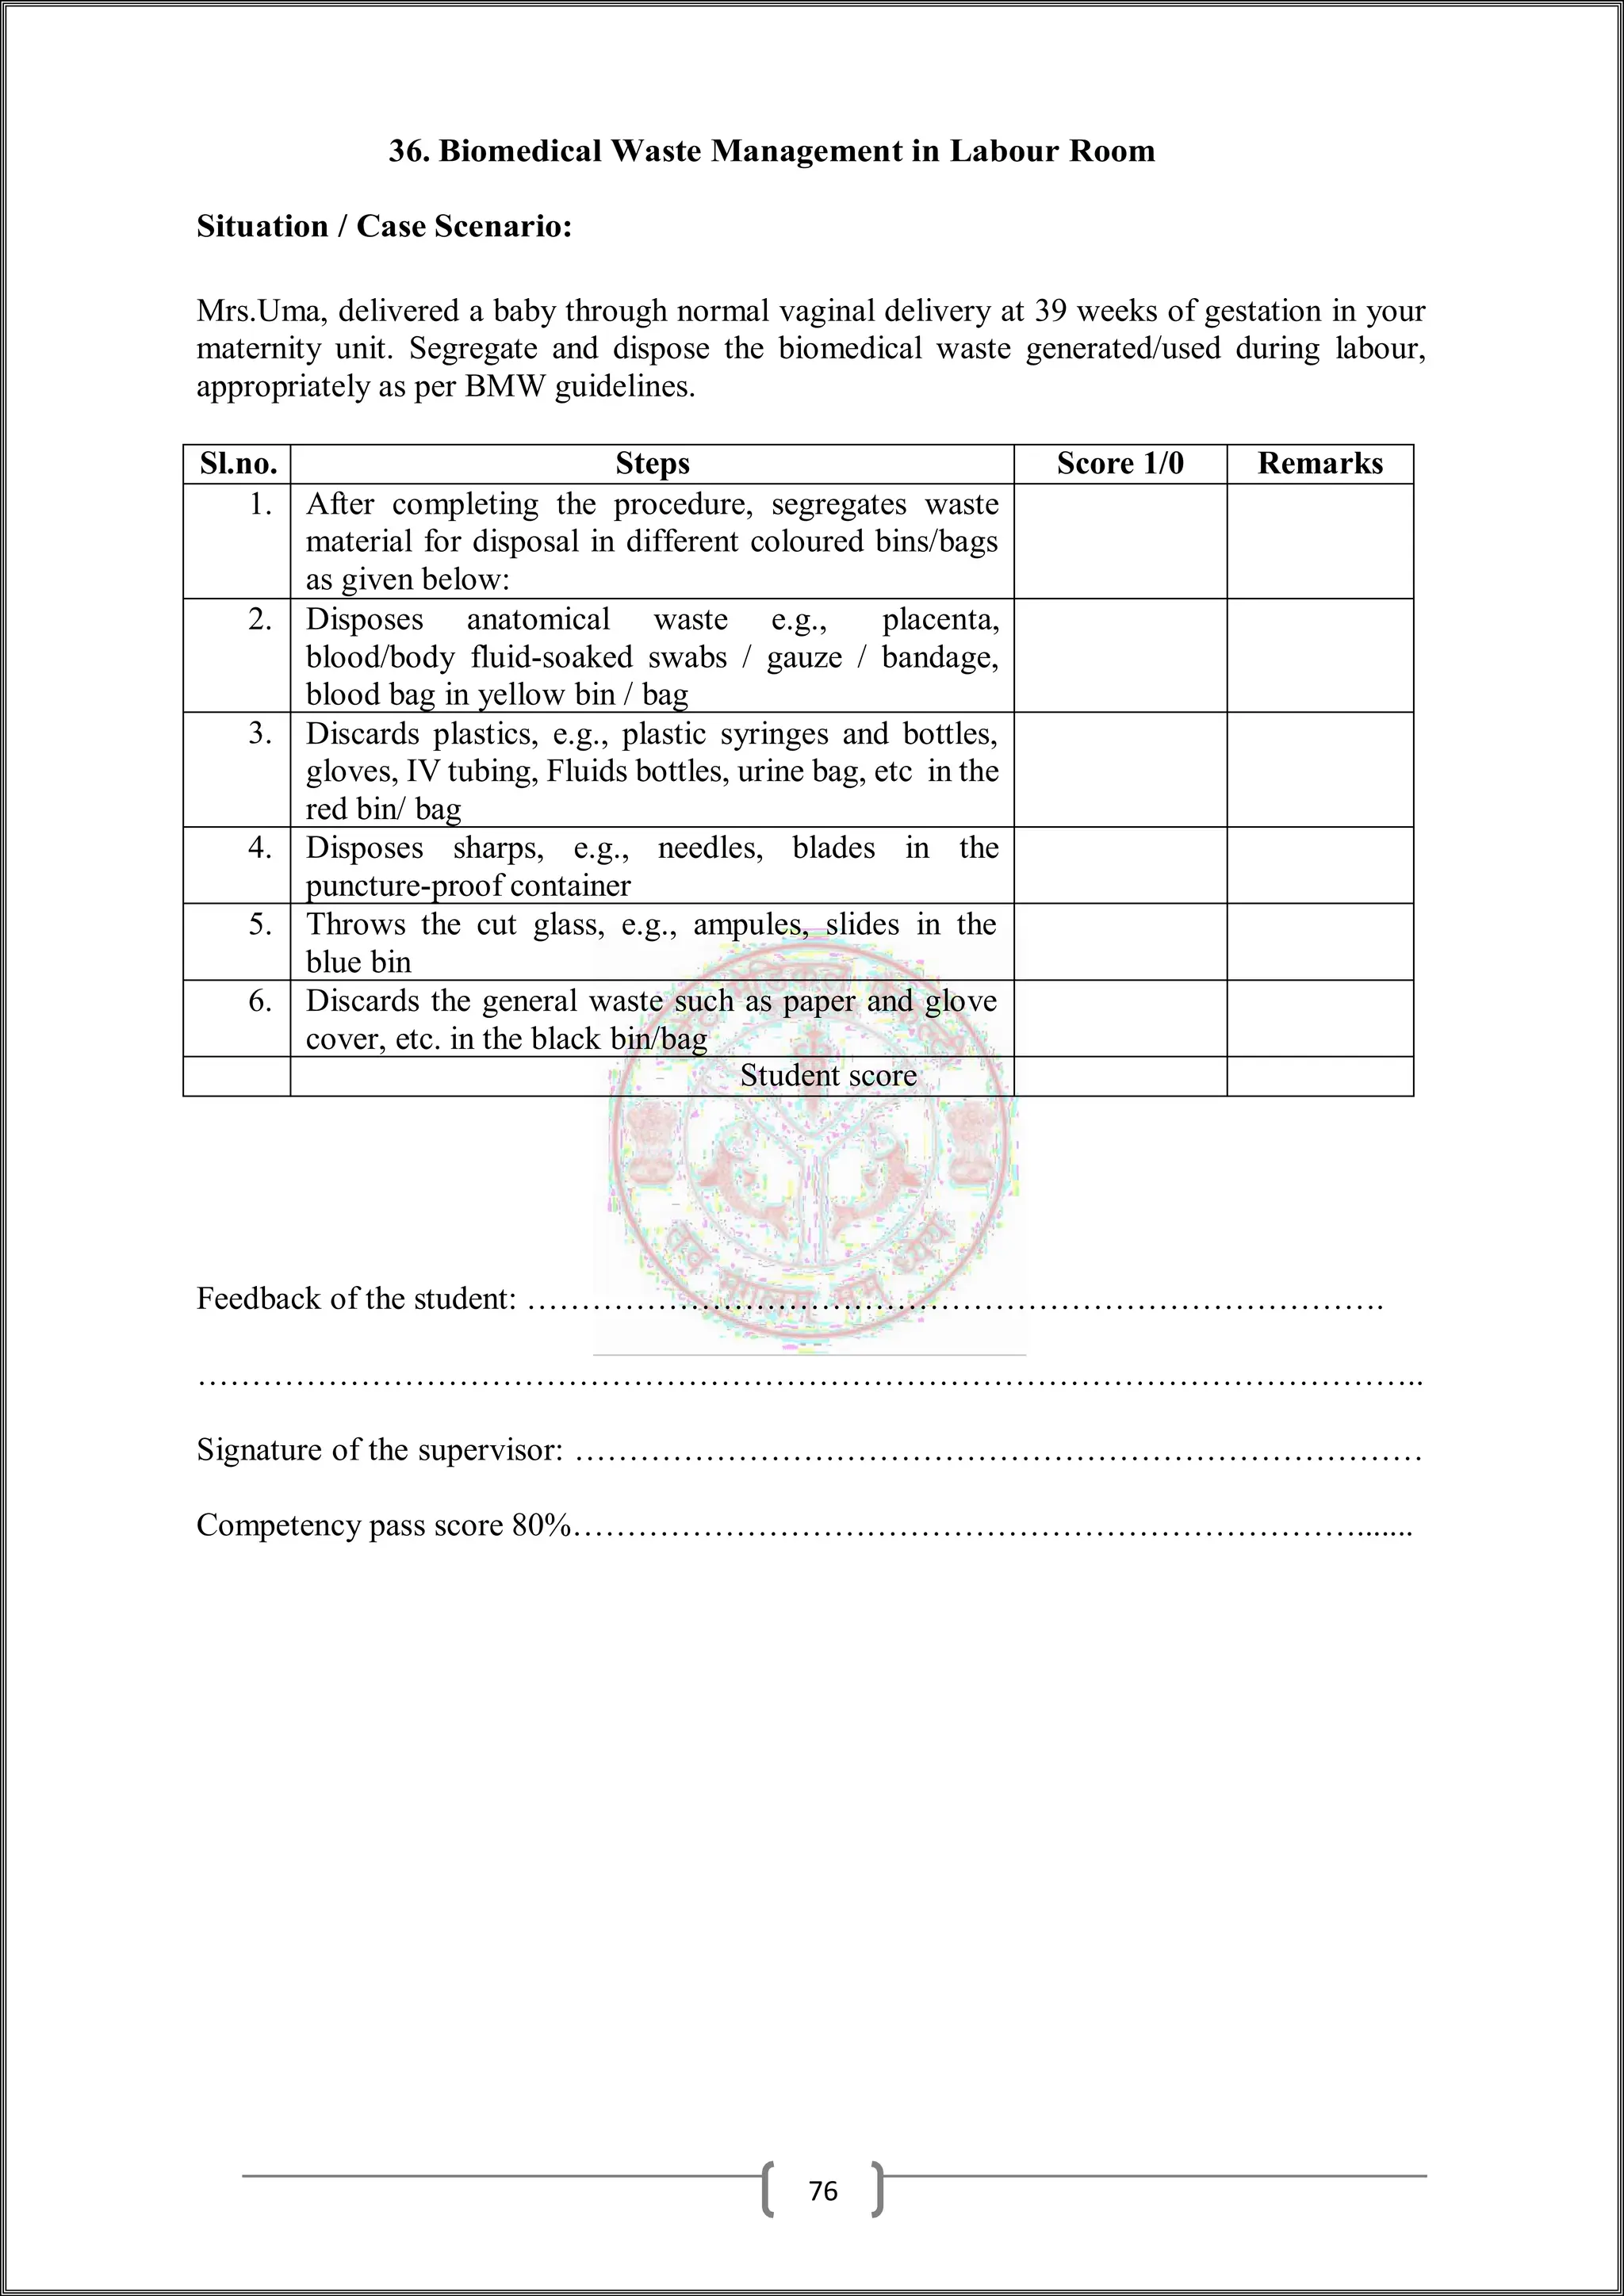
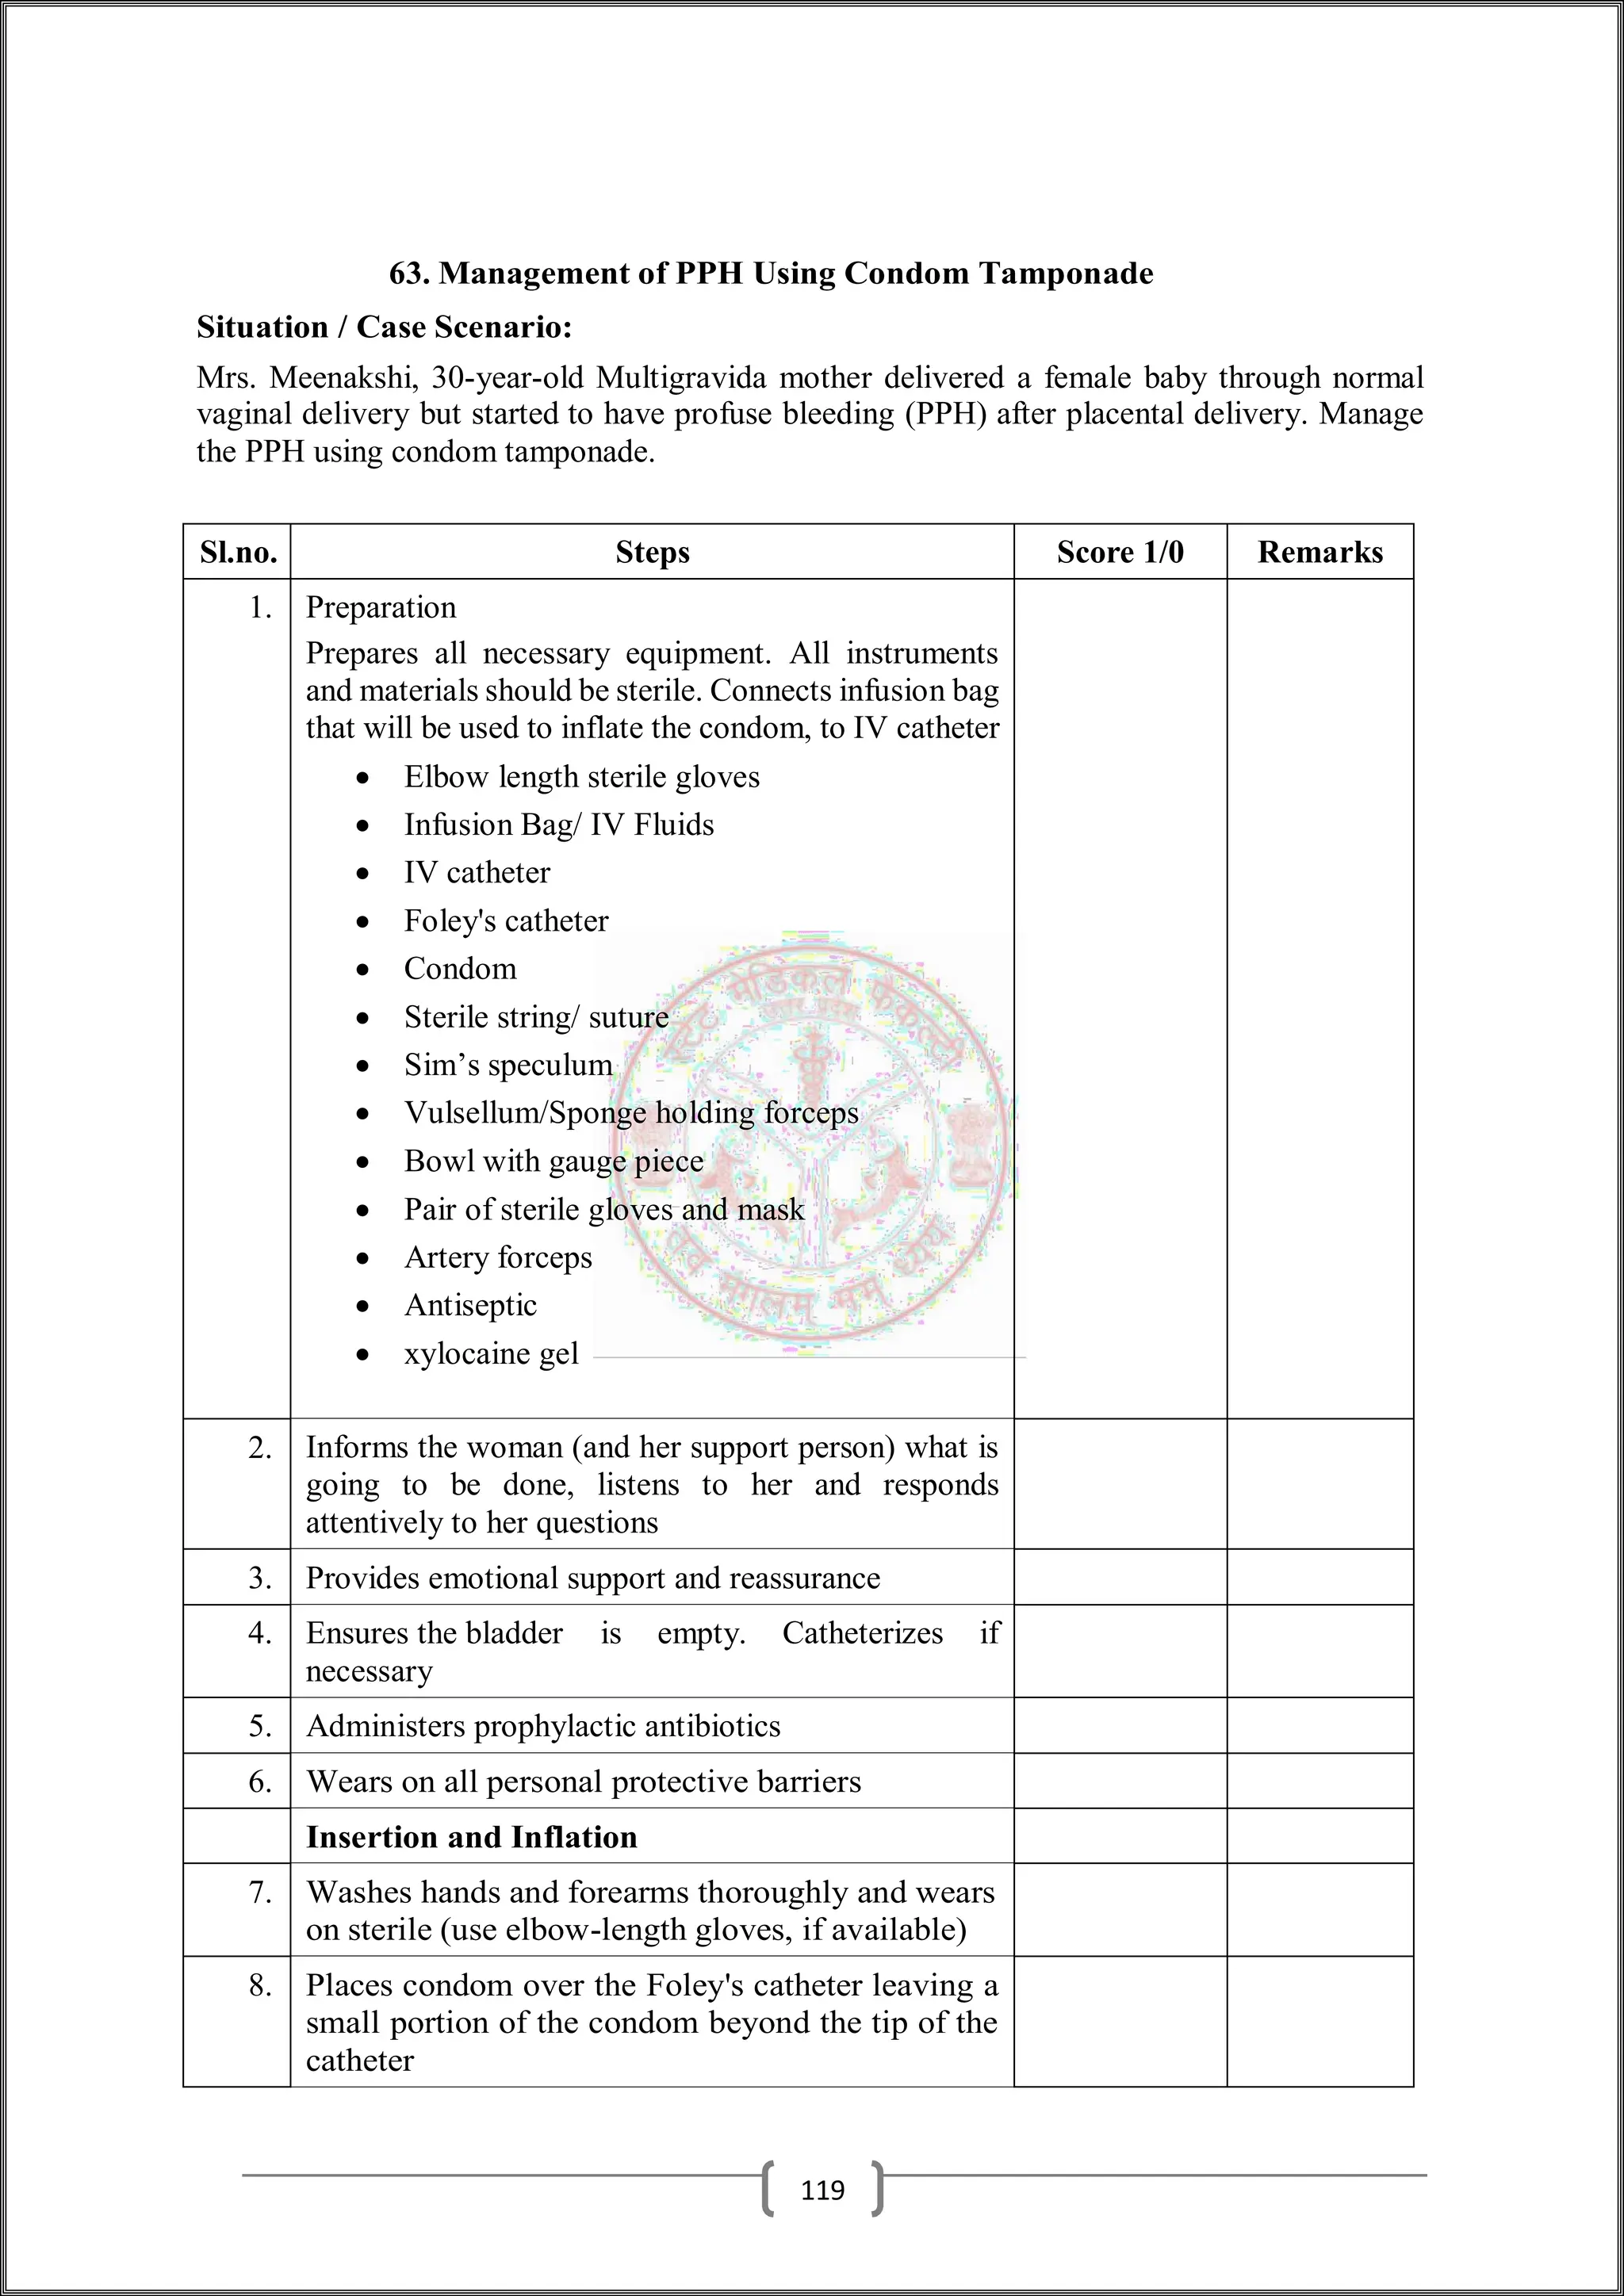
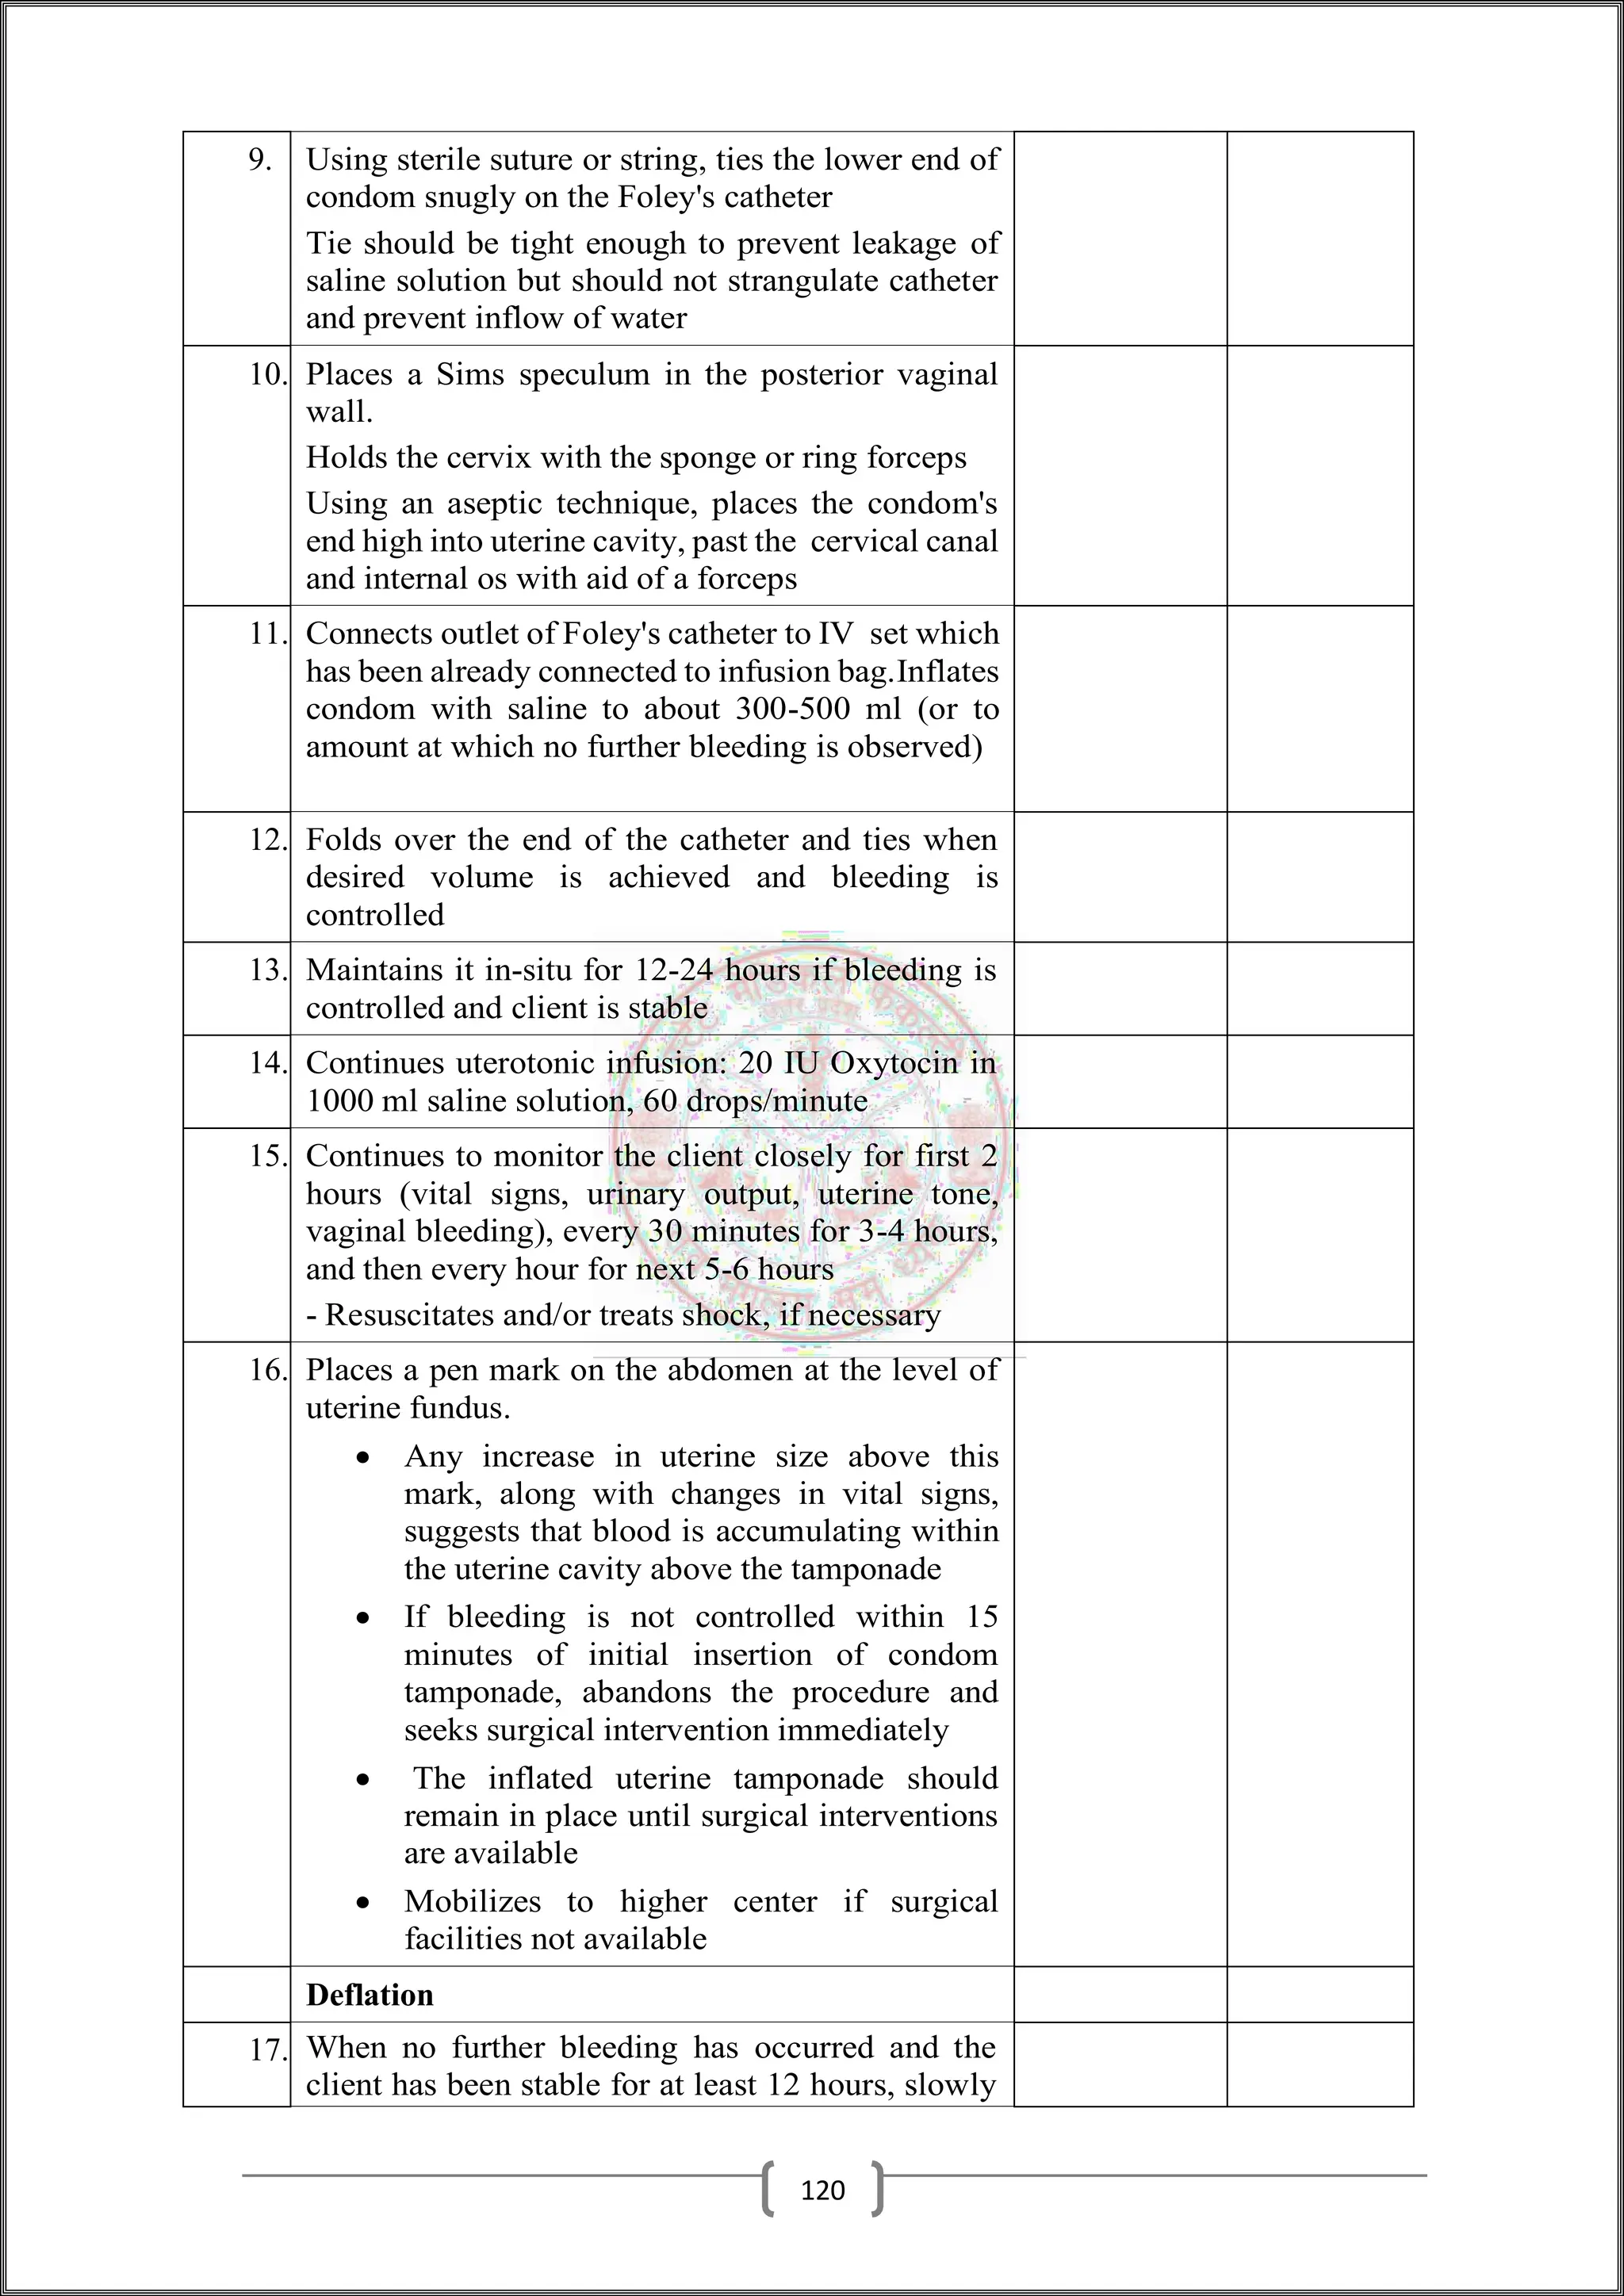
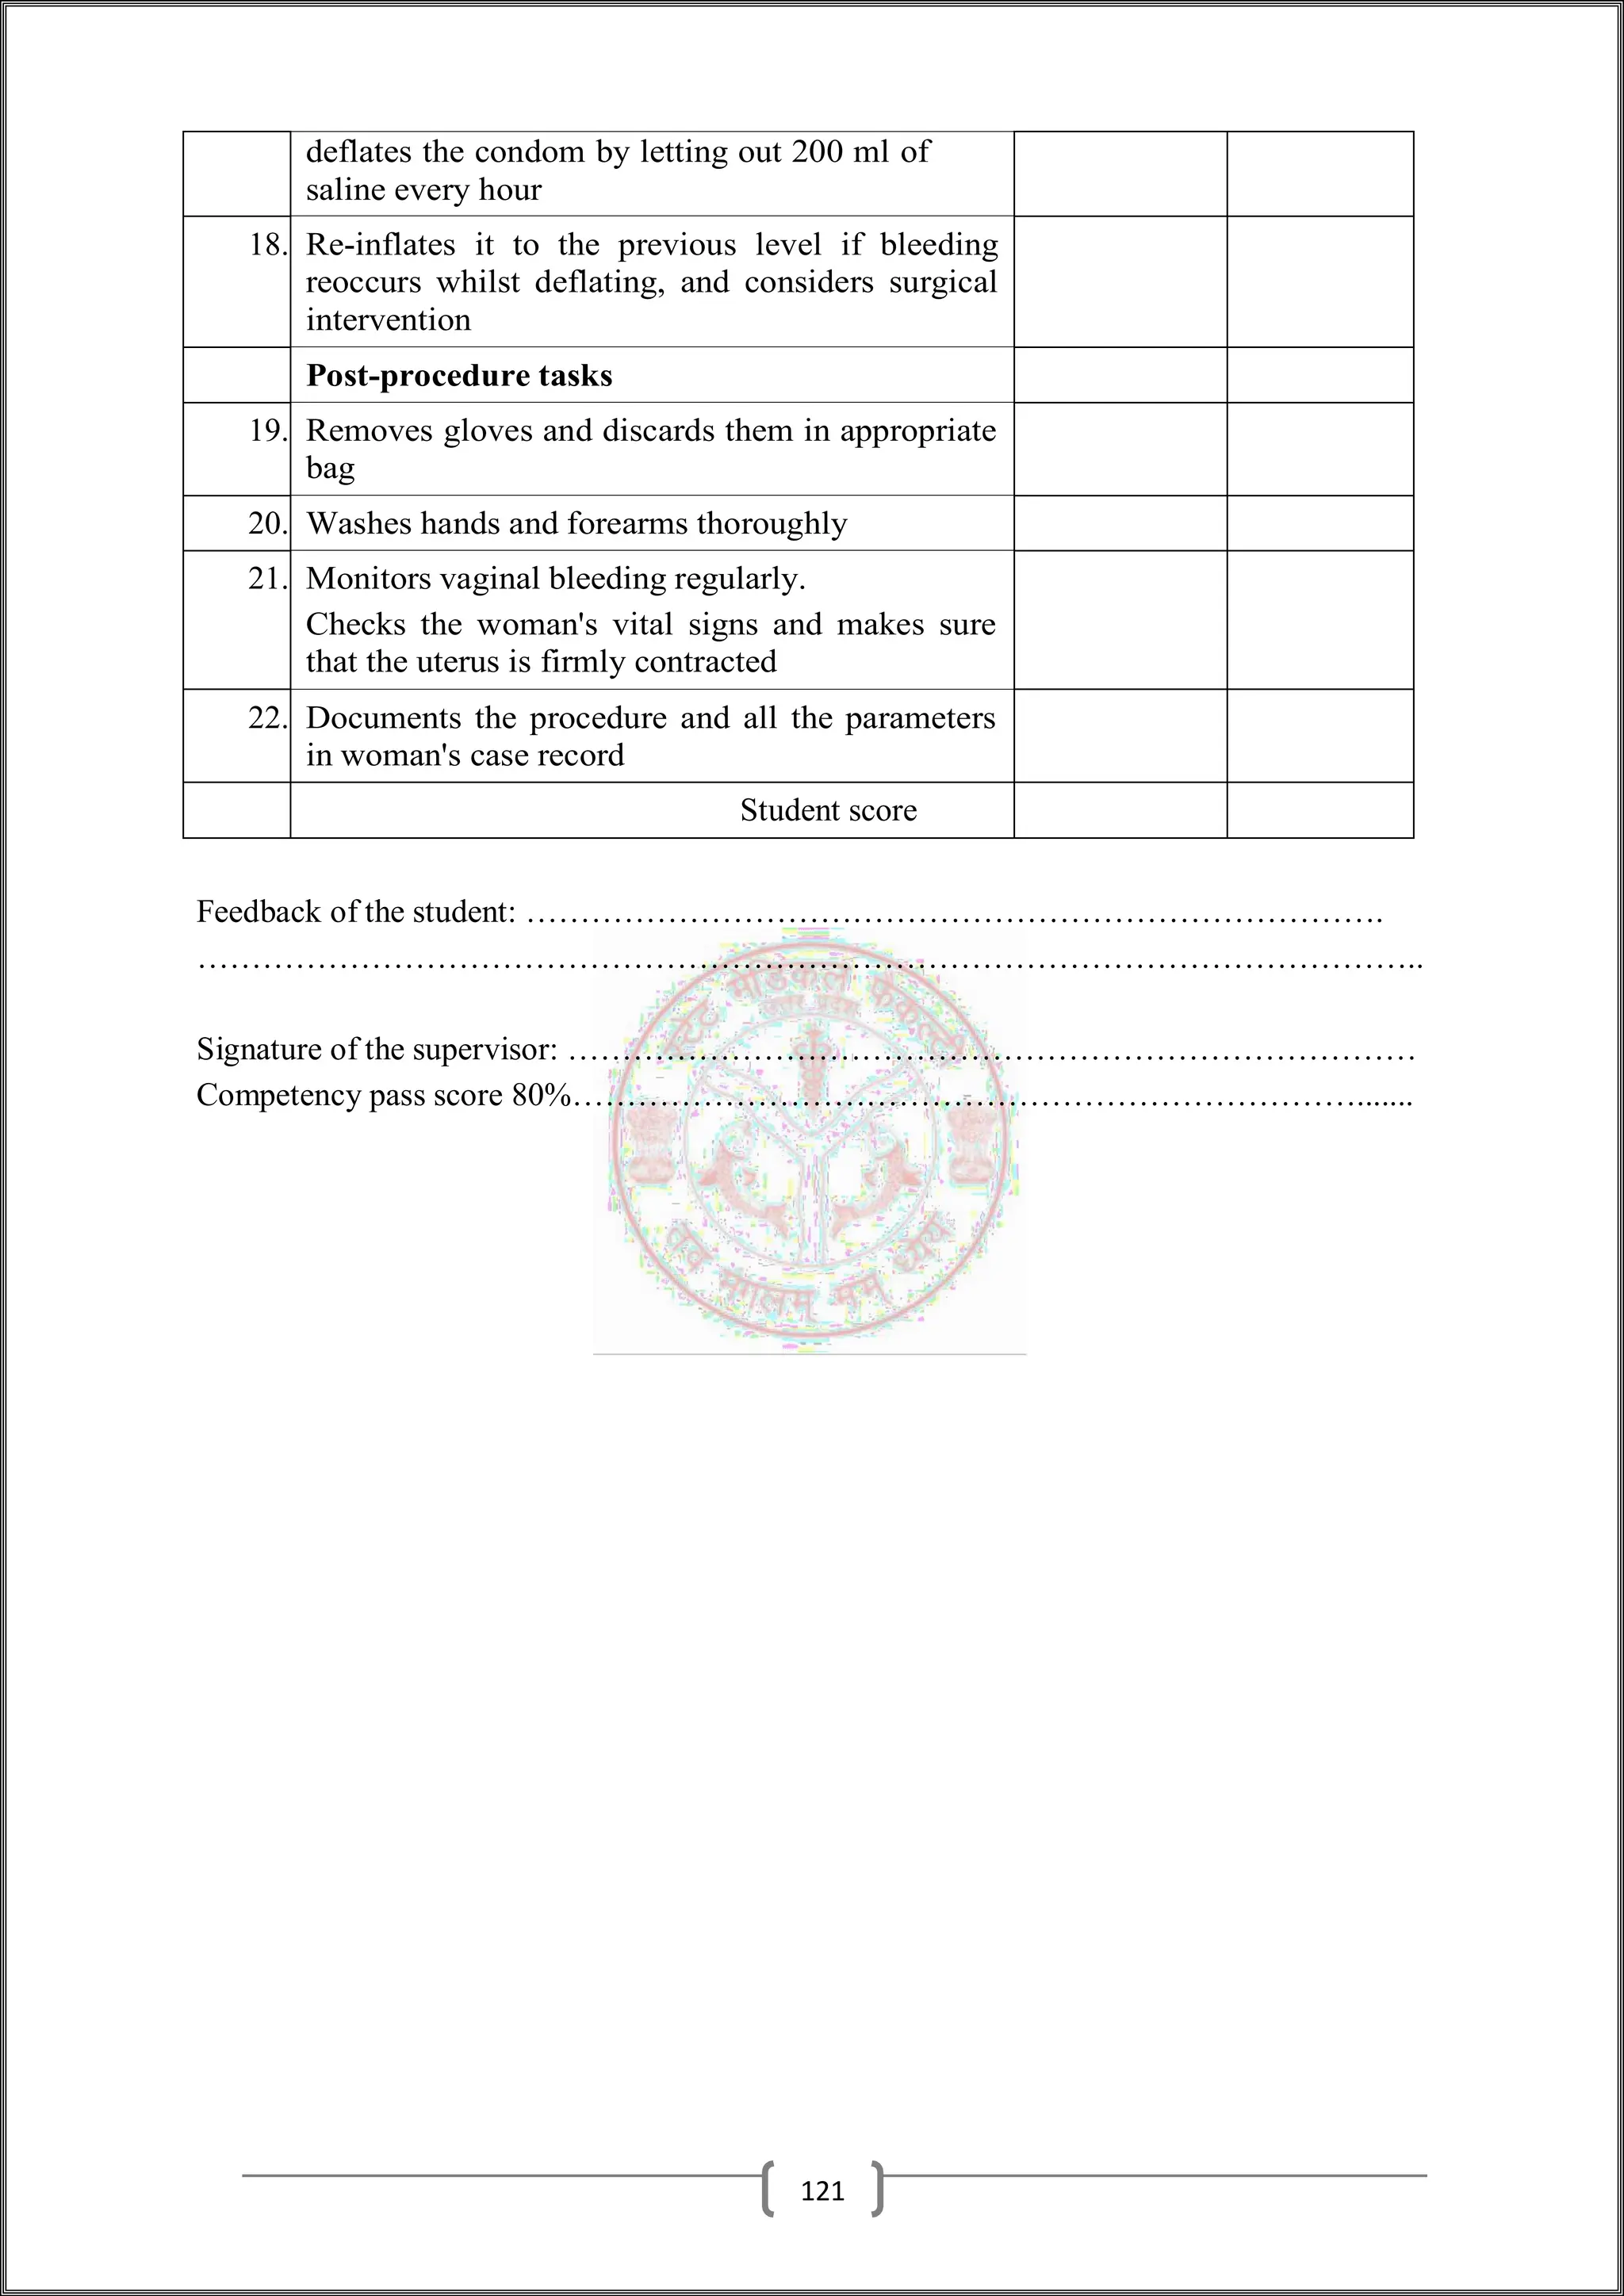
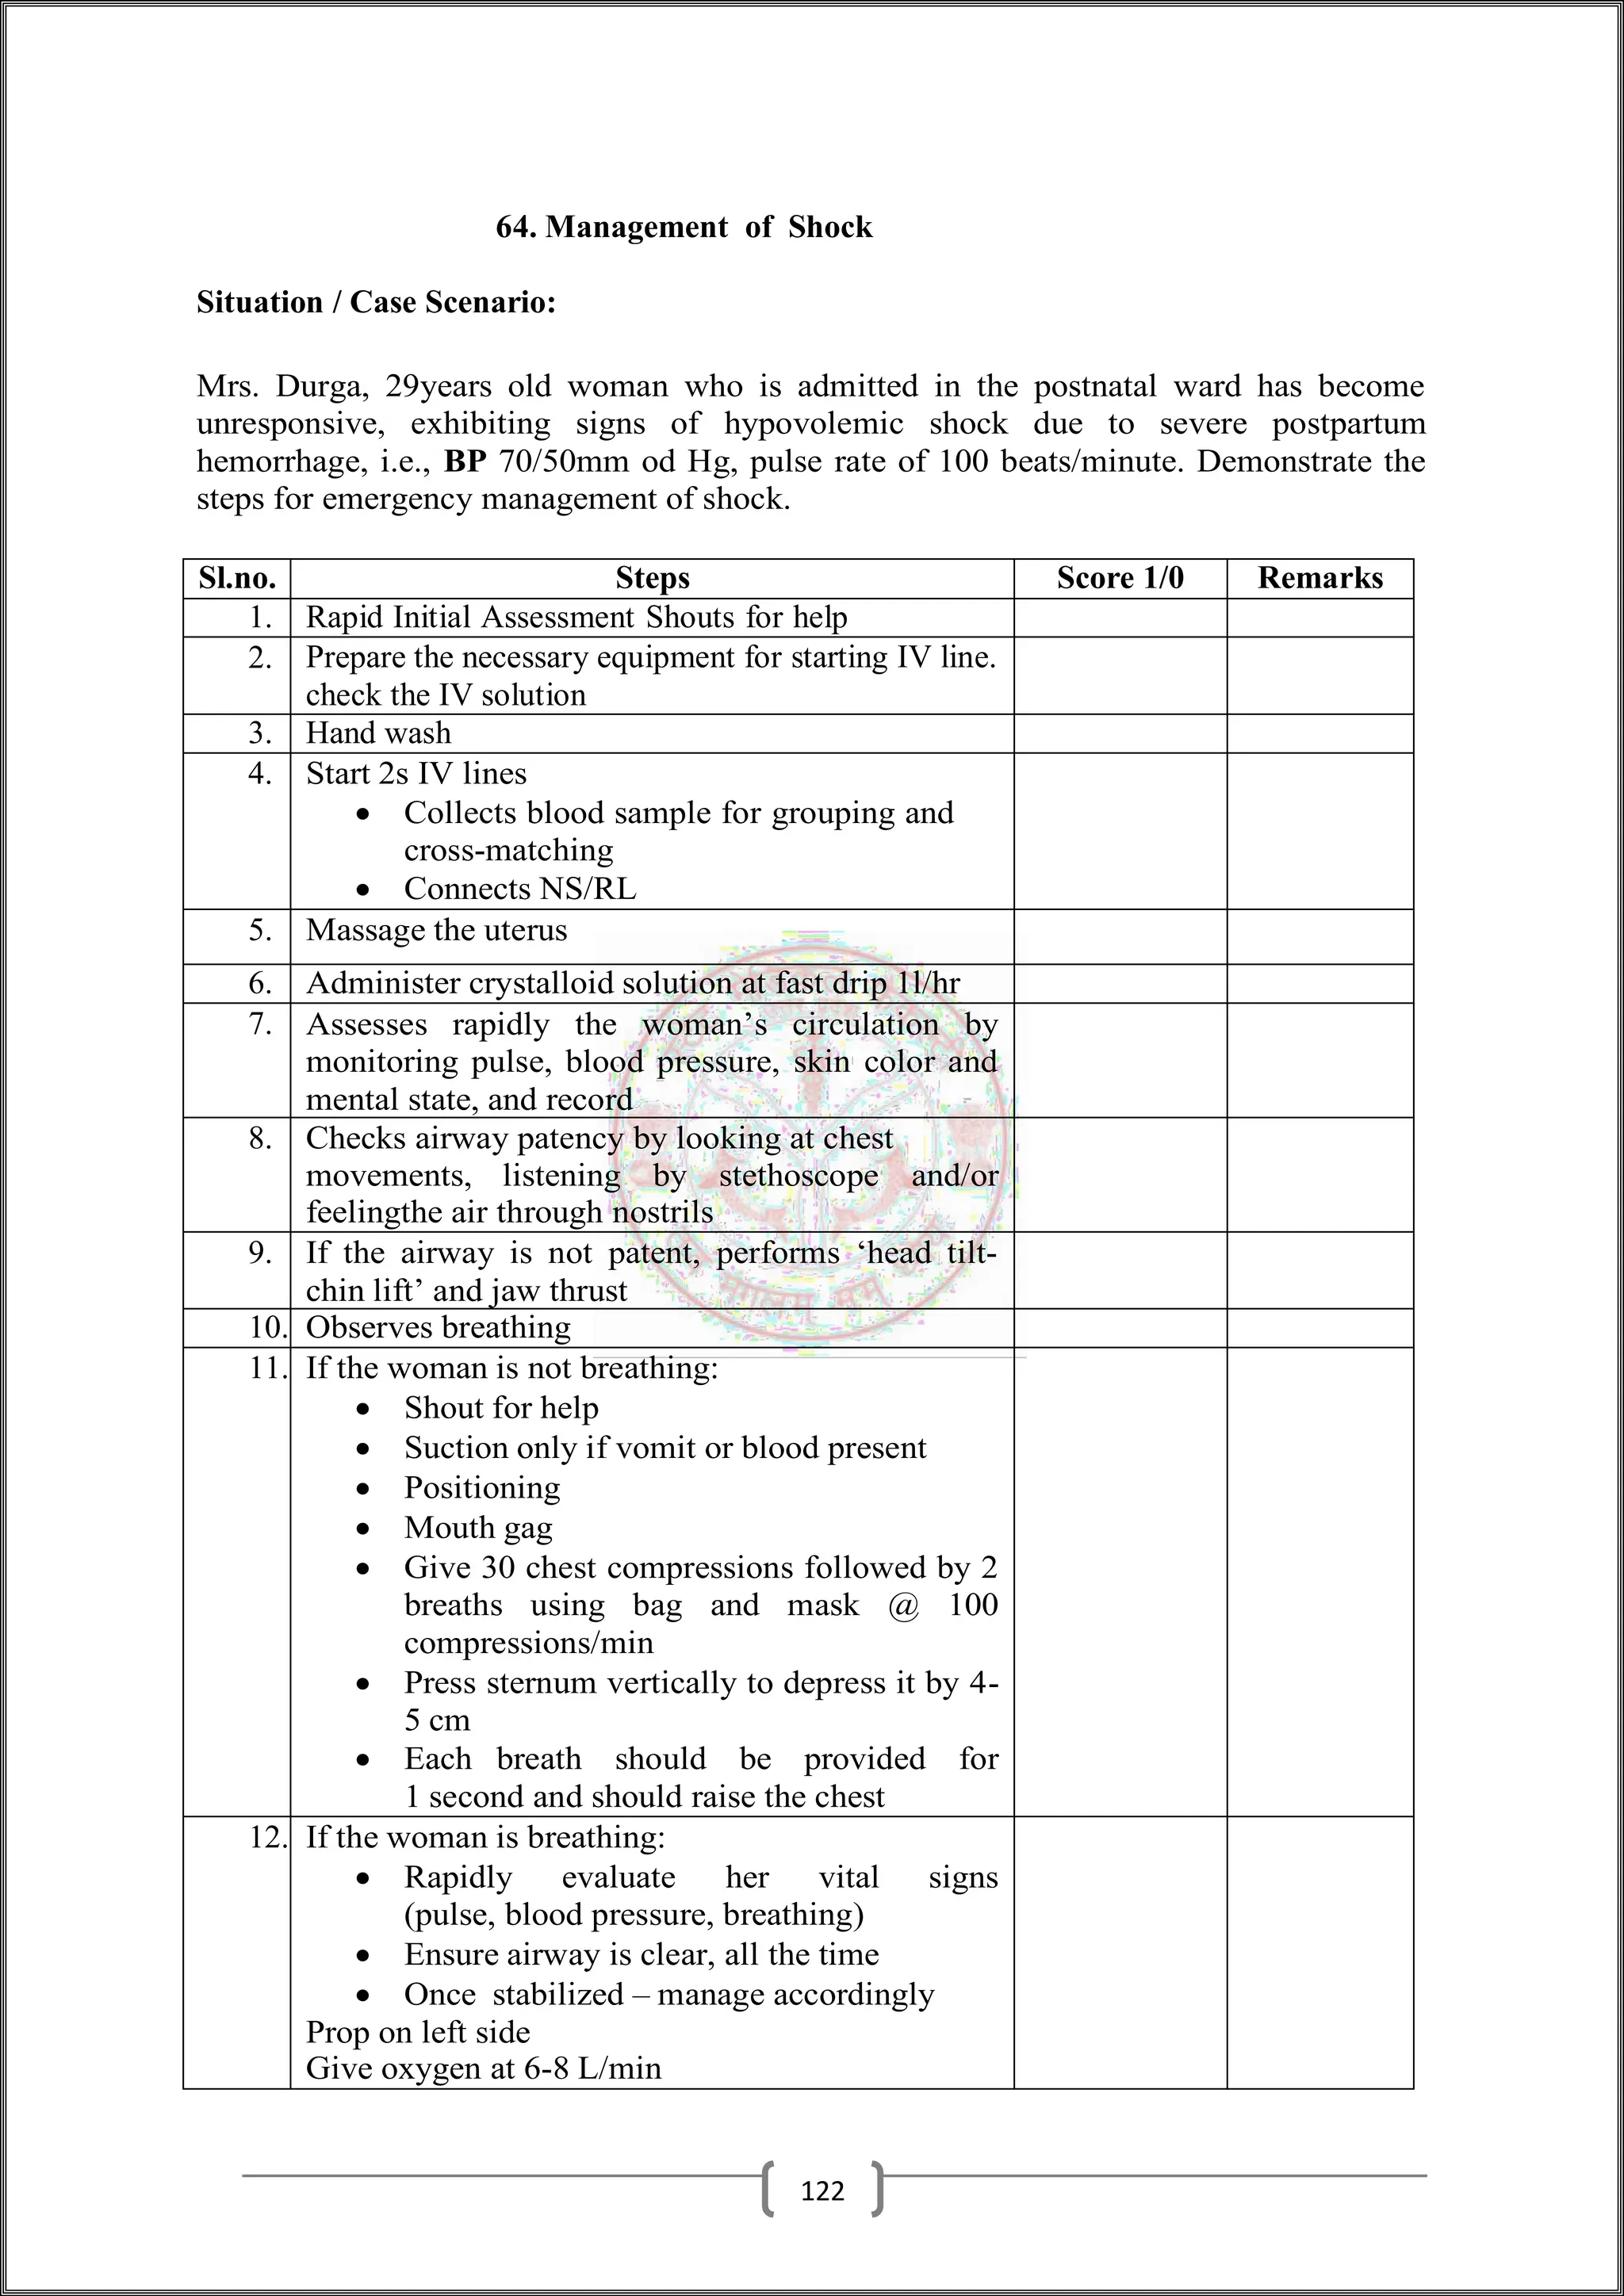
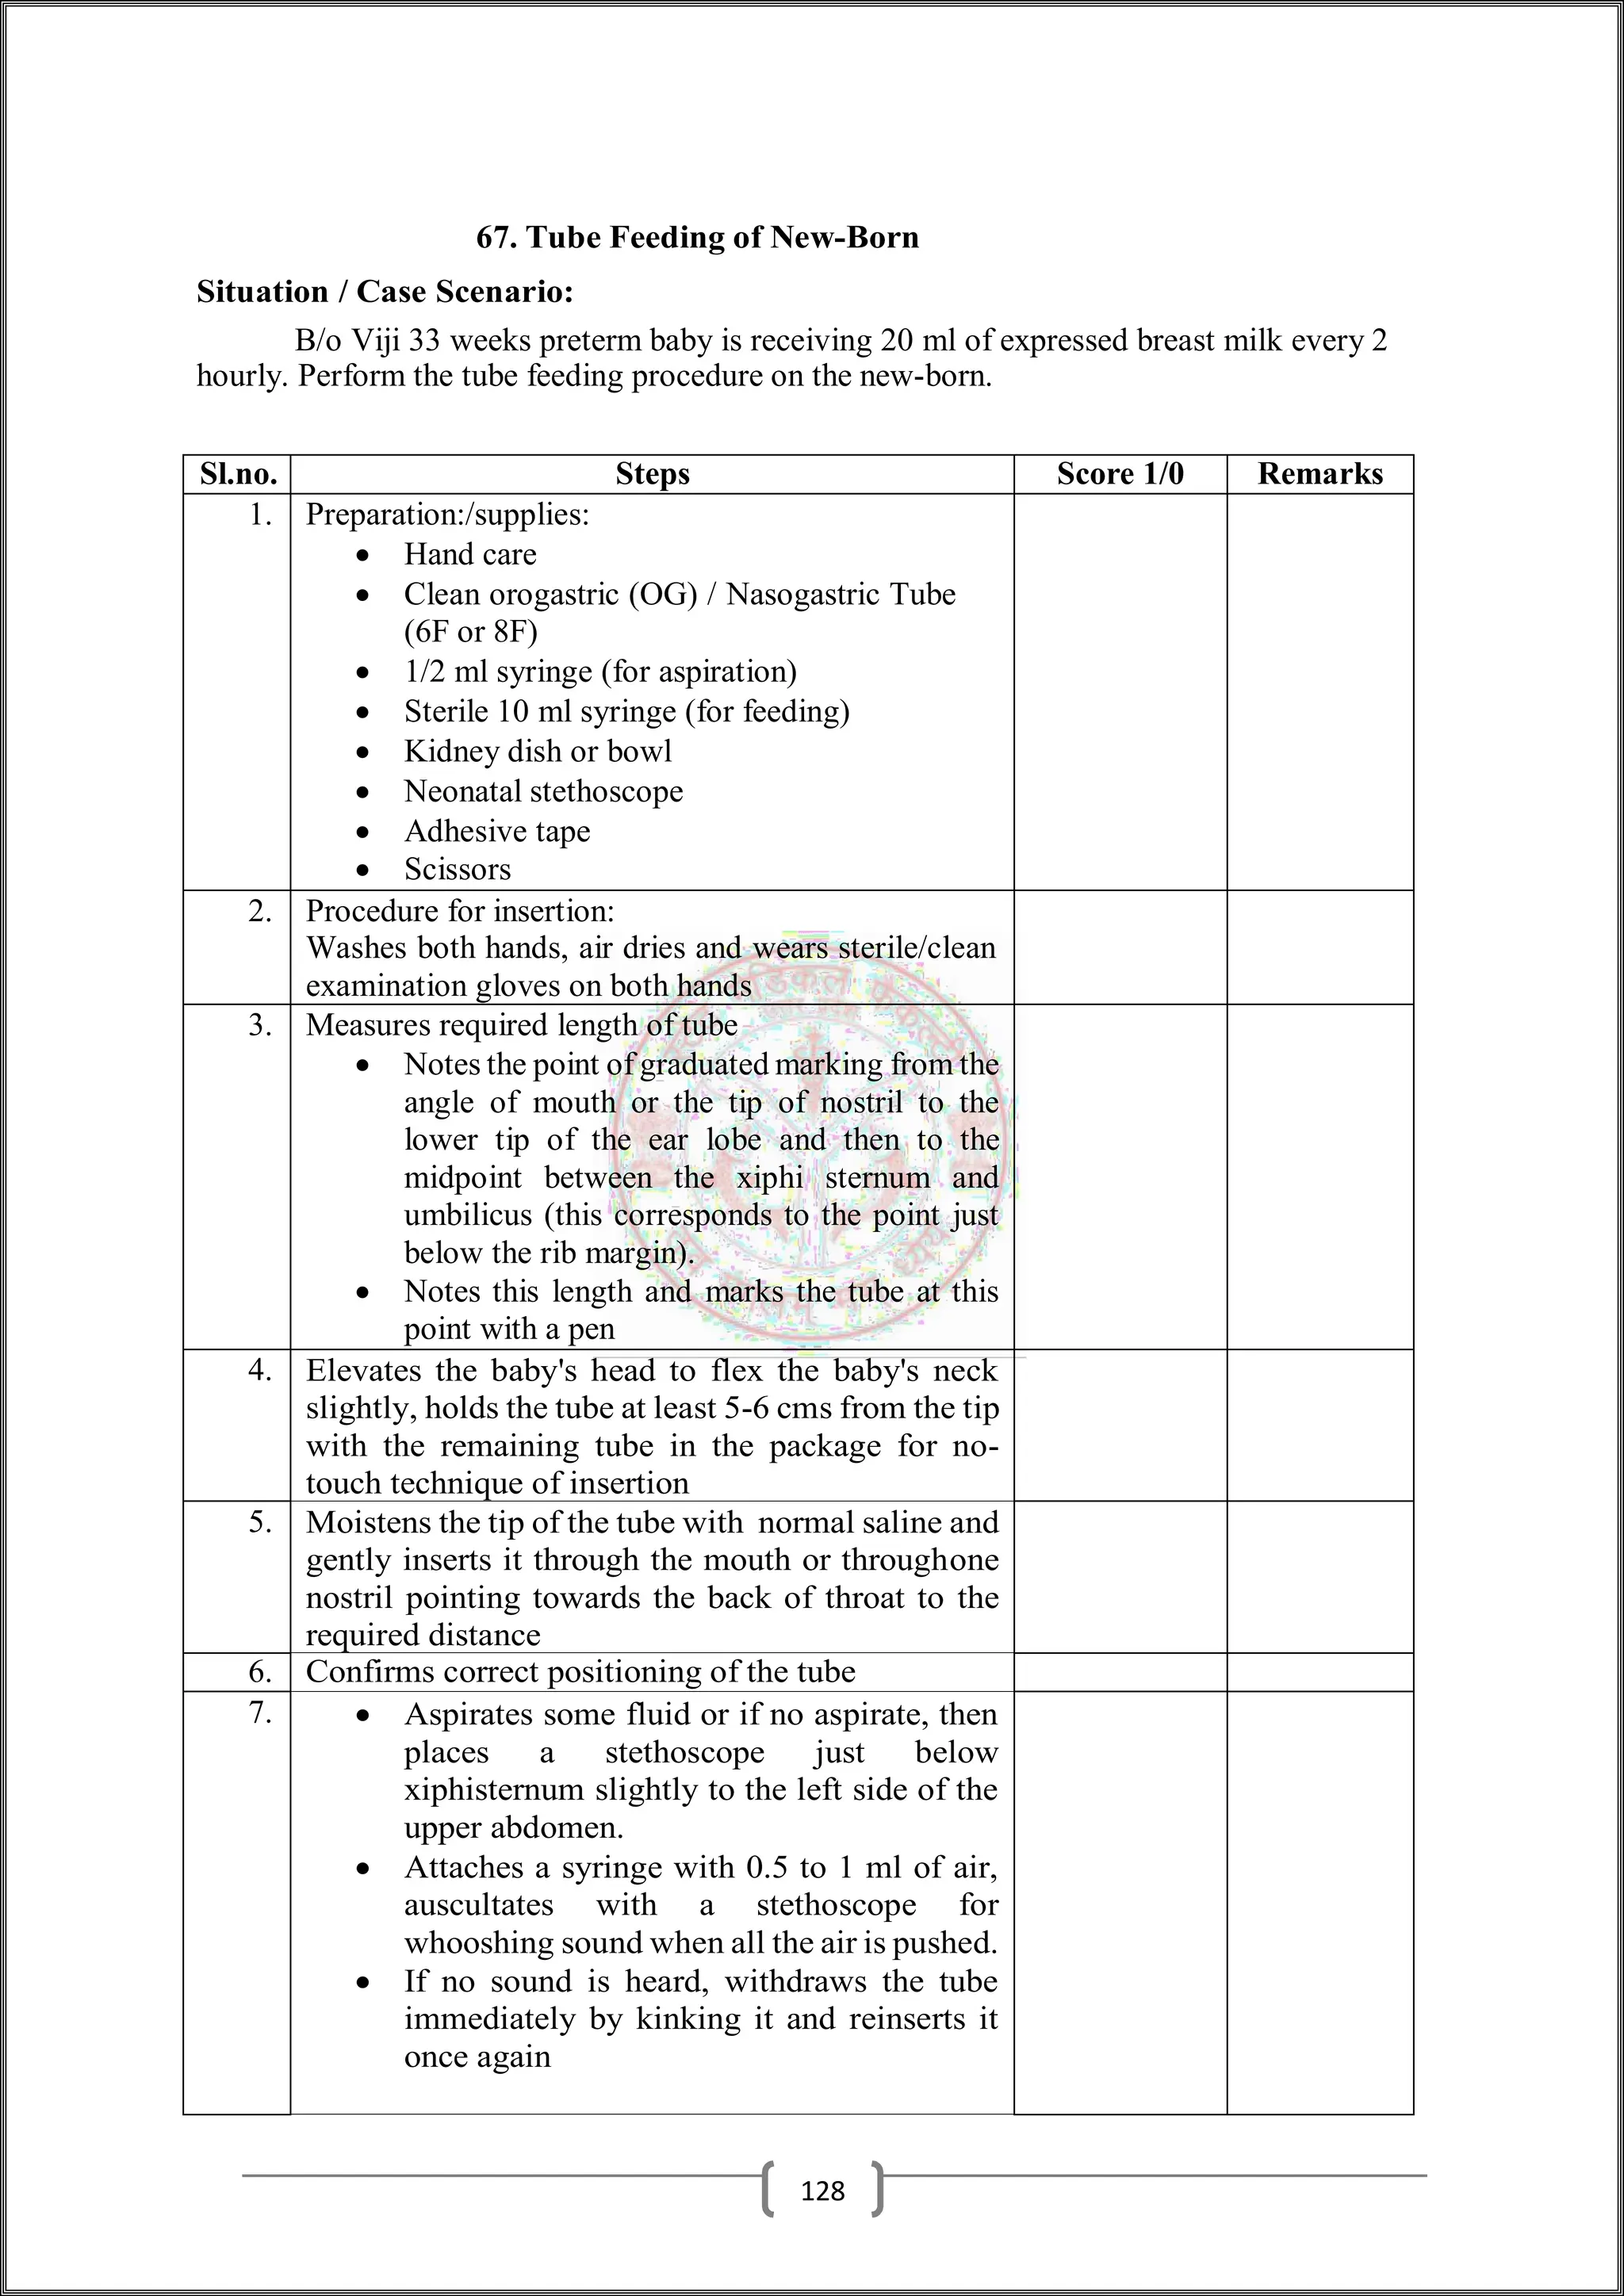
Downloaded 30 times


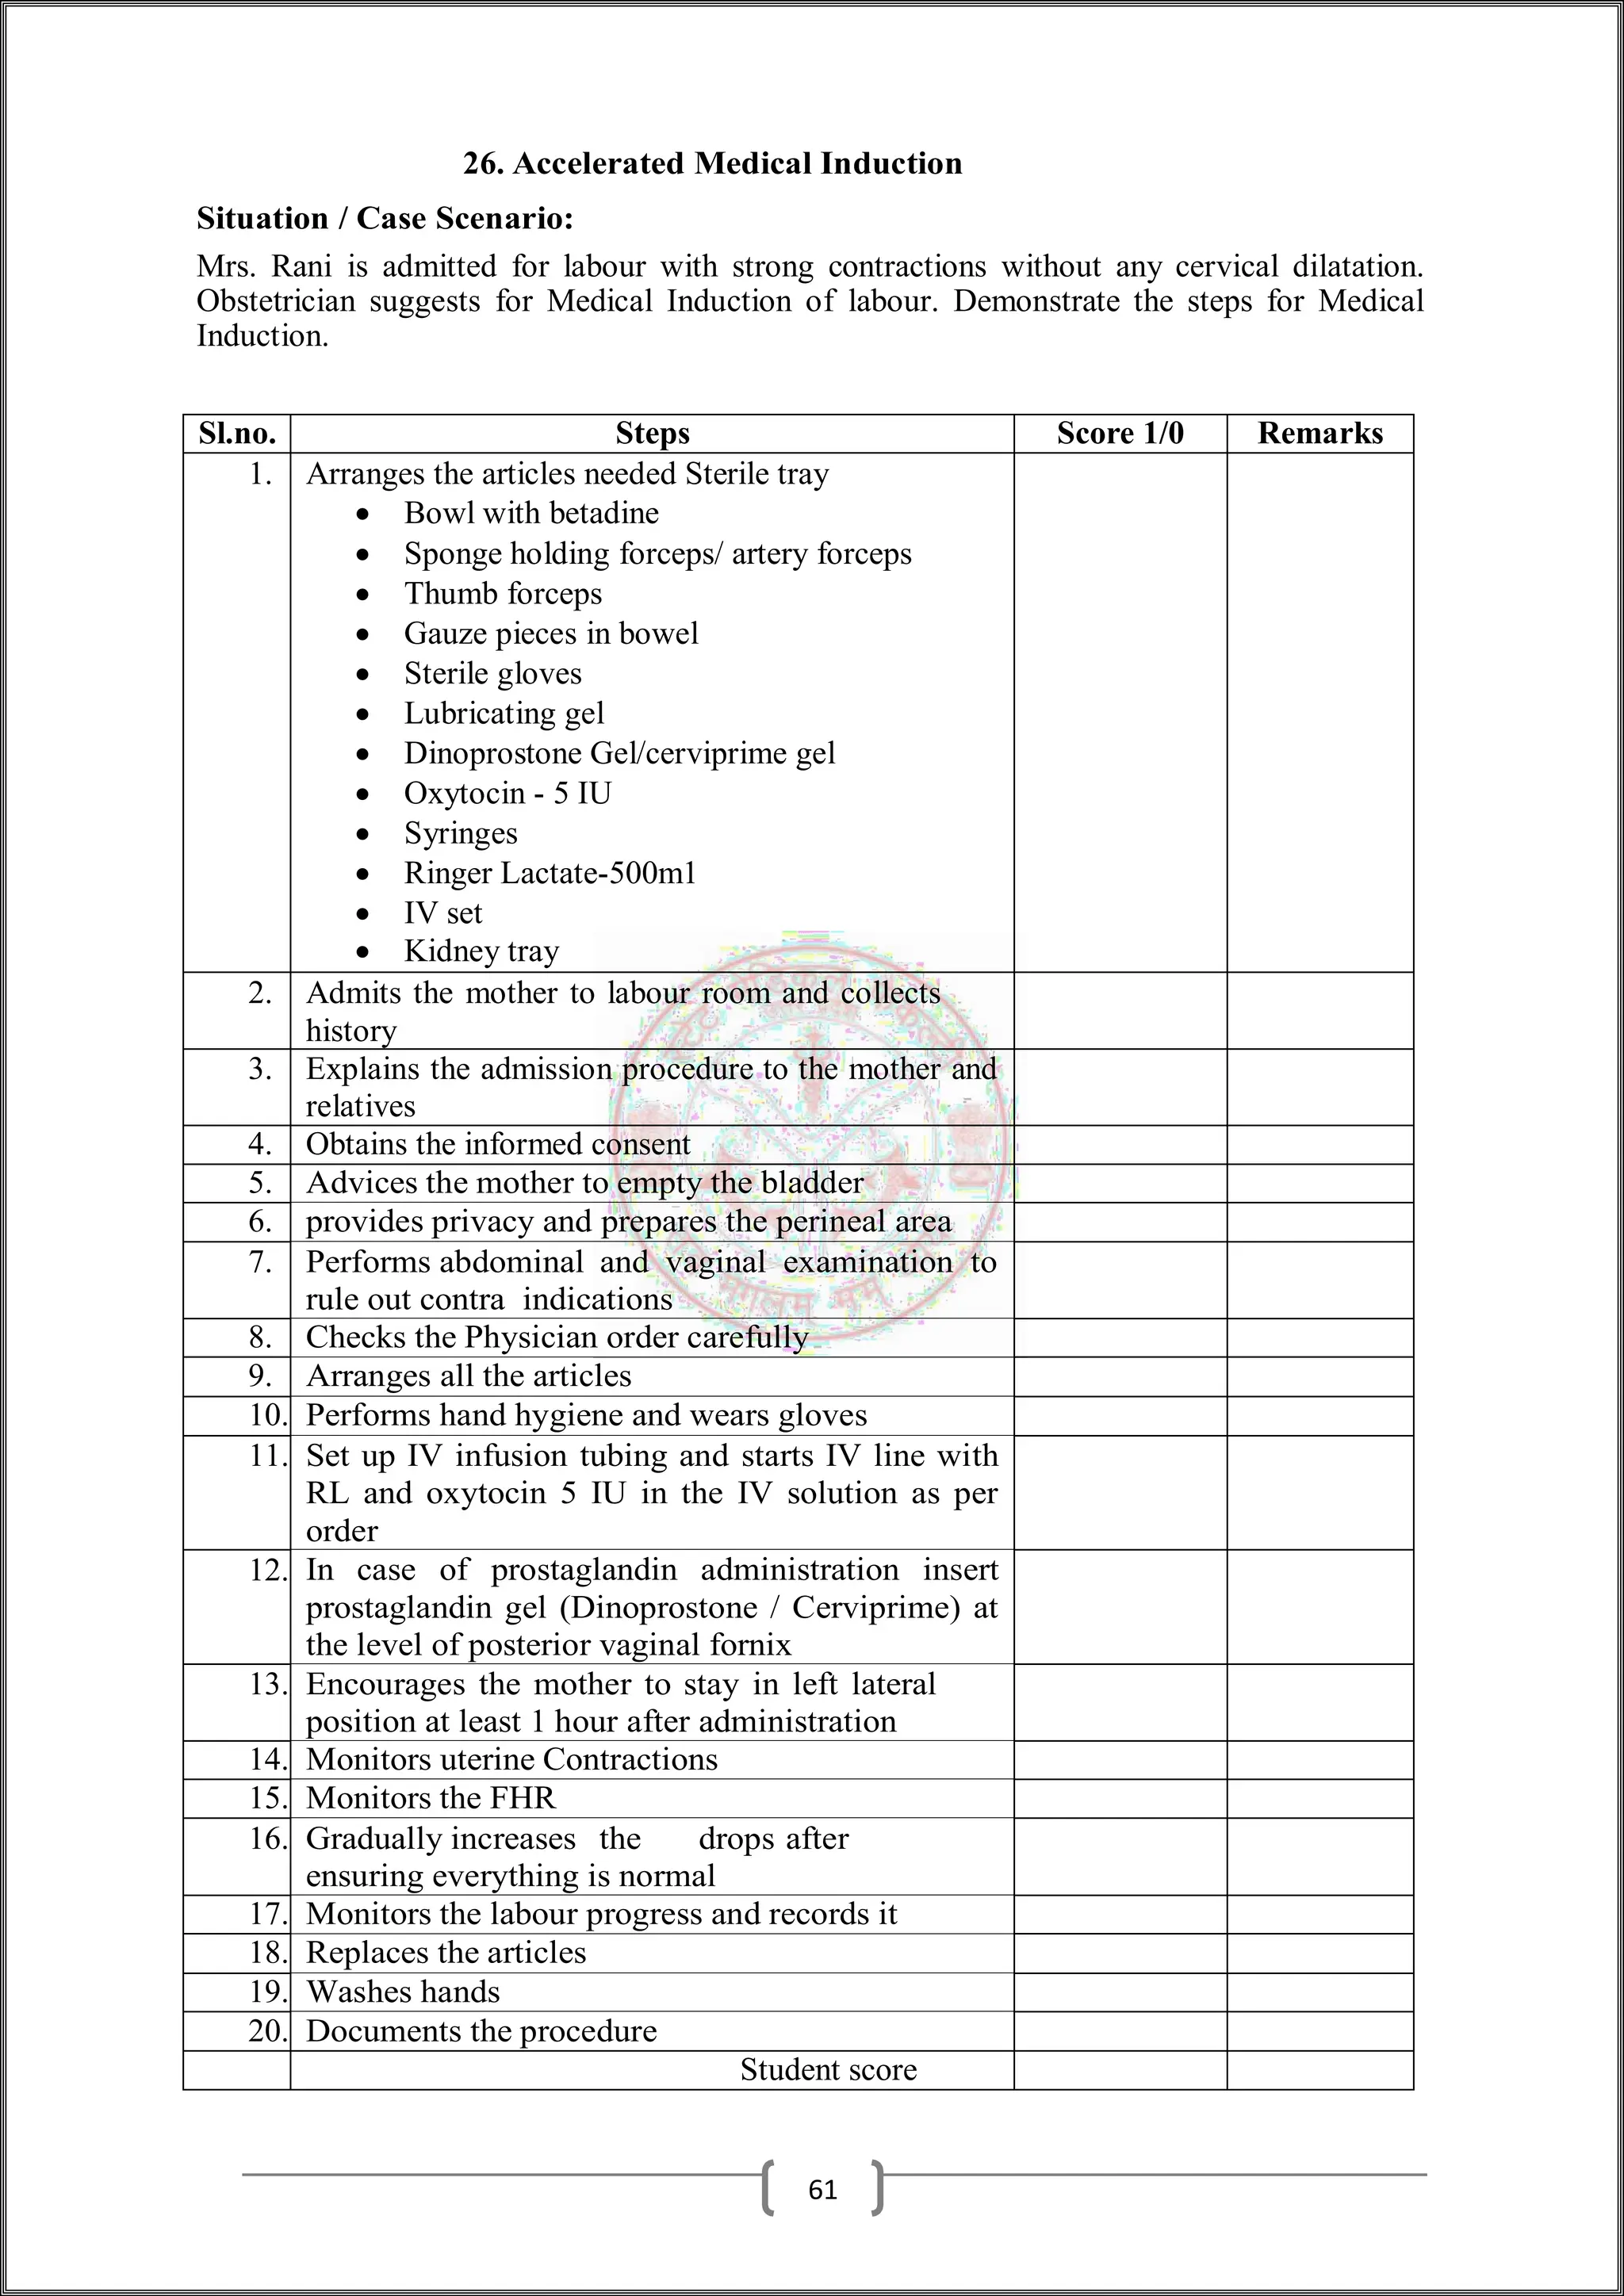
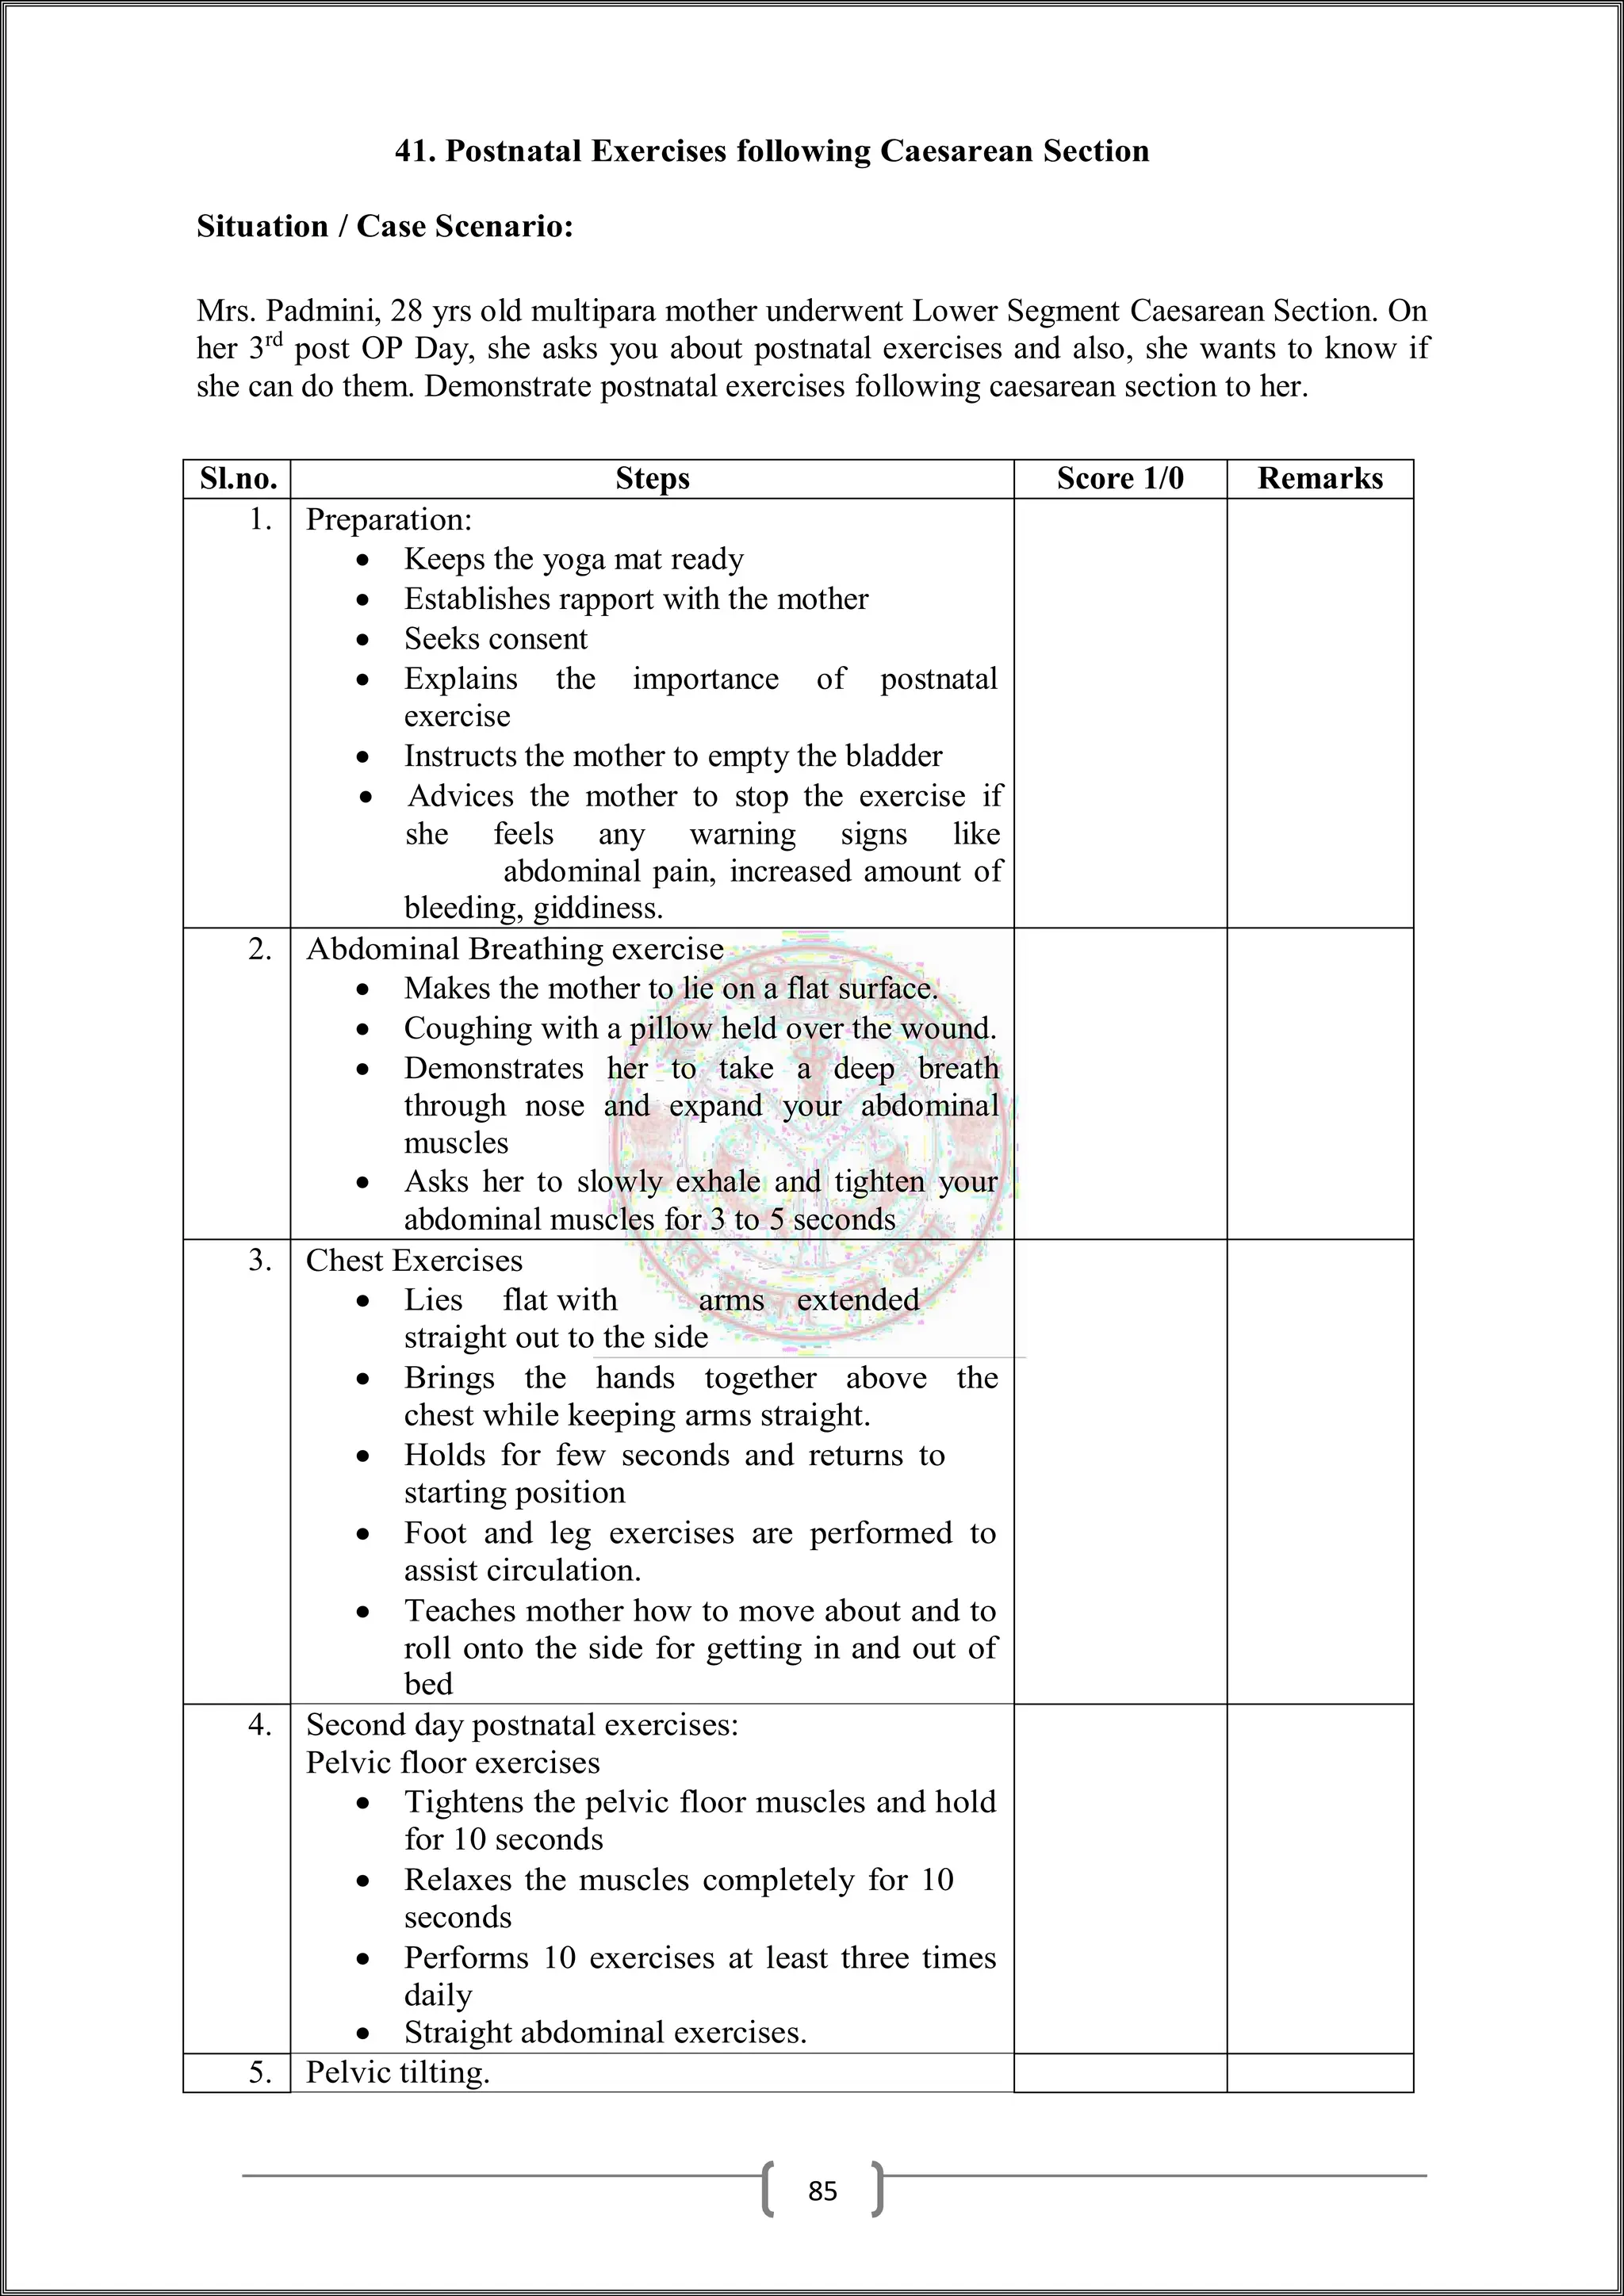
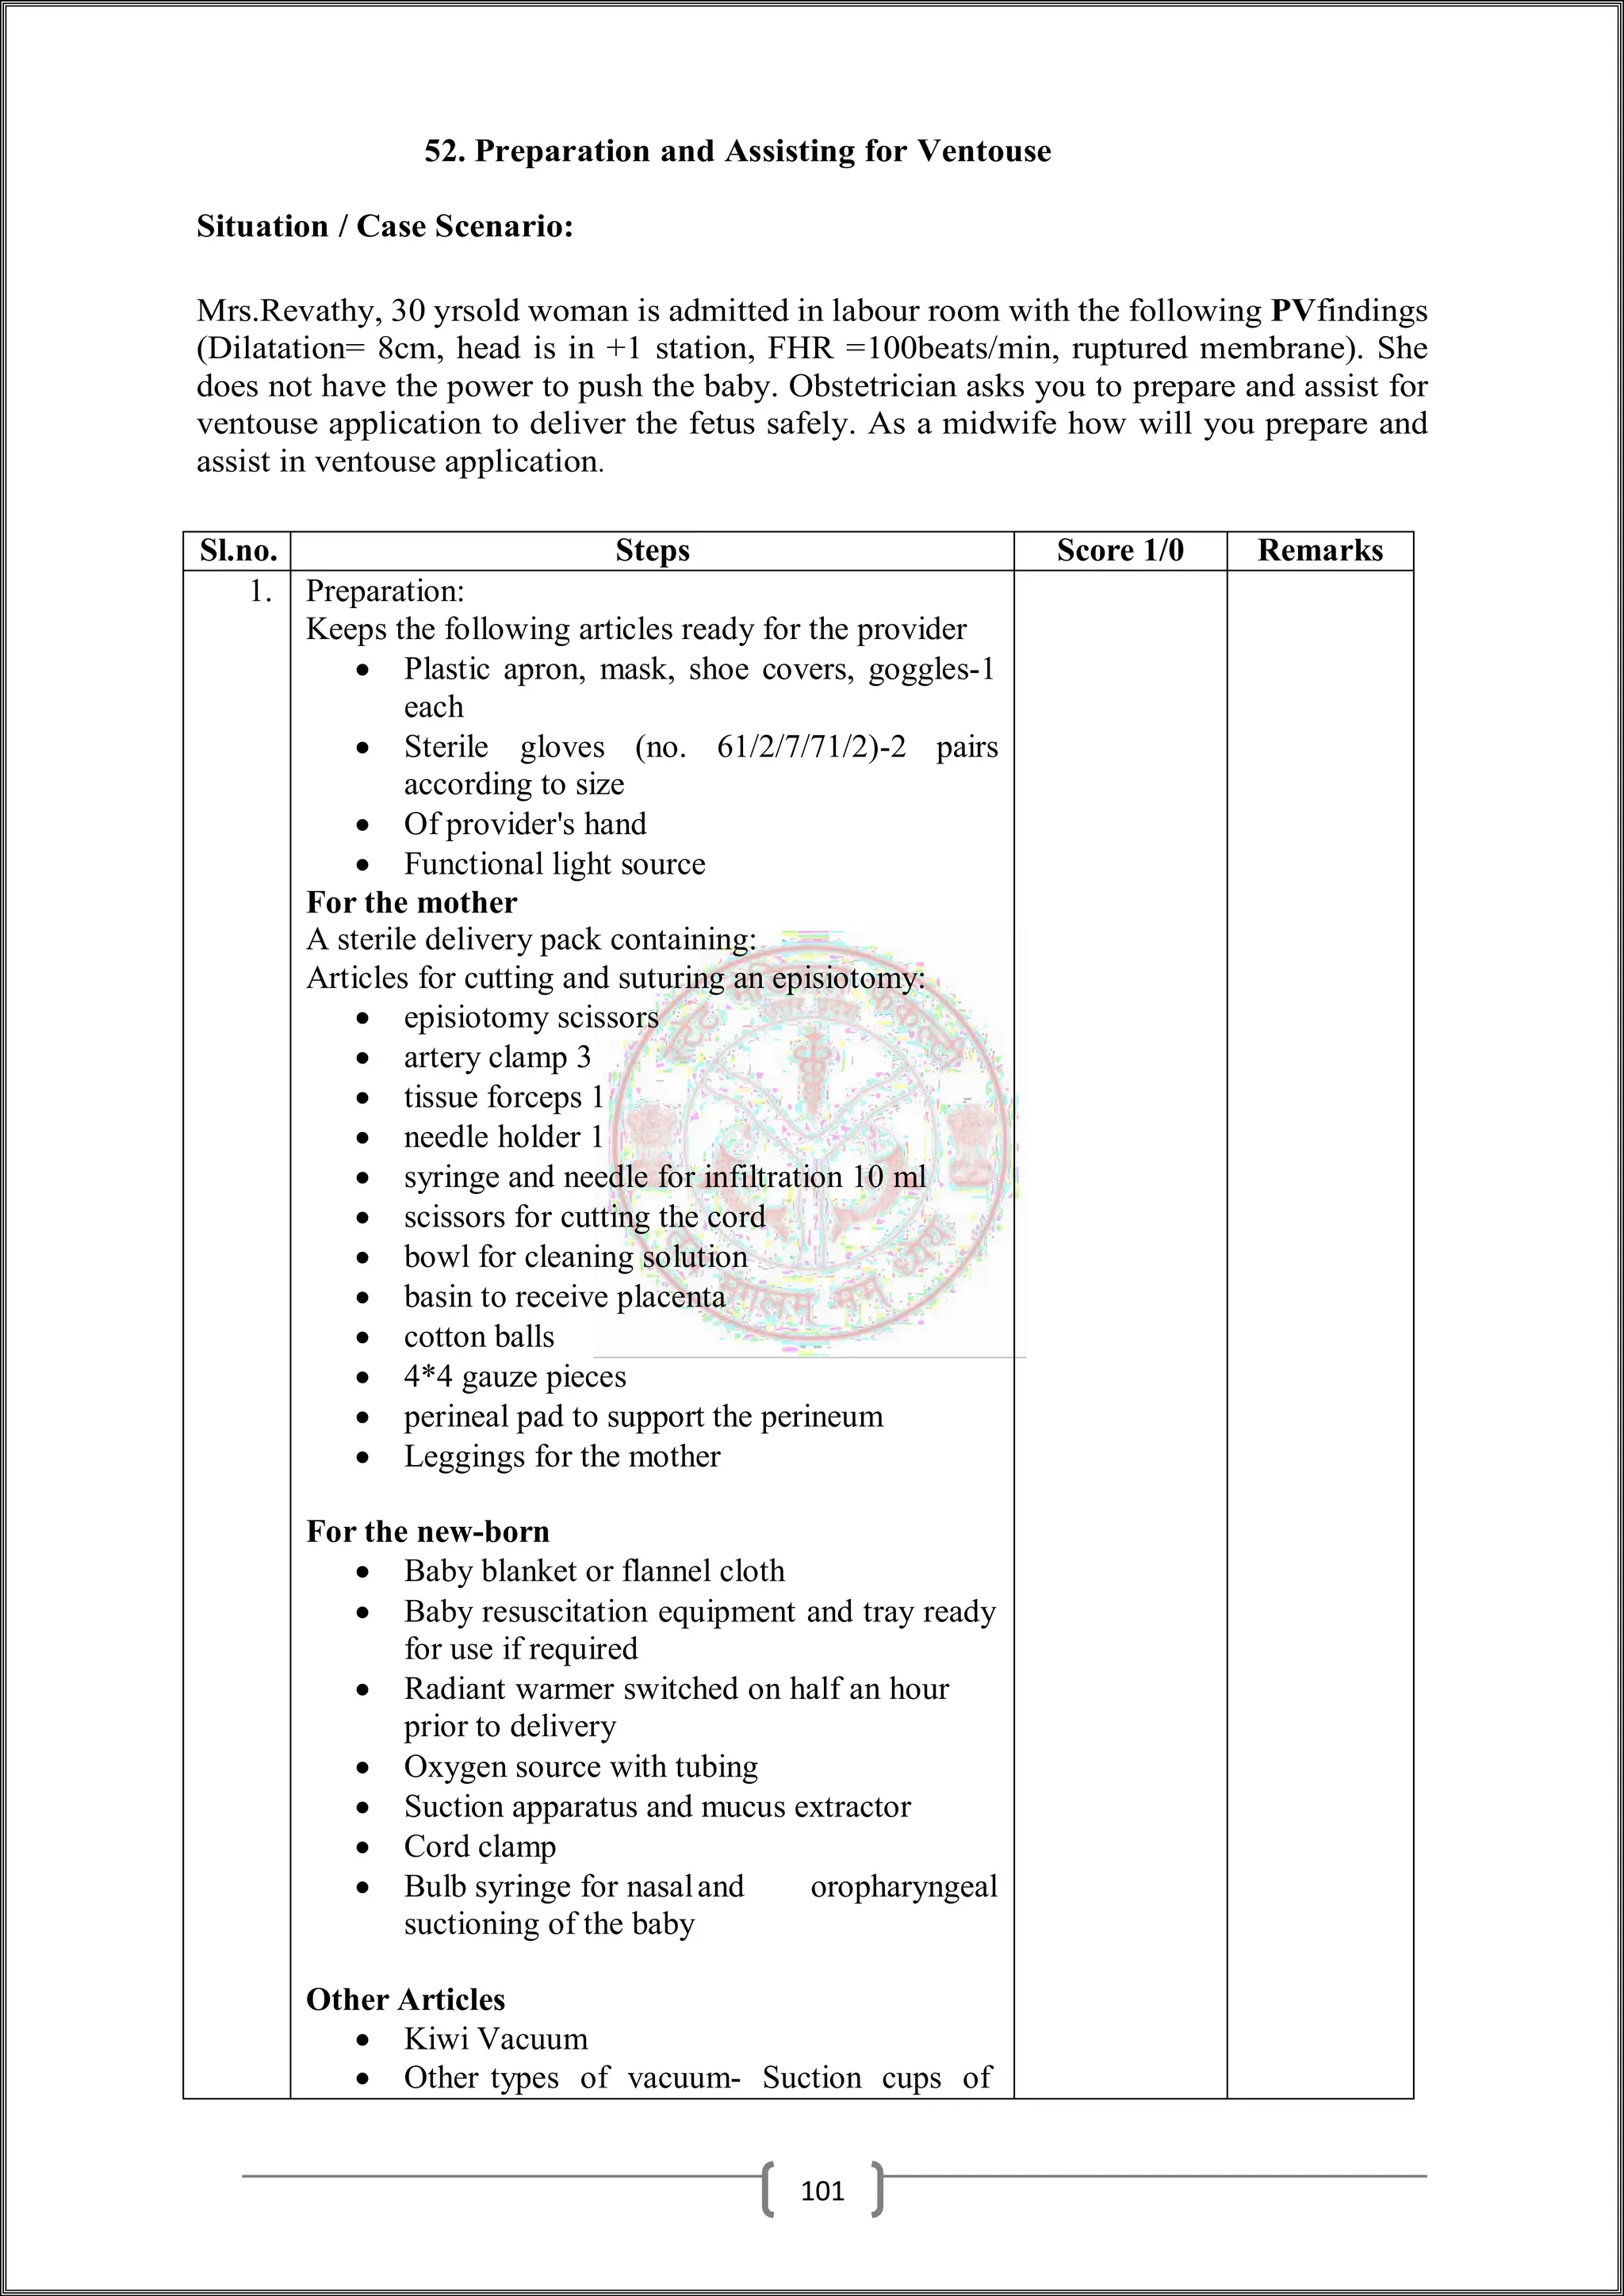
![then, however, that an appropriately trained SP can present a consistent portrayal of a
patient's history over multiple
encounters in an OSCE and that there is also a high level of consistency where different
SPs in parallel circuits portray the same encounters. Portrayal of physical findings may
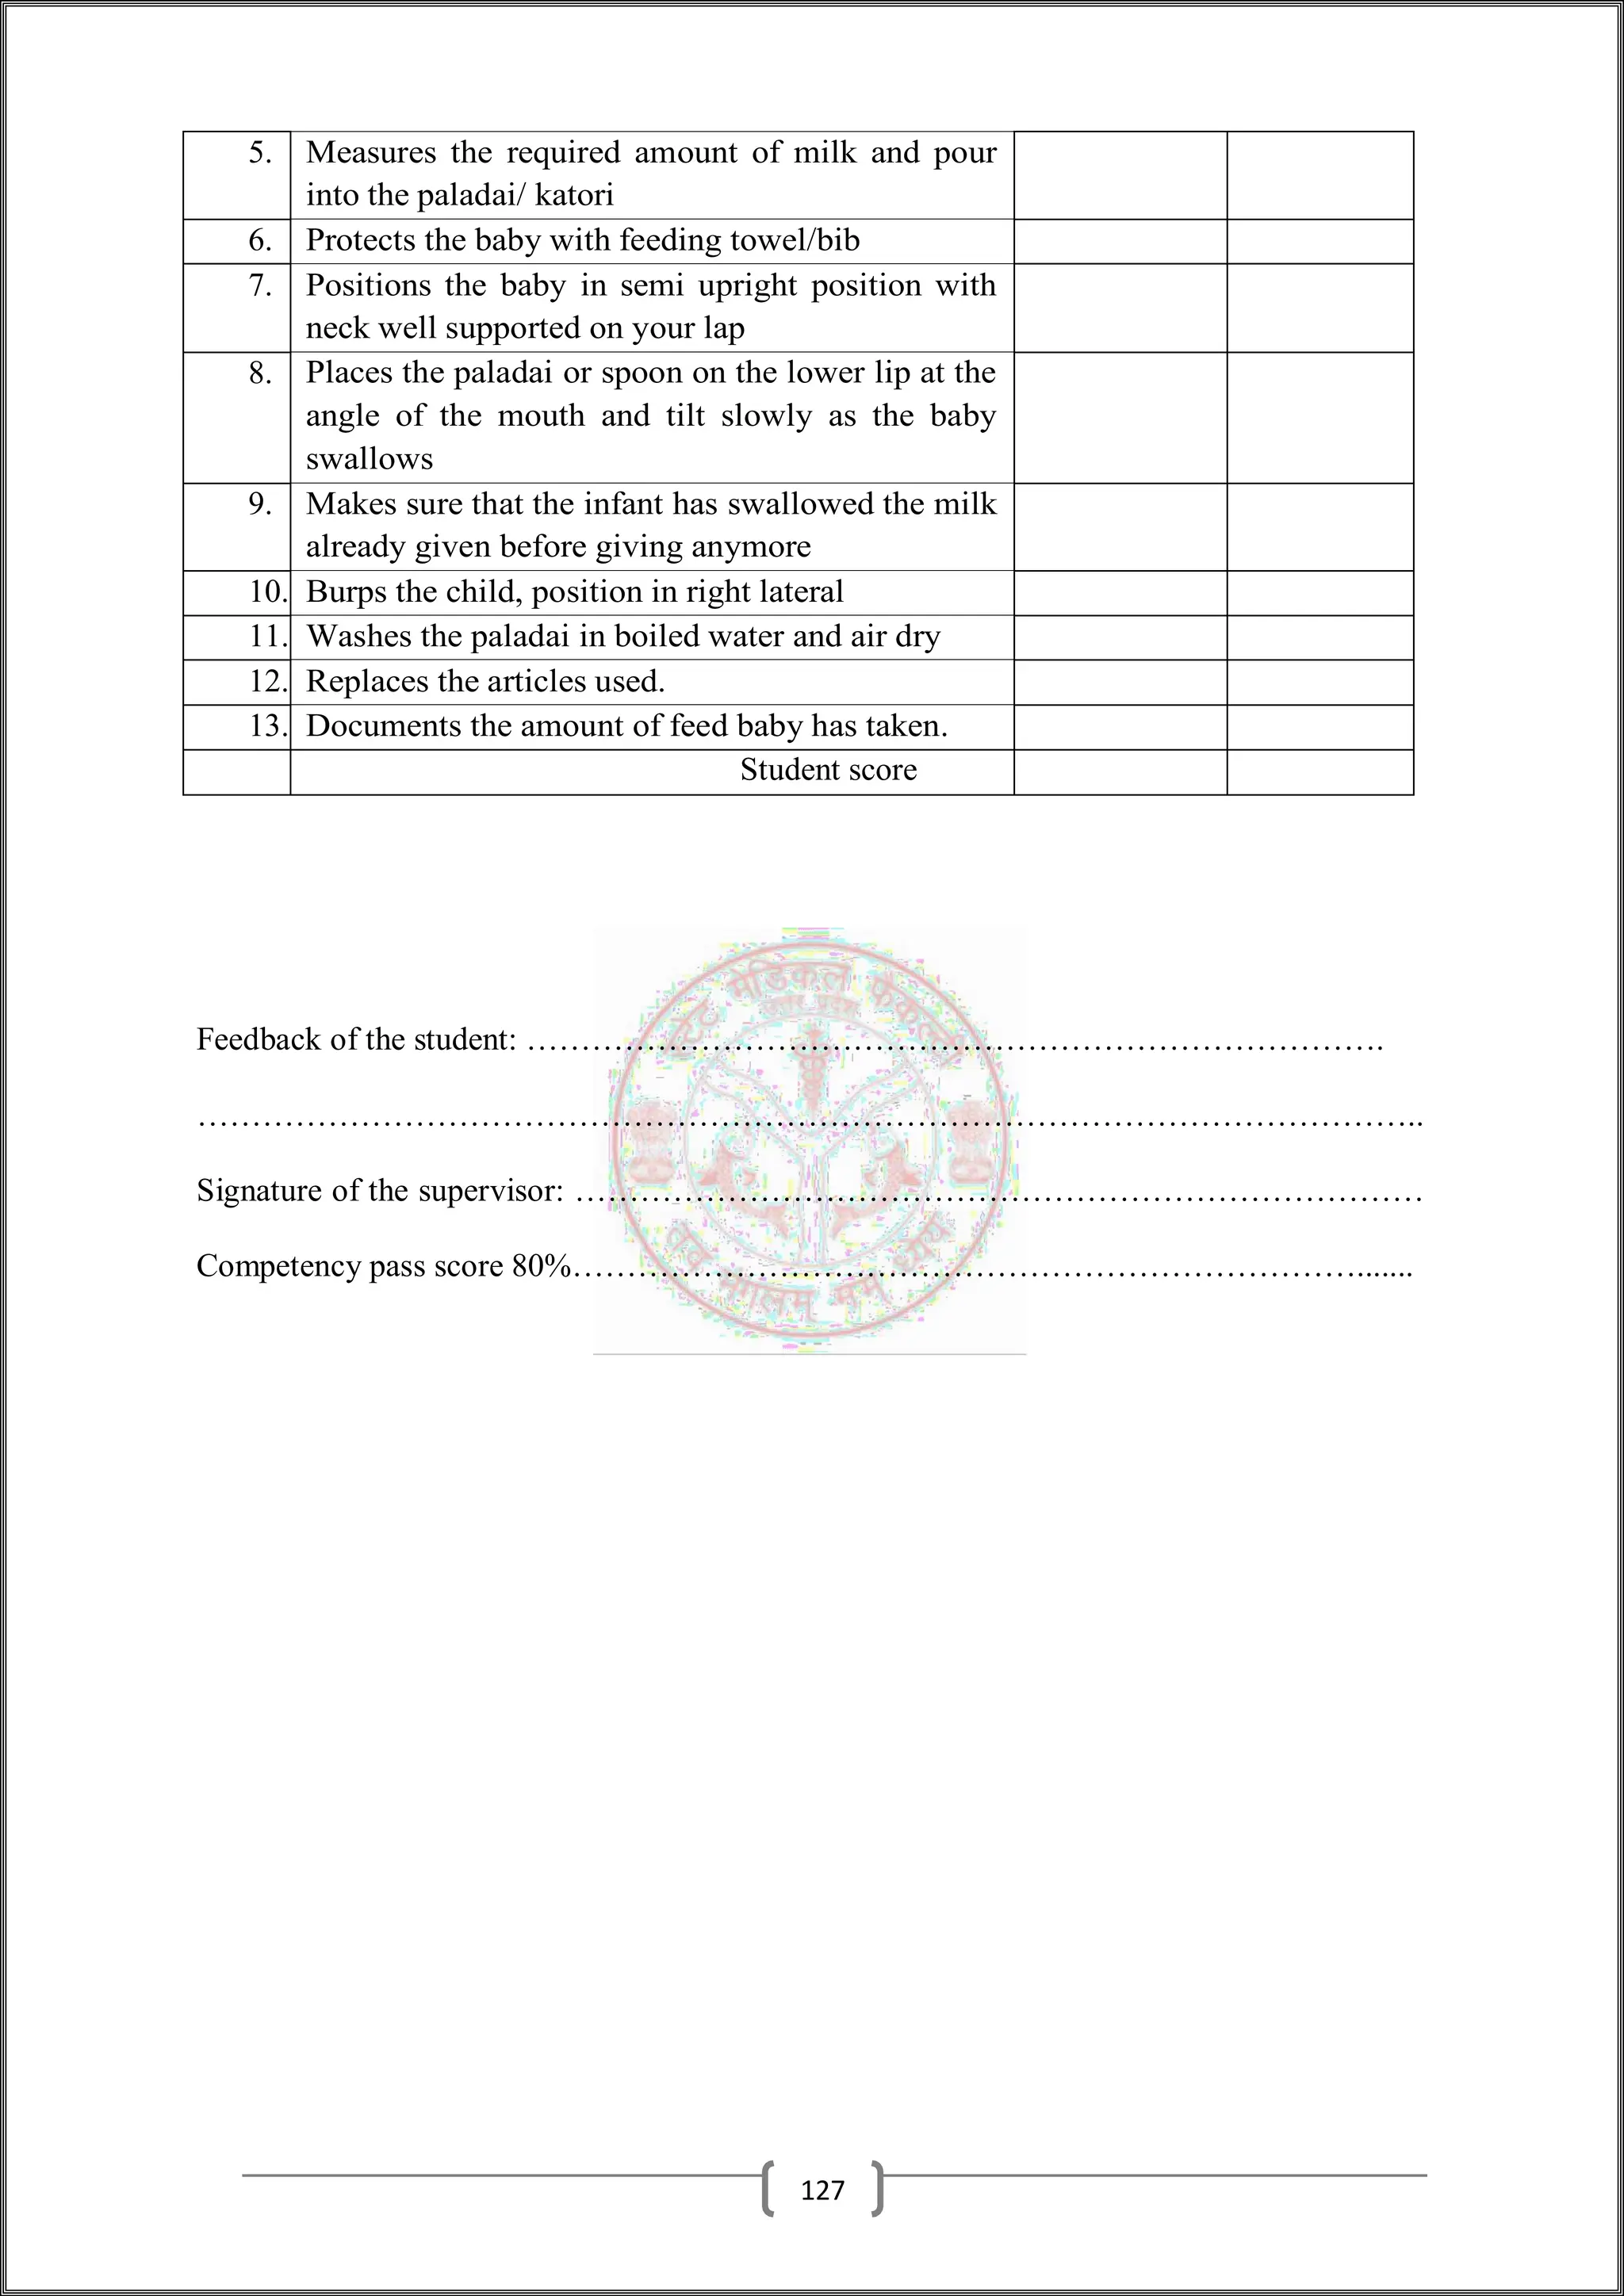
be less accurate, but this may be corrected with additional training.
14.3 Realism and the simulated patient
It is important to make the SPs portrayal of the patient as realistic as possible in order to
trigger more authentic conscious responses from examiners.
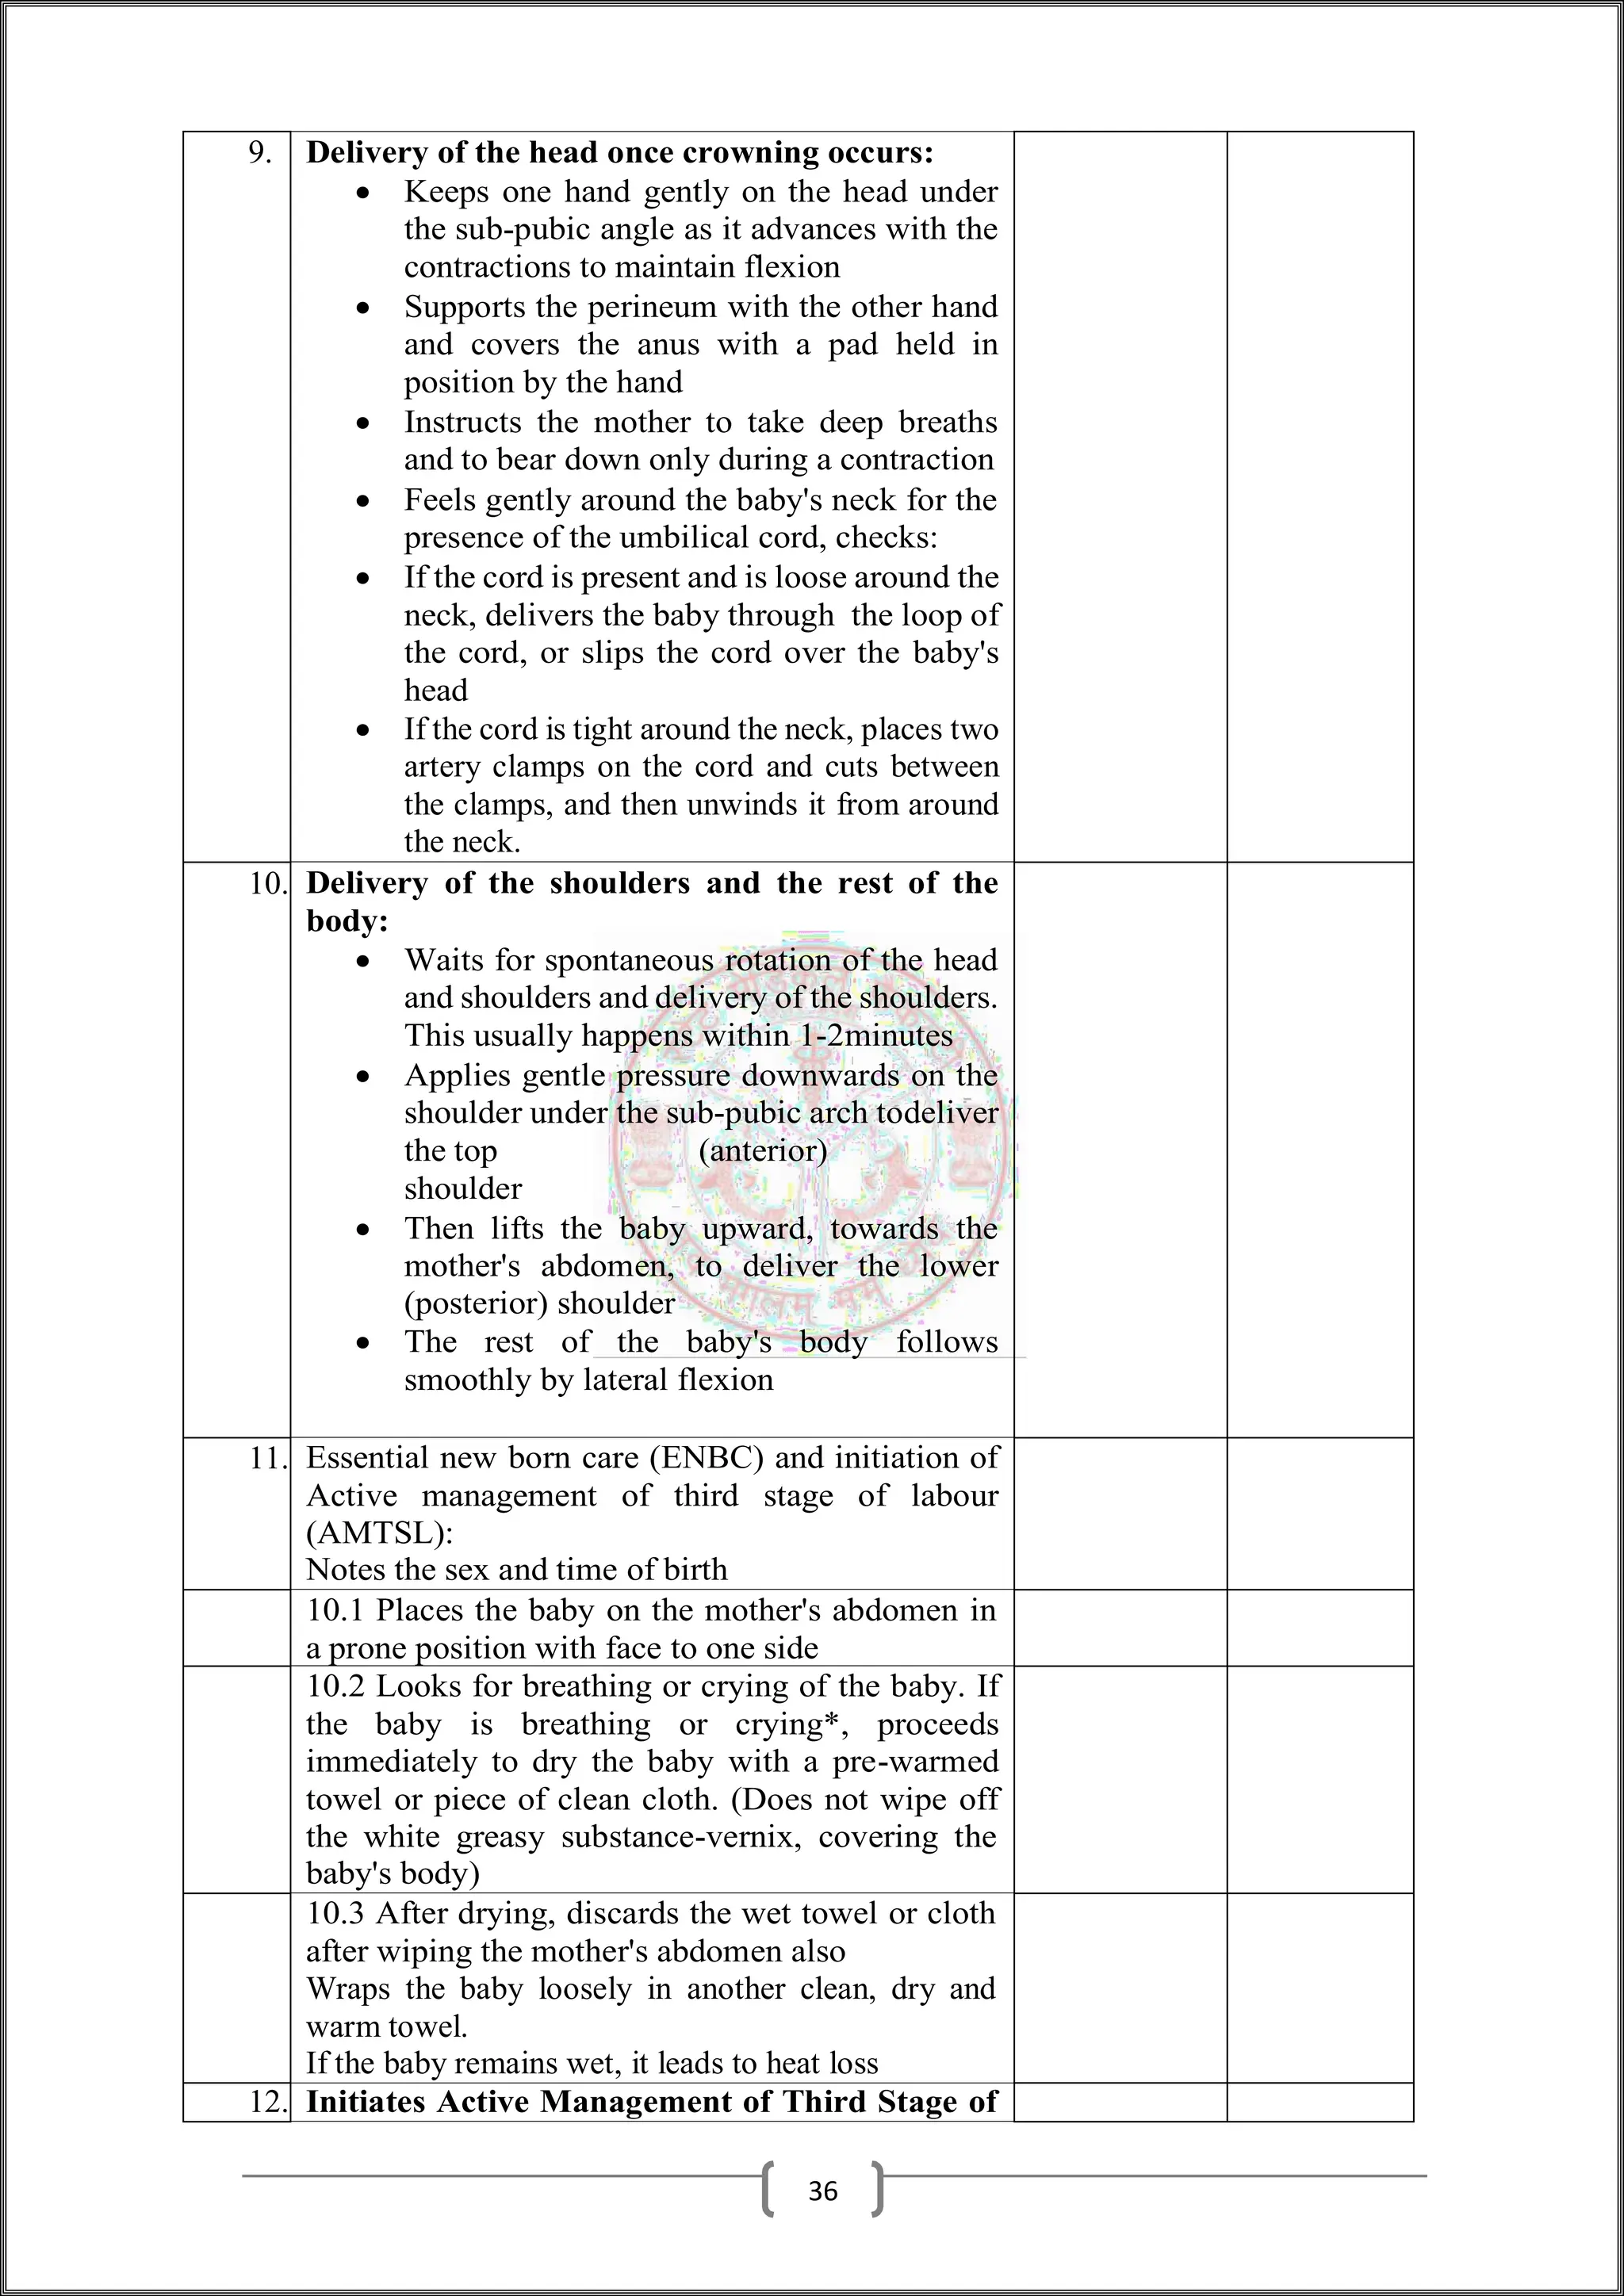
There are a number of measures that can be taken to facilitate a realistic portrayal of a
patient in an OSCE, as discussed below.
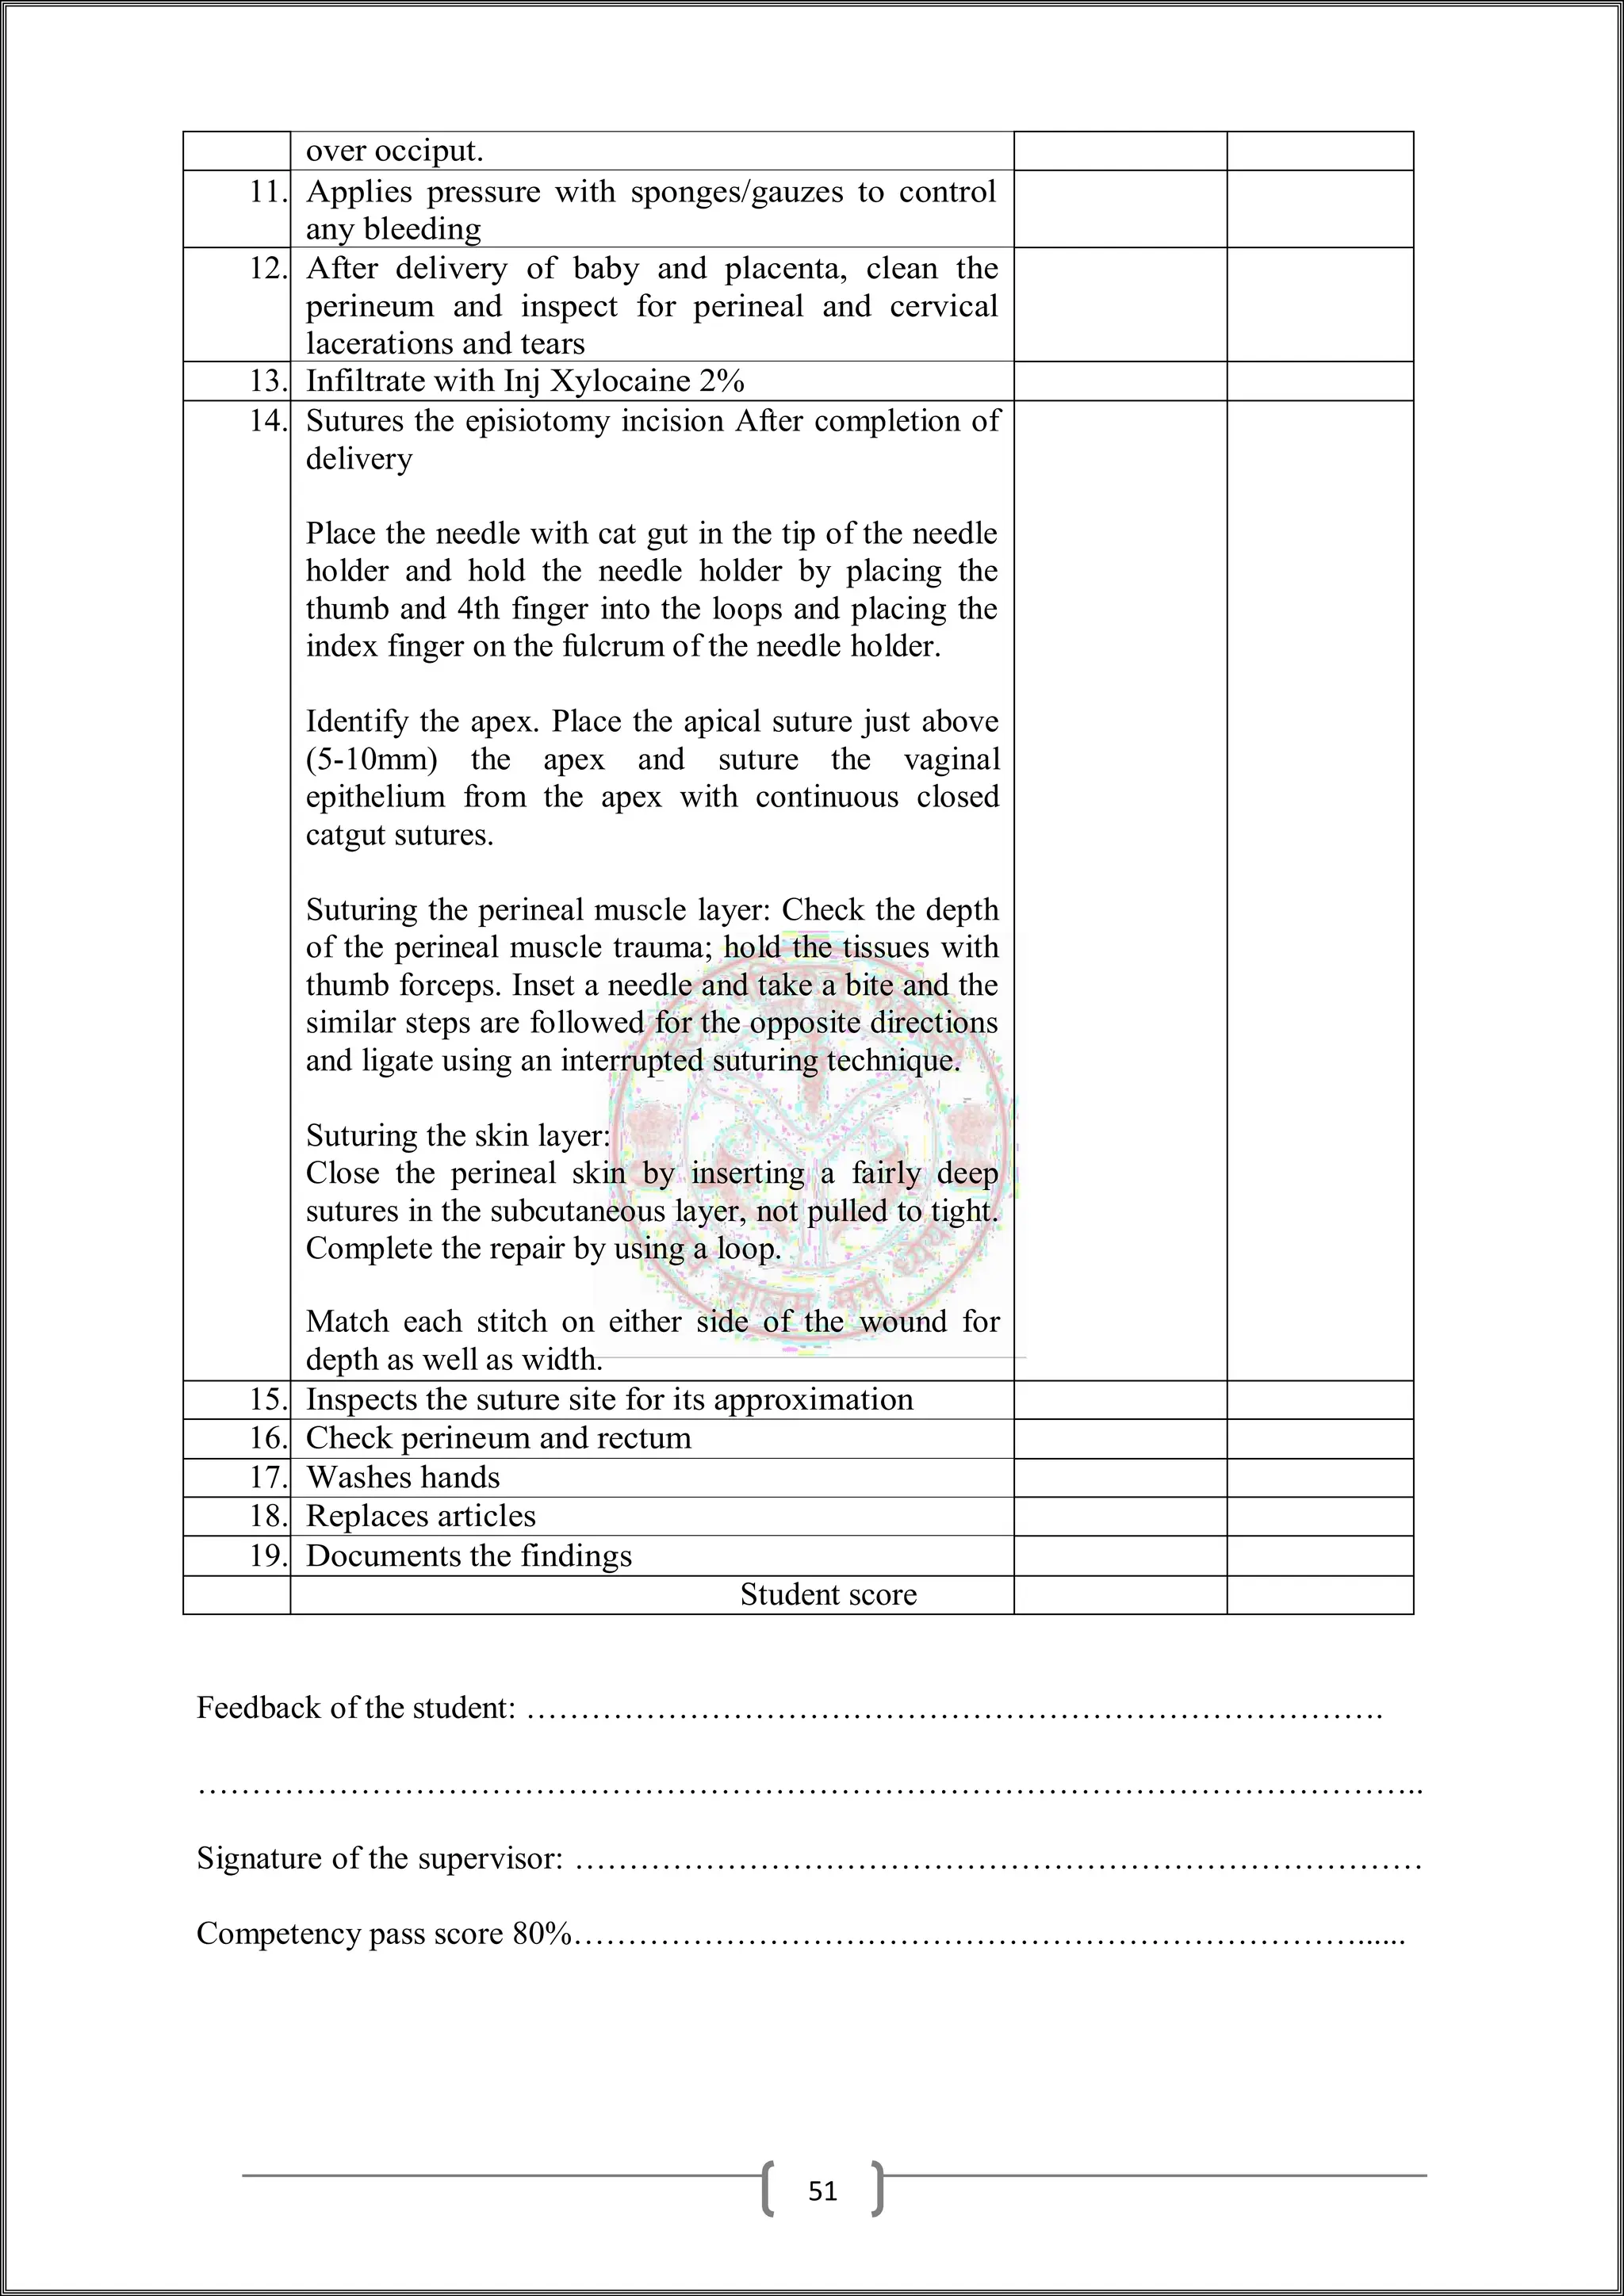
14.3.1 The patient narrative
In preparing for an OSCE, Nested et al.(2008) interviewed real patients in the emergency
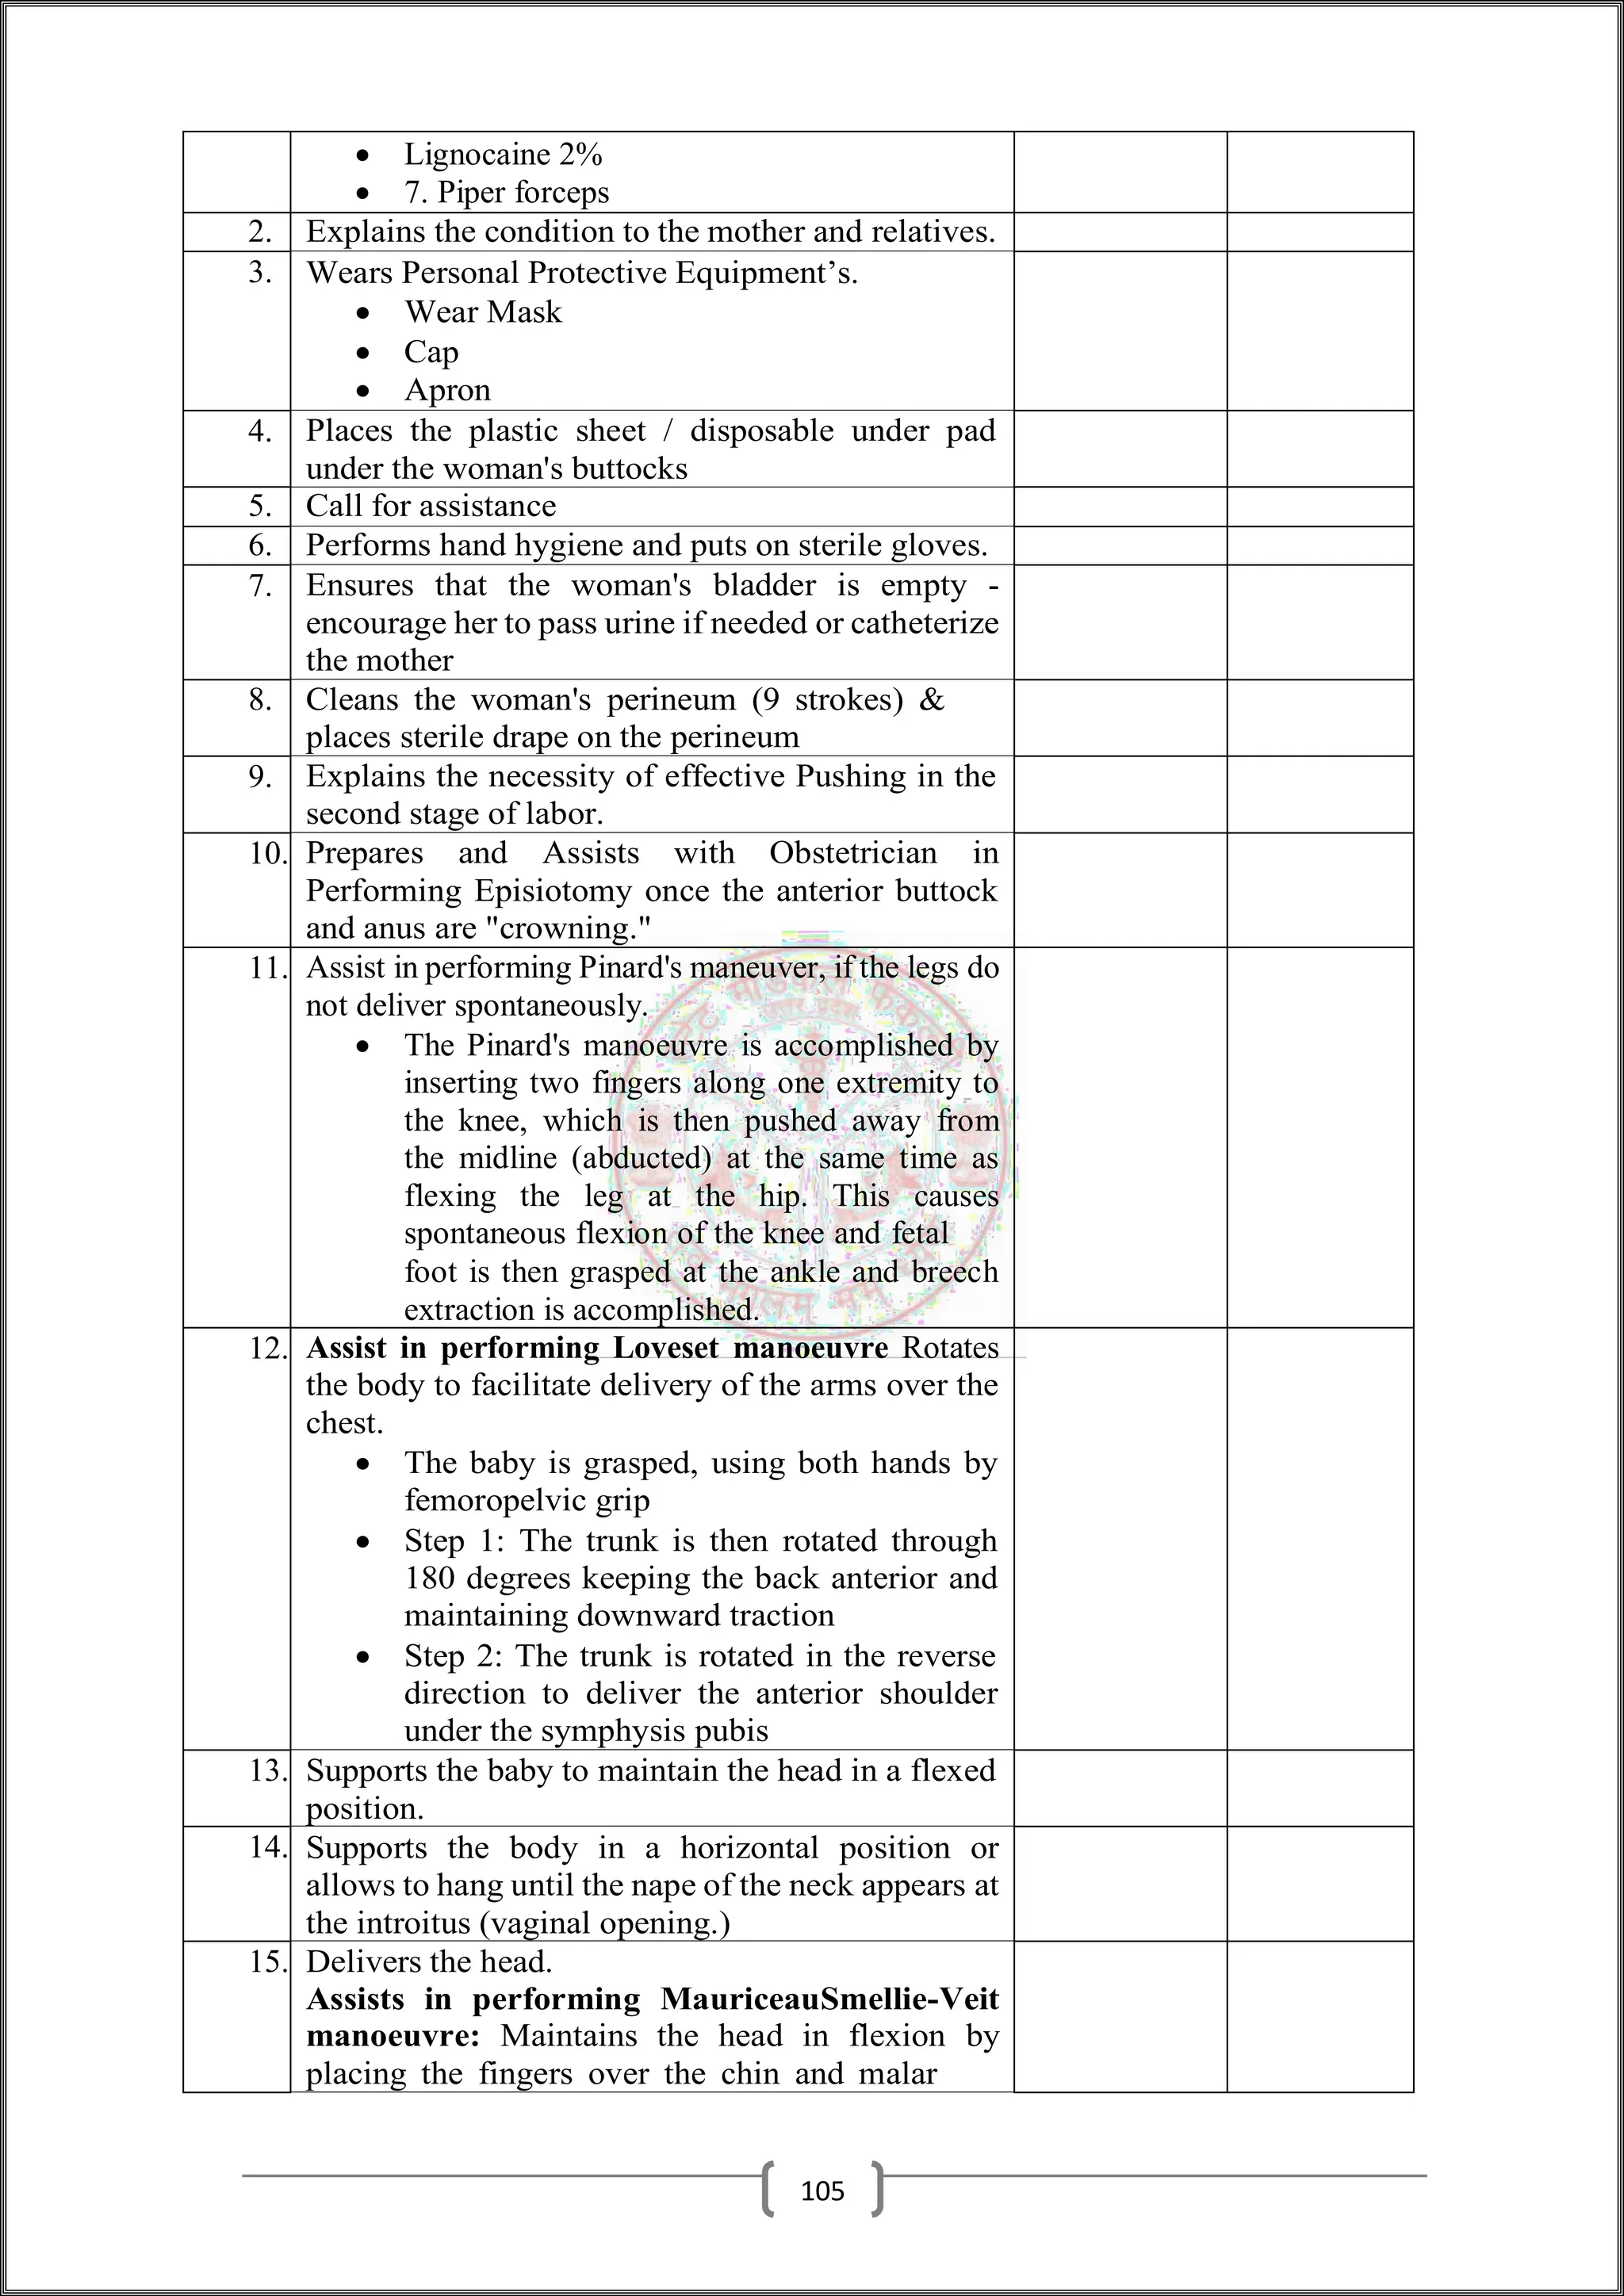
department shortly after a procedure. In the training of SPs, their use of 'verbatim
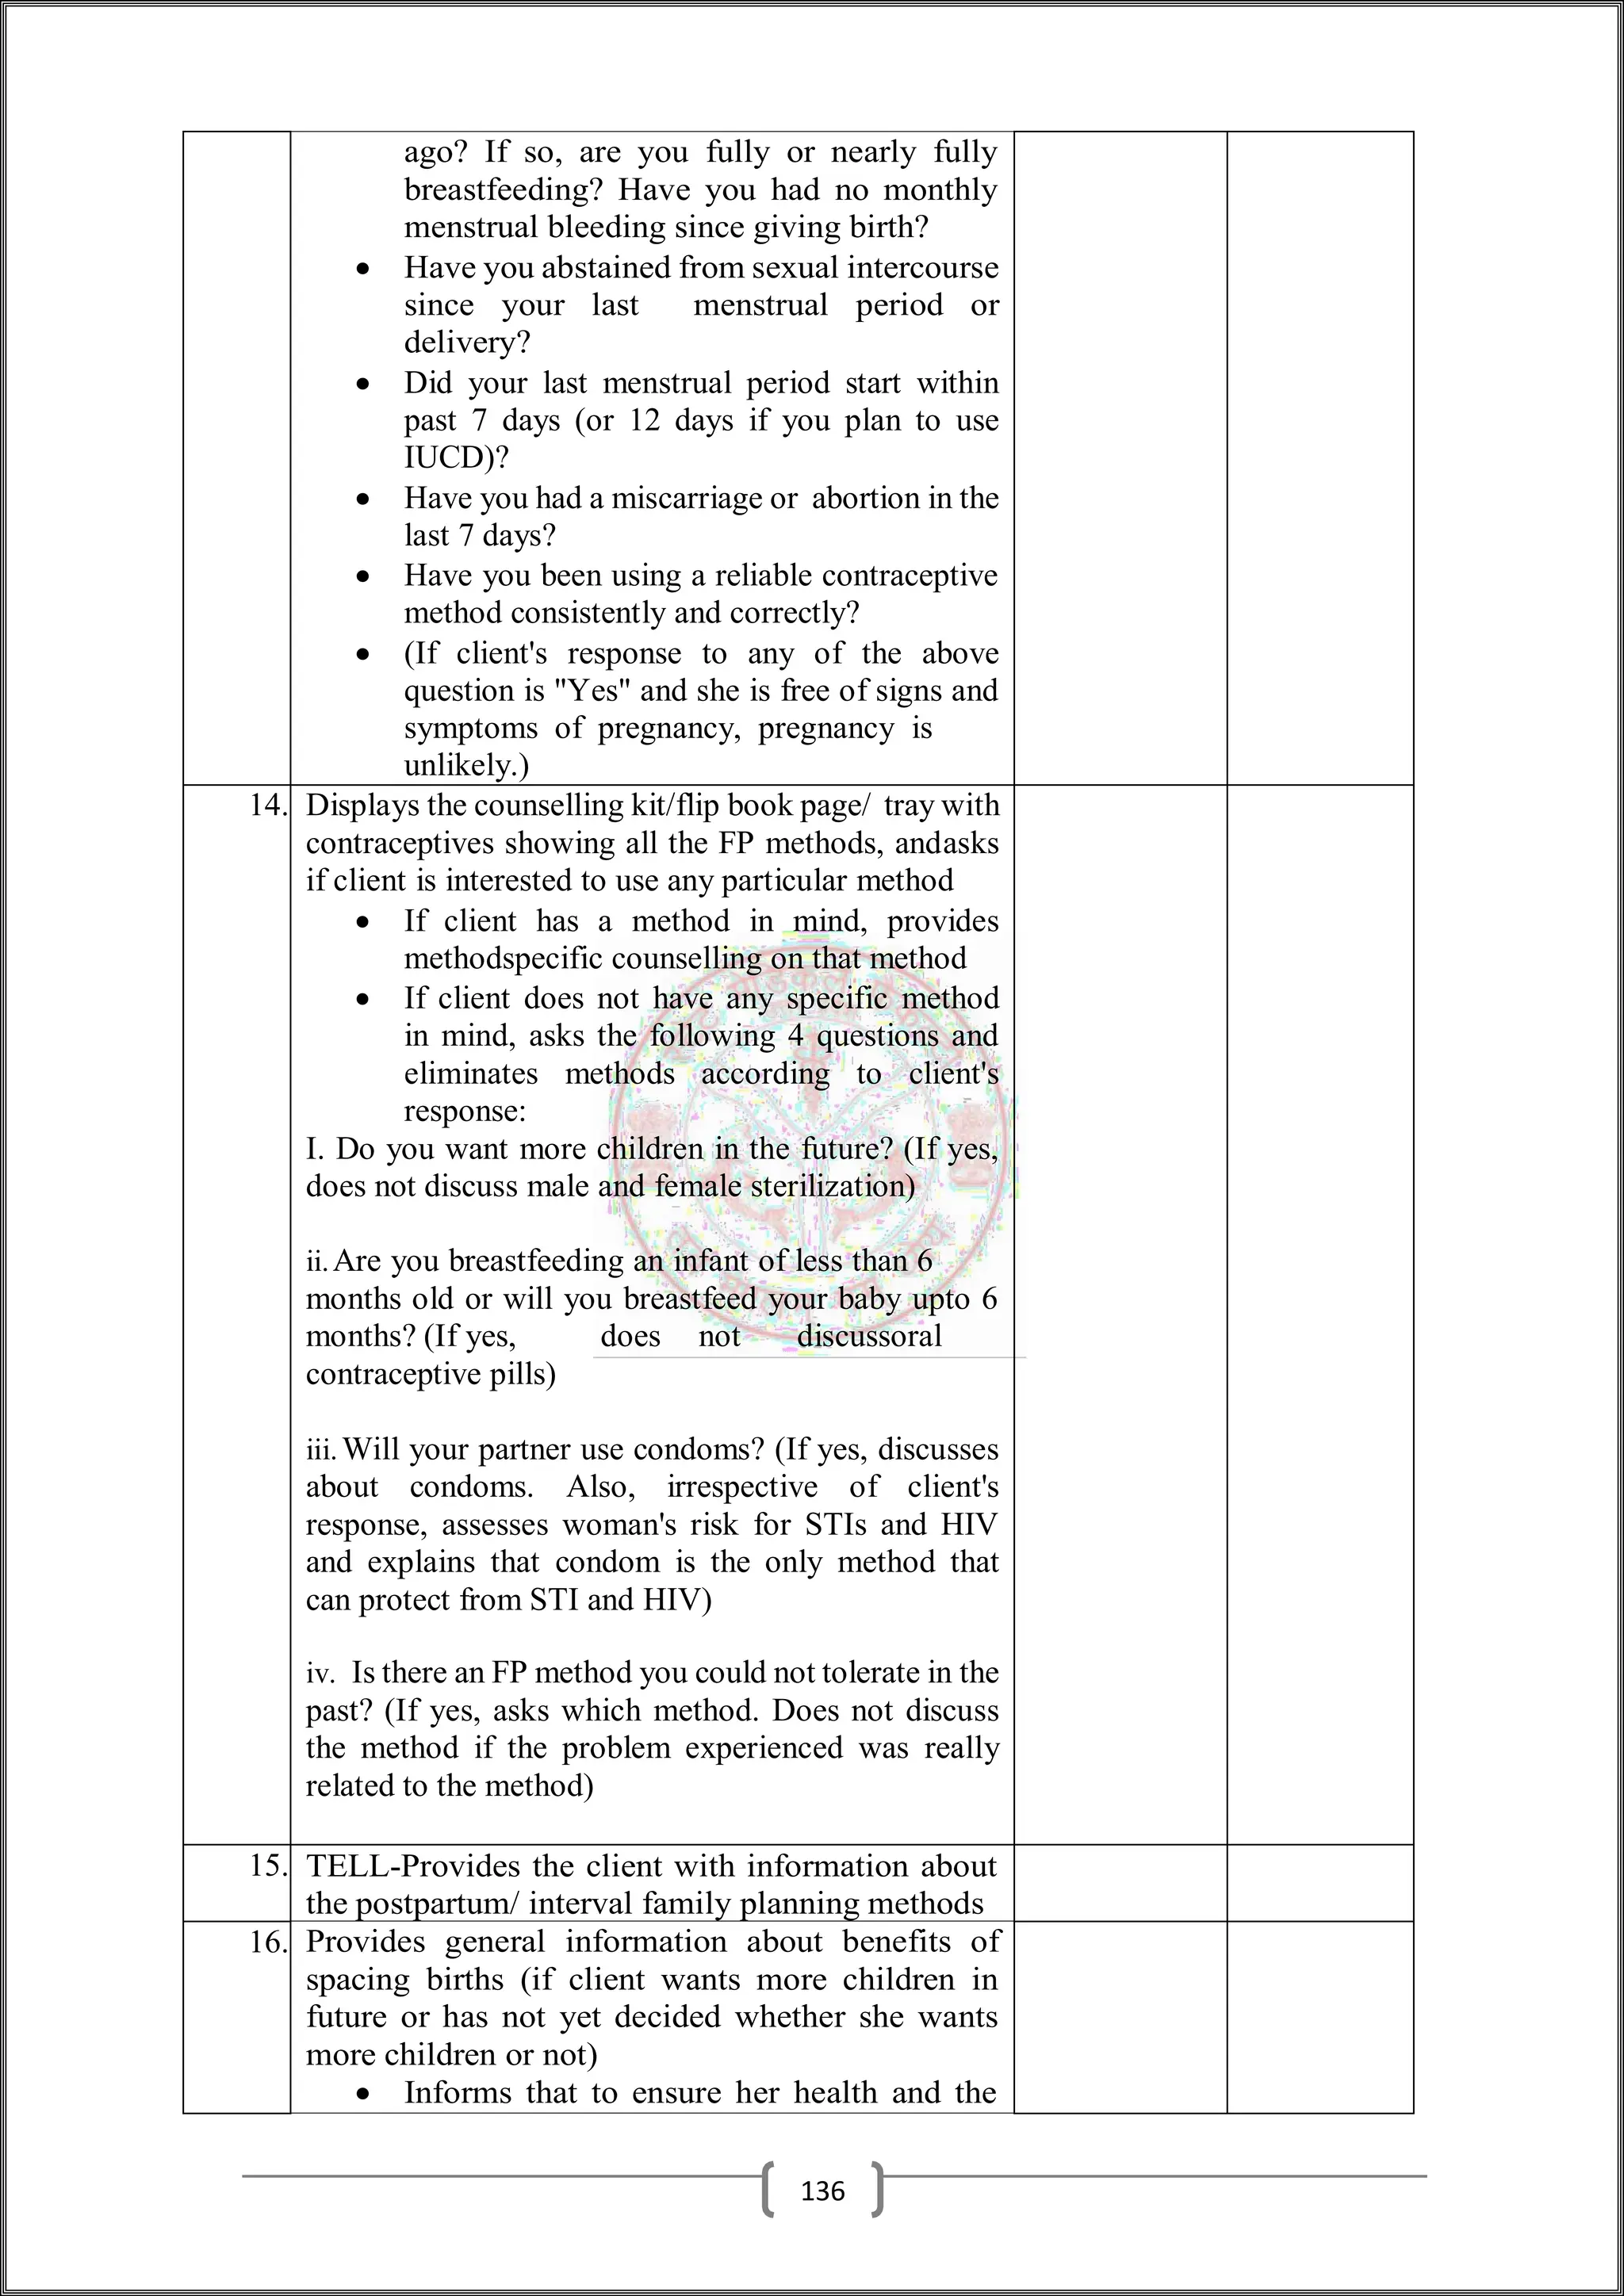
statements from patients provided authentic language for actors, offering a richness and
consistency of character sometimes lacking in roles crafted by our team.
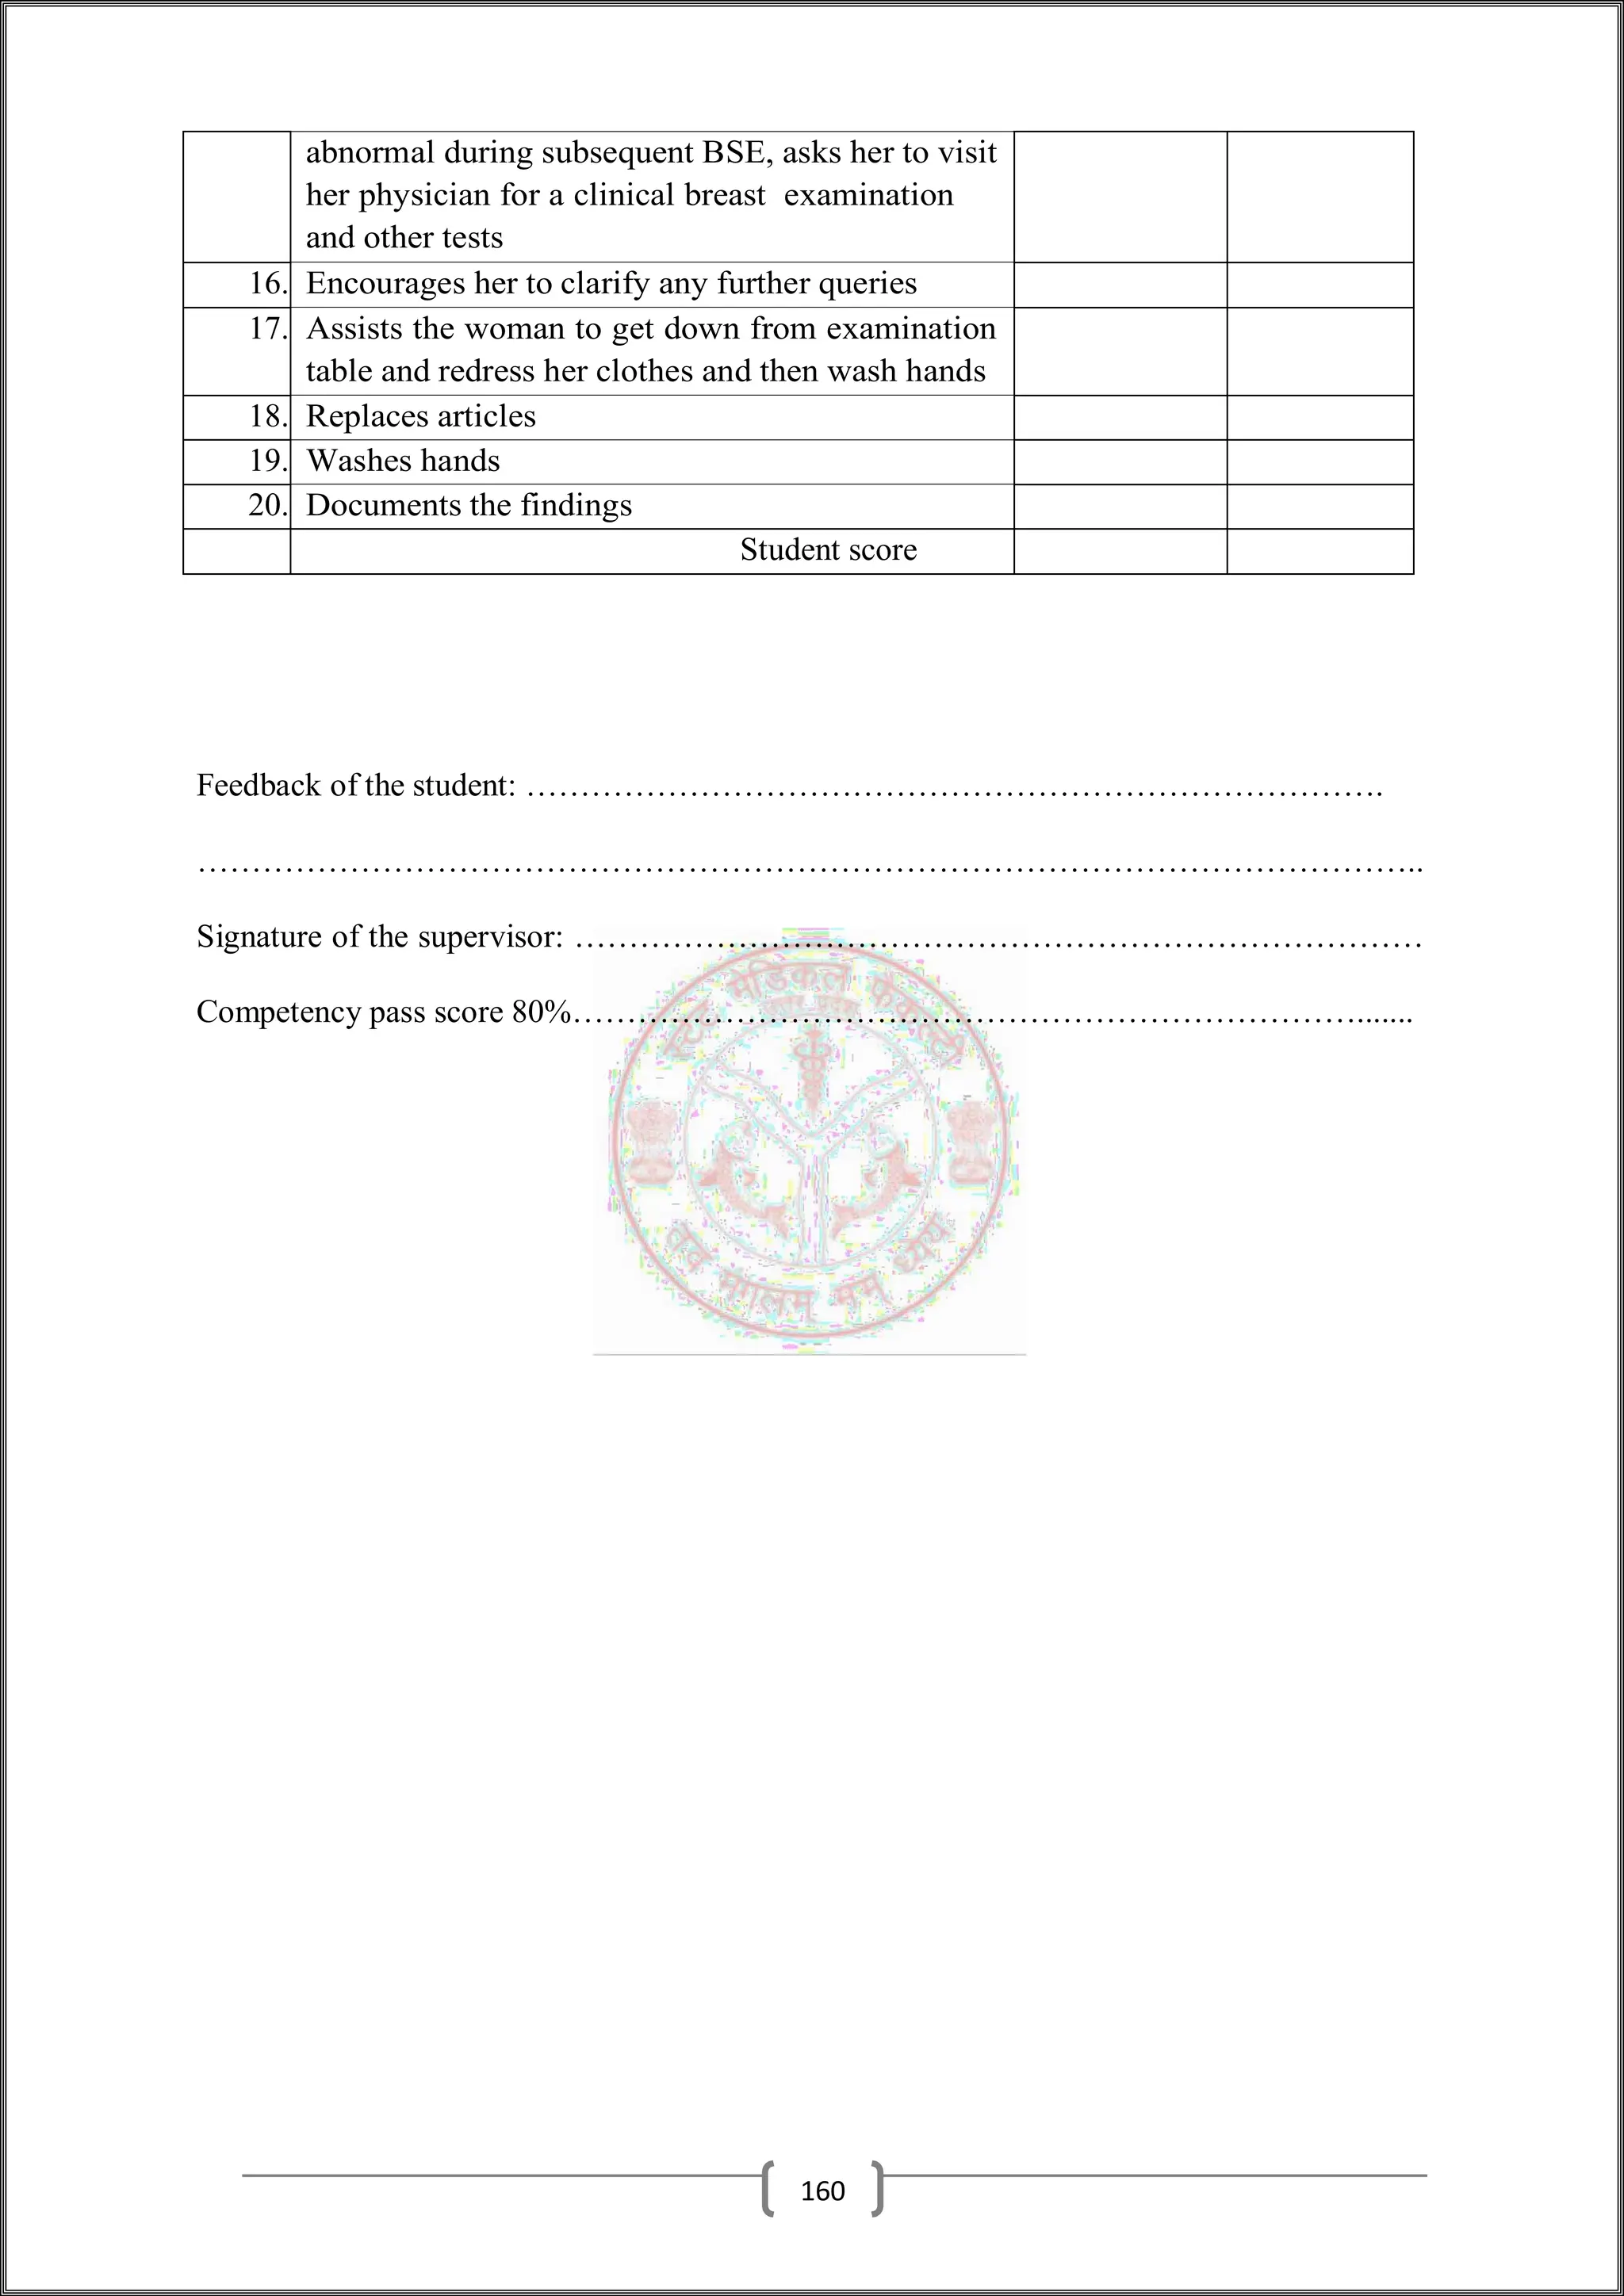
14.3.2 Patient characteristics
Realism and credibility is important in terms of SP portrayal. ASP selected to play the role
of a young person with anorexia would be more believable if she were a teenage and
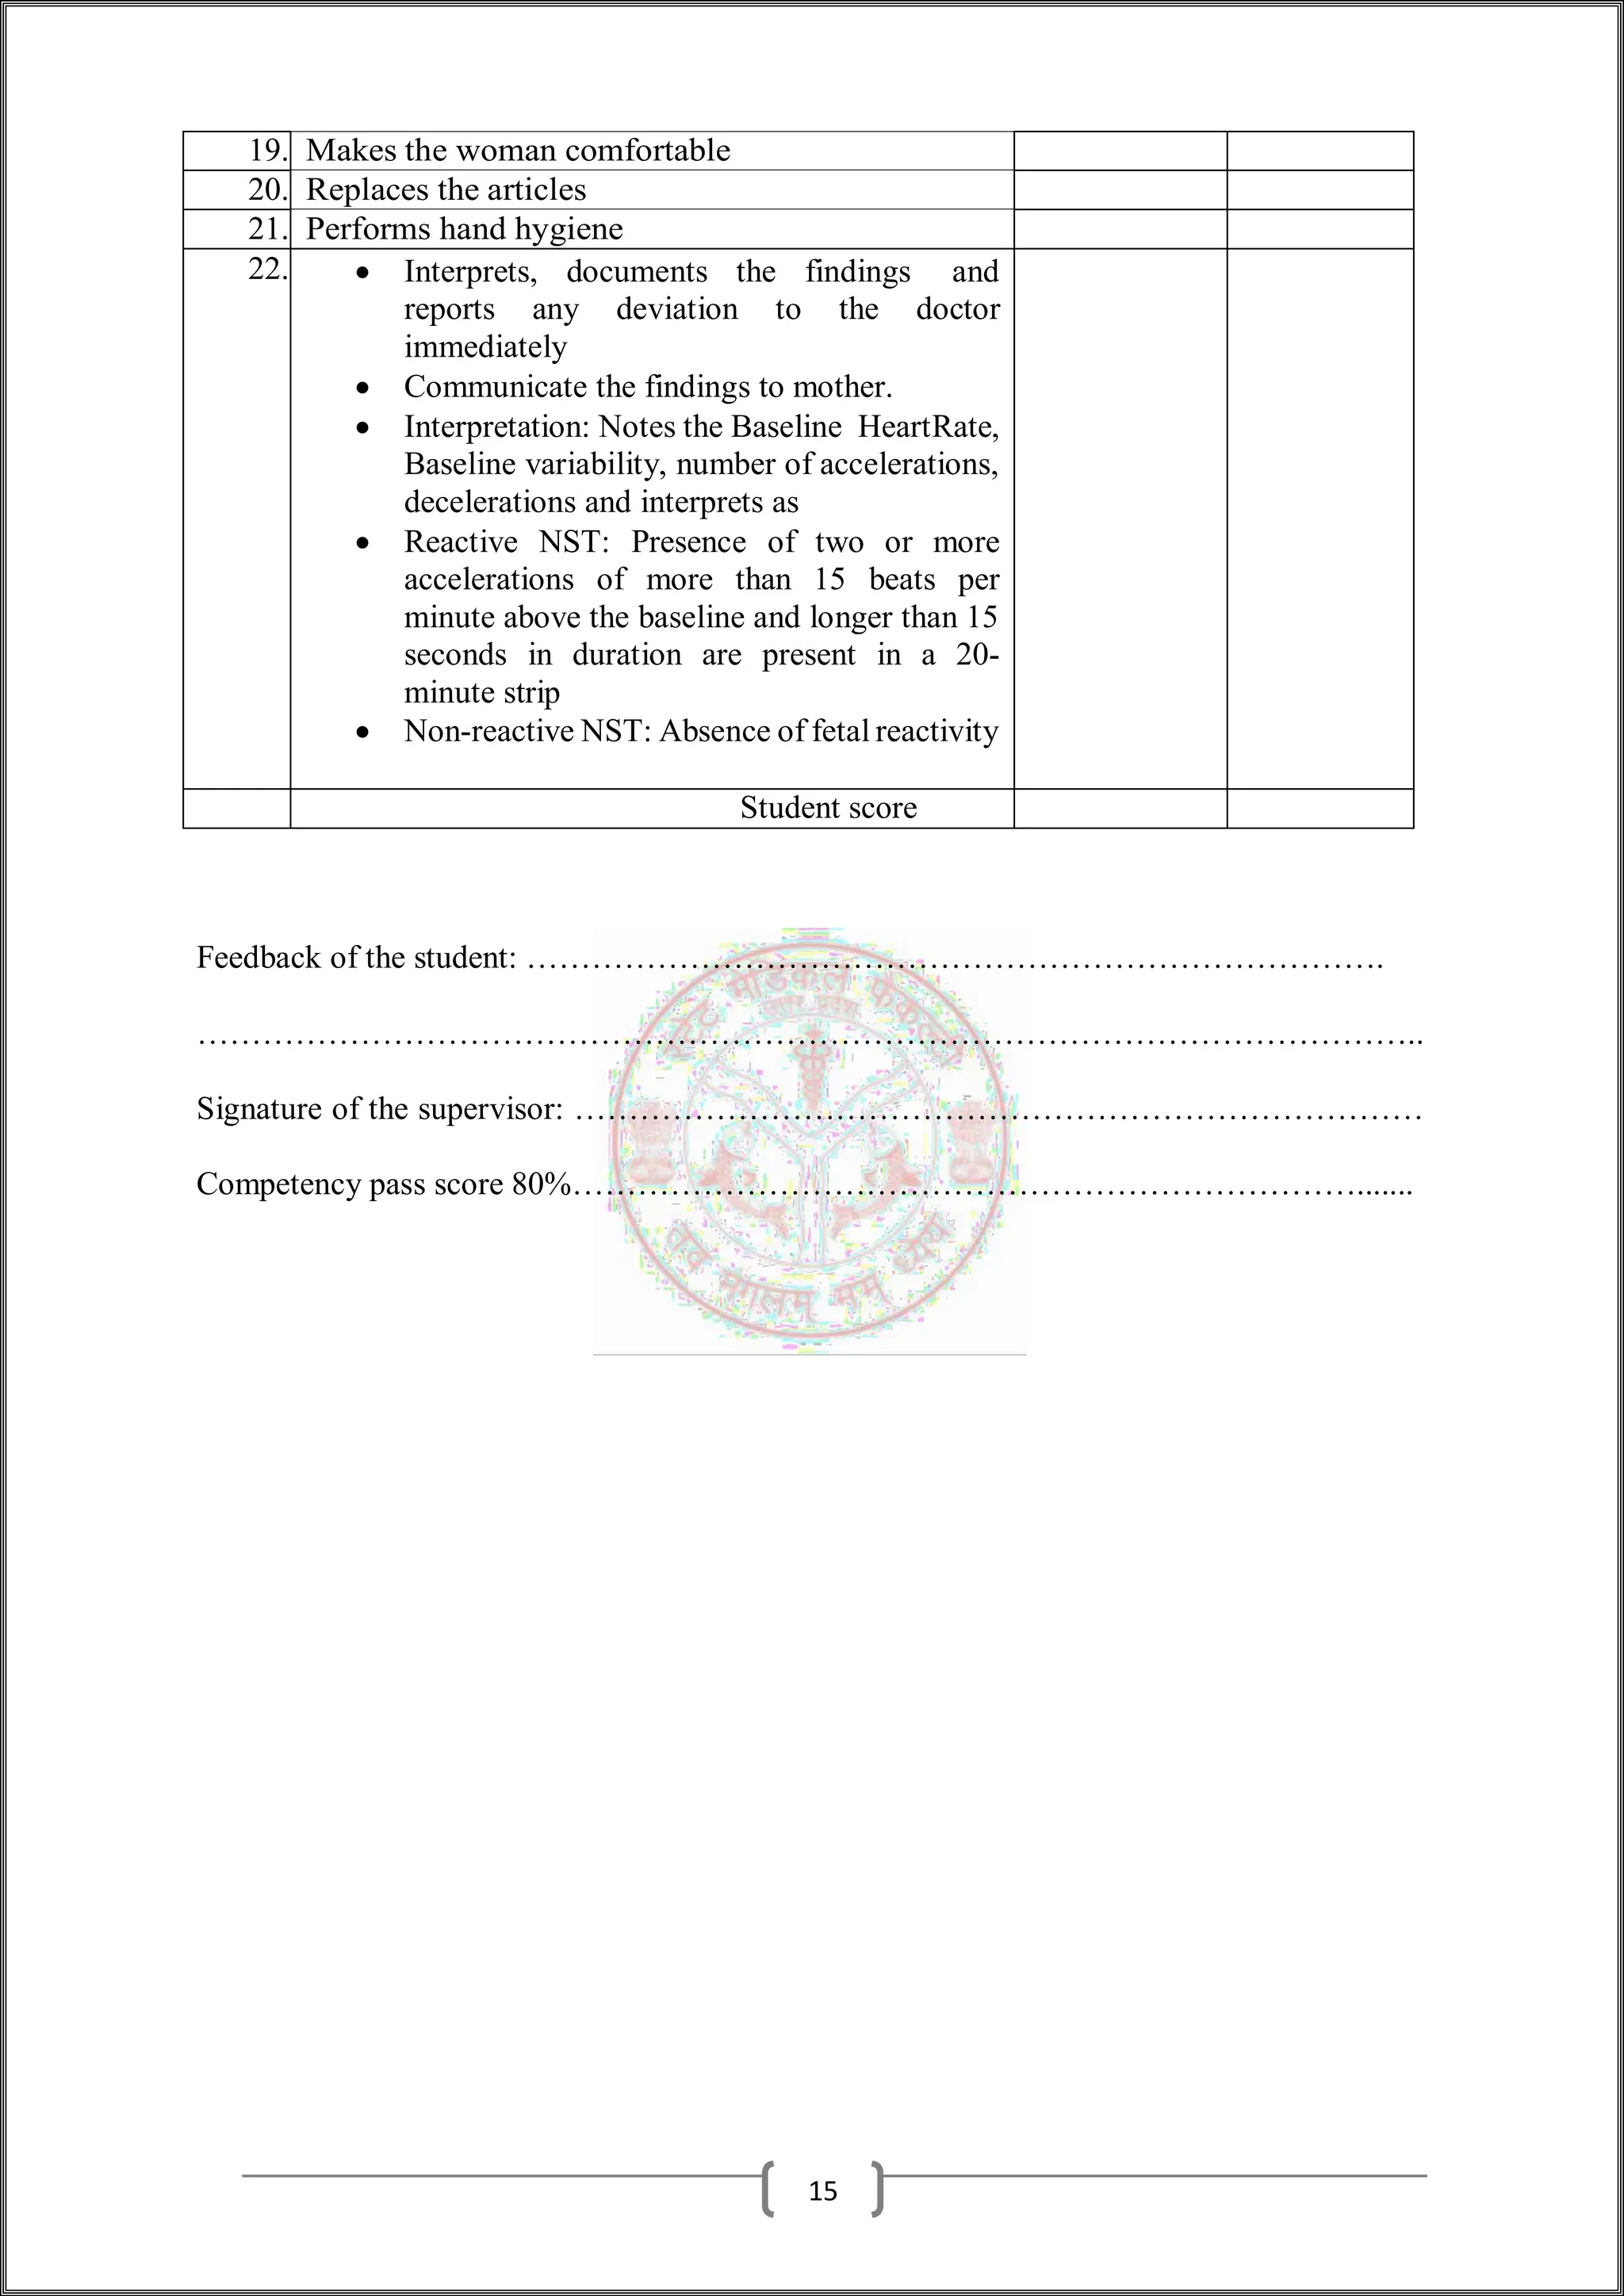
underweight. Conversely, an obese SP might be used to portray a patient with
cardiovascular disease or diabetes or a patient being counseled on the need to lose weight
at a health promotion station.
Prosthetics and make up may be used, for example, to add realism to SPs who do not have
physical manifestations of the condition they are portraying, such as wounds and other
skin conditions.
14.3.3 Faculty and students as simulated patients
Members of staff may act both as SP and as examiners in an OSCE and it has been claimed
that students are able to think of the staff SP as a real patient. However, if thereis a
possibility that the student may identify the SP as the member of staff, this is not to be
recommended as it does make it more difficult for the student to relate to the patientas
they would relate to a real patient. Faculty SPs were found by Mavis et al. [2006] tobe
more intimidating than actors or student peers acting as SPs.
Students can successfully serve as SPs, and this offers a number of advantages. Students
usually require less training than actors in portraying a patient case, and they are a low-
cost option. Probably most importantly,
students regard acting as an SP as a valuable learning experience and gain significant
benefit from acting out the role and from watching their peers perform at an OSCE station.
Students usually serve as SPs in the context of a formative OSCE, but they may also act
as SPs in summative examination.
14.3.4 Simulated patient as examiner
In adding to simulating the role of a patient, the SP can also be used in an OSCE to
assess the examinee's performance. Research suggests that they can assess the examinee
more reliably in respect of well-defined technical skills such as history taking andphysical
examination rather than on social skills, such as empathy and teamwork (Berg et
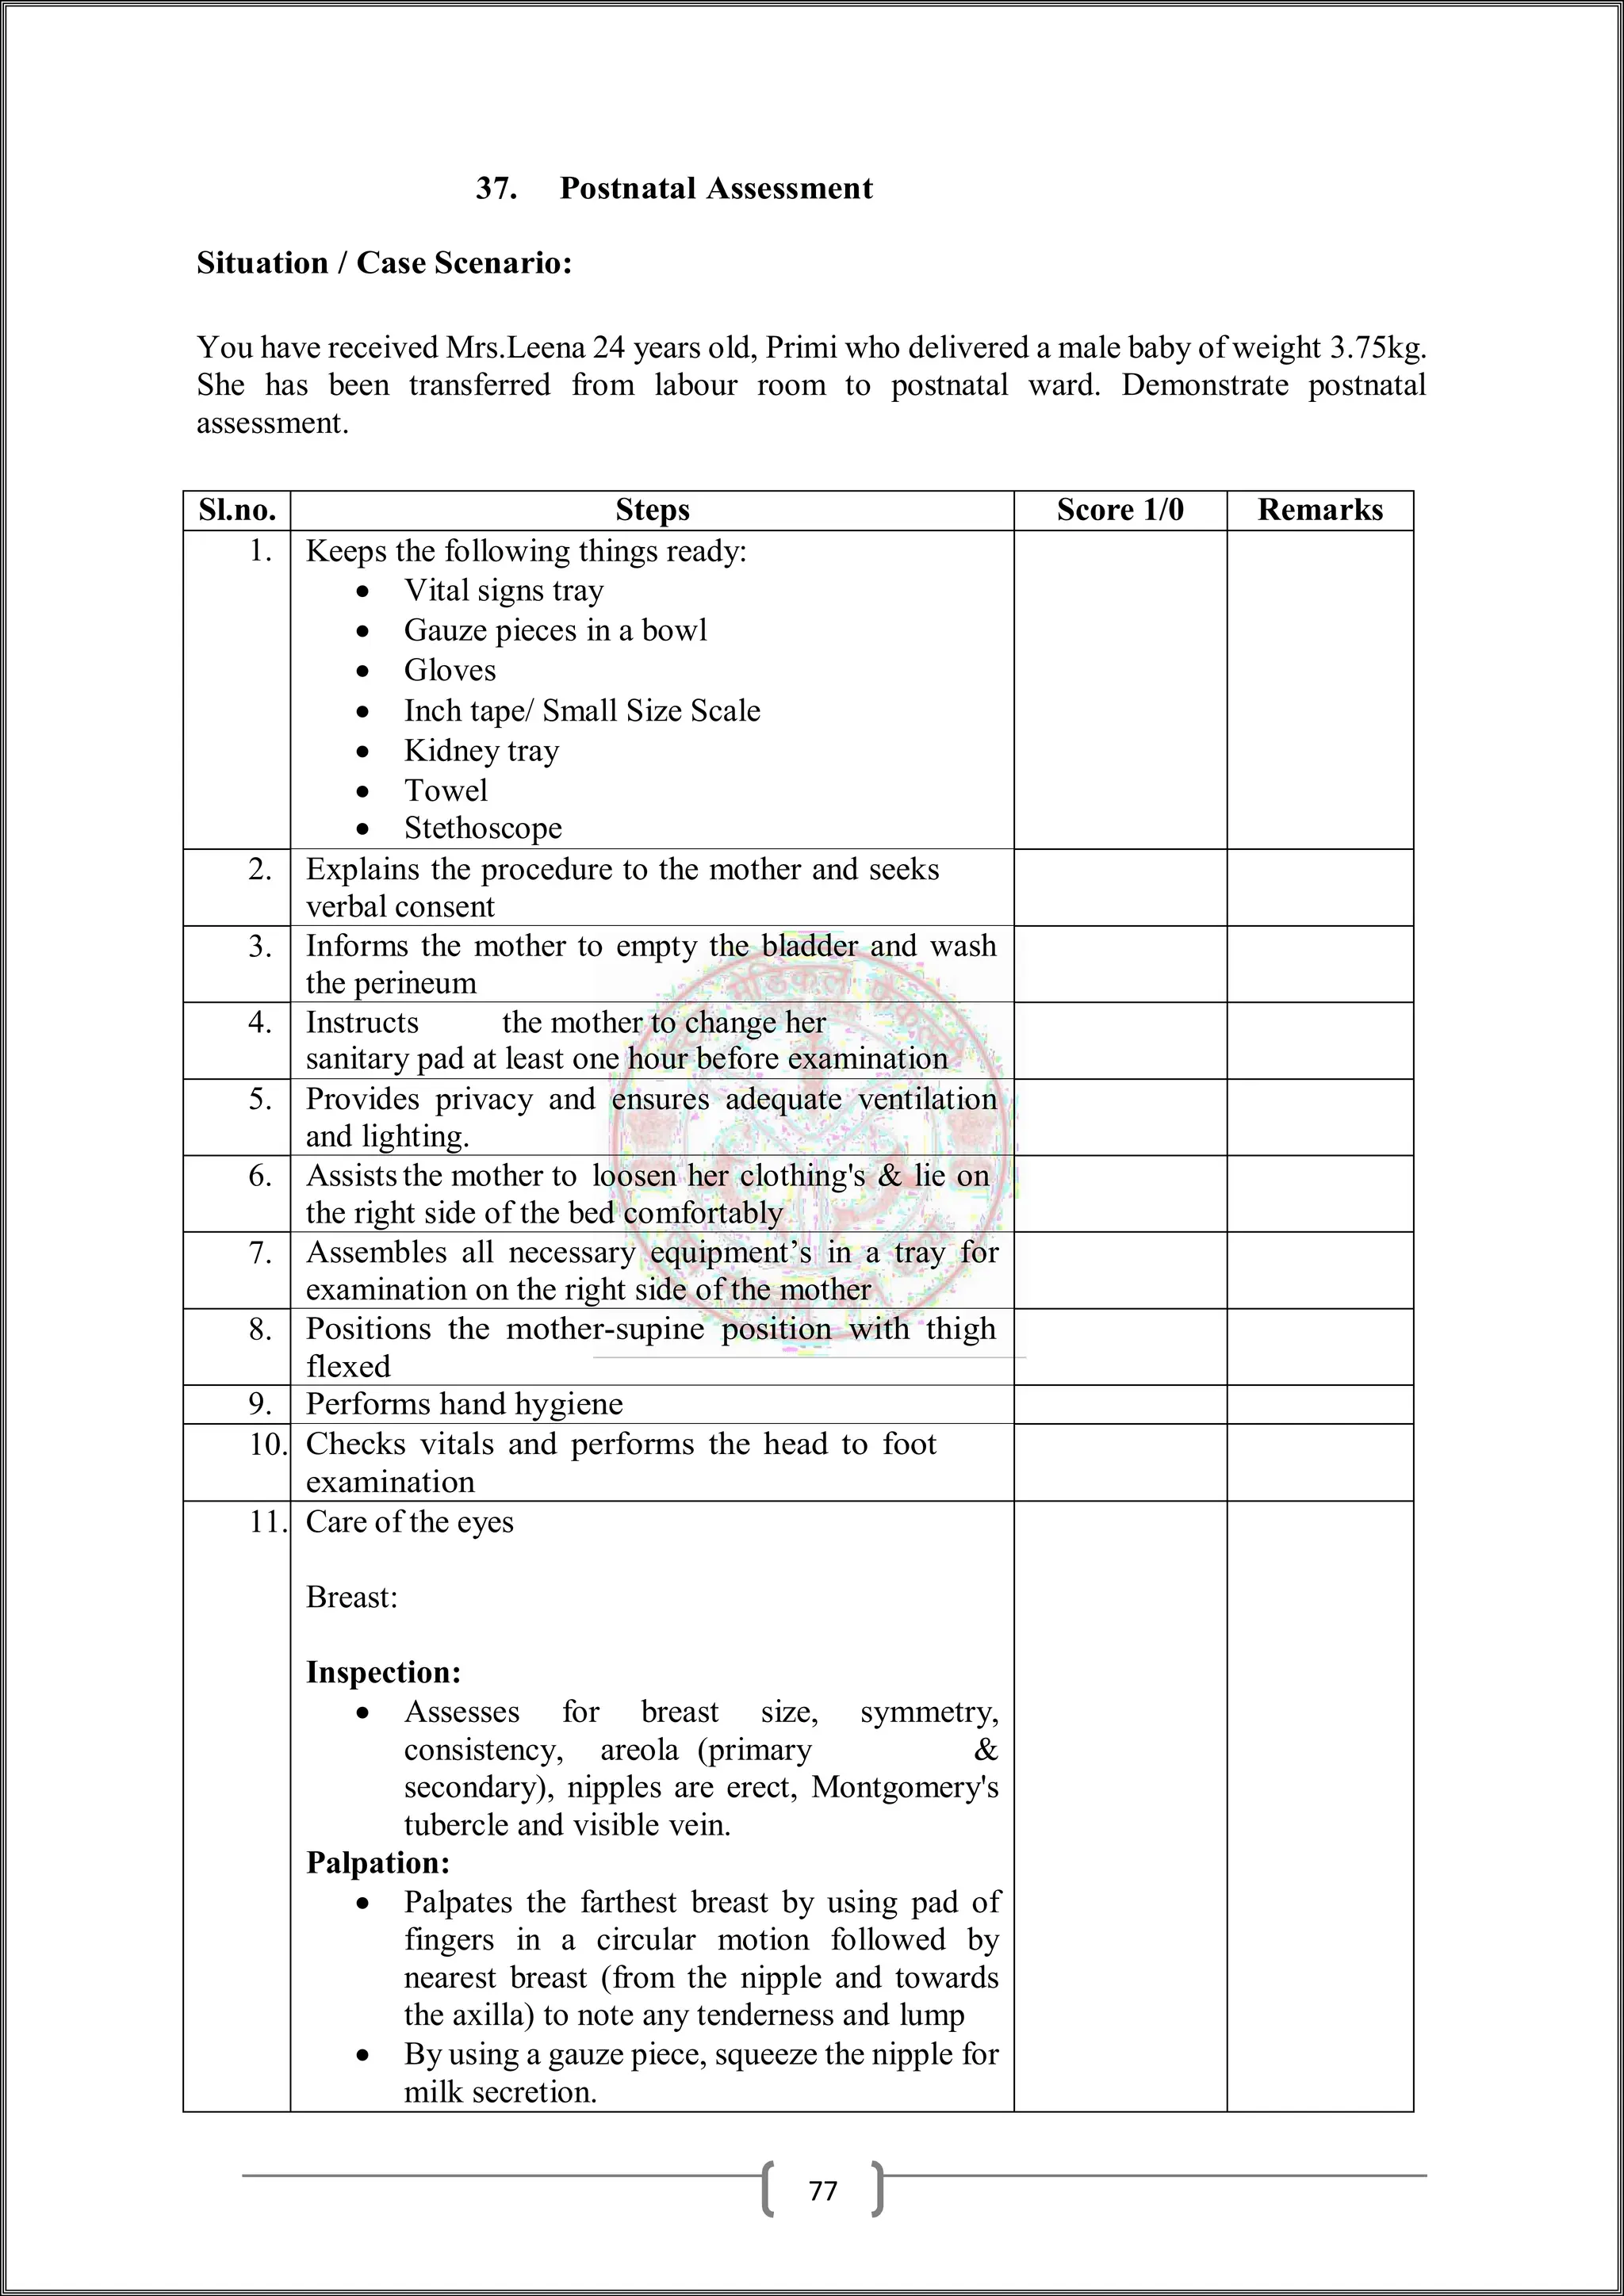
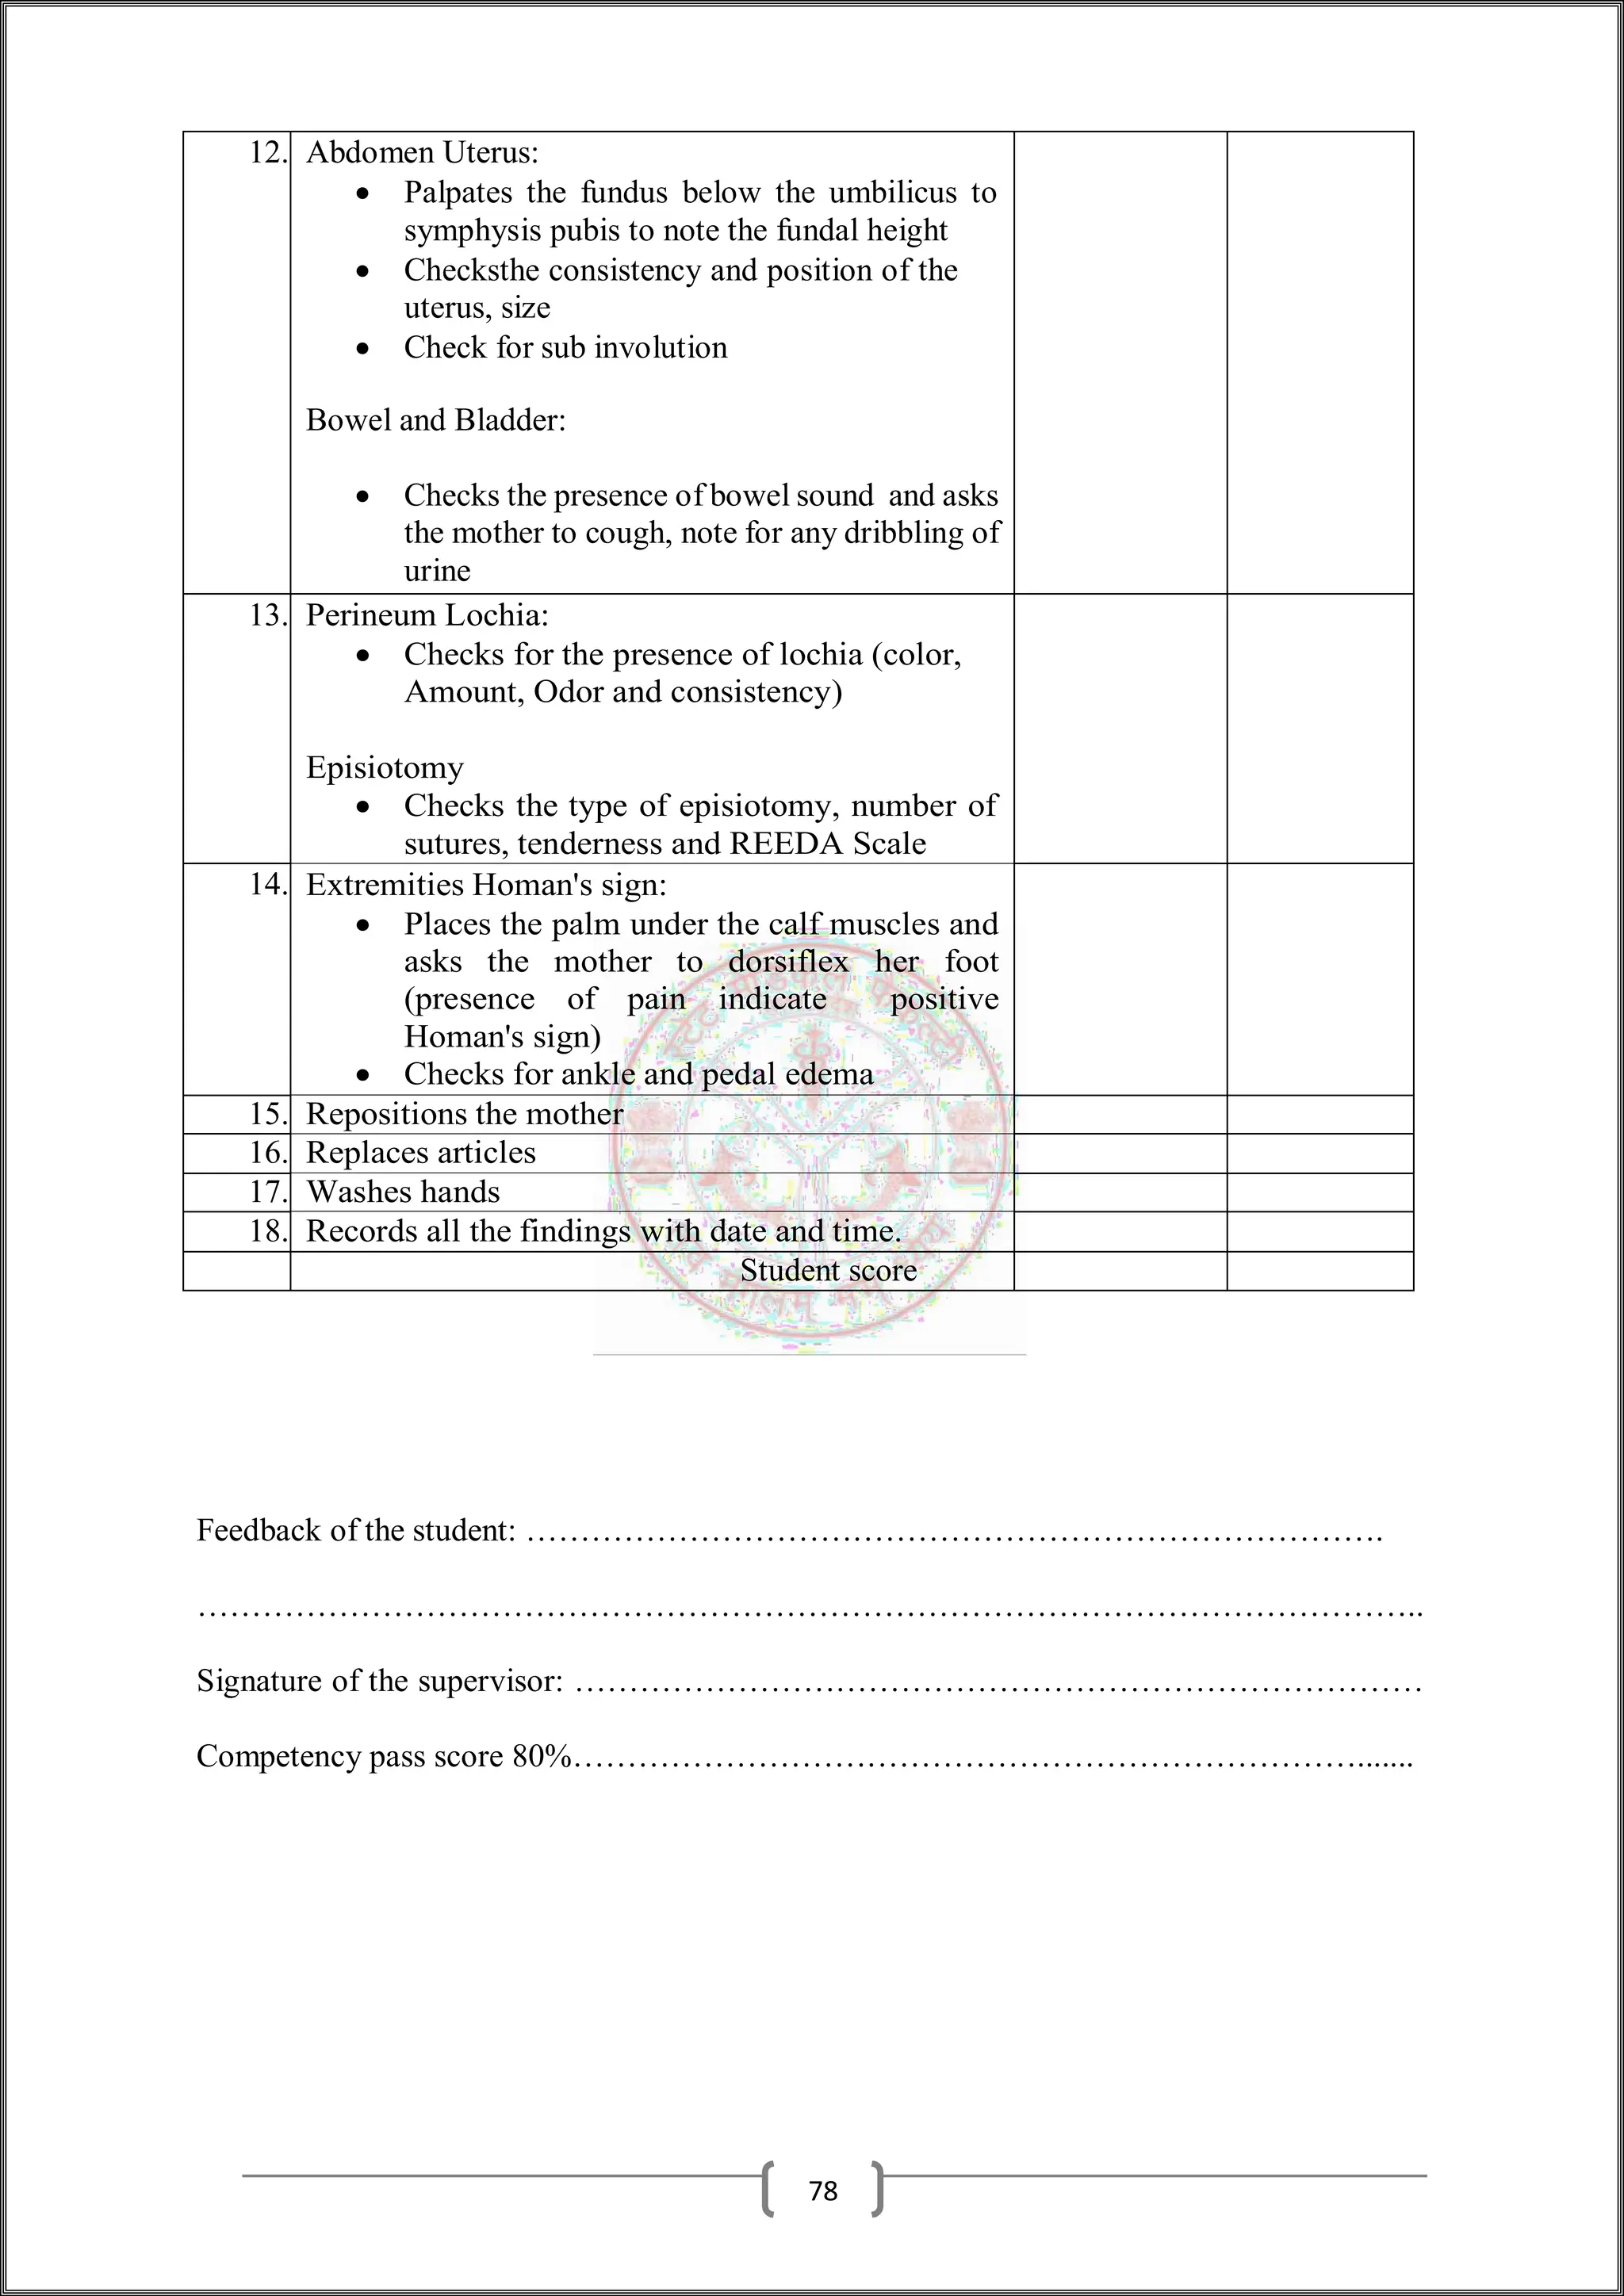
xv](https://image.slidesharecdn.com/upsmfoscechecklists-obg1-241228120725-022f5909/75/UPSMF-OSCE-CHECKLISTS-OBG-nursing-students-1-pdf-16-2048.jpg)
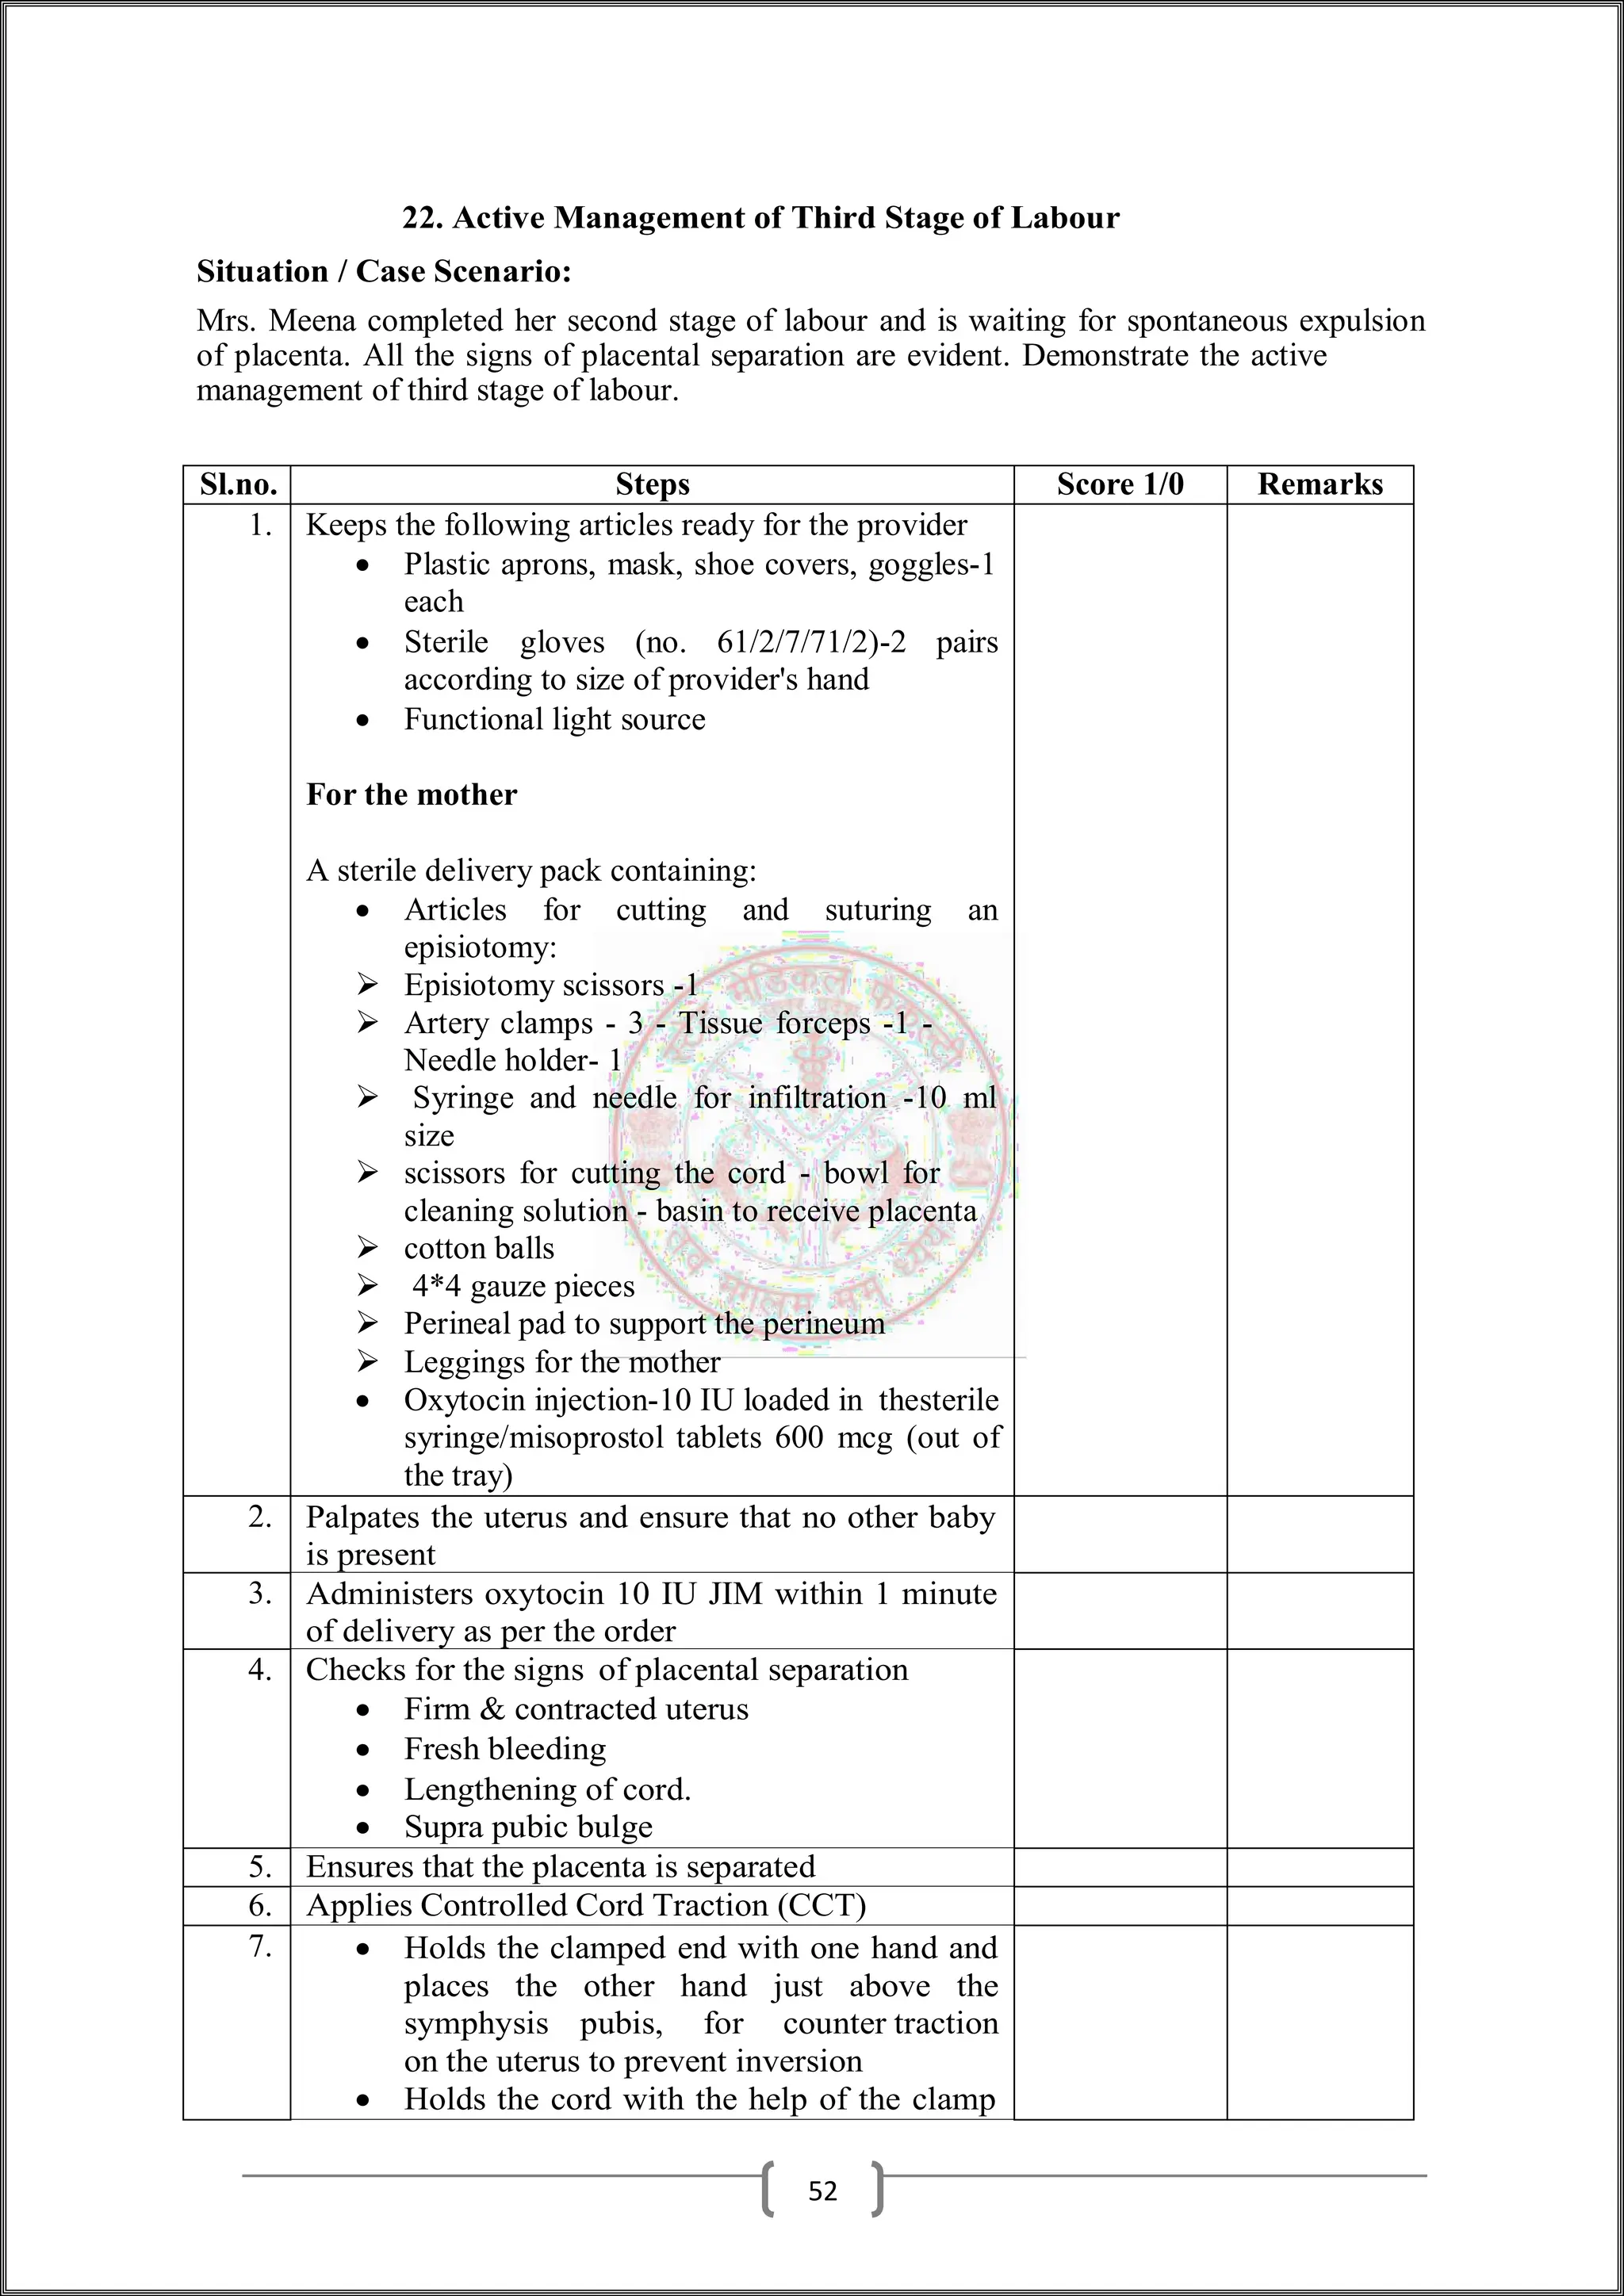
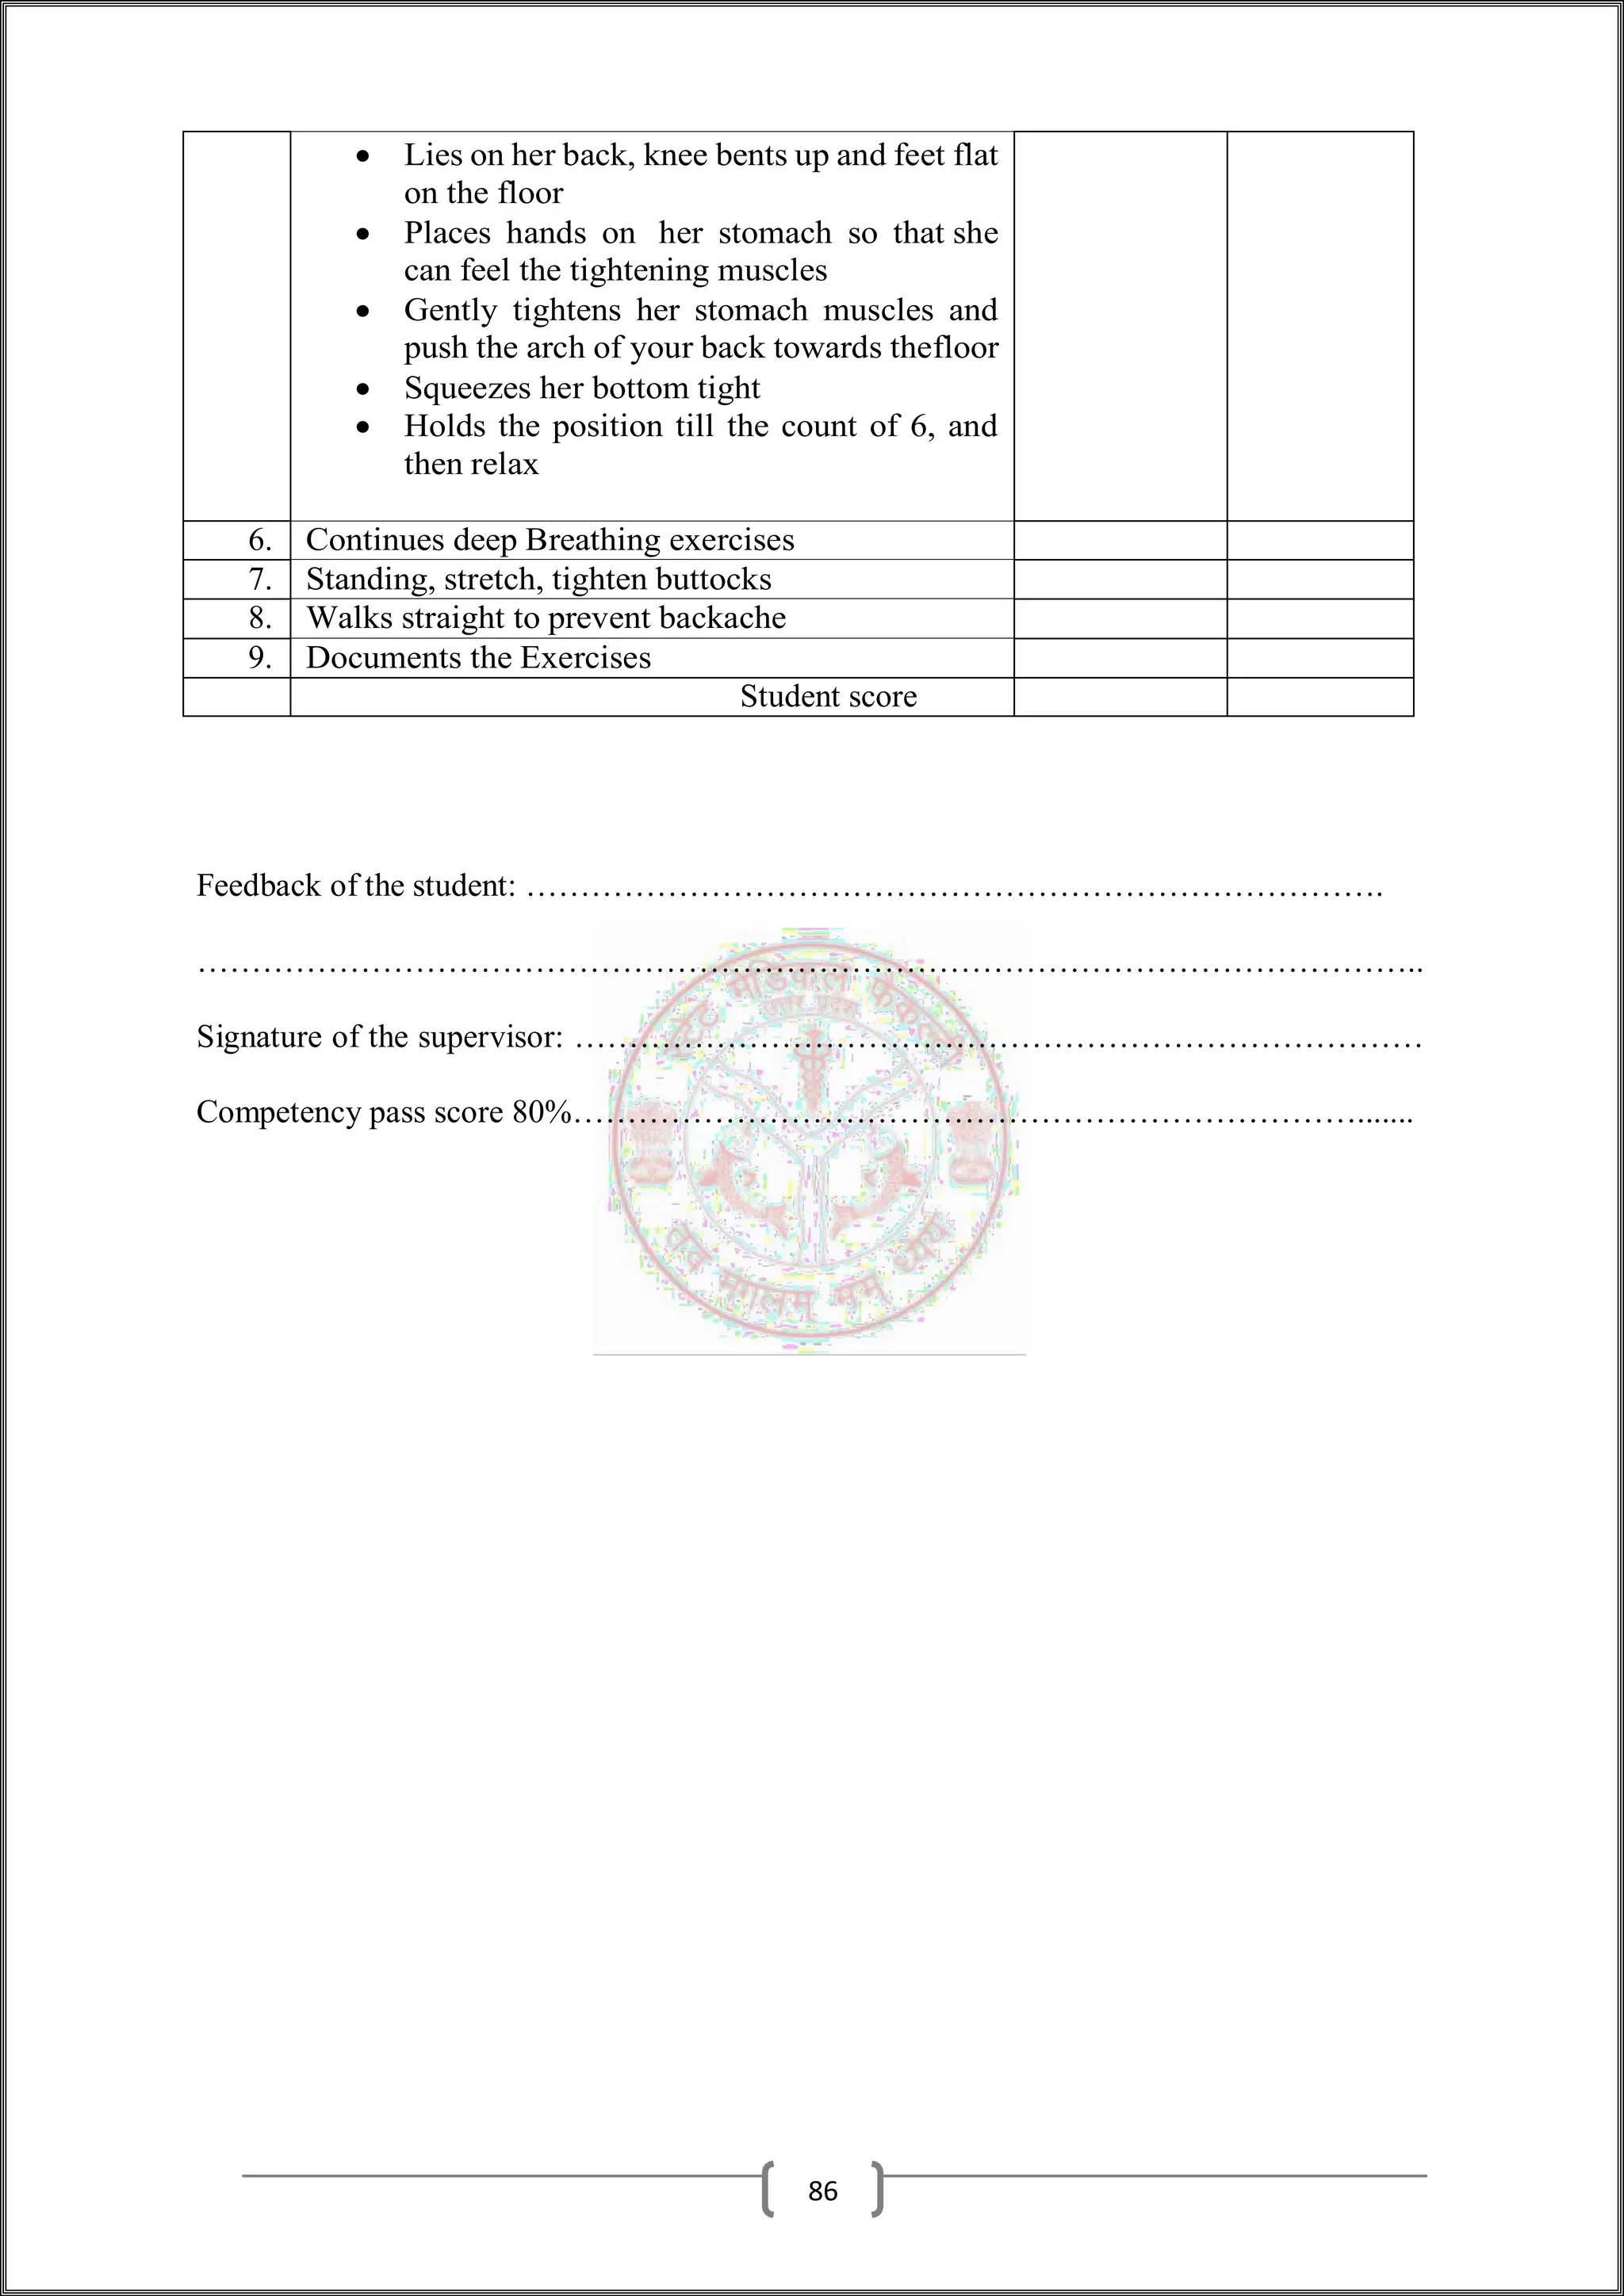
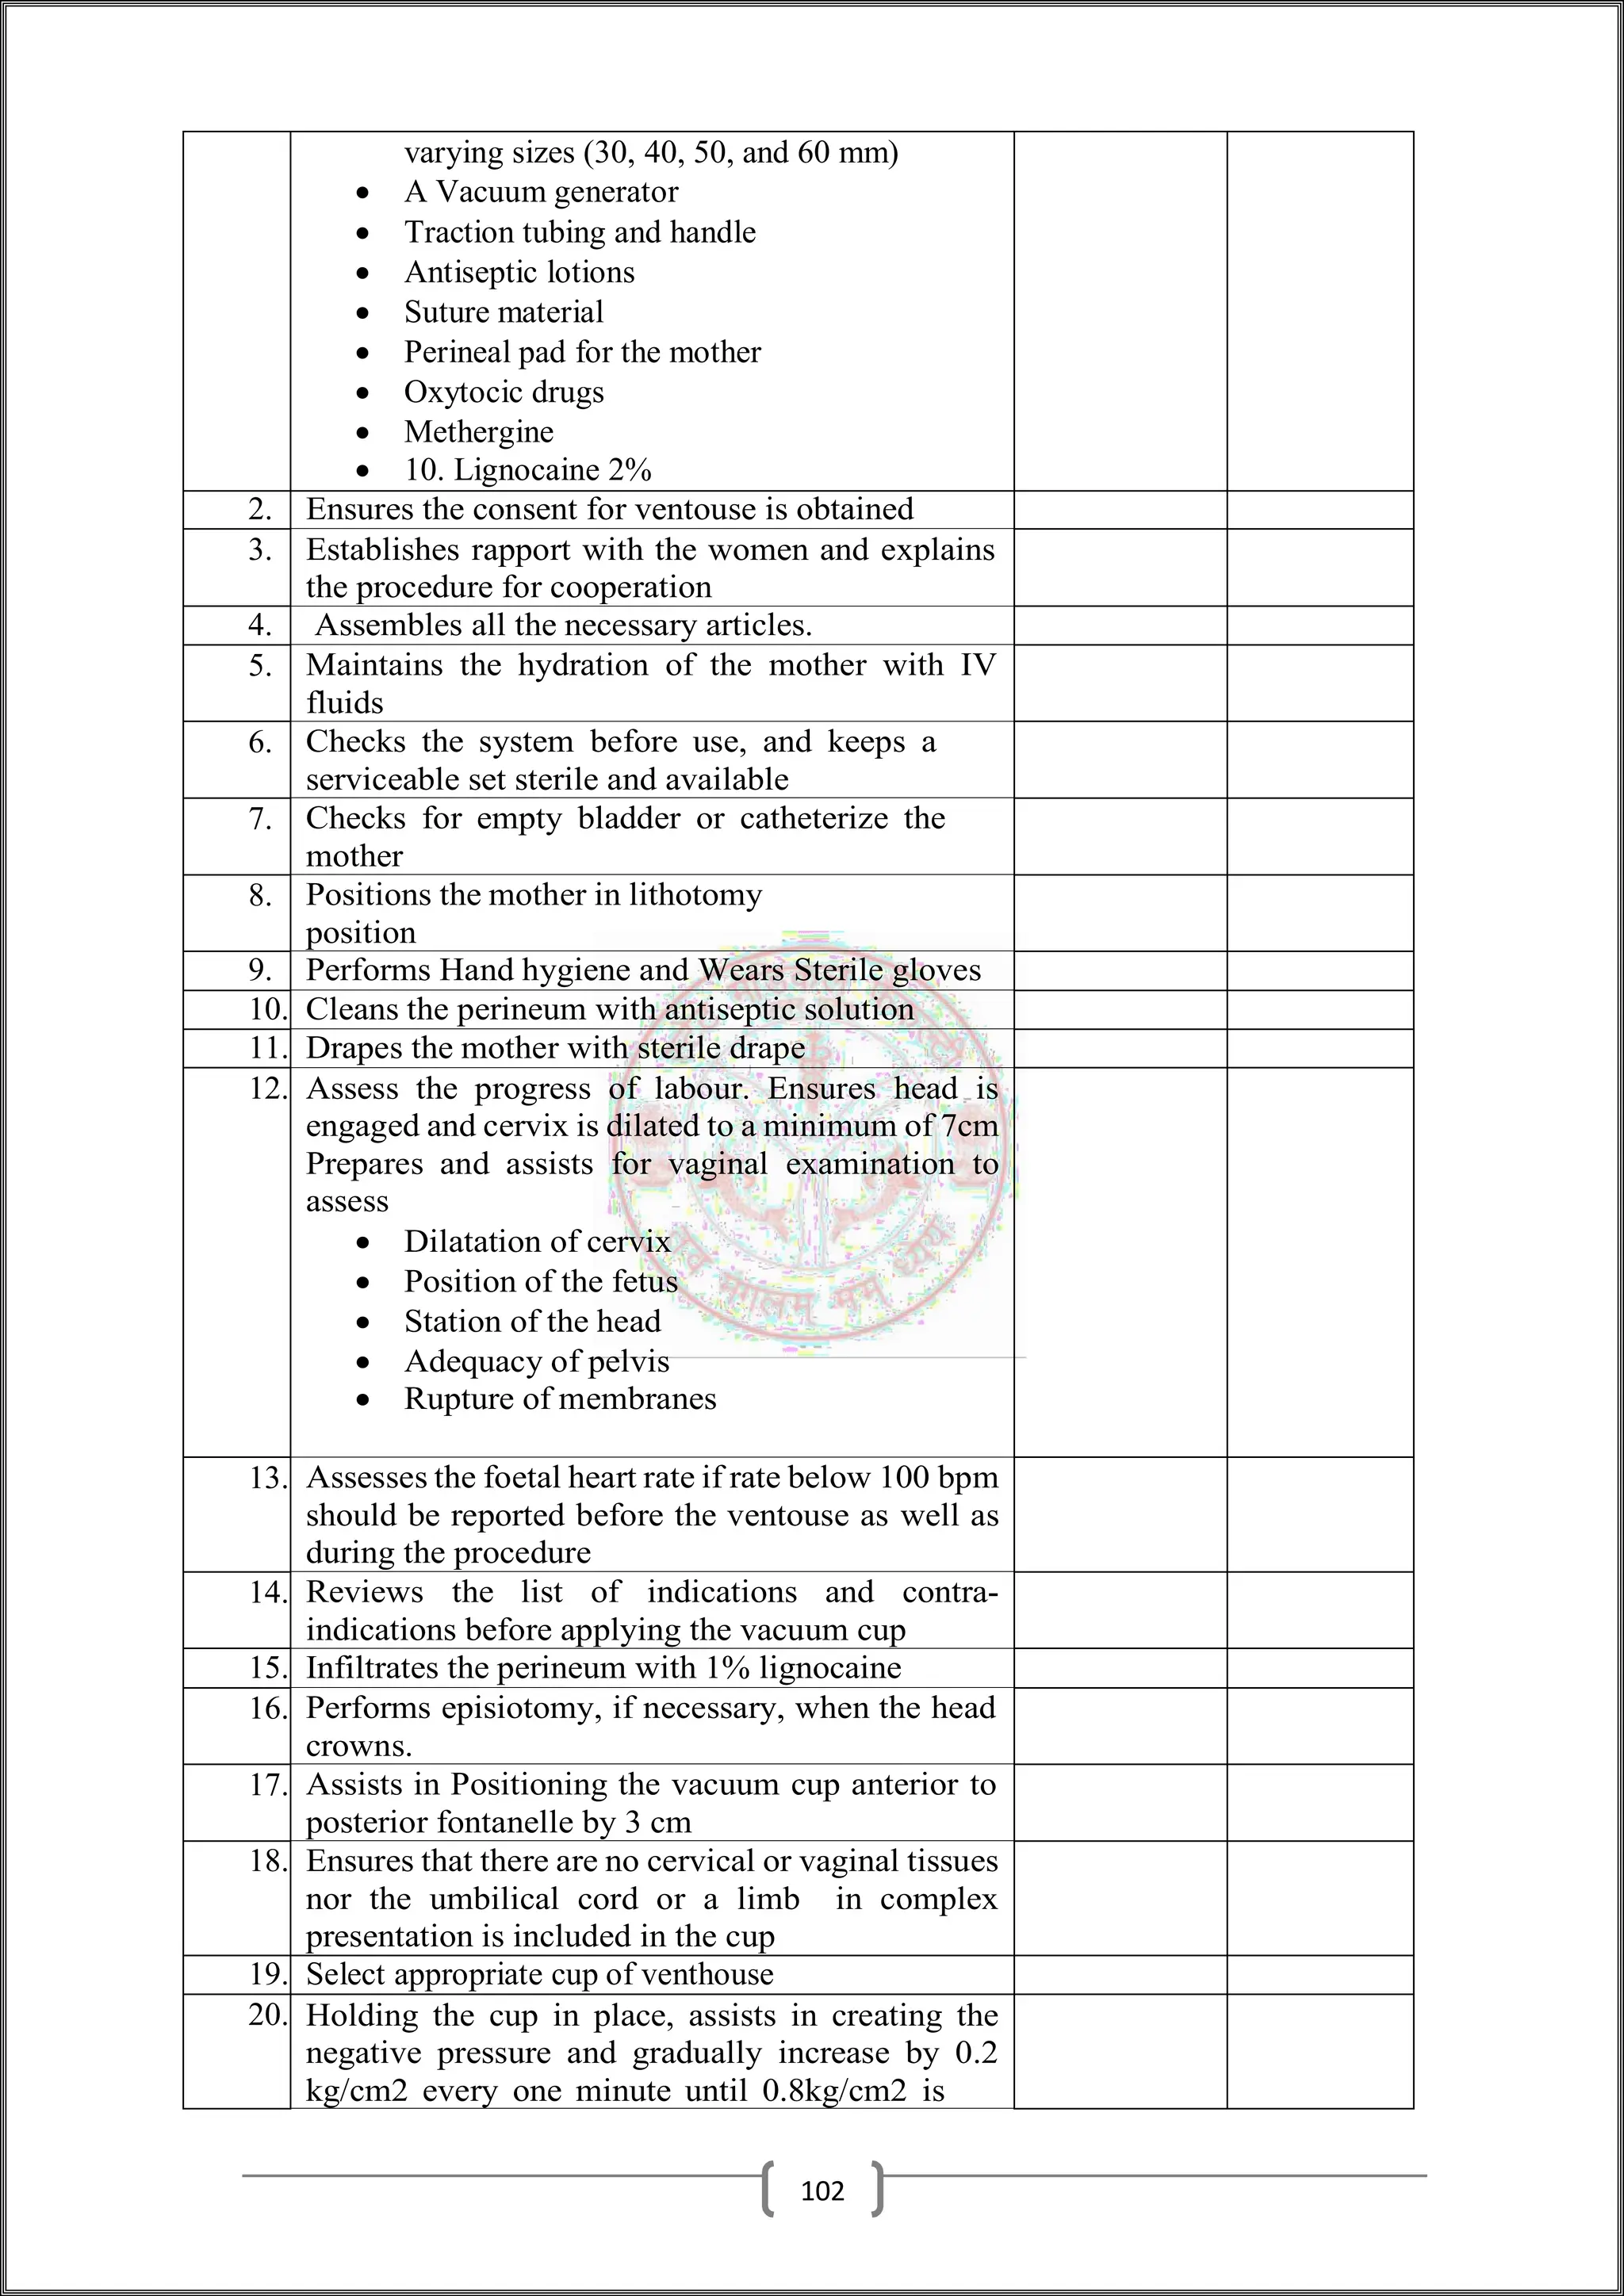
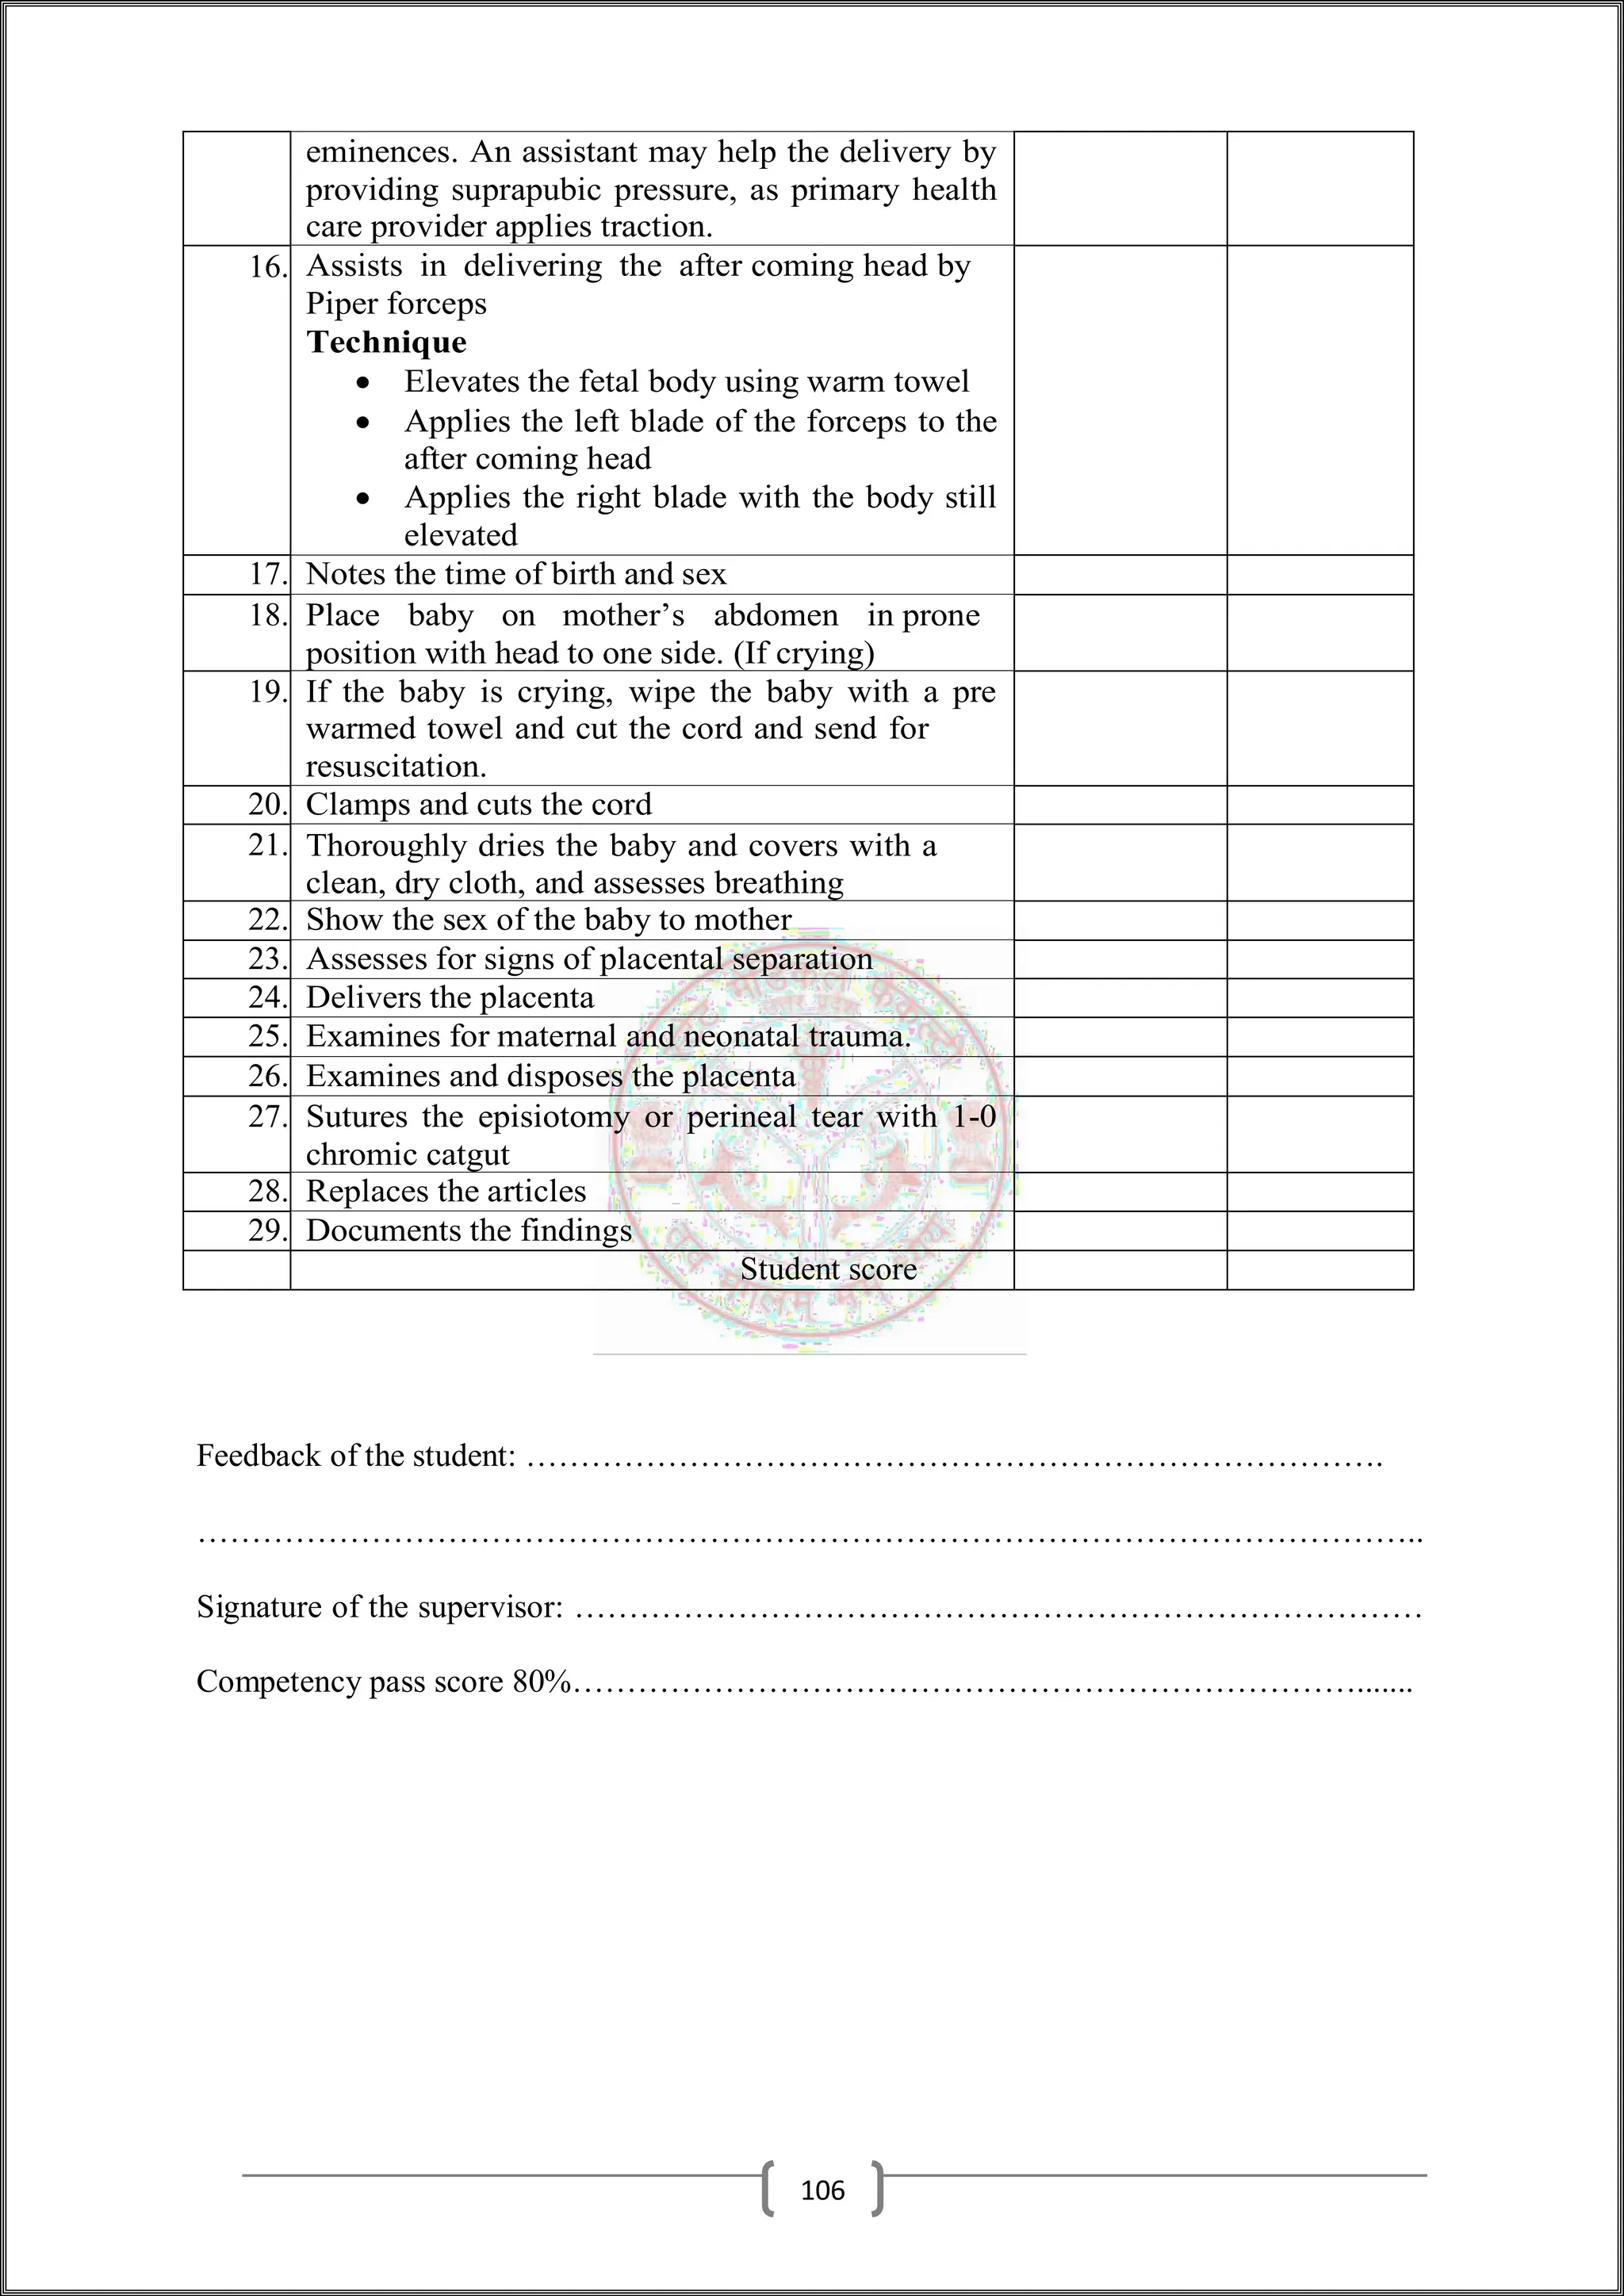
![The role of the SP can be extremely challenging, and good SPs are a valuable resource to
an institution. They need to be looked after and appreciated for the valuable work they
do. SPs frequently, as described above, perform three roles — portraying a patient,
assessing the examinee and providing feedback on performance — and have become much
respected and valued members of the team.
14.10 Simulators
Simulator technology is a powerful education tool in medicine. Althoughits
use has typically been in formative assessment, simulators are now established in
summative high-stakes assessment as well. Simulators play an important role in an OSCE
when either a real patient or an SP is not appropriate at a station designed to assess a
practical procedure, such as cystoscopy or cardiopulmonary resuscitation, or when a real
patient with the necessary physical findings is not available. Part-task trainers (PTTs) can
be used to assess a range of specific competencies in an OSCE, including the insertion of
intravenous lines.
14.12 Hybrid simulation
A simulator can be used alongside an SP to provide greater realism or authenticity to the
experience [Kneebone et.al]. The SP may present, for example, with a simulated wound
on the abdomen which requires suturing or may be lying on a bed attached to a simulated
pelvis for catheterization. Such hybrid simulators can be presented to appear authentic and
multiple and more complex competencies can be tested.
Stations with hybrid simulators allow an assessment to be made not only for the examinee's
competence in the practical procedure but also their rapport with the patient and their
communication skills. An examinee may be asked to perform an initiate examination
whilst at the same time engaging in conversation with an SP trained to be very talkative
and friendly, with the aim of simulating what may be perceived as a 'normal' nurse-patient
relationship.
14.13 Video recordings
Video recordings of patients can be incorporated into an OSCE in a number of ways. In a
pediatric postgraduate examination, for example, they were used to assess the candidates'
decision-making abilities with regard to the management of acutely unwell children and
vulnerable infants.
In a variation of the OSCE-Objectives Structured Video Exam [OSVE] students watch a
series of videos of doctor-nurse communications and then answer a set of written questions
to assess their ability to identify and understand the communications skills.
Patient medical records and investigation:
The patient’s records and their investigations may feature in an OSCE, and several of the
case studies include stations where examinees are asked to discuss and interpret the results
of an investigation, such as an ECG and abnormal blood results.
Health professionals, simulated patients and students can serve as examiners in anOSCE.
Their roles and responsibilities should be defined and training provided.
Examiners and the OSCE
The OSCE was designed to address these problems, and the examiners have a key role to
play. This may include:
Identifying in advance of the examination an overall blueprint for the examination
with details of what is to be assessed at each station and an agreed scoring sheet
to rate the candidate's performance.
xvii](https://image.slidesharecdn.com/upsmfoscechecklists-obg1-241228120725-022f5909/75/UPSMF-OSCE-CHECKLISTS-OBG-nursing-students-1-pdf-19-2048.jpg)


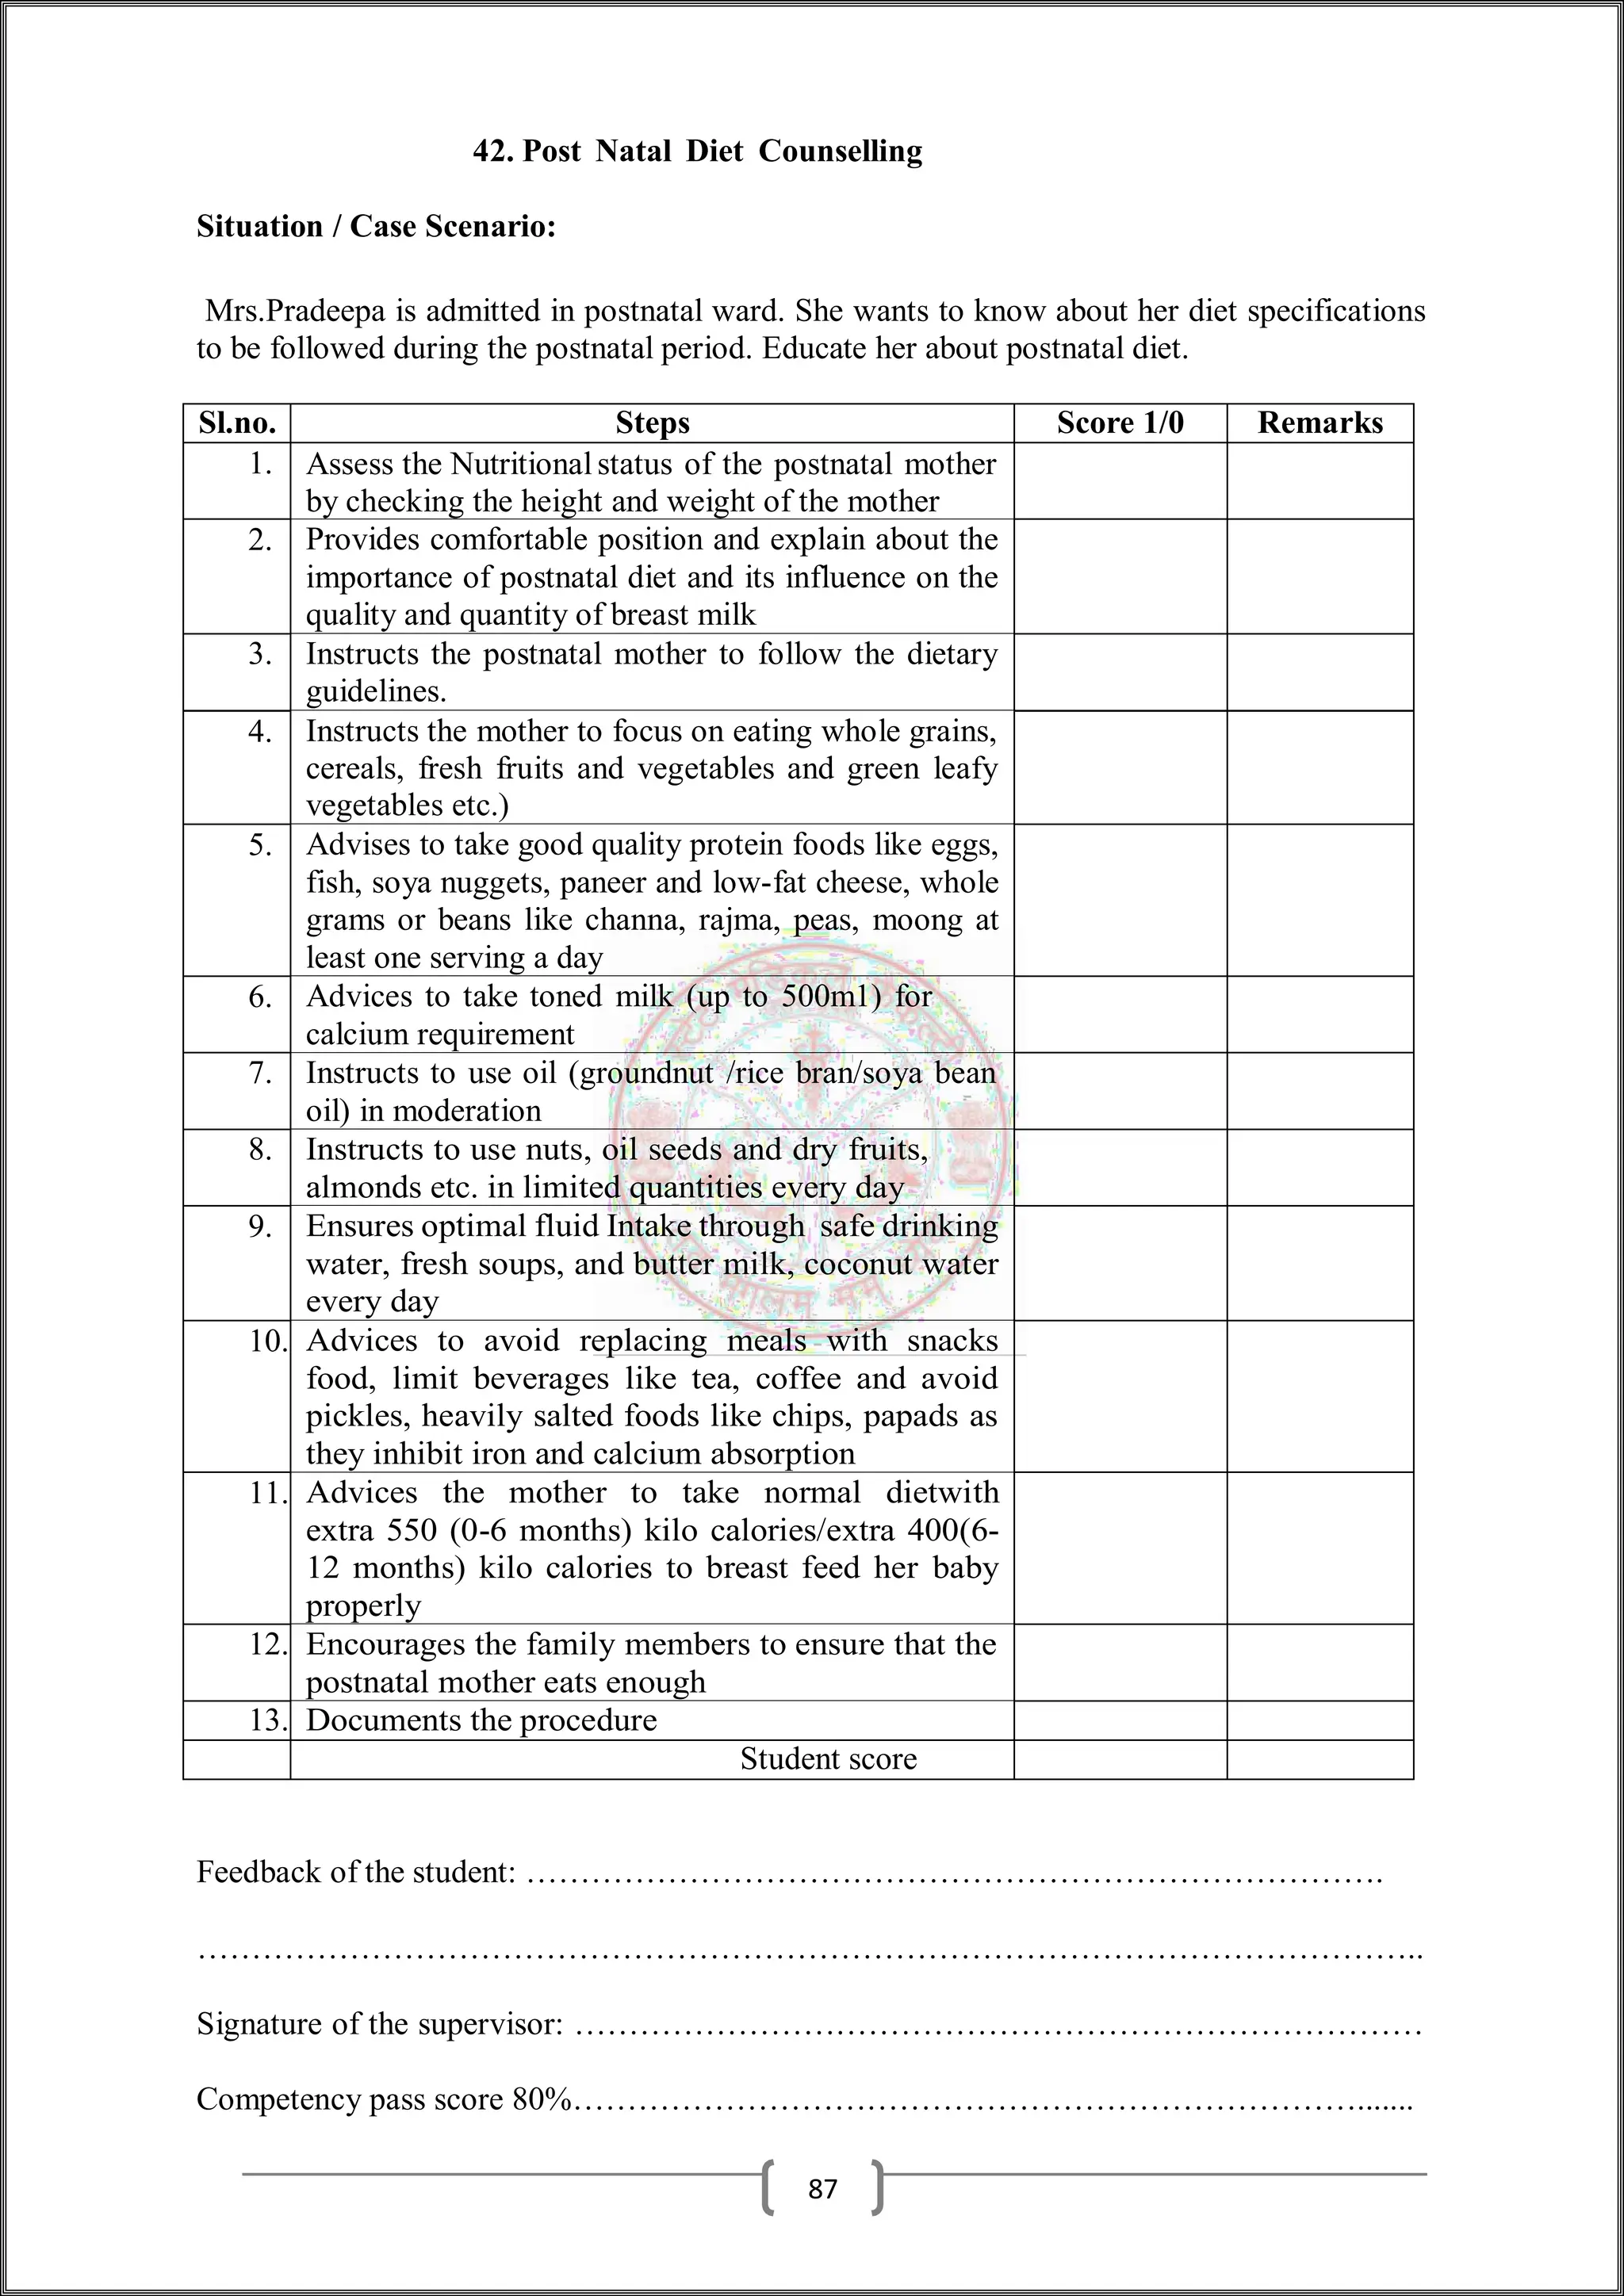


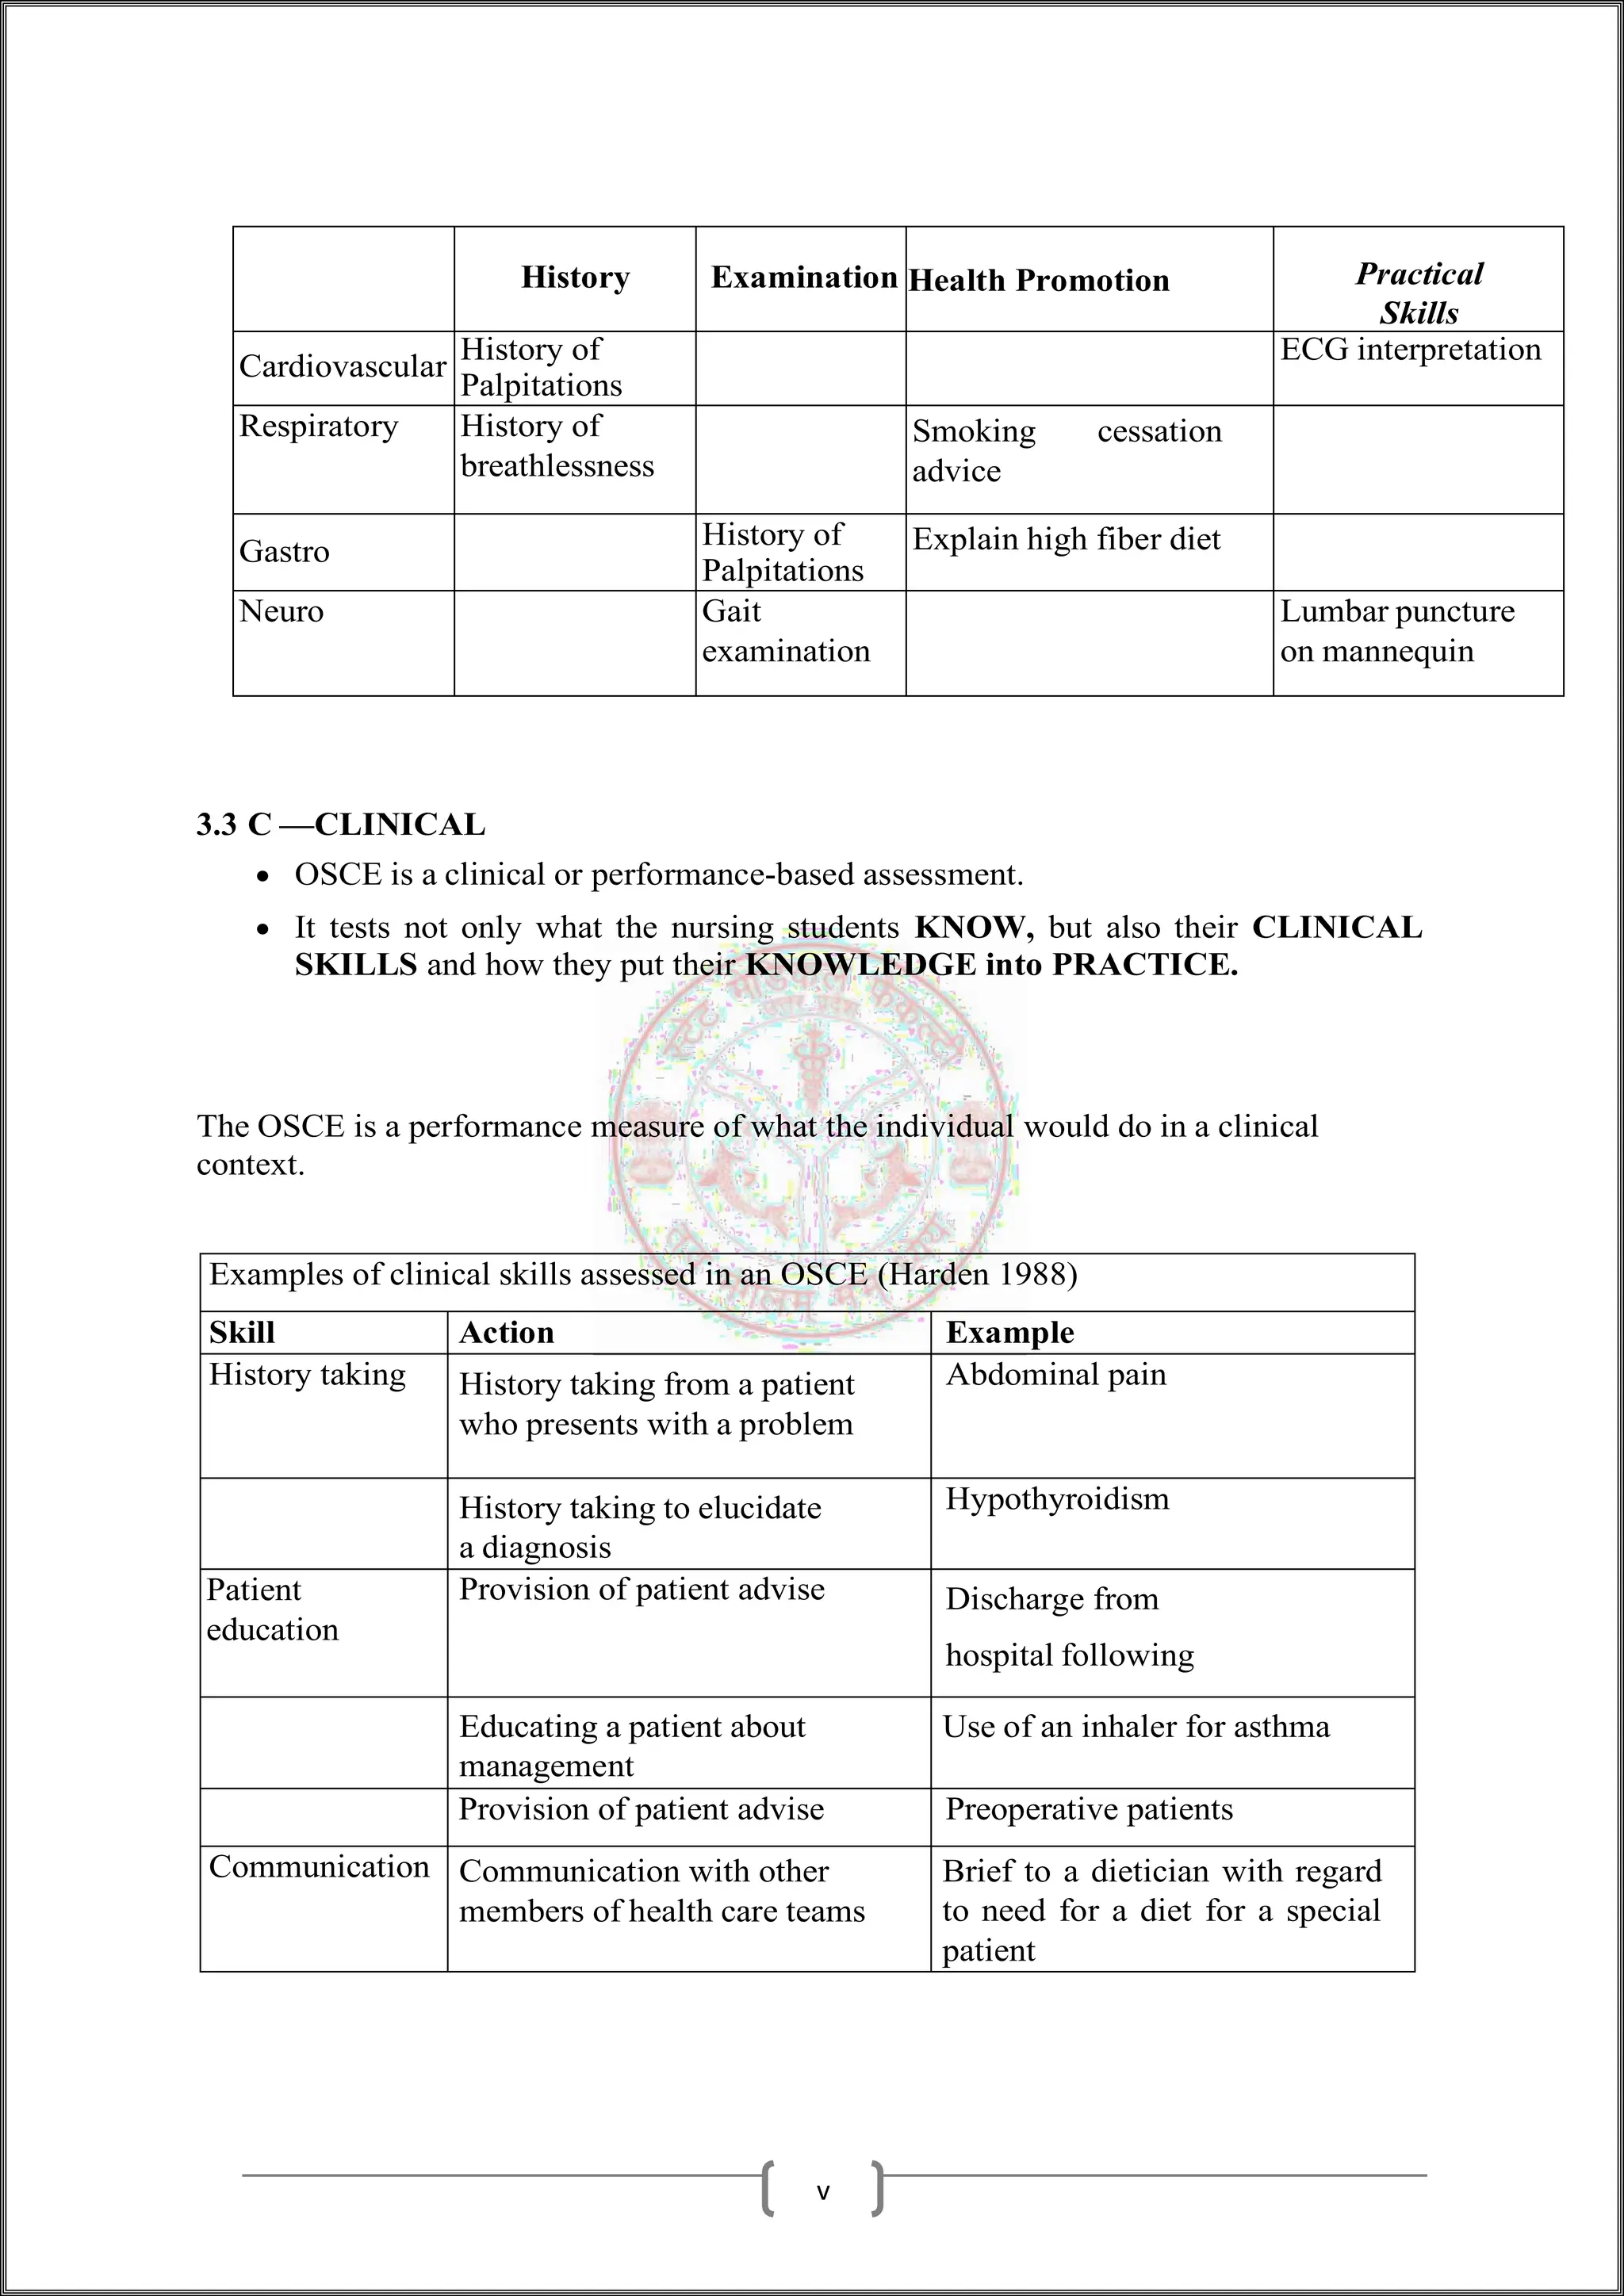
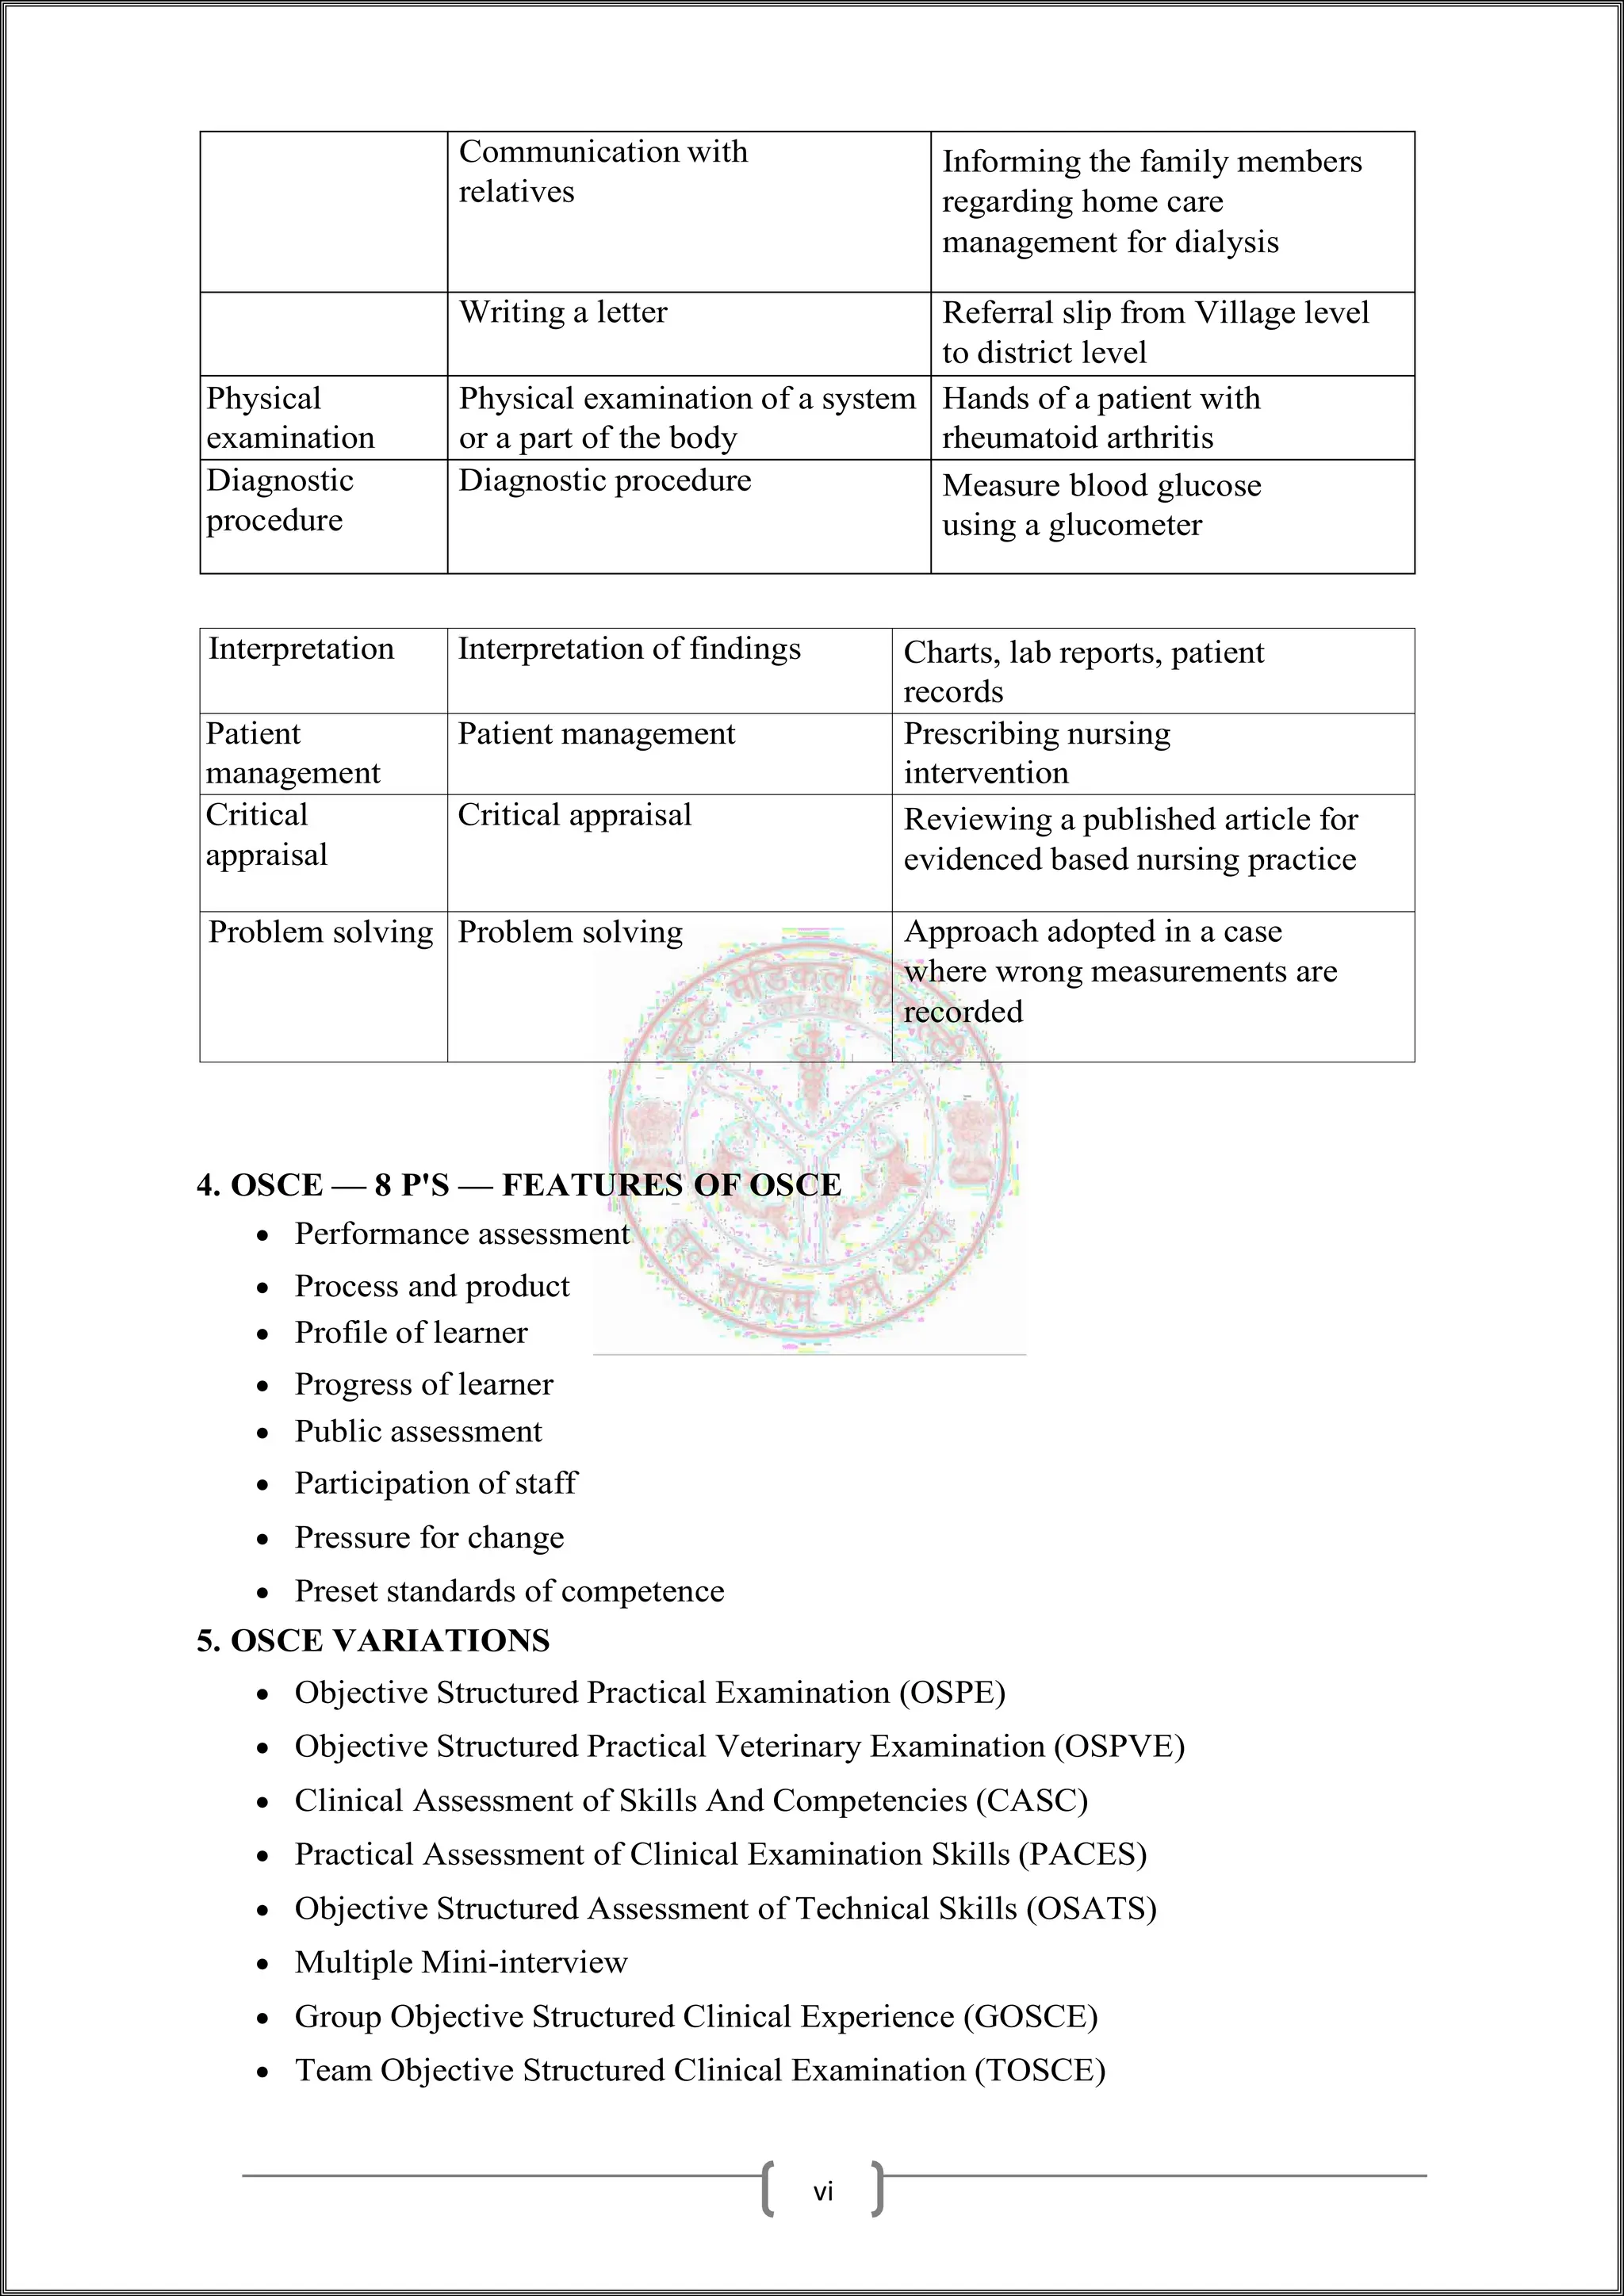
The document expresses gratitude for the contributions to the creation of an Objective Structured Clinical Examination (OSCE) booklet, highlighting the importance of collaboration among various professionals in nursing education. It details the structure, purpose, and assessment methods of OSCE, which evaluates clinical skills through a series of standardized tasks observed by examiners. The OSCE is recognized as a gold standard for assessing clinical competence, emphasizing its reliability, objectivity, and adaptability across various nursing educational contexts.


![Automating ISP Networks Using Ansible and IPAM as a Source of Truth [SoT]](https://cdn.slidesharecdn.com/ss_thumbnails/automatingispnetworksusingansibleandipamasasourceoftruthsot-v25-1-251124105117-d7d4ca24-thumbnail.jpg?width=640&height=640&fit=bounds)


